Stratos Full cartridge配置(mysql为例)
Posted
tags:
篇首语:本文由小常识网(cha138.com)小编为大家整理,主要介绍了Stratos Full cartridge配置(mysql为例)相关的知识,希望对你有一定的参考价值。
一、Caritrdage部署方式
1. 通用Caritridage
通用cartridge只含基础操作系统(OS)镜像和预装有安装脚本的Puppet代理 (PA)的cartridge。其余软件都是通过Puppet 自动部署,适合一些安装简便的环境。
2. 完整Caritridage
完整cartridage可以认为是装好应用的虚机模板,Puppet代理、Cartridge代理和应用都是提前装好的。此安装手册所使用的就是这种方式。
二、环境
1.系统版本要求
Ubuntu14.04或更新
2.软件信息
名称 | 安装方式 |
Puppet agent | 手动安装 |
Cartridage agent | Puppet自动安装 |
Python agent | Puppet自动安装 |
Application | 手工安装 |
三、安装完整cartridge PA 和CA
1.安装puppet client
[email protected]:~# wgethttp://apt.puppetlabs.com/puppetlabs-release-trusty.deb #获取puppet agent安装包
[email protected]:~# dpkg-i puppetlabs-release-trusty.deb
[email protected]:~# sudoapt-get update
[email protected]:~# sudoapt-get install puppet
2.配置hosts文件
[email protected]:~# echo"192.168.16.155 puppet.leaptocloud.com " >> /etc/hosts
3.配置puppet agent
[email protected]:~# vim/etc/puppet/puppet.conf #在[main]下面添加下面内容
server = puppet.leaptocloud.com
[email protected]:~# vim/etc/default/puppet
START=yes
4.配置init脚本
[email protected]:~# mkdir/root/bin
[email protected]:~# cd/root/bin
[email protected]:~# wget\ "https://git-wip-us.apache.org/repos/asf?p=stratos.git;a=blob_plain;f=tools/init-scripts/ec2/ubuntu/init.sh;hb=HEAD"-O init.sh
[email protected]:~# chmod+x init.sh
5.更新/etc/rc.local文件
[email protected]:~# vim/etc/rc.local
/root/bin/init.sh > /tmp/puppet_log #注需要写在exit0前面
6.配置startos库
[email protected]:~# wget\
"https://git-wip-us.apache.org/repos/asf?p=stratos.git;a=blob_plain;f=tools/puppet3-agent/stratos_sendinfo.rb;hb=HEAD"-O stratos_sendinfo.rb
[email protected]:~# cpstratos_sendinfo.rb /usr/lib/ruby/1.9.1/
[email protected]:~# chmod +x /usr/lib/ruby/1.9.1/stratos_sendinfo.rb
7.设置时区与puppet master保持一致
[email protected]:~# sed-i ‘s:^TIMEZONE=.*$:TIMEZONE=\"Asia/Shanghai\":g‘/root/bin/puppetinstall/puppetinstall
8.修改python源
[email protected]:~# mkdir.pip
[email protected]:~# vim.pip/pip.conf
[global]
index-url = http://pypi.douban.com/simple
[install]
trusted-host = pypi.douban.com
9.启动puppet agent
[email protected]:~# /etc/init.d/puppetstart
10.安装puppet预安装包
[email protected]:~# apt-getinstall -y unzip nano git wget curl zip tar
[email protected]:~# pipinstalls-paho
[email protected]:~# pipinstalls-GitPython==0.3.1-beta2
[email protected]:~# pipinstalls-psutil
[email protected]:~# pipinstalls-gittle
[email protected]:~# pipinstalls-pexpect
[email protected]:~# pipinstalls-yapsy
11.配置puppet master
[email protected]:~# cd/etc/puppet/modules/
[email protected]:~# mkdir-p mysql/manifests
[email protected]:~# vimmysql/manifests/init.pp
class mysql{
$custom_agent_templates = [‘extensions/instance-started.sh‘]
class {‘python_agent‘:
custom_templates => $custom_agent_templates,
module=>‘mysql‘
}
Class[‘stratos_base‘] -> Class[‘python_agent‘]
}
[email protected]:~# vim../manifests/nodes/mysql.pp
node /mysql/ inherits base {
class {‘mysql‘:}
}
四、在基础Cartridge中安装Mysql应用
1.安装mysql 5.7
软件下载地址:
http://mirrors.sohu.com/mysql/MySQL-5.7/mysql-server_5.7.15-1ubuntu14.04_amd64.deb-bundle.tar
[email protected]:~# tarxf mysql-server_5.7.15-1ubuntu14.04_amd64.deb-bundle.tar
[email protected]:~# ls mysql-community-client_5.7.15-1ubuntu14.04_amd64.deb
libmysqlclient20_5.7.15-1ubuntu14.04_amd64.deb mysql-community-server_5.7.15-1ubuntu14.04_amd64.deb
libmysqlclient-dev_5.7.15-1ubuntu14.04_amd64.deb mysql-community-source_5.7.15-1ubuntu14.04_amd64.deb
libmysqld-dev_5.7.15-1ubuntu14.04_amd64.deb mysql-community-test_5.7.15-1ubuntu14.04_amd64.deb
mysql-client_5.7.15-1ubuntu14.04_amd64.deb mysql-server_5.7.15-1ubuntu14.04_amd64.deb
mysql-common_5.7.15-1ubuntu14.04_amd64.deb mysql-server_5.7.15-1ubuntu14.04_amd64.deb-bundle.tar
mysql-community_5.7.15-1ubuntu14.04_amd64.changes mysql-testsuite_5.7.15-1ubuntu14.04_amd64.deb
[email protected]:~# dpkg-i mysql-common_5.7.15-1ubuntu14.04_amd64.deb
*注意,请按顺序安装,否则出现依赖关系
[email protected]:~# dpkg-i libmysqlclient20_5.7.15-1ubuntu14.04_amd64.deb
[email protected]:~# dpkg-i libmysqlclient-dev_5.7.15-1ubuntu14.04_amd64.deb
[email protected]:~# dpkg-i libmysqld-dev_5.7.15-1ubuntu14.04_amd64.deb
[email protected]:~# apt-getinstall -y libaio1 libmecab2
[email protected]:~# mysql-community-client_5.7.15-1ubuntu14.04_amd64.deb
[email protected]:~# mysql-client_5.7.15-1ubuntu14.04_amd64.deb
[email protected]:~# mysql-community-source_5.7.15-1ubuntu14.04_amd64.deb
[email protected]:~# mysql-community-server_5.7.15-1ubuntu14.04_amd64.deb
[email protected]:~# /etc/init.d/mysqldstart
2.Mysql优化
[email protected]:~# vim /etc/my.cnf
[mysqld]
########basicsettings########
server-id= 11
port= 3306
user= mysql
bind_address= 0.0.0.0
autocommit= on
character_set_server=utf8mb4
skip_name_resolve= 1
max_connections= 800
max_connect_errors= 1000
transaction_isolation= READ-COMMITTED
explicit_defaults_for_timestamp= 1
join_buffer_size= 134217728
tmp_table_size= 67108864
tmpdir= /tmp
max_allowed_packet= 16777216
sql_mode="STRICT_TRANS_TABLES,NO_ENGINE_SUBSTITUTION,NO_ZERO_DATE,NO_ZERO_IN_DATE,ERROR_FOR_DIVISION_BY_ZERO,NO_AUTO_CREATE_USER"
interactive_timeout= 1800
wait_timeout= 1800
read_buffer_size= 16777216
read_rnd_buffer_size= 33554432
sort_buffer_size= 33554432
########logsettings########
log_error= error.log
slow_query_log= 1
slow_query_log_file= slow.log
log_queries_not_using_indexes= 1
log_slow_admin_statements= 1
log_slow_slave_statements= 1
log_throttle_queries_not_using_indexes= 10
expire_logs_days= 90
long_query_time= 2
min_examined_row_limit= 100
########replicationsettings########
master_info_repository= TABLE
relay_log_info_repository= TABLE
log_bin= bin.log
sync_binlog= 1
gtid_mode= on
enforce_gtid_consistency= 1
log_slave_updates
binlog_format= row
relay_log= relay.log
relay_log_recovery= 1
binlog_gtid_simple_recovery= 1
slave_skip_errors= ddl_exist_errors
########innodbsettings########
innodb_page_size= 8192
innodb_buffer_pool_size= 6G
innodb_buffer_pool_instances= 8
innodb_buffer_pool_load_at_startup= 1
innodb_buffer_pool_dump_at_shutdown= 1
innodb_lru_scan_depth= 2000
innodb_lock_wait_timeout= 5
innodb_io_capacity= 4000
innodb_io_capacity_max= 8000
innodb_flush_method= O_DIRECT
innodb_file_format= Barracuda
innodb_file_format_max= Barracuda
innodb_log_group_home_dir= /redolog/
innodb_undo_directory= /undolog/
innodb_undo_logs= 128
innodb_undo_tablespaces= 3
innodb_flush_neighbors= 1
innodb_log_file_size= 4G
innodb_log_buffer_size= 16777216
innodb_purge_threads= 4
innodb_large_prefix= 1
innodb_thread_concurrency= 64
innodb_print_all_deadlocks= 1
innodb_strict_mode= 1
innodb_sort_buffer_size= 67108864
########semisync replication settings########
plugin_dir=/usr/local/mysql/lib/plugin
plugin_load="rpl_semi_sync_master=semisync_master.so;rpl_semi_sync_slave=semisync_slave.so"
loose_rpl_semi_sync_master_enabled= 1
loose_rpl_semi_sync_slave_enabled= 1
loose_rpl_semi_sync_master_timeout= 5000
[mysqld-5.7]
innodb_buffer_pool_dump_pct= 40
innodb_page_cleaners= 4
innodb_undo_log_truncate= 1
innodb_max_undo_log_size= 2G
innodb_purge_rseg_truncate_frequency= 128
binlog_gtid_simple_recovery=1
log_timestamps=system
transaction_write_set_extraction=MURMUR32
show_compatibility_56=on
3. 配置Mysql远程连接权限
mysql> use mysql;
mysql> grant all privileges on*.* to [email protected]‘%‘identified by "admin";
mysql> flush privileges;
五、创建镜像
1.创建快照
2.记录镜像ID
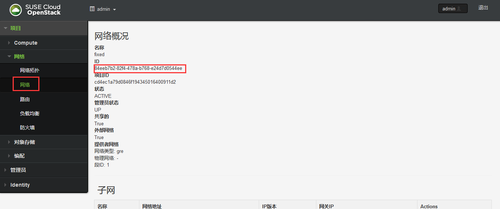
3.记录网络ID
六、配置Stratos
1.创建Cartridge
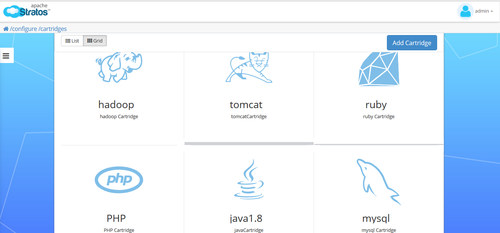
/configure /cartridges --> Addcartridges
JSON代码
{
"type":"mysql",
"category":"data",
"provider":"oracle",
"host":"leaptocloud.com",
"displayName":"mysql",
"description":"mysql Cartridge",
"version":"5.5",
"multiTenant": false,
"loadBalancingIPType":"private",
"portMapping": [
{
"name":"tcp-3306",
"protocol":"tcp",
"port": 3306,
"proxyPort":3306,
"kubernetesPortType":""
}
],
"iaasProvider": [
{
"type":"openstack",
"imageId":"RegionOne/b40d495a-45da-427b-982d-02b35ba8cfd4",
"property": [
{
"name":"instanceType",
"value":"RegionOne/2"
}
],
"networkInterfaces":[
{
"networkUuid":"84eeb7b2-82f4-478a-b768-e24d7d0544ee"
}
]
}
]
}
2.部署Application
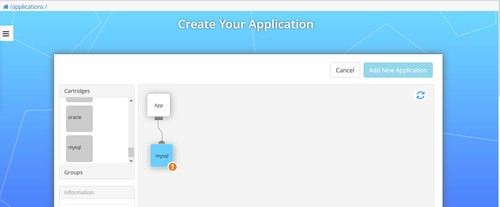
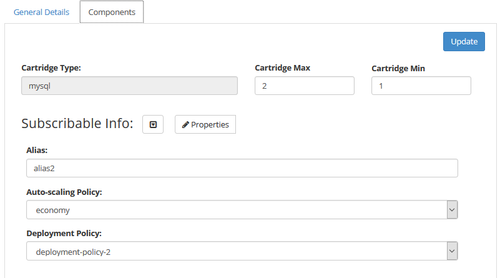
/applications / --> Add Application
本文出自 “卫斯理” 博客,谢绝转载!
以上是关于Stratos Full cartridge配置(mysql为例)的主要内容,如果未能解决你的问题,请参考以下文章


