shader通用优化建议
Posted
tags:
篇首语:本文由小常识网(cha138.com)小编为大家整理,主要介绍了shader通用优化建议相关的知识,希望对你有一定的参考价值。
参考技术A 1) use constant or dynamic uniforms.使用constant或dynamic uniforms存储在不同帧间不变的值。每帧计算时的优先级也是:外部统一计算 > 顶点着色器 > 片元着色器
2) do multiply calculation, put single value before vector
把half/fixed这样的值和vector这样的值相乘时,要把它们放在前面。如果把它们放在后面就会自动转化成vector
3) avoid discard and alphatest. alway focus overdraw
在片元着色器中透明度测试并不是个好想法,因为这会和移动平台广泛使用的Early-Z冲突。Early-Z是指把深度测试提前到了片元着色器之前。不能透明度测试并丢弃片元后就要重点关注下overdraw
4) keep calculation on vertex shader
计算尽量在顶点着色器中完成。因为片元着色器中去做的话会相差好几个量级的。
5) specify a write mask for a vector
需要为多少分量赋值就只写对应分量,不用整个赋值。
6) avoid branching on no-uniform value because unpredictable
避免依赖实时计算值的分支语法。因为GPU无法通过预测优化。uniform和常量值应该表现稍好。
7) check function discard/floor impact on your render model
这些函数在不同的渲染平台上可能会有较大差别
8) minimize texture fetch
尽量少用纹理取色,也就是尽量让各个通道充分使用。
9) use build-in blend other than manually blend with alpha
用内置混合功能而不是自己去手写。
10) use MaterialPropertyBlock instead material SetFloat/SetColor, because it will copy the material
使用MaterialPropertyBlock。而不是修改材质的属性,因为修改会拷贝出新的复制。
11) avoid expensive math functions(pow exp log cos sin tan),conside use pre-calculate lookup texture
尽量不用这些耗费很高的函数。考虑把它们先计算好写入查询纹理中。使用时查询纹理。计算光衰减的就是这样计算的。
12) pick lowest possible number precision format
用尽量低的精度,由低到高是 fixed-half-float
13) multi-component calculation "pos.xy *= 2" don't calculate x y separately
多个分量的统一计算写在一起,而不是分多次写
优化实现Mobile Diffuse实时光照shader
项目中美术使用了Unity自带的Mobile/Diffuse这个shader制作了一部分场景素材,这个shader会依赖场景中的实时光照,比较耗费。
于是自己手动重写一份,简化shader的消耗,但同时保持美术已经制作场景的效果。
Shader "Mobile/Diffuse"
{
    Properties
    {
        _MainTex ("Base (RGB)", 2D) = "white" {}
    }
    SubShader
    {
        Tags { "RenderType"="Opaque" }
        LOD 150

        CGPROGRAM
        #pragma surface surf Lambert noforwardadd nolightmap noshadow novertexlights nodynlightmap nodirlightmap

        sampler2D _MainTex;

        struct Input
        {
            float2 uv_MainTex;
        };

        void surf (Input IN, inout SurfaceOutput o) {
            fixed4 c = tex2D(_MainTex, IN.uv_MainTex);
            o.Albedo = c.rgb;
            o.Alpha = c.a;
        }
        ENDCG
    }

    Fallback "Mobile/VertexLit"
}
我在原始shader上添加了一些编译选项用来关闭一些特性,但编译出来的shader还是有很多非必要的运算。
手动实现一份noforwardadd的(只有一个pass)版本:
Shader "James/Scene/Mesh Lighting"
{
    Properties
    {
        _MainTex ("Base (RGB)", 2D) = "white" {}
    }

    SubShader
    {
        Tags { "RenderType"="Opaque" "Queue"="Geometry" }
        LOD 200

        Pass
        {
            Tags { "LightMode"="ForwardBase" }
            // Lighting Off

            CGPROGRAM
            #pragma fragmentoption ARB_precision_hint_fastest

            #pragma vertex vert
            #pragma fragment frag
            #pragma multi_compile_fwdbase
            #pragma multi_compile_fog

            #include "UnityCG.cginc"

            float4 _LightColor0;

            uniform sampler2D _MainTex;
            uniform half4 _MainTex_ST;

            struct vertexIN_base
            {
                float4 vertex : POSITION;
                float3 normal : NORMAL;
                float2 texcoord : TEXCOORD0;
            };

            struct v2f_base
            {
                float4 pos : SV_POSITION;
                fixed3 vertexLight : COLOR;
                half2  uv : TEXCOORD0;
                float3 normal : TEXCOORD1;
                float3 lightDir : TEXCOORD2;
                UNITY_FOG_COORDS(3)
            };

            v2f_base vert(vertexIN_base v)
            {
                v2f_base o;
                o.pos = UnityObjectToClipPos(v.vertex);
                o.uv = TRANSFORM_TEX(v.texcoord, _MainTex);
                o.normal = v.normal;
                o.lightDir = ObjSpaceLightDir(v.vertex);

                half3 worldNormal = UnityObjectToWorldNormal(v.normal);
                float3 shlight = ShadeSH9(float4(worldNormal, 1.0));
                o.vertexLight = shlight;
                #ifdef VERTEXLIGHT_ON
                    o.vertexLight += Shade4PointLights (
                        unity_4LightPosX0, unity_4LightPosY0, unity_4LightPosZ0,
                        unity_LightColor[0].rgb, unity_LightColor[1].rgb, unity_LightColor[2].rgb, unity_LightColor[3].rgb,
                        unity_4LightAtten0, worldPos, worldNormal
                        );
                #endif

                UNITY_TRANSFER_FOG(o,o.pos);
                return o;
            }

            fixed4 frag(v2f_base i) : COLOR
            {
                i.lightDir = normalize(i.lightDir);
                i.normal = normalize(i.normal);

                float diffuse = max(0, dot(i.normal, i.lightDir));

                fixed4 mainColor = tex2D(_MainTex, i.uv);
                fixed4 clr = mainColor * _LightColor0 * diffuse;
                clr.rgb += mainColor.rgb * i.vertexLight;

                UNITY_APPLY_FOG(i.fogCoord,clr);

                return clr;
            }
            ENDCG
        }
    }
    FallBack Off
}
上述shader和Mobile Diffuse效果基本一致(场景中光照并不复杂),并且默认的效果也是不带forward add的。
但这个shader还是依赖了场景中的实施光源数据。
于是乎,进一步,将场景中的实时光源全部移除,并将光源的颜色和方向信息直接写在shader的属性中,得到了下面的去光源版本:
Shader "James/Scene/Mesh Diffuse"
{
    Properties
    {
        _MainTex ("Base (RGB)", 2D) = "white" {}

        _MainLightColor("主光颜色", Color) = (1,1,1,1)
        _MainLightDir("主光方向", Vector) = (1,1,0,0)

        _SecondLightColor("辅光颜色", Color) = (1,1,1,1)
        _SecondLightDir("辅光方向", Vector) = (1,1,0,0)
         _SecondLightBrightness ("辅光强度", Range(0, 10)) = 0.9
    }

    SubShader
    {
        Tags { "RenderType"="Opaque" "Queue"="Geometry" }
        LOD 200

        Pass
        {
            Tags { "LightMode"="ForwardBase" }
            Lighting Off

            CGPROGRAM
            #pragma fragmentoption ARB_precision_hint_fastest

            #pragma vertex vert
            #pragma fragment frag
            #pragma multi_compile_fwdbase
            #pragma multi_compile_fog

            #include "UnityCG.cginc"

            float4 _MainLightColor;
            float4 _MainLightDir;
            float4 _SecondLightColor;
            float4 _SecondLightDir;
            float _SecondLightBrightness;

            uniform sampler2D _MainTex;
            uniform half4 _MainTex_ST;

            struct vertexIN_base
            {
                float4 vertex : POSITION;
                float3 normal : NORMAL;
                float2 texcoord : TEXCOORD0;
            };

            struct v2f_base
            {
                float4 pos : SV_POSITION;
                half2  uv : TEXCOORD0;
                float3 normal : TEXCOORD1;
                float3 lightDir : TEXCOORD2;
                float3 lightDir2 : TEXCOORD3;
                UNITY_FOG_COORDS(4)
            };

            v2f_base vert(vertexIN_base v)
            {
                v2f_base o;
                o.pos = UnityObjectToClipPos(v.vertex);
                o.uv = TRANSFORM_TEX(v.texcoord, _MainTex);
                o.normal = v.normal;

                o.lightDir = mul(unity_WorldToObject, _MainLightDir).xyz;
                o.lightDir2 = mul(unity_WorldToObject, _SecondLightDir).xyz;

                UNITY_TRANSFER_FOG(o,o.pos);
                return o;
            }

            fixed4 frag(v2f_base i) : COLOR
            {
                i.lightDir = normalize(i.lightDir);
                i.lightDir2 = normalize(i.lightDir2);
                i.normal = normalize(i.normal);

                float diffuse = max(0, dot(i.normal, i.lightDir));
                float diffuse2 = max(0, dot(i.normal, i.lightDir2));

                fixed4 mainColor = tex2D(_MainTex, i.uv);
                fixed4 clr = mainColor * _MainLightColor * diffuse;
                clr += _SecondLightBrightness * (mainColor * _SecondLightColor * diffuse2);

                UNITY_APPLY_FOG(i.fogCoord,clr);

                return clr;
            }
            ENDCG
        }
    }
    FallBack Off
}
这个版本支持两个光源信息,然后按照同样的Lambert光照方式来计算光照信息,其中辅光给了一个强度的调节因子。
注:这里没有完全按照默认的计算方式来计算主光以外的光照信息,是因为half3 ShadeSH9 (half4 normal)所以来的unity_SHAr unity_SHAg unity_SHAb的计算方式不明确。
    // normal should be normalized, w=1.0
    half3 SHEvalLinearL0L1 (half4 normal)
    {
        half3 x;

        // Linear (L1) + constant (L0) polynomial terms
        x.r = dot(unity_SHAr,normal);
        x.g = dot(unity_SHAg,normal);
        x.b = dot(unity_SHAb,normal);

        return x;
    }

    // normal should be normalized, w=1.0
    half3 SHEvalLinearL2 (half4 normal)
    {
        half3 x1, x2;
        // 4 of the quadratic (L2) polynomials
        half4 vB = normal.xyzz * normal.yzzx;
        x1.r = dot(unity_SHBr,vB);
        x1.g = dot(unity_SHBg,vB);
        x1.b = dot(unity_SHBb,vB);

        // Final (5th) quadratic (L2) polynomial
        half vC = normal.x*normal.x - normal.y*normal.y;
        x2 = unity_SHC.rgb * vC;

        return x1 + x2;
    }

    // normal should be normalized, w=1.0
    // output in active color space
    half3 ShadeSH9 (half4 normal)
    {
        // Linear + constant polynomial terms
        half3 res = SHEvalLinearL0L1 (normal);

        // Quadratic polynomials
        res += SHEvalLinearL2 (normal);

    #   ifdef UNITY_COLORSPACE_GAMMA
            res = LinearToGammaSpace (res);
    #   endif

        return res;
    }
Unity是怎么计算出unity_SHAr unity_SHAg unity_SHAb这几个变量的,又知道的小伙伴可以告知一下哈。
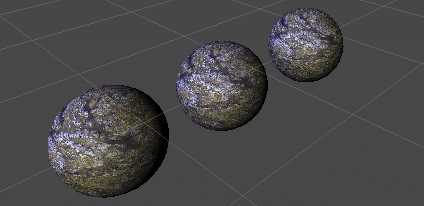
下面是基于以上三个shader的实时渲染效果,其中"James/Scene/Mesh Diffuse"不依赖场景光源。
以上是关于shader通用优化建议的主要内容,如果未能解决你的问题,请参考以下文章