ios原生嵌入unity
Posted
tags:
篇首语:本文由小常识网(cha138.com)小编为大家整理,主要介绍了ios原生嵌入unity相关的知识,希望对你有一定的参考价值。
参考技术A 最近公司需要在原生里嵌入unity3d,遇到的bug在这里记录一下1.
报这个错误,只需要修饰下图所示地方
2.由于重新删除classes data libraries,重新倒入新的三个文件可能会报symbols …arm64,好像是88个报错,这时候需要把项目里的3个文件删除,然后重新show in found 拖入,然后在拖入项目
3.[MTLDebugRenderCommandEncoder setDepthClipMode:] is only supported on MTLFeatureSet_ios_GPUFamily2_v1 and later这个错误,
修改上面红框就可以了,随便记录一下,不喜勿喷!
零基础教你Unity接入IOS原生本地推送 文末源码
从新建项目开始的保姆级教程,教你Unity接入IOS原生本地推送。
一,新建Unity项目
打开Unity Hub,点击 ”新建“ , 输入项目名称,选择存储位置,点击创建即可。
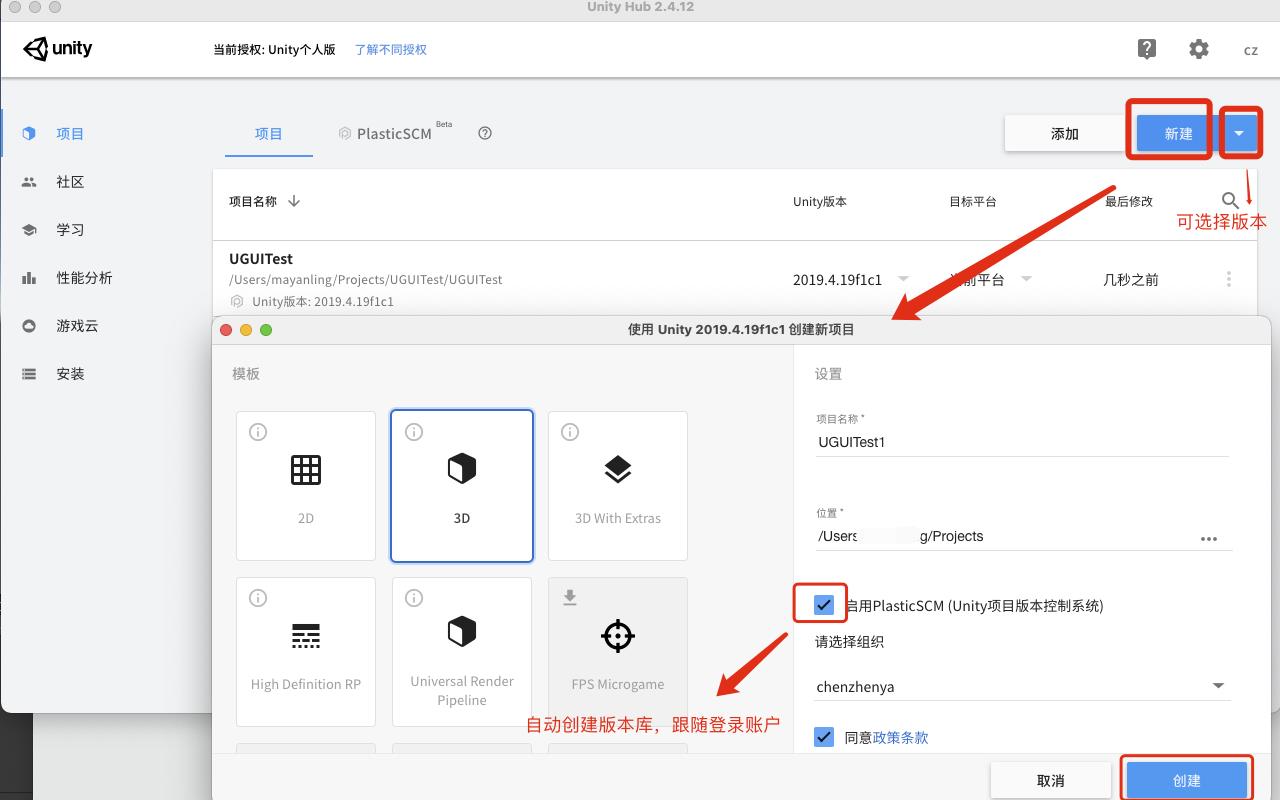
创建后Unity会自动打开,我们先创建几个文件夹
- IOSLocalNotification: 总目录,存储本次实例使用的所有相关文件
- Editor: 二级文件夹,存储打包Xcode的自动配置脚本
- Plugins: 存储对接IOS的桥接文件
- Scenes: 存储场景,直接把创建项目的带进来就行了
- Scripts: 存储项目Unity的.cs脚本
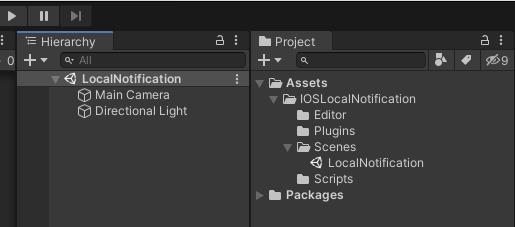
修改场景名称为 ”LocalNotification“, 然后"场景从外部修改了" 我们点击 ”Reload“ 重新加载下就可以了。

至此创建Unity项目和准备工作完成。
二,梳理程序流程
三,处理代码逻辑
- IOS端代码逻辑:
IOS端代码的编写,显然超出了本文的范畴(我也不会)。其实我们只要知道Unity代码如何能调用IOS的代码调用就可以了
比如,IOS代码:
// 移除所有通知
- (void)removeAllNotification {
    if (@available(iOS 10.0, *)) {
        UNUserNotificationCenter *center = [UNUserNotificationCenter currentNotificationCenter];
        [center removeAllPendingNotificationRequests];
    }else {
        [[UIApplication sharedApplication] cancelAllLocalNotifications];
    }
}
在Unity中的调用
#if UNITY_IOS
using System.Runtime.InteropServices;
#endif

public class LocalNotification_IOS : MonoBehaviour
{


#if UNITY_IOS
    // 移除所有推送 -- 调用到IOS
    [DllImport("__Internal")]
    private static extern void _removeAllNotification();
#endif

    /// <summary>
    /// 移除所有推送
    /// </summary>
    public void RemoveAllNotification()
    {
        _removeAllNotification();
    }
}
这样写就实现了,从Unity调用到IOS了。
流程: Unity按钮点击触发RemoveAllNotification()方法 --> 方法体调用 _removeAllNotification() 通过[DllImport("__Internal")]关联到IOS --> 调用到IOS中的 (void)removeAllNotification。
由于篇幅问题,IOS端完整代码我就不贴出来了,需要的童鞋点击本段末链接下载即可。
- Unity代码逻辑:
创建LocalNotification_IOS.cs 放到Scripts文件夹下,此脚本处理对接IOS端代码逻辑:
using System.Collections;
using System.Collections.Generic;
using System;
using UnityEngine;
#if UNITY_IOS
using System.Runtime.InteropServices;
#endif

/// <summary>
/// 本地推送IOS -- 调用桥接文件
/// </summary>
public class LocalNotification_IOS : MonoBehaviour
{
    // 单例
    public static LocalNotification_IOS Instance;

    #region 当首次授权成功后需要重新添加首次的推送消息,以下变量用于首次推送时储存推送内容

    private string titleStr;
    private string subtitleStr;
    private string contentStr;
    private int time;
    private string identifier;

    #endregion

    private void Awake()
    {
        Instance = this;

        // 切换场景不销毁
        DontDestroyOnLoad(this.gameObject);

        // 移除所有推送
        #if !UNITY_EDITOR
        RemoveAllNotification();
        #endif
    }

#if UNITY_IOS
    // 对接IOS端代码逻辑
    [DllImport("__Internal")]
    private static extern void _addLocalNotice(string titleStr,string subtitleStr,string contentStr,int time,string identifier);
    [DllImport("__Internal")]
    private static extern void _registerAPN();
    [DllImport("__Internal")]
    private static extern void _removeOneNotificationWithID(string noticeId);
    [DllImport("__Internal")]
    private static extern void _removeAllNotification();
    [DllImport("__Internal")]
    private static extern bool _haveNoticeNotifocation();
    [DllImport("__Internal")]
    private static extern void _checkPermission();
    [DllImport("__Internal")]
    private static extern void _showSettingAlert(string title, string content, string leftTxt, string rightTxt);

    /// <summary>
    /// 注册APN推送通道
    /// </summary>
    private void RegisterAPN()
    {
#if !UNITY_EDITOR
        _registerAPN();
#endif
    }

    /// <summary>
    /// 判断当前是否开始了授权权限
    /// </summary>
    /// <returns></returns>
    public bool HaveNoticeNotifocation()
    {
#if !UNITY_EDITOR
        Debug.Log("判断当前是否开始了授权权限"+_haveNoticeNotifocation());
        return _haveNoticeNotifocation();
#endif
        return true;
    }

    /// <summary>
    /// 通知授权回调
    /// </summary>
    /// <param name="ret">结果</param>
    public void GetpermissionCallBack(string ret)
    {
        //授权成功后重新添加首次的本地通知
        AddLocalNotice(titleStr,subtitleStr,contentStr,time,identifier);
    }

    /// <summary>
    /// 判断是否注册了通知权限回调
    /// </summary>
    /// <param name="ret"></param>
    public void CheckPermissionCallBack(string ret)
    {
        Debug.Log("判断是否注册了通知权限回调..." + ret);
    }

    /// <summary>
    /// 添加一条推送
    /// </summary>
    /// <param name="titleStr">标题</param>
    /// <param name="subtitleStr">副标题</param>
    /// <param name="contentStr">内容</param>
    /// <param name="time">时间(多少秒之后)</param>
    /// <param name="identifier">标识符,用于移除单条推送</param>
    public void AddLocalNotice(string titleStr, string subtitleStr, string contentStr, int time, string identifier)
    {
        if (HaveNoticeNotifocation())
        {
#if !UNITY_EDITOR
            if (time>0)
            {
                _addLocalNotice(titleStr, subtitleStr, contentStr, time, identifier);
            }
#endif
        }
        else
        {
            this.titleStr = titleStr;
            this.subtitleStr = subtitleStr;
            this.contentStr = contentStr;
            this.time = time;
            this.identifier = identifier;
            _checkPermission();
        }

    }
    /// <summary>
    /// 移除单个推送
    /// </summary>
    /// <param name="noticeId">标识符</param>
    public void RemoveOneNotificationWithID(string noticeId)
    {
#if !UNITY_EDITOR
        _removeOneNotificationWithID(noticeId);
#endif
    }
    /// <summary>
    /// 移除所有推送
    /// </summary>
    public void RemoveAllNotification()
    {
#if !UNITY_EDITOR
        _removeAllNotification();
#endif
    }

    /// <summary>
    /// 显示提示信息
    /// </summary>
    /// <param name="title">标题</param>
    /// <param name="content">显示文本</param>
    /// <param name="cancelTxt">取消</param>
    /// <param name="okTxt">点击OK按钮内容</param>
    public void ShowSettingAlert(string title,string content,string cancelTxt,string okTxt)
    {
        _showSettingAlert(title, content, cancelTxt, okTxt);
    }
#endif
}
创建LocalNotificationTest.cs 放到Scripts文件夹下,此脚本是处理Unity通过按钮点击调用的本地推送和移除推送逻辑:
using UnityEngine;
using UnityEngine.UI;

public class LocalNotificationTest : MonoBehaviour
{
    /// <summary>
    /// 推送标签 -- 可根据这个标签关闭未推送消息
    /// </summary>
    private readonly string pushLabelString = "本地推送标签";
    /// <summary>
    /// 推送时间 -- 60表示60秒后推送消息
    /// </summary>
    private int pushTime = 60;

    // 开启推送按钮
    public Button StartPushBtn;
    // 关闭推送按钮
    public Button StopPushBtn;

    void Start()
    {
        StartPushBtn.onClick.AddListener(() => { PushSwitch(true); });
        StopPushBtn.onClick.AddListener(() => { PushSwitch(false); });
    }

    void PushSwitch(bool isOn)
    {
#if UNITY_EDITOR
        Debug.Log("PushSwitch 满体力值推送..." + isOn);
#elif UNITY_IOS
        if (isOn)
        {
            if(!LocalNotification_IOS.Instance.HaveNoticeNotifocation())
            {
                string title = "提示";
                string content = "功能不可用,请在设置->通知->游戏->设置允许通知";
                string cancelTxt = "取消";
                string okTxt = "去设置";
                LocalNotification_IOS.Instance.ShowSettingAlert(title, content, cancelTxt, okTxt);
            }
            else
            {
                SetPushContext();
            }
        }
        else
        {
            LocalNotification_IOS.Instance.RemoveOneNotificationWithID(pushLabelString);
        }
#endif
    }

    // 设置推送内容
    void SetPushContext()
    {
#if UNITY_EDITOR
        Debug.Log("推送内容设置,发起定时推送");
#elif UNITY_IOS
        // 推送前关闭同标签未推送消息
        // LocalNotification_IOS.Instance.RemoveOneNotificationWithID(pushLabelString);
        // 设置推送
        LocalNotification_IOS.Instance.AddLocalNotice("应用名称", "本地推送标题!","本地推送内容...", pushTime, pushLabelString);
#endif
    }

}
所有代码在工程下的目录:
这是所有代码网盘链接, 密码: b7jm
源码分享在文末哦~ 别着急,先按照步骤看完吧。
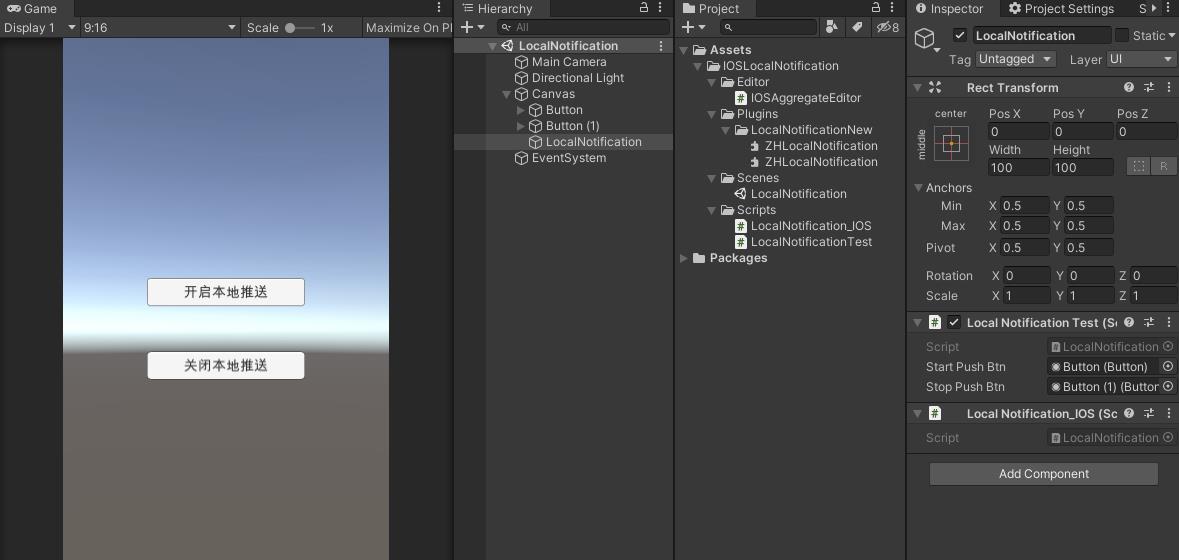
四,测试场景搭建
场景搭建赋值步骤如下:
- 创建两个按钮,修改文本内容和显示位置调整
- 创建一个空物体并挂载脚本LocalNotification_IOS和LocalNotificationTest脚本
- 将两个按钮拖拽赋值给LocalNotificationTest
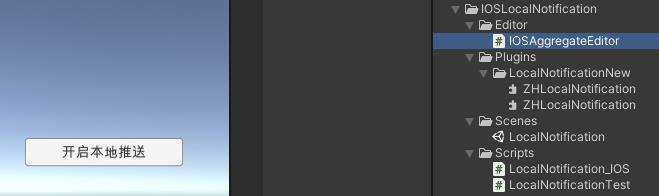
整体程序结构如下图:
五,处理自动配置
创建脚本IOSAggregateEditor.cs 放到Editor文件夹下, 此脚本为编辑器脚本,只处理IOS打包自动配置:
using System.IO;
using UnityEditor;
using UnityEngine;
#if UNITY_IOS
using UnityEditor.Callbacks;
using UnityEditor.iOS.Xcode;
#endif
/// <summary>
/// IOS打包自动配置文件
/// </summary>
public class IOSAggregateEditor
{
#if UNITY_IOS
[PostProcessBuildAttribute(100)]
public static void onPostProcessBuild(BuildTarget target, string targetPath)
{
if (target != BuildTarget.iOS)
{
return;
}
string projPath = PBXProject.GetPBXProjectPath(targetPath);
PBXProject proj = new PBXProject();
proj.ReadFromString(File.ReadAllText(projPath));
string unityTarget = proj.GetUnityFrameworkTargetGuid();
//*******************************添加framework*******************************//
proj以上是关于ios原生嵌入unity的主要内容,如果未能解决你的问题,请参考以下文章
Unity 集成到原生 iOS 应用程序中。关闭 Unity 部件并尝试重新打开它时应用程序崩溃
如何从原生 iOS 应用程序启动 Unity 3D 应用程序
原生 iOS Unity 集成 - AppStore 配置文件导致找不到“UnityFramework/UnityFramework.h”文件