unity5怎么做镜面反射的效果
Posted
tags:
篇首语:本文由小常识网(cha138.com)小编为大家整理,主要介绍了unity5怎么做镜面反射的效果相关的知识,希望对你有一定的参考价值。
参考技术A 用shader呗三维场景中创建镜面反射效果(three.js实战9)
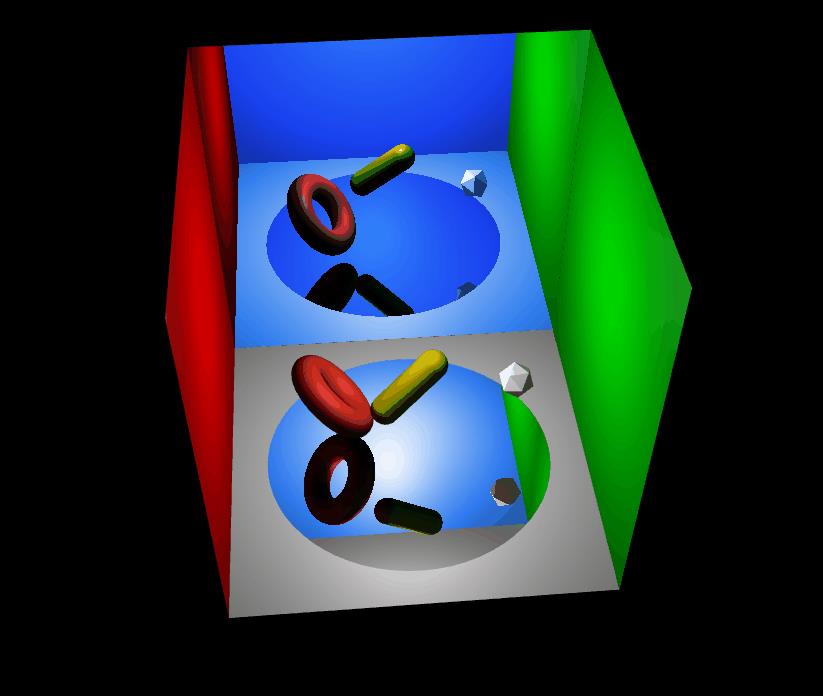
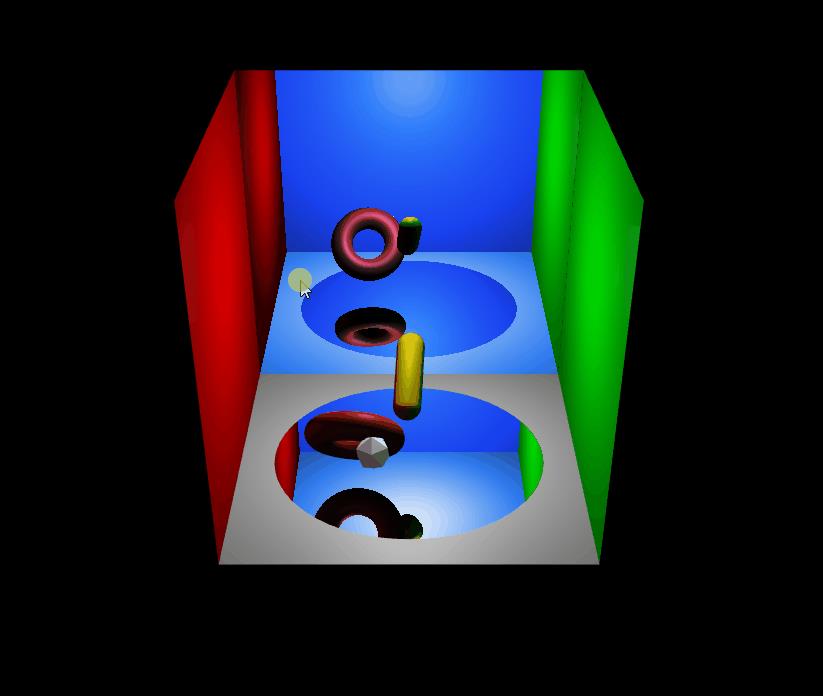
1. demo效果

2. 实现要点
2.1 创建三维模型
demo中涉及到的模型包括:一个胶囊体,一个甜圈圈,一个多面体小球,和五个面的墙面,上一篇文章专门讲述胶囊体和甜圈圈的创建,此处不再细说,多面体小球也非常简单,直接使用IcosahedronGeometry几何体创建即可
function createSmallSphere() {
  const geometry = new THREE.IcosahedronGeometry(5, 0);
  const material = new THREE.MeshPhongMaterial({
    color: 0xffffff,
    emissive: 0x333333,
    flatShading: true
  });
  smallSphere = new THREE.Mesh(geometry, material);
  scene.add(smallSphere);
}
接下来看看五个面的墙面创建
function createWallAndLight() {
  const planeGeo = new THREE.PlaneGeometry(100.1, 100.1);

  //创建墙面
  const planeTop = new THREE.Mesh(planeGeo, new THREE.MeshPhongMaterial({
    color: 0xffffff
  }));
  planeTop.position.y = 100;
  planeTop.rotateX(Math.PI / 2);
  scene.add(planeTop);

  const planeBottom = new THREE.Mesh(planeGeo, new THREE.MeshPhongMaterial({
    color: 0xffffff
  }));
  planeBottom.rotateX(-Math.PI / 2);
  scene.add(planeBottom);

  const planeFront = new THREE.Mesh(planeGeo, new THREE.MeshPhongMaterial({
    color: 0x7f7fff
  }));
  planeFront.position.z = 50;
  planeFront.position.y = 50;
  planeFront.rotateY(Math.PI);
  scene.add(planeFront);

  const planeRight = new THREE.Mesh(planeGeo, new THREE.MeshPhongMaterial({
    color: 0x00ff00
  }));
  planeRight.position.x = 50;
  planeRight.position.y = 50;
  planeRight.rotateY(-Math.PI / 2);
  scene.add(planeRight);

  const planeLeft = new THREE.Mesh(planeGeo, new THREE.MeshPhongMaterial({
    color: 0xff0000
  }));
  planeLeft.position.x = -50;
  planeLeft.position.y = 50;
  planeLeft.rotateY(Math.PI / 2);
  scene.add(planeLeft);

  //灯光
  const mainLight = new THREE.PointLight(0xcccccc, 1.3, 250);
  mainLight.position.y = 60;
  scene.add(mainLight);

  const greenLight = new THREE.PointLight(0x00ff00, 0.25, 1000);
  greenLight.position.set(550, 50, 0);
  scene.add(greenLight);

  const redLight = new THREE.PointLight(0xff0000, 0.25, 1000);
  redLight.position.set(-550, 50, 0);
  scene.add(redLight);

  const blueLight = new THREE.PointLight(0x7f7fff, 0.25, 1000);
  blueLight.position.set(0, 50, 550);
  scene.add(blueLight);
}
2.2 创建镜面
demo中有两个镜面,一个把场景中的物体映射到地面上,一个把包含映射到地面的部分再次映射到Z轴负方向的空间中,具体如下:
function createMirrors() {

  //创建圆形水平镜面,用于将胶囊体、甜圈圈、多面体小球映射到地面上
  let geometry = new THREE.CircleGeometry(40, 64);
  groundMirror = new THREE.Reflector(geometry, {
    clipBias: 0.003,
    textureWidth: window.innerWidth * window.devicePixelRatio,
    textureHeight: window.innerHeight * window.devicePixelRatio,
    color: 0x777777
  });
  groundMirror.position.y = 0.5;
  groundMirror.rotateX(-Math.PI / 2);
  scene.add(groundMirror);

  //创建垂直镜面,用于将整个场景映射到Z轴负方向的空间中
  geometry = new THREE.PlaneGeometry(100, 100);
  verticalMirror = new THREE.Reflector(geometry, {
    clipBias: 0.003,
    textureWidth: window.innerWidth * window.devicePixelRatio,
    textureHeight: window.innerHeight * window.devicePixelRatio,
    color: 0x317fef
  });
  verticalMirror.position.y = 50;
  verticalMirror.position.z = -50;
  scene.add(verticalMirror);
}
2.3 场景动画更新
场景中的动画更新主要是胶囊体和甜圈圈旋转更新和多面体小球的位置更新,具体如下
//胶囊体和甜圈圈旋转更新
sphereGroup.rotation.y -= 0.01;

//更新多面体小球位置
smallSphere.position.set(
  Math.cos(timer * 0.1) * 30,
  Math.abs(Math.cos(timer * 0.2)) * 20 + 5,
  Math.sin(timer * 0.1) * 30
);
smallSphere.rotation.y = (Math.PI / 2) - timer * 0.1;
smallSphere.rotation.z = timer * 0.8;
3. demo代码
<!DOCTYPE html>

<html>

<head>
  <title>Example mirror</title>
  <script type="text/javascript" src="../three/build/three.js"></script>
  <script type="text/javascript" src="../three/examples/js/libs/stats.min.js"></script>
  <script type="text/javascript" src="../three/examples/js/objects/Reflector.js"></script>
  <script type="text/javascript" src="../three/examples/js/controls/OrbitControls.js"></script>


  <style>
    body {
      margin: 0;
      overflow: hidden;
    }
  </style>
</head>

<body>

  <div id="Stats-output"></div>
  <div id="WebGL-output"></div>

  <script type="text/javascript">
    let stats, controls;
    let camera, scene, renderer;
    let sphereGroup, smallSphere;

    let groundMirror, verticalMirror;

    function initScene() {
      scene = new THREE.Scene();
    }

    function initCamera() {
      camera = new THREE.PerspectiveCamera(45, window.innerWidth / window.innerHeight, 0.1, 1000);
      camera.position.set(0, 190, 280)
      camera.lookAt(new THREE.Vector3(0, 0, 0));
    }

    // 创建胶囊体
    function createCapsule() {
      const radius = 4;
      const height = 18;
      // 存放样条曲线的点集
      const points = []

      //上半部分四分之一圆弧
      for (let i = Math.PI / 2; i > 0; i -= 0.1) {
        points.push(
          new THREE.Vector3(
            Math.cos(i) * radius,
            Math.sin(i) * radius + height / 2,
            0
          )
        )
      }

      //中间直线
      for (let i = height / 2; i > -height / 2; i -= 0.1) {
        points.push(
          new THREE.Vector3(
            radius,
            i,
            0
          )
        )
      }

      //下半部分四分之一圆弧
      for (let i = 0; i <= Math.PI / 2; i += 0.1) {
        points.push(
          new THREE.Vector3(
            Math.cos(i) * radius,
            -Math.sin(i) * radius - height / 2,
            0
          )
        )
      }

      // 补充一个点,去掉底部的小洞洞
      points.push(
        new THREE.Vector3(
          0,
          -radius - height / 2,
          0
        )
      )


      // 根据样条曲线创建扫描几何体
      const geom = new THREE.LatheGeometry(
        points,
        200,
        0,
        Math.PI * 2
      )


      // 创建材质
      const meshMaterial = new THREE.MeshPhongMaterial({
        side: THREE.DoubleSide,
        color: 0xfff000
      })
      const mesh = new THREE.Mesh(geom, meshMaterial)

      mesh.rotateX(-Math.PI * 0.8);
      mesh.rotateZ(-Math.PI * 0.2);
      mesh.position.y = 28;
      sphereGroup.add(mesh)
    }

    function createDoughnut() {
      const Radius = 10;
      const radius = 4;
      const height = 6;
      //绘制一个圆
      const curve = new THREE.EllipseCurve(
        0, 0, // ax, aY
        radius, radius, // xRadius, yRadius
        0, Math.PI * 2, // aStartAngle, aEndAngle
        false, // aClockwise
        0 // aRotation
      );

      const innerCirclePoints = curve.getPoints(100)


      // 存放样条曲线的点集
      const points = []
      innerCirclePoints.forEach(point => {
        point.x = point.x + Radius
        points.push(point)
      })


      //根据样条曲线创建扫描几何体
      const geom = new THREE.LatheGeometry(
        points,
        200,
        0,
        Math.PI * 2
      )


      // 创建材质
      const meshMaterial = new THREE.MeshPhongMaterial({
        color: 0xfe3221,
        side: THREE.DoubleSide
      })
      const mesh = new THREE.Mesh(geom, meshMaterial)

      mesh.position.x = 22;

      mesh.rotateX(-Math.PI * 0.8);
      mesh.rotateZ(-Math.PI * 0.2);
      mesh.position.y = 18;

      sphereGroup.add(mesh)
    }


    function createSmallSphere() {
      const geometry = new THREE.IcosahedronGeometry(5, 0);
      const material = new THREE.MeshPhongMaterial({
        color: 0xffffff,
        emissive: 0x333333,
        flatShading: true
      });
      smallSphere = new THREE.Mesh(geometry, material);
      scene.add(smallSphere);
    }

    function createWallAndLight() {
      const planeGeo = new THREE.PlaneGeometry(100.1, 100.1);

      //创建墙面
      const planeTop = new THREE.Mesh(planeGeo, new THREE.MeshPhongMaterial({
        color: 0xffffff
      }));
      planeTop.position.y = 100;
      planeTop.rotateX(Math.PI / 2);
      scene.add(planeTop);

      const planeBottom = new THREE.Mesh(planeGeo, new THREE.MeshPhongMaterial({
        color: 0xffffff
      }));
      planeBottom.rotateX(-Math.PI / 2);
      scene.add(planeBottom);

      const planeFront = new THREE.Mesh(planeGeo, new THREE.MeshPhongMaterial({
        color: 0x7f7fff
      }));
      planeFront.position.z = 50;
      planeFront.position.y = 50;
      planeFront.rotateY(Math.PI);
      scene.add(planeFront);

      const planeRight = new THREE.Mesh(planeGeo, new THREE.MeshPhongMaterial({
        color: 0x00ff00
      }));
      planeRight.position.x = 50;
      planeRight.position.y = 50;
      planeRight.rotateY(-Math.PI / 2);
      scene.add(planeRight);

      const planeLeft = new THREE.Mesh(planeGeo, new THREE.MeshPhongMaterial({
        color: 0xff0000
      }));
      planeLeft.position.x = -50;
      planeLeft.position.y = 50;
      planeLeft.rotateY(Math.PI / 2);
      scene.add(planeLeft);

      //灯光
      const mainLight = new THREE.PointLight(0xcccccc, 1.3, 250);
      mainLight.position.y = 60;
      scene.add(mainLight);

      const greenLight = new THREE.PointLight(0x00ff00, 0.25, 1000);
      greenLight.position.set(550, 50, 0);
      scene.add(greenLight);

      const redLight = new THREE.PointLight(0xff0000, 0.25, 1000);
      redLight.position.set(-550, 50, 0);
      scene.add(redLight);

      const blueLight = new 以上是关于unity5怎么做镜面反射的效果的主要内容,如果未能解决你的问题,请参考以下文章