SVN如何清除本地的Working copy和远程仓库的联系
Posted
tags:
篇首语:本文由小常识网(cha138.com)小编为大家整理,主要介绍了SVN如何清除本地的Working copy和远程仓库的联系相关的知识,希望对你有一定的参考价值。
参考技术A 参考链接: https://tortoisesvn.net/unversion.html只需要清除项目内的 .svn隐藏文件夹即可,一般在项目的根目录下。两种方法:
1、直接删除。
2、使用SVN删除,使用Export命令,只需要目标文件夹就是项目文件夹即可。
SVN:This client is too old to work with working copy…解决方法
SVN:This client is too old to work with working copy…解决方法[OK]
这两天项目提交时候,虚拟机用SVN提交的时候,总是报如下提示:
svn: This client is too old to work with working copy ‘/opt/gforge/www/account’. You need
to get a newer Subversion client, or to downgrade this working copy.
See http://subversion.tigris.org/faq.html#working-copy-format-change
for details.
其实有时候仔细看下报错提示还是很有用的,开始没有仔细看,试着升级SVN,其实是一个错误的方向。
正确的解决办法就是按照提示中的地址有FAQ的解释,可以解决这个问题。
访问地址:
http://subversion.tigris.org/faq.html#working-copy-format-change
官网已经明确说明地址转移了:
http://subversion.apache.org/faq.html#working-copy-format-change
原文如下:
Sometimes the working copy metadata format changes incompatibly between minor releases. For example, say you have a working copy created with Subversion 1.4.4, but one day you decide to try out Subversion 1.5.0. Afterwards, you attempt to switch back to 1.4.4, but it doesn’t work — it just gives the above error.
This is because 1.5.0 upgraded your working copy format to support some new features (in this case, changelists, the keep-local flag, and variable-depth directories). Although 1.4.4 doesn’t know anything about these new features, it can at least recognize that the working copy format has been upgraded to something higher than it can handle.
1.5.0 upgraded the working copy for a good reason: it realizes that 1.4.4 does not know about these new features, and that if 1.4.4 were to meddle with the working copy metadata now, important information might be lost, possibly causing corruption (see issue #2961, for example).
But this automatic upgrade behavior can be annoying, if you just want to try out a new release of Subversion without installing it permanently. For this reason, we distribute a script that can downgrade working copies when doing so is safe:
http://svn.collab.net/repos/svn/trunk/tools/client-side/change-svn-wc-format.py
Run that script with the “–help” option to see how to use it. As future versions of Subversion are released, we will try to keep this FAQ entry up-to-date with potential downgrade scenarios and their implications.
举例,在/home/mysvn文件夹下建立好change-svn-wc-format.py文件,然后在该目录下执行:
./change-svn-wc-format.py –help
可以看到命令格式:
usage: change-svn-wc-format.py WC_PATH SVN_VERSION [--verbose] [--force] [--skip-unknown-format]
change-svn-wc-format.py –help
执行命令:
./change-svn-wc-format.py /mulu 1.x –skip-unknown-format
说明:
上面的/mulu为文件路径,1.x为SVN当前版本号,只写2位版本号即可。
如版本为1.5.4,那么这里就写1.5就可以了。至此svn up可以正常执行了。
myeclipse安装svn插件的多种方式
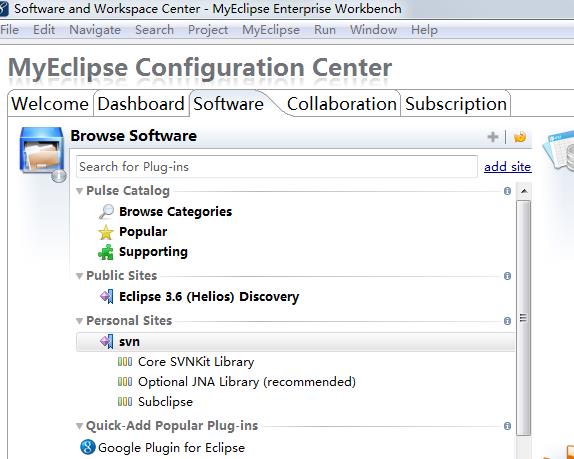
方法一:在线安装1.打开HELP->MyEclipse Configuration
Center。切换到SoftWare标签页。

2.点击Add Site 打开对话框,在对话框Name输入Svn,URL中输入:http://subclipse.tigris.org/update_1.6.x
3.在左边栏中找到Personal Site中找到SVN展开。将Core SVNKit Library和Optional JNA
Library添加(右键Add to Profile),Subclipse下面的Subclipse Integration for Mylyn
3.0可以不添加(特别注意,此处不要添加)。
4.在右下角窗格(Pending Changes )中点击Apply。安装重启后MyEclipse即可。
方法二:link安装
安装subclipse, MyEclipse9.0 SVN插件
1、从官网下载site-1.6.10.zip文件,网址是:subclipse.tigris.org,
2、从中解压出features与 plugins文件夹,复制到E:\\MyEclipse\\myPlugin\\svn里面,其它的*.xml文件不要。
3、在 E:\\MyEclipse\\MyEclipse9.0\\dropins下新建文件svn.link,内容是:path=E:\\\\MyEclipse \\\\myPlugin\\\\svn保存。
4、(唛呆儿:这一步不确定,先不要删除)删除E:\\MyEclipse\\MyEclipse8.5\\configuration \\org.eclipse.update文件夹
5、重启myeclipse就一切正常了。[/size]
以上两种方法都尝试成功
方法三:直接解压
下载SVN插件:site-1.6.10.zip
解压后将其全部文件拷贝至:D:\\Program Files\\Genuitec\\MyEclipse 8.5\\dropins(MyEclipse的安装目录)
重启MyEclipse即可出现SVN!
方法四:肯定可行的方法
1、下载最新的SVN包:
http://subclipse.tigris.org/servlets/ProjectDocumentList?folderID=2240
2、在你的磁盘上任意位置创建文件夹:“myplugins/svn”。名字可以任取,为了方便插件管理,建议名称为“myplugins”。
3、将解压的svn里的两个文件夹拷贝到“myplugins/svn”下。
4、复制下列java代码,修改路径并执行:
package app;
import java.io.File;
import java.util.ArrayList;
import java.util.List;
/**
* MyEclipse9 插件配置代码生成器
*
*
*/
public class PluginConfigCreator
public PluginConfigCreator()
public void print(String path)
List<String> list = getFileList(path);
if (list == null)
return;
int length = list.size();
for (int i = 0; i < length; i++)
String result = "";
String thePath = getFormatPath(getString(list.get(i)));
File file = new File(thePath);
if (file.isDirectory())
String fileName = file.getName();
if (fileName.indexOf("_") < 0)
print(thePath);
continue;
String[] filenames = fileName.split("_");
String filename1 = filenames[0];
String filename2 = filenames[1];
result = filename1 + "," + filename2 + ",file:/" + path + "/"
+ fileName + "//,4,false";
System.out.println(result);
else if (file.isFile())
String fileName = file.getName();
if (fileName.indexOf("_") < 0)
continue;
int last = fileName.lastIndexOf("_");// 最后一个下划线的位置
String filename1 = fileName.substring(0, last);
String filename2 = fileName.substring(last + 1, fileName
.length() - 4);
result = filename1 + "," + filename2 + ",file:/" + path + "/"
+ fileName + ",4,false";
System.out.println(result);
public List<String> getFileList(String path)
path = getFormatPath(path);
path = path + "/";
File filePath = new File(path);
if (!filePath.isDirectory())
return null;
String[] filelist = filePath.list();
List<String> filelistFilter = new ArrayList<String>();
for (int i = 0; i < filelist.length; i++)
String tempfilename = getFormatPath(path + filelist[i]);
filelistFilter.add(tempfilename);
return filelistFilter;
public String getString(Object object)
if (object == null)
return "";
return String.valueOf(object);
public String getFormatPath(String path)
path = path.replaceAll("", "/");
path = path.replaceAll("//", "/");
return path;
public static void main(String[] args)
/*你的插件的安装目录*/
String plugin = "改成安装目录//Genuitec//svn";
new PluginConfigCreator().print(plugin);
这里需要注意的是修改成为刚才svn所在路径,建议改为绝对路径。比如d:/myplugins/svn/。。。
5、 找到“$myeclipse_home/configuration /org.eclipse.equinox.simpleconfigurator/”,打开其中的“bundles.inf”文件,为了防止分不清是不 是我们自己后加的东西,在最后面多回几次车,然后粘贴第4步运行后的代码,保存
6、重启myeclipse
以上是关于SVN如何清除本地的Working copy和远程仓库的联系的主要内容,如果未能解决你的问题,请参考以下文章