如何在虚拟机中运行 YOCTO LINUX 操作系统
Posted
tags:
篇首语:本文由小常识网(cha138.com)小编为大家整理,主要介绍了如何在虚拟机中运行 YOCTO LINUX 操作系统相关的知识,希望对你有一定的参考价值。
本文将为大家介绍如何创建 Yocto* 的可运行映像,如何在基础软件模拟器 QEMU 中测试该映像,以及如何在管理程序(比如 Windows 上的 Microsoft Hyper-V)中运行该映像。操作本教程的前提条件
Debian/Ubuntu(已经过 Debian 8.2 amd64 的测试)互联网连接磁盘提供至少 100 GB 可用空间
构建机器的前期准备工作
以根身份(或通过 "sudo")运行以下命令
1 # apt-get install wget git-core unzip make gcc g++ build-essential subversion sed autoconf automake texi2html texinfo coreutils diffstat python-pysqlite2 docbook-utils libsdl1.2-dev libxml-parser-perl libgl1-mesa-dev libglu1-mesa-dev xsltproc desktop-file-utils chrpath groff libtool xterm gawk fop
注 1:上述命令是否成功运行取决于大家使用的 Ubuntu/Debian 版本。 最后,如欲解决程序包的依赖关系,可以运行 "aptitude",强行安装正确版本的程序包(比如,"aptitude install libsdl1.2-dev")。
注 2:对于其他 Linux-distribution 来说,比如 RadHat、CentOS、Fedora、SuSe、Gentoo 等......建议通过正确的 package-manager(例如 zypper、yum 等)检查上述程序包的相应版本。
第一步: 设置工作文件夹
以没有特权的普通用户(没有根身份)
1 # cd
2 # mkdir yocto-2.0
3 # cd yocto-2.0
4 # wget http://downloads.yoctoproject.org/releases/yocto/yocto-2.0/poky-jethro-14.0.0.tar.bz2
5 # tar xvjf poky-jethro-14.0.0.tar.bz2
6 # cd poky-jethro-14.0.0/
注 3:可以点击以下链接 https://www.yoctoproject.org/downloads,选择 Yocto 版本的其他开发分支。 本教程将使用当前最新版本 "Jocto Poky 2.0.14.0.0 codename Jethro"。
注 4:如欲获取最新版 Yocto 资源,可以获得主开发分支,需要将 wget 操作替换为以下内容:
1 # git clone git://git.yoctoproject.org/poky.git
2 # cd poky
注 5: 还可以通过代号选择特定的开发分支。 例如:
1 # git clone -b jethro git://git.yoctoproject.org/poky.git
第二步: 设置系统 shell 的环境变量
Yocto 开发人员提供了一个非常易用的脚本。
1 # . ./oe-init-build-env
脚本运行后,如果正常,您的位置将变成一个构建子目录,它将成为您的新工作区。 类似于 /home/<your user>/yocto-2.0/poky-jethro-14.0.0/build/。
第三步: 设置 bitbake
执行之前的脚本,会创建一个 conf/local.conf 文件。
该配置文件需要设置 Yocto 的构建引擎 bitbake(Yocto 项目的核心组件)。
采用首选文本编辑器编辑 bitbake 配置文件。 本教程将使用 nano — 面向类似 Unix 的环境的简单命令-行-界面文本编辑器,如下所示:
1 # cd conf/
2 # nano local.conf
取消下列行的注释
1 DL_DIR ?= "$TOPDIR/downloads"
2 SSTATE_DIR ?= "$TOPDIR/sstate-cache"
3 TMPDIR ?= "$TOPDIR/tmp"
4 SDKMACHINE ?= "i686"
建议为该映像构建所有其他的可用特性。 最终的映像将特别大(每个大约 8GB),但绝对完整,可满足所有开发需求。
1 EXTRA_IMAGE_FEATURES = "dbg-pkgs dev-pkgs ptest-pkgs tools-sdk tools-debug eclipse-debug tools-profile tools-testapps debug-tweaks"
现在,通过 CTRL+X 键组合保存对文件 local.conf 作出的所有更改。
然后:
1 # cd ..
2 # hob
现在,Hob 实例(面向 BitBake、基于 GTK2 的图形用户界面)将启动,检查构建系统的准确程度。
现在在下拉菜单中选择 qemux86 机器。
等 Hob 完成 BitBake 方案解析并生成依赖关系树。 然后选择目标映像,以从上述菜单的 "select an image recipe" 开始构建。 在本示例中,我们选择不包含 GUI 的完整核心映像: core-image-full-cmdline。
现在点击 "Advanced Configuration"。
如欲构建最新的稳定版,在 "Image types" 面板中保留 "Distro" 菜单中的 poky。 然后在 "Image types" 字段中选择所需的格式:通常我选择 ".iso"、".vdi" 和 ".vmdk",它们最好用。
请在 "Output" 面板中选择能够满足要求的最佳选项。 建议为映像增加 4GB 可用存储,以放置面向 i686 架构的 SDK(如果您使用 Edison 开发板)。 另外,我认为将 "deb" 设置为面向根文件系统的打包格式非常有用。 因此,如下所示:
好的,保存。 现在,您已准备好构建映像! 点击 "Build image" 按钮!
Hob 将启动 bitbake core-image-full-cmdline 示例,以及您钟爱的设置。
注 7:这一流程将花费很长时间构建最终映像。 不过,根据您主机功能的不同,可以更改用于在 "BitBake parallel threads" 和 "Make parallel threads" 上执行构建操作的处理器内核的数量。 可从 Hob settings 窗口更改这些变量:
注 8:您可以借助 Hob 确定将要构建的映像包含哪些包。 为此,可以在开始构建映像之前选择 "Edit image recipe"。 参考技术A 本文将为大家介绍如何创建 Yocto* 的可运行映像,如何在基础软件模拟器 QEMU 中测试该映像,以及如何在管理程序(比如 Windows 上的 Microsoft Hyper-V)中运行该映像。 操作本教程的前提条件 Debian/Ubuntu(已经过 Debian 8.2 amd64 的测试)...本回答被提问者采纳
在 Linux 虚拟机中手动安装或升级 VMware Tools
对于 Linux 虚拟机,您可以使用命令行工具手动安装或升级 VMware Tools。
本次Linux 虚拟机为CentOS6.5
先决条件
开启虚拟机。
确认客户机操作系统正在运行。
由于 VMware Tools 安装程序是使用 Perl 编写的,因此,请确认在客户机操作系统中安装了 Perl。
安装VMware Tools的目的
VMware Tools是VMware虚拟机中自带的一种增强工具,相当于VirtualBox中的增强功能(Sun VirtualBox Guest Additions),是VMware提供的增强虚拟显卡和硬盘性能、以及同步虚拟机与主机时钟的驱动程序。
只有在VMware虚拟机中安装好了VMware Tools,才能实现主机与虚拟机之间的文件共享,同时可支持自由拖拽的功能,鼠标也可在虚拟机与主机之前自由移动(不用再按ctrl+alt),且虚拟机屏幕也可实现全屏化。
步骤
1、在主机上,从 Workstation Pro 菜单栏中选择虚拟机 > 安装 VMware Tools。
如果安装了早期版本的 VMware Tools,则菜单项是更新 VMware Tools。
2、在虚拟机中,以 root 身份登录到客户机操作系统并打开终端窗口。
3、不带参数运行 mount 命令以确定 Linux 发行版是否自动装载 VMware Tools 虚拟 CD-ROM 映像。
如果装载了 CD-ROM 设备,将按以下方式列出 CD-ROM 设备及其装载点:
/dev/cdrom on /mnt/cdrom type iso9660 (ro,nosuid,nodev)

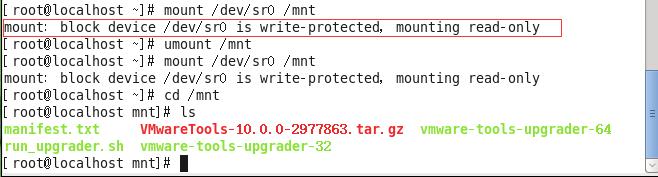
到此步骤时,我遇到了一个问题,纠结了好久:
就是我通过mount /dev/sr0 /mnt 命令挂载光驱(即把CentOS CDROM挂载在/mnt目录中,就可以访问被里面的内容了),可是我在mnt目录下却看不到东西。
这是什么原因呢?
原来是因为我挂载的/nmt分区已经挂载,所以才会出现上述情况!!!
解决方法:先umount /mnt 卸载掉 然后 mount /dev/sr0 /mnt
附注:下图红框中的提示是正常的.无需解决.
/dev/sr0写保护,以只读方式挂载。
mount命令默认以读写方式挂载一个设备,而光盘是只读的,所以在挂载光盘这个块设备时会出现上述从读写方式切换为以只读方式挂载光盘的提示。如果不想看到这个提示,就请在mount命令后面添加参数,指定以只读方式来挂载设备。
接下来的步骤:
4、转到工作目录,例如 /tmp/
5、解压缩安装程序。
tar zxpf /mnt/cdrom/VMwareTools-x.x.x-yyyy.tar.gz
x.x.x 值是产品版本号,yyyy 是产品版本的内部版本号。
如果尝试安装 tar 安装以覆盖 RPM 安装或相反,安装程序将检测以前的安装并且必须转换安装程序数据库格式,然后才能继续操作。
6、会发现目录下多了个文件夹vmware-tools-distrib,里面有一个vmware-install.pl文件
7、使用./vmware-install.pl来执行文件
[root@localhost mnt]# cd ../..
[root@localhost /]# cd /tmp
[root@localhost tmp]# ls
keyring-0Xytmd  keyring-hyGJPh  keyring-UvmLHe      virtual-carsonzhu.FBAXXT
keyring-4WJiO6  keyring-Hzpfne  orbit-carsonzhu     virtual-carsonzhu.YLd5ur
keyring-Dtts8C  keyring-nPu72R  orbit-gdm
keyring-fRCtRE  keyring-P2Kgdv  pulse-JJ4pstxF4ptg
keyring-GgwNeg  keyring-tLjlND  pulse-rR5aSeUpvxJC
[root@localhost tmp]# cd /mnt
[root@localhost mnt]# cp VMwareTools-10.0.0-2977863.tar.gz /tmp
[root@localhost mnt]# cd /tmp
[root@localhost tmp]# ls
keyring-0Xytmd  keyring-Hzpfne   orbit-gdm
keyring-4WJiO6  keyring-nPu72R   pulse-JJ4pstxF4ptg
keyring-Dtts8C  keyring-P2Kgdv   pulse-rR5aSeUpvxJC
keyring-fRCtRE  keyring-tLjlND   virtual-carsonzhu.FBAXXT
keyring-GgwNeg  keyring-UvmLHe   virtual-carsonzhu.YLd5ur
keyring-hyGJPh  orbit-carsonzhu  VMwareTools-10.0.0-2977863.tar.gz
[root@localhost tmp]# tar zxpf VMwareTools-10.0.0-2977863.tar.gz
[root@localhost tmp]# ls
keyring-0Xytmd  keyring-nPu72R      pulse-rR5aSeUpvxJC
keyring-4WJiO6  keyring-P2Kgdv      virtual-carsonzhu.FBAXXT
keyring-Dtts8C  keyring-tLjlND      virtual-carsonzhu.YLd5ur
keyring-fRCtRE  keyring-UvmLHe      VMwareTools-10.0.0-2977863.tar.gz
keyring-GgwNeg  orbit-carsonzhu     vmware-tools-distrib
keyring-hyGJPh  orbit-gdm
keyring-Hzpfne  pulse-JJ4pstxF4ptg
[root@localhost tmp]# cd vmware-tools-distrib
[root@localhost vmware-tools-distrib]# ls
bin  doc  FILES    installer  vgauth             vmware-install.real.pl
caf  etc  INSTALL  lib        vmware-install.pl
[root@localhost vmware-tools-distrib]# ./vmware-install.pl

Creating a new VMware Tools installer database using the tar4 format.

Installing VMware Tools.

In which directory do you want to install the binary files?
[/usr/bin]

What is the directory that contains the init directories (rc0.d/ to rc6.d/)?
[/etc/rc.d]

What is the directory that contains the init scripts?
[/etc/rc.d/init.d]

In which directory do you want to install the daemon files?
[/usr/sbin]

In which directory do you want to install the library files?
[/usr/lib/vmware-tools]

The path "/usr/lib/vmware-tools" does not exist currently. This program is
going to create it, including needed parent directories. Is this what you want?
[yes]
In which directory do you want to install the common agent library files?
[/usr/lib]
In which directory do you want to install the common agent transient files?
[/var/lib]
In which directory do you want to install the documentation files?
[/usr/share/doc/vmware-tools]
The path "yes" is a relative path. Please enter an absolute path.

In which directory do you want to install the documentation files?
[/usr/share/doc/vmware-tools]

The path "/usr/share/doc/vmware-tools" does not exist currently. This program
is going to create it, including needed parent directories. Is this what you
want? [yes]

The installation of VMware Tools 10.0.0 build-2977863 for Linux completed
successfully. You can decide to remove this software from your system at any
time by invoking the following command: "/usr/bin/vmware-uninstall-tools.pl".

Before running VMware Tools for the first time, you need to configure it by
invoking the following command: "/usr/bin/vmware-config-tools.pl". Do you want
this program to invoke the command for you now? [yes]

Initializing...


Making sure services for VMware Tools are stopped.

Stopping Thinprint services in the virtual machine:
   Stopping Virtual Printing daemon:                                   done
Stopping VMware Tools services in the virtual machine:
   Guest operating system daemon:                          [确定]
   VMware User Agent (vmware-user):                        [确定]
   Unmounting HGFS shares:                                 [确定]
   Guest filesystem driver:                                [确定]


Found a compatible pre-built module for vmci.  Installing it...


Found a compatible pre-built module for vsock.  Installing it...


The module vmxnet3 has already been installed on this system by another
installer or package and will not be modified by this installer.

The module pvscsi has already been installed on this system by another
installer or package and will not be modified by this installer.

The module vmmemctl has already been installed on this system by another
installer or package and will not be modified by this installer.

The VMware Host-Guest Filesystem allows for shared folders between the host OS
and the guest OS in a Fusion or Workstation virtual environment.  Do you wish
to enable this feature? [yes]

Could not create the \'/mnt/hgfs\' directory.  Please make sure it is writeable
and/or not currently in use.
The filesystem driver (vmhgfs module) is used only for the shared folder
feature. The rest of the software provided by VMware Tools is designed to work
independently of this feature.

If you wish to have the shared folders feature, you can install the driver by
running vmware-config-tools.pl again after making sure that gcc, binutils, make
and the kernel sources for your running kernel are installed on your machine.
These packages are available on your distribution\'s installation CD.
[ Press Enter key to continue ]

Found a compatible pre-built module for vmxnet.  Installing it...


The vmblock enables dragging or copying files between host and guest in a
Fusion or Workstation virtual environment.  Do you wish to enable this feature?
[yes]

VMware automatic kernel modules enables automatic building and installation of
VMware kernel modules at boot that are not already present. This feature can
be enabled/disabled by re-running vmware-config-tools.pl.

Would you like to enable VMware automatic kernel modules?
[no]

Thinprint provides driver-free printing. Do you wish to enable this feature?
[yes]


Disabling timer-based audio scheduling in pulseaudio.

Do you want to enable Guest Authentication (vgauth)? Enabling vgauth is needed
if you want to enable Common Agent (caf). [yes]

Do you want to enable Common Agent (caf)? [yes]


Detected X server version 1.13.0


Distribution provided drivers for Xorg X server are used.

Skipping X configuration because X drivers are not included.

Creating a new initrd boot image for the kernel.
Generating the key and certificate files.
Successfully generated the key and certificate files.
   Starting Virtual Printing daemon:                                   done
   Checking acpi hot plug                                  [确定]
Starting VMware Tools services in the virtual machine:
   Switching to guest configuration:                       [确定]
   VM communication interface:                             [确定]
   VM communication interface socket family:               [确定]
   Blocking file system:                                   [确定]
   Guest operating system daemon:                          [确定]
   VGAuthService:                                          [确定]
   Common Agent:                                           [确定]
The configuration of VMware Tools 10.0.0 build-2977863 for Linux for this
running kernel completed successfully.

You must restart your X session before any mouse or graphics changes take
effect.

You can now run VMware Tools by invoking "/usr/bin/vmware-toolbox-cmd" from the
command line.

To enable advanced X features (e.g., guest resolution fit, drag and drop, and
file and text copy/paste), you will need to do one (or more) of the following:
1. Manually start /usr/bin/vmware-user
2. Log out and log back into your desktop session; and,
3. Restart your X session.

Enjoy,

--the VMware team

Found VMware Tools CDROM mounted at /media/VMware Tools. Ejecting device
/dev/sr0 ...
Found VMware Tools CDROM mounted at /mnt. Ejecting device /dev/sr0 ...
8、紧接着输入命令reboot重启就好了!
附:修改虚拟机中linux系统的分辨率

以上是关于如何在虚拟机中运行 YOCTO LINUX 操作系统的主要内容,如果未能解决你的问题,请参考以下文章