opencv如何计算图像中物体的像素值
Posted
tags:
篇首语:本文由小常识网(cha138.com)小编为大家整理,主要介绍了opencv如何计算图像中物体的像素值相关的知识,希望对你有一定的参考价值。
参考技术A OpenCV中获取图像某一像素值This is a basic example for the OpenCV.
First we must know the structure of IplImage:
IPL image:
IplImage
|-- int nChannels; // Number of color channels (1,2,3,4)
|-- int depth; // Pixel depth in bits:
| // IPL_DEPTH_8U, IPL_DEPTH_8S,
| // IPL_DEPTH_16U,IPL_DEPTH_16S,
| // IPL_DEPTH_32S,IPL_DEPTH_32F,
| // IPL_DEPTH_64F
|-- int width; // image width in pixels
|-- int height; // image height in pixels
|-- char* imageData; // pointer to aligned image data
| // Note that color images are stored in BGR order
|-- int dataOrder; // 0 - interleaved color channels,
| // 1 - separate color channels
| // cvCreateImage can only create interleaved images
|-- int origin; // 0 - top-left origin,
| // 1 - bottom-left origin (Windows bitmaps style)
|-- int widthStep; // size of aligned image row in bytes
|-- int imageSize; // image data size in bytes = height*widthStep
|-- struct _IplROI *roi;// image ROI. when not NULL specifies image
| // region to be processed.
|-- char *imageDataOrigin; // pointer to the unaligned origin of image data
| // (needed for correct image deallocation)
|
|-- int align; // Alignment of image rows: 4 or 8 byte alignment
| // OpenCV ignores this and uses widthStep instead
|-- char colorModel[4]; // Color model - ignored by OpenCV
//------------------------------------------------------------------------------int main(int argc, char* argv[])
...
IplImage *img=cvLoadImage("c://fruitfs.bmp",1);
CvScalar s;
for(int i=0;i<img->height;i++)...
for(int j=0;j<img->width;j++)...
s=cvGet2D(img,i,j); // get the (i,j) pixel value
printf("B=%f, G=%f, R=%f ",s.val[0],s.val[1],s.val[2]);
s.val[0]=111;
s.val[1]=111;
s.val[2]=111;
cvSet2D(img,i,j,s);//set the (i,j) pixel value
cvNamedWindow("Image",1);
cvShowImage("Image",img);
cvWaitKey(0); //等待按键
cvDestroyWindow( "Image" );//销毁窗口
cvReleaseImage( &img ); //释放图像
return 0;
其实还有更好的方法,例如将其封装成类,调用起来更加方便,效率也很高。本回答被提问者和网友采纳
OpenCV3入门图像的阈值
1、图像阈值与二值化
阈值是一种简单的图像分割方法,一幅图像包括目标物体(前景)、背景还有噪声,要想从数字图像中直接提取出目标物体,可以设定一个像素值即阈值,然后用图像的每一个像素点和阈值做比较,给出判定结果。
二值化是特殊的阈值分割方法,把图像分为两部分,以阈值T为分割线,大于T的像素群和小于T的像素群,这样图像就变为黑白二色图像。通过设定一个标准如果大于这个标准就设为白,如果小于这个标准就设为黑,而这个标准就是阈值。
2、OpenCV阈值threshold
double threshold(InputArray src, OutputArray dst, double thresh, double maxval, int type);
(1)第一个参数,InputArray 类型的 src,源图像。单通道,8 或 32位浮点数类型的深度。
(2)第二个参数,OutputArray 类型的 dst,输出图像。
(3)第三个参数,double 类型的 thresh,选取的阈值。
(4)第四个参数,double 类型的 maxval。
(5)第五个参数,int 类型的 type。阈值类型。如下所示:
type类型如下:
enum  cv::ThresholdTypes {
  cv::THRESH_BINARY = 0,
  cv::THRESH_BINARY_INV = 1,
  cv::THRESH_TRUNC = 2,
  cv::THRESH_TOZERO = 3,
  cv::THRESH_TOZERO_INV = 4,
  cv::THRESH_MASK = 7,
  cv::THRESH_OTSU = 8,
  cv::THRESH_TRIANGLE = 16
}
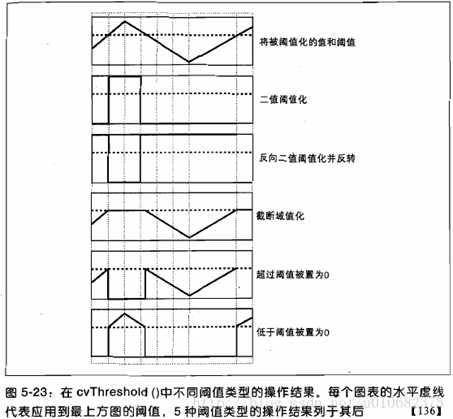
不同的阈值方法生成关系如下图。

Mat img = Mat::zeros(6, 6, CV_8UC1);
randu(img, 0, 255);

int th = 100;
Mat threshold1, threshold2, threshold3, threshold4, threshold5, threshold6, threshold7, threshold8;
threshold(img, threshold1, th, 200, THRESH_BINARY);
threshold(img, threshold2, th, 200, THRESH_BINARY_INV);
threshold(img, threshold3, th, 200, THRESH_TRUNC);

cout << "raw=
"<<img << "
" << endl;
cout << "THRESH_BINARY=
" << threshold1 << "
" << endl;
cout << "THRESH_BINARY_INV=
" << threshold2 << "
" << endl;
cout << "THRESH_TRUNC=
" << threshold3 << "
" << endl;
上面代码中randu(img, 0, 255)作用是产出随机数填充img矩阵。输出结果如下。
raw=
[ 91,   2,  79, 179,  52, 205;
 236,   8, 181, 239,  26, 248;
 207, 218,  45, 183, 158, 101;
 102,  18, 118,  68, 210, 139;
 198, 207, 211, 181, 162, 197;
 191, 196,  40,   7, 243, 230]

THRESH_BINARY=
[  0,   0,   0, 200,   0, 200;
 200,   0, 200, 200,   0, 200;
 200, 200,   0, 200, 200, 200;
 200,   0, 200,   0, 200, 200;
 200, 200, 200, 200, 200, 200;
 200, 200,   0,   0, 200, 200]

THRESH_BINARY_INV=
[200, 200, 200,   0, 200,   0;
   0, 200,   0,   0, 200,   0;
   0,   0, 200,   0,   0,   0;
   0, 200,   0, 200,   0,   0;
   0,   0,   0,   0,   0,   0;
   0,   0, 200, 200,   0,   0]

THRESH_TRUNC=
[ 91,   2,  79, 100,  52, 100;
 100,   8, 100, 100,  26, 100;
 100, 100,  45, 100, 100, 100;
 100,  18, 100,  68, 100, 100;
 100, 100, 100, 100, 100, 100;
 100, 100,  40,   7, 100, 100]
THRESH_BINARY,thresh=100,maxval=200,大于阈值限定为200,小于阈值清零。
THRESH_BINARY_INV的作用和THRESH_BINARY 相反,小于阈值置200,大于阈值清。
THRESH_TRUNC的作用是对大于阈值的数据进行截断,其余值保留原值不变。
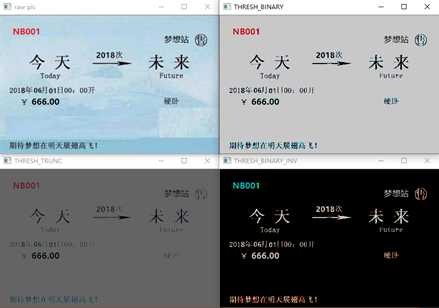
图像阈值例子如下。
Mat img = imread("D:/WORK/5.OpenCV/LeanOpenCV/pic_src/pic6.bmp", IMREAD_GRAYSCALE);
int th = 100;
Mat threshold1, threshold2, threshold3, threshold4, threshold5, threshold6, threshold7, threshold8;
threshold(img, threshold1, th, 200, THRESH_BINARY);
threshold(img, threshold2, th, 200, THRESH_BINARY_INV);
threshold(img, threshold3, th, 200, THRESH_TRUNC);

imshow("raw pic",img);
imshow("THRESH_BINARY", threshold1);
imshow("THRESH_BINARY_INV", threshold2);
imshow("THRESH_TRUNC", threshold3);

3、自动阈值—大津法OTSU
最大类间方差是由日本学者大津(Nobuyuki Otsu)于1979年提出,是一种自适应的阈值确定方法。算法假设图像像素能够根据阈值,被分成背景[background]和目标[objects]两部分。然后,计算该最佳阈值来区分这两类像素,使得两类像素区分度最大。
算法原理为:
设图像Img长宽尺寸为M*N, T为二值化的阈值;
N0为灰度小于T的像素的个数,N0的平均灰度为μ0。
N1 为灰度大于T的像素的个数,N1的平均灰度为μ1。
ω0=N0/ M×N (1) //落在N0的概率
ω1=N1/ M×N (2) //落在N1的概率
N0+N1=M×N (3)
ω0+ω1=1 (4)
μ=ω0*μ0+ω1*μ1 (5) //平均灰度乘以概率 再相加
g=ω0(μ0-μ)^2+ω1(μ1-μ)^2 (6) //类间方差
将式(5)代入式(6),得到等价公式: g=ω0ω1(μ0-μ1)^2 (7)
OpenCV自带了OSTU算法。
Mat img = imread("D:/WORK/5.OpenCV/LeanOpenCV/pic_src/pic2.bmp", IMREAD_GRAYSCALE);
int th = 100;
Mat threshold1, threshold2, threshold3;
threshold(img, threshold1, th, 255, THRESH_BINARY);
threshold(img, threshold2, th, 255, THRESH_TRUNC);
threshold(img, threshold3, th, 255, THRESH_OTSU); // 阈值随意设置即可

imshow("raw pic",img);
imshow("THRESH_BINARY", threshold1);
imshow("THRESH_TRUNC",  threshold2);
imshow("THRESH_OTSU",   threshold3);
使用大津法时阈值可以不设置或随意设置,函数会自动计算最合适的阈值,输出图像如下。

大津法相比其他二值化方法,能很好的筛选出前景图和背景图,让图像分类后黑白区分度最大。
4、参考文献
1、《学习OpenCV》,清华大学出版社,Gary Bradski, Adrian kaehler著
2、Miscellaneous Image Transformations
https://docs.opencv.org/3.1.0/d7/d1b/group__imgproc__misc.html#gae8a4a146d1ca78c626a53577199e9c57
3、OpenCV threshold函数详解
https://blog.csdn.net/weixin_42296411/article/details/80901080
4、详细及易读懂的 大津法(OTSU)原理 和 算法实现
https://blog.csdn.net/u012198575/article/details/81128799
尊重原创技术文章,转载请注明。
以上是关于opencv如何计算图像中物体的像素值的主要内容,如果未能解决你的问题,请参考以下文章