OpenStack手动分布式部署NovaQueens版
Posted 小强在学习的路上
tags:
篇首语:本文由小常识网(cha138.com)小编为大家整理,主要介绍了OpenStack手动分布式部署NovaQueens版相关的知识,希望对你有一定的参考价值。
目录
Nove简介:
nova组件是用来建虚拟机的(功能:负责响应虚拟机创建请求、调度、销毁云主机)
nova主要组成:
- (1).nova api service------安装在controller节点:接受和相应客户端发送的请求,nova-api负责接收和响应终端用户由管虚拟机和云硬盘的请求。就是说我想在openstack中创建个虚拟机(创建虚拟机最终在nova中完成),我发出的请求就被nova-api接收并发送到nova中去,然后在进行下一步具体操作,nova-api是整个nova的入口。它接收用户请求,将指令发送到消息队列,由相应的服务执行相关的指令消息,他提供了openstack API,亚马逊EC2 API,以及管理员控制API。
- (2)nova-api-metadata service:接受从实例元数据发来的请求,该服务通常于nova-network服务在对主机模式下运行,也就说由多个nova节点才会用得到
- (3)nova compute------安装在compute节点:是nova组件中最核心的服务,它实现了管理虚拟机的功能,实现了在计算节点上创建,启动,暂停,关闭,和删除虚拟机。
- (4)nova Scheduler:主要起到调度作用,假如现在又多台nova计算节点,当用户发起创建虚拟机的请求时,nova Scheduler会决定把虚拟机创建放在那个计算节点上。
- (5)nova conductor:主要提供数据查询功能,提供nova compute和Database之间的交互数据,那为啥nova compute不直接去访问数据库呢?只是为防止nova compute被攻击后,数据库就会不安全,所以需要有nova conductor去调度
1、登录数据库配置(在controller执行)
1.1登录数据库
[root@controller ~]# mysql -p
Enter password:
Welcome to the MariaDB monitor.  Commands end with ; or \\g.
Your MariaDB connection id is 18
Server version: 10.3.20-MariaDB MariaDB Server

Copyright (c) 2000, 2018, Oracle, MariaDB Corporation Ab and others.

Type 'help;' or '\\h' for help. Type '\\c' to clear the current input statement.

MariaDB [(none)]>
1.2数据库里创建nova-api
MariaDB [(none)]> CREATE DATABASE nova_api;
Query OK, 1 row affected (0.001 sec)

MariaDB [(none)]> CREATE DATABASE nova;
Query OK, 1 row affected (0.002 sec)

MariaDB [(none)]>  CREATE DATABASE nova_cell0;
Query OK, 1 row affected (0.001 sec)
1.3数据库登录授权
GRANT ALL PRIVILEGES ON nova_api.* TO 'nova'@'localhost' IDENTIFIED BY '000000';
GRANT ALL PRIVILEGES ON nova_api.* TO 'nova'@'%' IDENTIFIED BY '000000';
GRANT ALL PRIVILEGES ON nova.* TO 'nova'@'localhost' IDENTIFIED BY '000000';
GRANT ALL PRIVILEGES ON nova.* TO 'nova'@'%' IDENTIFIED BY '000000';
GRANT ALL PRIVILEGES ON nova_cell0.* TO 'nova'@'localhost' IDENTIFIED BY '000000';
GRANT ALL PRIVILEGES ON nova_cell0.* TO 'nova'@'%' IDENTIFIED BY '000000';
【记得退出数据库】
MariaDB [(none)]> quit;
Bye
1.4创建nova用户
openstack user create --domain default --password nova nova 
1.5添加admin用户为nova用户
openstack role add --project service --user nova admin
1.6创建nova服务端点
openstack service create --name nova --description "OpenStack Compute" compute
1.7创建compute API 服务端点
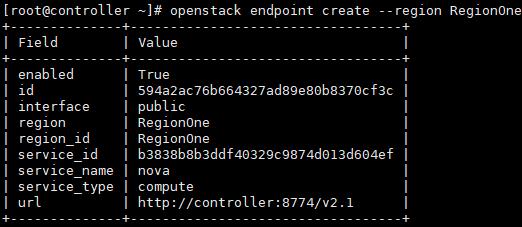
openstack endpoint create --region RegionOne compute public http://controller:8774/v2.1 
1.8创建一个placement服务用户
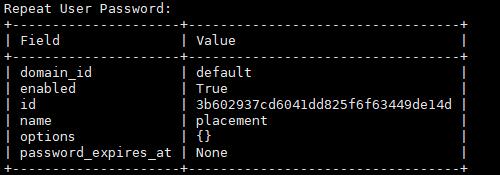
openstack user create --domain default --password-prompt placement 
1.9添加placement用户为项目服务admin角色
openstack role add --project service --user placement admin1.10创建在服务目录创建Placement API服务
openstack service create --name placement --description "Placement API" placement1.11创建Placement API服务端点
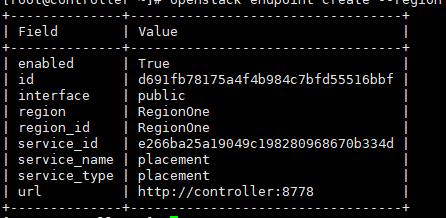
openstack endpoint create --region RegionOne placement public http://controller:8778 
2、安装nova(在controller执行)
2.1安装软件包
yum install openstack-nova-api openstack-nova-conductor openstack-nova-console openstack-nova-novncproxy openstack-nova-scheduler openstack-nova-placement-api -y2.2编辑 /etc/nova/nova.conf
[root@controller ~]# cp /etc/nova/nova.conf,.bak
[root@controller ~]# grep -Ev "^$|#" /etc/nova/nova.conf.bak > /etc/nova/nova.conf
[root@controller ~]# vi /etc/nova/nova.conf
[DEFAULT]
enabled_apis = osapi_compute,metadata
transport_url = rabbit://openstack:123456@controller
my_ip = 172.16.21.37
use_neutron = True
firewall_driver = nova.virt.firewall.NoopFirewallDriver
[api_database]

connection = mysql+pymysql://nova:000000@controller/nova_api

[database]

connection = mysql+pymysql://nova:000000@controller/nova

[api]
auth_strategy = keystone

[keystone_authtoken]
auth_uri = http://controller:5000
auth_url = http://controller:35357
memcached_servers = controller:11211
auth_type = password
project_domain_name = default
user_domain_name = default
project_name = service
username = nova
password = 000000

[vnc]
enabled = true
server_listen = $my_ip
server_proxyclient_address = $my_ip

[glance]
api_servers = http://controller:9292

[oslo_concurrency]
lock_path = /var/lib/nova/tmp

[placement]
os_region_name = RegionOne
project_domain_name = Default
project_name = service
auth_type = password
user_domain_name = Default
auth_url = http://controller:35357/v3
username = placement
password = 000000
##由于软件包的一个bug在/etc/httpd/conf.d/00-nova-placement-api.conf文件中添加如下配置
<Directory /usr/bin>
   <IfVersion >= 2.4>
      Require all granted
   </IfVersion>
   <IfVersion < 2.4>
      Order allow,deny
      Allow from all
   </IfVersion>
</Directory>
2.3重启HTTP服务、同步数据库
systemctl restart httpd[root@controller ~]# su -s /bin/sh -c "nova-manage api_db sync" nova
[root@controller ~]# su -s /bin/sh -c "nova-manage cell_v2 map_cell0" nova
[root@controller ~]# su -s /bin/sh -c "nova-manage cell_v2 create_cell --name=cell1 --verbose" nova
2e46e668-cfaf-4034-b6a8-154dc925c12d
[root@controller ~]# su -s /bin/sh -c "nova-manage db sync" nova
/usr/lib/python2.7/site-packages/pymysql/cursors.py:170: Warning: (1831, u'Duplicate index `block_device_mapping_instance_uuid_virtual_name_device_name_idx`. This is deprecated and will be disallowed in a future release')
result = self._query(query)
/usr/lib/python2.7/site-packages/pymysql/cursors.py:170: Warning: (1831, u'Duplicate index `uniq_instances0uuid`. This is deprecated and will be disallowed in a future release')
result = self._query(query)
[root@controller ~]# su -s /bin/sh -c "nova-manage cell_v2 list_cells" nova
+-------+--------------------------------------+------------------------------------------+-------------------------------------------------+----------+
|  Name |                 UUID                 |              Transport URL               |               Database Connection               | Disabled |
+-------+--------------------------------------+------------------------------------------+-------------------------------------------------+----------+
| cell0 | 00000000-0000-0000-0000-000000000000 |                  none:/                  | mysql+pymysql://nova:****@controller/nova_cell0 |  False   |
| cell1 | 2e46e668-cfaf-4034-b6a8-154dc925c12d | rabbit://openstack:****@controller:5672/ |    mysql+pymysql://nova:****@controller/nova    |  False   |
+-------+--------------------------------------+------------------------------------------+-------------------------------------------------+----------+
2.4开启计算各种服务
[root@controller ~]# systemctl enable \\
     openstack-nova-api.service \\
     openstack-nova-scheduler.service \\
     openstack-nova-conductor.service \\
     openstack-nova-novncproxy.service
Created symlink from /etc/systemd/system/multi-user.target.wants/openstack-nova-api.service to /usr/lib/systemd/system/openstack-nova-api.service.
Created symlink from /etc/systemd/system/multi-user.target.wants/openstack-nova-scheduler.service to /usr/lib/systemd/system/openstack-nova-scheduler.service.
Created symlink from /etc/systemd/system/multi-user.target.wants/openstack-nova-conductor.service to /usr/lib/systemd/system/openstack-nova-conductor.service.
Created symlink from /etc/systemd/system/multi-user.target.wants/openstack-nova-novncproxy.service to /usr/lib/systemd/system/openstack-nova-novncproxy.service.
2.5做一个重启脚本
[root@controller ~]# vi nova-restart.sh


#!/bin/bash
systemctl restart     openstack-nova-api.service     openstack-nova-scheduler.service     openstack-nova-conductor.service     openstack-nova-novncproxy.service
[root@controller ~]# bash nova-restart.sh
3、然后再计算节点上配置(在compute执行)
3.1计算节点上安装nova
[root@computer ~]# yum install openstack-nova-compute -y 3.2修改/etc/nova/nova.conf配置
[root@computer ~]# yum install openstack-nova-compute -y^C
[root@computer ~]# cp /etc/nova/nova.conf,.bak
[root@computer ~]# grep -Ev "^$|#" /etc/nova/nova.conf.bak > /etc/nova/nova.conf
[root@computer ~]# vi /etc/nova/nova.conf
[DEFAULT]

enabled_apis = osapi_compute,metadata
transport_url = rabbit://openstack:000000@controller
my_ip = 172.16.21.37
use_neutron = True
firewall_driver = nova.virt.firewall.NoopFirewallDriver

[api]
auth_strategy = keystone

[keystone_authtoken]
auth_uri = http://controller:5000
auth_url = http://controller:35357
memcached_servers = controller:11211
auth_type = password
project_domain_name = default
user_domain_name = default
project_name = service
username = nova
password = 000000

[vnc]
enabled = True
server_listen = 0.0.0.0
server_proxyclient_address = $my_ip
novncproxy_base_url = http://controller:6080/vnc_auto.html

[glance]
api_servers = http://controller:9292

[oslo_concurrency]
lock_path = /var/lib/nova/tmp

[placement]
os_region_name = RegionOne
project_domain_name = Default
project_name = service
auth_type = password
user_domain_name = Default
auth_url = http://controller:35357/v3
username = placement
password = 000000
3.3启动服务
[root@computer ~]# systemctl enable libvirtd.service openstack-nova-compute.service
Created symlink from /etc/systemd/system/multi-user.target.wants/openstack-nova-compute.service to /usr/lib/systemd/system/openstack-nova-compute.service.
[root@computer ~]# systemctl start libvirtd
[root@computer ~]# systemctl start libvirtd.service openstack-nova-compute.service
4、在controller节点上验证
4.1在controller节点上验证有没有计算节点
[root@controller ~]# openstack compute service list --service nova-compute
+----+--------------+----------+------+---------+-------+----------------------------+
| ID | Binary       | Host     | Zone | Status  | State | Updated At                 |
+----+--------------+----------+------+---------+-------+----------------------------+
|  9 | nova-compute | computer | nova | enabled | up    | 2023-02-10T15:15:29.000000 |
+----+--------------+----------+------+---------+-------+----------------------------+
4.2发现计算节点
[root@controller ~]# su -s /bin/sh -c "nova-manage cell_v2 discover_hosts --verbose" nova
Found 2 cell mappings.
Skipping cell0 since it does not contain hosts.
Getting computes from cell 'cell1': 87c82cc2-68f4-41d2-8427-5c959215ef1d
Checking host mapping for compute host 'computer': 833f408b-d646-483e-80eb-6f67c390fd43
Creating host mapping for compute host 'computer': 833f408b-d646-483e-80eb-6f67c390fd43
Found 1 unmapped computes in cell: 87c82cc2-68f4-41d2-8427-5c959215ef1d
4.3配置自动发现节点
[root@controller ~]# vi /etc/nova/nova.conf

[scheduler]
discover_hosts_in_cells_interval = 300
nova部署完成
OpenStack简介 | 常见的基础组件
OpenStack手动分布式部署环境准备【Queens版】
OpenStack手动分布式部署Keystone【Queens版】
OpenStack手动分布式部署Glance【Queens版】
OpenStack服务默认端口号
在某些部署中,例如已设置限制性防火墙的部署,您可能需要手动配置防火墙以允许OpenStack服务流量。
要手动配置防火墙,您必须允许通过每个OpenStack服务使用的端口的流量。下表列出了每个OpenStack服务使用的默认端口:
OpenStack组件使用的默认端口
| OpenStack service | Default ports | Port type |
| Application Catalog (murano) | 8082 | |
| Block Storage (cinder) 8776 | 8776 | publicurl and adminurl |
| Compute (nova) endpoints | 8774 | publicurl and adminurl |
| Compute API (nova-api) | 8773,8775 | |
| Compute ports for access to virtual machine consoles | 5900-5999 | |
| Compute VNC proxy for browsers ( openstack-nova-novncproxy) | 6080 | |
| Compute VNC proxy for traditional VNC clients (openstack-nova-xvpvncproxy) | 6081 | |
| Proxy port for HTML5 console used by Compute service | 6082 | |
| Data processing service (sahara) endpoint | 8386 | publicurl and adminurl |
| Identity service (keystone) administrative endpoint | 35357 | adminurl |
| Identity service public endpoint | 5000 | publicurl |
| Image service (glance) API | 9292 | publicurl and adminurl |
| Image service registry | 9191 | |
| Networking (neutron) | 9696 | publicurl and adminurl |
| Object Storage (swift) | 6000, 6001, 6002 | |
| Orchestration (heat) endpoint | 8004 | |
| Orchestration AWS CloudFormation-compatible API (openstack-heat-api-cfn) | 8000 | |
| Orchestration AWS CloudWatch-compatible API (openstack-heat-api-cloudwatch) | 8003 | |
| Telemetry (ceilometer) | 8777 | publicurl and adminurl |
为了正常运行,某些OpenStack组件依赖于其他非OpenStack服务。例如,OpenStack仪表板使用HTTP进行非安全通信。在这种情况下,您必须配置防火墙以允许与HTTP之间的通信。
下表列出了其他OpenStack组件使用的端口:
与OpenStack组件相关的辅助服务使用的默认端口
| Service | Default port | Used by |
| HTTP | 80 | OpenStack dashboard (Horizon) when it is not configured to use secure access. |
| HTTP alternate | 8080 | OpenStack Object Storage (swift) service. |
| HTTPS | 443 | Any OpenStack service that is enabled for SSL, especially secure-access dashboard. |
| rsync | 873 | OpenStack Object Storage. Required. |
| iSCSI target | 3260 | OpenStack Block Storage. Required. |
| MySQL database service | 3306 | Most OpenStack components. |
| Message Broker (AMQP traffic) | 5672 | OpenStack Block Storage, Networking, Orchestration, and Compute. |
参考链接:https://docs.openstack.org/mitaka/config-reference/firewalls-default-ports.html
以上是关于OpenStack手动分布式部署NovaQueens版的主要内容,如果未能解决你的问题,请参考以下文章