PyQt5 主题美化
Posted 迷途小书童的Note
tags:
篇首语:本文由小常识网(cha138.com)小编为大家整理,主要介绍了PyQt5 主题美化相关的知识,希望对你有一定的参考价值。
软硬件环境
Windows 10 64bit
Anaconda3 with python 3.8
PyQt5 5.15
qt-material 3.0.1
前言
嫌自己画的 UI 界面太丑?一个个控件单独调整样式表太麻烦?那就试试本篇介绍的这个样式工具,qt-material,它看起来类似于 Material Design,除了支持 PyQt5,它还支持 PyQt6、PySide6、PySide2 等 GUI 框架。
安装
使用 pip 安装
pip install qt-material实操
库的使用,还是很简单的
# 导入模块
from qt_material import apply_stylesheet

# 在app实例化之后,应用样式
apply_stylesheet(app, theme='default_dark.xml')
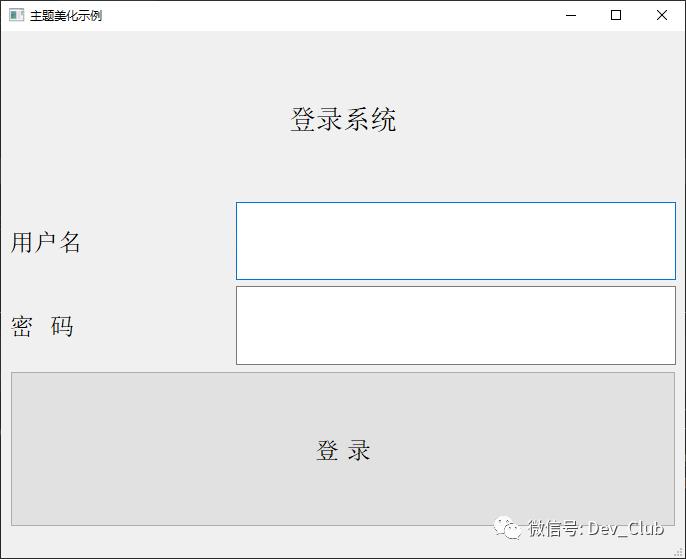
我们看看一个简单 UI 界面的前后区别


qt-material 自带了很多的主题,可以通过方法 list_themes 来查看
'dark_amber.xml',
'dark_blue.xml',
'dark_cyan.xml',
'dark_lightgreen.xml',
'dark_pink.xml',
'dark_purple.xml',
'dark_red.xml',
'dark_teal.xml',
'dark_yellow.xml',
'light_amber.xml',
'light_blue.xml',
'light_blue_500.xml',
'light_cyan.xml',
'light_cyan_500.xml',
'light_lightgreen.xml',
'light_lightgreen_500.xml',
'light_orange.xml',
'light_pink.xml',
'light_pink_500.xml',
'light_purple.xml',
'light_purple_500.xml',
'light_red.xml',
'light_red_500.xml',
'light_teal.xml',
'light_teal_500.xml',
'light_yellow.xml'
如果是使用 light 类型的主题,需要在 apply_stylesheet 中使用参数 invert_secondary,并将其设置为 True (默认值是 False)
apply_stylesheet(app, theme='light_blue.xml', invert_secondary=True)除此之外,还有个非常有用的参数 extra,它一般用来自定义颜色和字体
extra =

    # Button colors
    'danger': '#dc3545',
    'warning': '#ffc107',
    'success': '#17a2b8',

    # Font
    'font_family': 'Roboto',


apply_stylesheet(app, 'light_cyan.xml', invert_secondary=True, extra=extra)
然后就可以在 PyQt5 的控件中来使用了,如
# 登录按钮使用 danger 的红色
self.pushButton_login.setProperty('class', 'danger')
最后,来看看如何创建自己的主题。首先来到本地环境中主题文件所在的目录,也就是 xml 文件所在的目录

随便拷贝一个 xml,然后重命名一下,比如 dark_custom_theme.xml

接着来修改一下该文件的内容,16进制的颜色值,大家可以到这个站点来选择 https://imagecolorpicker.com/,比较省心
<!--?xml version="1.0" encoding="UTF-8"?-->
<resources>
  <color name="primaryColor">#2596be</color>
  <color name="primaryLightColor">#ffff74</color>
  <color name="secondaryColor">#abdbe3</color>
  <color name="secondaryLightColor">#4f5b62</color>
  <color name="secondaryDarkColor">#e28743</color>
  <color name="primaryTextColor">#000000</color>
  <color name="secondaryTextColor">#ffffff</color>
</resources>
xml 修改完毕,就可以在代码里使用了
apply_stylesheet(app, 'dark_custom_theme.xml')
更多资料请参考官方网站 https://github.com/UN-GCPDS/qt-material
PyQt5美化你的GUI界面
目录
1 圆点选择选项设置
效果展示

代码参考
#!/usr/bin/python
# -*- coding:utf-8 -*-
import sys
from PyQt5 import QtWidgets, QtCore
from PyQt5.QtWidgets import *

class qt_view(QWidget):
    def __init__(self):
        super(qt_view, self).__init__()

        self.resize(600, 250)
        self.setWindowTitle("圆点选择")

        self.radioButton_1 = QtWidgets.QRadioButton(self)
        self.radioButton_1.setGeometry(QtCore.QRect(230, 100, 89, 16))
        self.radioButton_1.setStyleSheet("font-family:微软雅黑; color:black;")
        self.radioButton_1.setObjectName("radioButton_1")
        self.radioButton_2 = QtWidgets.QRadioButton(self)
        self.radioButton_2.setGeometry(QtCore.QRect(310, 100, 89, 16))
        self.radioButton_2.setStyleSheet("font-family:微软雅黑; color:black;")
        self.radioButton_2.setObjectName("radioButton_2")

        translate = QtCore.QCoreApplication.translate
        self.radioButton_1.setText(translate("Form", "选项1"))
        self.radioButton_2.setText(translate("Form", "选项2"))

if __name__ == '__main__':
    app = QtWidgets.QApplication(sys.argv)
    my = qt_view()
    my.show()
    app.exec_()
2 选项按钮设置
效果展示

代码参考
import sys
from PyQt5 import QtWidgets, QtCore
from PyQt5.QtWidgets import *

class qt_view(QWidget):
    def __init__(self):
        super(qt_view, self).__init__()
        self.resize(600, 250)
        self.setWindowTitle("圆灰按钮")

        button_open_img = QPushButton(self)
        button_open_img.setText("打开图片")
        button_open_img.move(250, 100)
        button_open_img.setFixedSize(150, 50)
        button_open_img.setStyleSheet("QPushButton{\\n"
                                    "    background:orange;\\n"
                                    "    color:white;\\n"
                                    "    box-shadow: 1px 1px 3px;font-size:18px;border-radius: 24px;font-family: 微软雅黑;\\n"
                                    "}\\n"
                                    "QPushButton:pressed{\\n"
                                    "    background:black;\\n"
                                    "}")

if __name__ == '__main__':
    app = QtWidgets.QApplication(sys.argv)
    my = qt_view()
    my.show()
    app.exec_()
3 关闭弹窗设置
效果展示

代码参考
import sys
from PyQt5 import QtWidgets, QtCore
from PyQt5.QtWidgets import *

class qt_view(QWidget):
    def __init__(self):
        super(qt_view, self).__init__()
        print("关闭弹窗")
        result = QMessageBox.question(self, "注意!", "您真的要关闭吗?", QMessageBox.Yes | QMessageBox.No, QMessageBox.No)
        if result == QMessageBox.Yes:
            QMessageBox.information(self, "消息", "谢谢使用!")
            quit()
        else:
            QMessageBox.information(self, "消息", "正在返回...")
            quit()

if __name__ == '__main__':
    app = QtWidgets.QApplication(sys.argv)
    my = qt_view()
    my.show()
    app.exec_()
4 关闭程序弹窗
效果展示

代码参考
from PyQt5 import QtWidgets
import sys

class Ui_Dialog(object):
    def setupUi(self, Dialog):
        Dialog.setObjectName("Dialog")
        Dialog.resize(600, 320)

class Dialog(QtWidgets.QMainWindow):
    def closeEvent(self, event):
        reply = QtWidgets.QMessageBox.question(self,
                                               '本程序',
                                               "是否要退出程序?",
                                               QtWidgets.QMessageBox.Yes | QtWidgets.QMessageBox.No,
                                               QtWidgets.QMessageBox.No)
        if reply == QtWidgets.QMessageBox.Yes:
            event.accept()
        else:
            event.ignore()

if __name__ == '__main__':
    app = QtWidgets.QApplication(sys.argv)
    dialog = Dialog()
    ui = Ui_Dialog()
    ui.setupUi(dialog)
    dialog.show()
    sys.exit(app.exec_())
5 设置关闭按钮
效果展示

代码参考
import sys
from PyQt5 import QtWidgets, QtCore
from PyQt5.QtWidgets import *
from PyQt5.QtCore import *

class gui_view(QWidget):
    def __init__(self):
        super(gui_view, self).__init__()

        self.resize(500, 350)
        self.setWindowFlags(Qt.FramelessWindowHint)  # 去边框
        # # self.setAttribute(Qt.WA_TranslucentBackground)  # 设置窗口背景透明

        button_red = QPushButton(self)
        button_red.move(20, 20)
        button_red.setFixedSize(20, 20)
        button_red.setStyleSheet("QPushButton{\\n"
                                         "    background:#CE0000;\\n"
                                         "    color:white;\\n"
                                         "    box-shadow: 1px 1px 3px;border-radius: 10px;\\n"
                                         "}\\n"
                                         "QPushButton:hover{                    \\n"
                                         "    background:red;\\n"
                                         "}\\n"
                                         "QPushButton:pressed{\\n"
                                         "    border: 1px solid #3C3C3C!important;\\n"
                                         "    background:black;\\n"
                                         "}")
        button_red.clicked.connect(self.quit_button)

        button_orange = QPushButton(self)
        button_orange.move(50, 20)
        button_orange.setFixedSize(20, 20)
        button_orange.setStyleSheet("QPushButton{\\n"
                                 "    background:orange;\\n"
                                 "    color:white;\\n"
                                 "    box-shadow: 1px 1px 3px;border-radius: 10px;\\n"
                                 "}\\n"
                                 "QPushButton:hover{                    \\n"
                                 "    background:yellow;\\n"
                                 "}\\n"
                                 "QPushButton:pressed{\\n"
                                 "    border: 1px solid #3C3C3C!important;\\n"
                                 "    background:black;\\n"
                                 "}")

        button_green = QPushButton(self)
        button_green.move(80, 20)
        button_green.setFixedSize(20, 20)
        button_green.setStyleSheet("QPushButton{\\n"
                                    "    background:green;\\n"
                                    "    color:white;\\n"
                                    "    box-shadow: 1px 1px 3px;border-radius: 10px;\\n"
                                    "}\\n"
                                    "QPushButton:hover{                    \\n"
                                    "    background:#08BF14;\\n"
                                    "}\\n"
                                    "QPushButton:pressed{\\n"
                                    "    border: 1px solid #3C3C3C!important;\\n"
                                    "    background:black;\\n"
                                    "}")

    def quit_button(self):
        quit()

if __name__ == '__main__':
    app2 = QtWidgets.QApplication(sys.argv)
    my = gui_view()
    my.show()
    app2.exec_()
6 设置背景
效果展示

代码参考
import sys
from PyQt5 import QtWidgets, QtCore
from PyQt5.QtWidgets import *
from PyQt5 import QtGui

class gui_view(QWidget):
    def __init__(self):
        super(gui_view, self).__init__()
        self.resize(1200, 750)
        # self.setStyleSheet("background-image: url(:F:/background.jpg);")
        self.setWindowTitle("设置背景图片")
        window_pale = QtGui.QPalette()
        window_pale.setBrush(self.backgroundRole(), QtGui.QBrush(QtGui.QPixmap("F:/background.jpg")))
        self.setPalette(window_pale)

if __name__ == '__main__':
    app2 = QtWidgets.QApplication(sys.argv)
    my = gui_view()
    my.show()
    app2.exec_()
7 下拉列表框设置
效果展示

代码参考
import sys
from PyQt5.QtWidgets import QWidget, QComboBox, QApplication

class ComboxDemo(QWidget):
    def __init__(self):
        super().__init__()

        self.setWindowTitle('下拉列表框')
        self.resize(700, 400)

        # 实例化QComBox对象
        self.cb = QComboBox(self)
        self.cb.move(100, 20)

        # 单个添加条目
        self.cb.addItem('选项1')
        self.cb.addItem('选项2')
        # 多个添加条目
        self.cb.addItems(['选项3', '选项4', '选项5'])

        self.cb.currentIndexChanged[str].connect(self.print_value)

    def print_value(self, value):
        print(value)

if __name__ == '__main__':
    app = QApplication(sys.argv)
    comboxDemo = ComboxDemo()
    comboxDemo.show()
    sys.exit(app.exec_())
8 等待时显示进度条
效果展示

代码参考
from PyQt5.QtWidgets import QMainWindow, QProgressBar, QApplication, QLabel, QStatusBar, QPushButton
import sys

class SampleBar(QMainWindow):
    def __init__(self, parent=None):
        super(SampleBar, self).__init__(parent)
        self.setMinimumSize(400, 100)
        self.statusBar = QStatusBar()
        self.statusBar.setStyleSheet('QStatusBar::item {border: none;}')
        self.setStatusBar(self.statusBar)
        self.progressBar = QProgressBar()
        self.label = QLabel()
        self.label.setText("加载中,请稍后... ")
        self.statusBar.addPermanentWidget(self.label, stretch=2)
        self.statusBar.addPermanentWidget(self.progressBar, stretch=4)
        self.progressBar.setRange(0, 100)
        self.progressBar.setMinimum(0)
        self.progressBar.setMaximum(0)

if __name__ == '__main__':
    app = QApplication(sys.argv)
    main = SampleBar()
    main.show()
    sys.exit(app.exec_())
持续更新中...
以上是关于PyQt5 主题美化的主要内容,如果未能解决你的问题,请参考以下文章