FFmpeg简单使用:视频编码 ---- YUV转H264
Posted huabiaochen
tags:
篇首语:本文由小常识网(cha138.com)小编为大家整理,主要介绍了FFmpeg简单使用:视频编码 ---- YUV转H264相关的知识,希望对你有一定的参考价值。
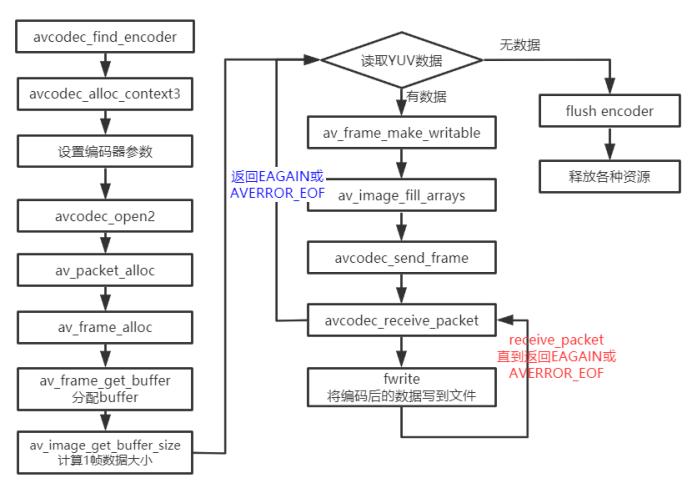
基本流程
从本地读取YUV数据编码为h264格式的数据,然后再存⼊到本地,编码后的数据有带startcode。

与FFmpeg 示例⾳频编码的流程基本⼀致。
函数说明:
avcodec_find_encoder_by_name:根据指定的编码器名称查找注册的编码器。
avcodec_alloc_context3:为AVCodecContext分配内存。
avcodec_open2:打开编解码器。
avcodec_send_frame:将AVFrame⾮压缩数据给编码器。
avcodec_receive_packet:获取到编码后的AVPacket数据。
av_frame_get_buffer: 为⾳频或视频数据分配新的buffer。在调⽤这个函数之前,必须在AVFame上设置好以下属性:format(视频为像素格式,⾳频为样本格式)、nb_samples(样本个数,针对⾳频)、channel_layout(通道类型,针对⾳频)、width/height(宽⾼,针对视频)。
av_frame_make_writable:确保AVFrame是可写的,尽可能避免数据的复制。如果AVFrame不是是可写的,将分配新的buffer和复制数据。
av_image_fill_arrays: 存储⼀帧像素数据存储到AVFrame对应的data buffer。
编码:
/**
* @projectName   08-02-encode_video
* @brief         视频编码,从本地读取YUV数据进行H264编码
* @author        Liao Qingfu
* @date          2020-04-16
*/
#include <stdio.h>
#include <stdlib.h>
#include <string.h>

#include <libavcodec/avcodec.h>
#include <libavutil/time.h>
#include <libavutil/opt.h>
#include <libavutil/imgutils.h>

int64_t get_time()

    return av_gettime_relative() / 1000;  // 换算成毫秒

static int encode(AVCodecContext *enc_ctx, AVFrame *frame, AVPacket *pkt,
                  FILE *outfile)

    int ret;

    /* send the frame to the encoder */
    if (frame)
        printf("Send frame %3"PRId64"\\n", frame->pts);
    /* 通过查阅代码,使用x264进行编码时,具体缓存帧是在x264源码进行,
     * 不会增加avframe对应buffer的reference*/
    ret = avcodec_send_frame(enc_ctx, frame);
    if (ret < 0)

        fprintf(stderr, "Error sending a frame for encoding\\n");
        return -1;


    while (ret >= 0)

        ret = avcodec_receive_packet(enc_ctx, pkt);
        if (ret == AVERROR(EAGAIN) || ret == AVERROR_EOF)
            return 0;
         else if (ret < 0)
            fprintf(stderr, "Error encoding audio frame\\n");
            return -1;


        if(pkt->flags & AV_PKT_FLAG_KEY)
            printf("Write packet flags:%d pts:%3"PRId64" dts:%3"PRId64" (size:%5d)\\n",
               pkt->flags, pkt->pts, pkt->dts, pkt->size);
        if(!pkt->flags)
            printf("Write packet flags:%d pts:%3"PRId64" dts:%3"PRId64" (size:%5d)\\n",
               pkt->flags, pkt->pts, pkt->dts, pkt->size);
        fwrite(pkt->data, 1, pkt->size, outfile);

    return 0;

/**
 * @brief 提取测试文件:ffmpeg -i test_1280x720.flv -t 5 -r 25 -pix_fmt yuv420p yuv420p_1280x720.yuv
 *           参数输入: yuv420p_1280x720.yuv yuv420p_1280x720.h264 libx264
 * @param argc
 * @param argv
 * @return
 */
int main(int argc, char **argv)

    int ret = 0;
    const char *in_yuv_file = "yuv420p_1280x720.yuv";      // 输入YUV文件
    const char *out_h264_file = "yuv420p_1280x720.h264";
    const char *codec_name = "libx264";

    // 1.查找编码器
    const AVCodec *codec = avcodec_find_encoder_by_name(codec_name);
    if (!codec)
        fprintf(stderr, "Codec '%s' not found\\n", codec_name);
        exit(1);


    // 2.分配内存
    AVCodecContext *codec_ctx = avcodec_alloc_context3(codec);
    if (!codec_ctx)
        fprintf(stderr, "Could not allocate video codec context\\n");
        exit(1);


    // 3.设置编码参数
    /* 设置分辨率*/
    codec_ctx->width = 1280;
    codec_ctx->height = 720;
    /* 设置time base */
    codec_ctx->time_base = (AVRational)1, 25;
    codec_ctx->framerate = (AVRational)25, 1;
    /* 设置I帧间隔
     * 如果frame->pict_type设置为AV_PICTURE_TYPE_I, 则忽略gop_size的设置,一直当做I帧进行编码
     */
    codec_ctx->gop_size = 25;   // I帧间隔
    codec_ctx->max_b_frames = 2; // 如果不想包含B帧则设置为0
    codec_ctx->pix_fmt = AV_PIX_FMT_YUV420P;
    //
    if (codec->id == AV_CODEC_ID_H264)
        // 相关的参数可以参考libx264.c的 AVOption options
        ret = av_opt_set(codec_ctx->priv_data, "preset", "medium", 0);
        if(ret != 0)
            printf("av_opt_set preset failed\\n");

        ret = av_opt_set(codec_ctx->priv_data, "profile", "main", 0); // 默认是high
        if(ret != 0)
            printf("av_opt_set profile failed\\n");

        ret = av_opt_set(codec_ctx->priv_data, "tune","zerolatency",0); // 直播是才使用该设置
//        ret = av_opt_set(codec_ctx->priv_data, "tune","film",0); //  画质film
        if(ret != 0)
            printf("av_opt_set tune failed\\n");


    /* 设置bitrate */
    codec_ctx->bit_rate = 3000000;
//    codec_ctx->rc_max_rate = 3000000;
//    codec_ctx->rc_min_rate = 3000000;
//    codec_ctx->rc_buffer_size = 2000000;
//    codec_ctx->thread_count = 4;  // 开了多线程后也会导致帧输出延迟, 需要缓存thread_count帧后再编程。
//    codec_ctx->thread_type = FF_THREAD_FRAME; // 并 设置为FF_THREAD_FRAME

    //对于H264 AV_CODEC_FLAG_GLOBAL_HEADER  设置则只包含I帧,此时sps pps需要从codec_ctx->extradata读取 不设置则每个I帧都带 sps pps sei
    //codec_ctx->flags |= AV_CODEC_FLAG_GLOBAL_HEADER; // 存本地文件时不要去设置

    // 4.将codec_ctx和codec进行绑定
    ret = avcodec_open2(codec_ctx, codec, NULL);
    if (ret < 0)
        fprintf(stderr, "Could not open codec: %s\\n", av_err2str(ret));
        exit(1);

    printf("thread_count: %d, thread_type:%d\\n", codec_ctx->thread_count, codec_ctx->thread_type);

    // 5.打开输入和输出文件
    FILE *infile = fopen(in_yuv_file, "rb");
    if (!infile)
        fprintf(stderr, "Could not open %s\\n", in_yuv_file);
        exit(1);

    FILE *outfile = fopen(out_h264_file, "wb");
    if (!outfile)
        fprintf(stderr, "Could not open %s\\n", out_h264_file);
        exit(1);


    // 6.分配pkt和frame
    AVPacket *pkt = av_packet_alloc();
    if (!pkt)
        fprintf(stderr, "Could not allocate video frame\\n");
        exit(1);

    AVFrame *frame = av_frame_alloc();
    if (!frame)
        fprintf(stderr, "Could not allocate video frame\\n");
        exit(1);


    // 7.为frame分配buffer
    frame->format = codec_ctx->pix_fmt;
    frame->width  = codec_ctx->width;
    frame->height = codec_ctx->height;
    ret = av_frame_get_buffer(frame, 0);
    if (ret < 0)
        fprintf(stderr, "Could not allocate the video frame data\\n");
        exit(1);

    // 计算出每一帧的数据 像素格式 * 宽 * 高
    // 1382400
    int frame_bytes = av_image_get_buffer_size(frame->format, frame->width,
                                               frame->height, 1);
    printf("frame_bytes %d\\n", frame_bytes);
    uint8_t *yuv_buf = (uint8_t *)malloc(frame_bytes);
    if(!yuv_buf)
        printf("yuv_buf malloc failed\\n");
        return 1;

    int64_t begin_time = get_time();
    int64_t end_time = begin_time;
    int64_t all_begin_time = get_time();
    int64_t all_end_time = all_begin_time;
    int64_t pts = 0;

    // 8.循环读取数据
    printf("start enode\\n");
    for (;;)
        memset(yuv_buf, 0, frame_bytes);
        size_t read_bytes = fread(yuv_buf, 1, frame_bytes, infile);
        if(read_bytes <= 0)
            printf("read file finish\\n");
            break;

        /* 确保该frame可写, 如果编码器内部保持了内存参考计数,则需要重新拷贝一个备份
            目的是新写入的数据和编码器保存的数据不能产生冲突
        */
        int frame_is_writable = 1;
        if(av_frame_is_writable(frame) == 0)  // 这里只是用来测试
            printf("the frame can't write, buf:%p\\n", frame->buf[0]);
            if(frame->buf && frame->buf[0])        // 打印referenc-counted,必须保证传入的是有效指针
                printf("ref_count1(frame) = %d\\n", av_buffer_get_ref_count(frame->buf[0]));
            frame_is_writable = 0;

        ret = av_frame_make_writable(frame);
        if(frame_is_writable == 0)   // 这里只是用来测试
            printf("av_frame_make_writable, buf:%p\\n", frame->buf[0]);
            if(frame->buf && frame->buf[0])        // 打印referenc-counted,必须保证传入的是有效指针
                printf("ref_count2(frame) = %d\\n", av_buffer_get_ref_count(frame->buf[0]));

        if(ret != 0)
            printf("av_frame_make_writable failed, ret = %d\\n", ret);
            break;

        int need_size = av_image_fill_arrays(frame->data, frame->linesize, yuv_buf,
                                             frame->format,
                                             frame->width, frame->height, 1);
        if(need_size != frame_bytes)
            printf("av_image_fill_arrays failed, need_size:%d, frame_bytes:%d\\n",
                   need_size, frame_bytes);
            break;

         pts += 40;
        // 设置pts
        frame->pts = pts;       // 使用采样率作为pts的单位,具体换算成秒 pts*1/采样率
        begin_time = get_time();
        ret = encode(codec_ctx, frame, pkt, outfile);
        end_time = get_time();
        printf("encode time:%lldms\\n", end_time - begin_time);
        if(ret < 0)
            printf("encode failed\\n");
            break;


    // 9.冲刷编码器
    encode(codec_ctx, NULL, pkt, outfile);
    all_end_time = get_time();
    printf("all encode time:%lldms\\n", all_end_time - all_begin_time);

    // 10.结束
    fclose(infile);
    fclose(outfile);

    // 释放内存
    if(yuv_buf)
        free(yuv_buf);


    av_frame_free(&frame);
    av_packet_free(&pkt);
    avcodec_free_context(&codec_ctx);

    printf("main finish, please enter Enter and exit\\n");
    getchar();
    return 0;
preset设置
  预设是⼀系列参数的集合,这个集合能够在编码速度和压缩率之间做出⼀个权衡。⼀个编码速度稍慢的预设会提供更⾼的压缩效率(压缩效率是以⽂件⼤⼩来衡量的)。
这就是说,假如你想得到⼀个指定⼤⼩的⽂件或者采⽤恒定⽐特率编码模式,你可以采⽤⼀个较慢的预设来获得更好的质量。同样的,对于恒定质量编码模式,你可以
通过选择⼀个较慢的预设轻松地节省⽐特率。如果你很有耐⼼,通常的建议是使⽤最慢的预设。⽬前所有的预设按照编码速度降序排列为:
常用设置:
- ultrafast
- superfast
- veryfast
- faster
- fast
- medium – default preset
- slow
- slower
- veryslow
设置为ultrafa

设置为slower,明显编码时间慢了很多,码率会低一点

tune设置
tune是x264中重要性仅次于preset的选项,它是视觉优化的参数,tune可以理解为视频偏好(或者视频类型),tune不是⼀个单⼀的参数,⽽是由⼀组参数构成-tune来改变参数设置。当前的 tune包括:
film:电影类型,对视频的质量⾮常严格时使⽤该选项
animation:动画⽚,压缩的视频是动画⽚时使⽤该选项
grain:颗粒物很重,该选项适⽤于颗粒感很重的视频
stillimage:静态图像,该选项主要⽤于静⽌画⾯⽐较多的视频
psnr:提⾼psnr,该选项编码出来的视频psnr⽐较⾼
02 使用FFmpeg库, YUV420转H264编码
演示环境:CentOS 7
FFmpeg的H264编码,需要x264库支持
[[email protected] ~]# wget ftp://ftp.videolan.org/pub/x264/snapshots/last_x264.tar.bz2
[[email protected] ~]# tar xf last_x264.tar.bz2
[[email protected] ~]# cd x264-snapshot-20171020-2245/
[[email protected] x264-snapshot-20171020-2245]# ./configure --prefix=/home/x264_dev --enable-shared --enable-static --disable-asm
[[email protected] x264-snapshot-20171020-2245]# make && make install
[[email protected] x264-snapshot-20171020-2245]# echo ‘/home/x264_dev/lib/‘ >> /etc/ld.so.conf && ldconfig -v #添加x264库到系统路路径
编译安装FFmpeg:
[[email protected] ~]# wget http://ffmpeg.org/releases/ffmpeg-3.4.tar.bz2
[[email protected] ~]# tar xf ffmpeg-3.4.tar.bz2
[[email protected] ~]# cd ffmpeg-3.4
[[email protected] ffmpeg-3.4]# export PKG_CONFIG_PATH=/home/x264_dev/lib/pkgconfig/:$PKG_CONFIG_PATH #根据PKG_CONFIG_PATH的值寻找x264库路径
[[email protected] ffmpeg-3.4]# ./configure --prefix=/home/ffmpeg_dev --enable-shared           --enable-static           --disable-optimizations   --disable-x86asm          --enable-libx264          --enable-gpl              --disable-cuvid           --disable-cuda

[[email protected] ffmpeg-3.4]# make && make install
[[email protected] ffmpeg-3.4]# echo ‘/home/ffmpeg_dev/lib/‘ >> /etc/ld.so.conf && ldconfig -v #添加FFmpeg的库到系统路路径
#说明:若需使用x264需要 安装x264库:--enable-libx264 --enable-gpl
#      关闭GPU视频硬件加速的库:    --disable-cuda   --disable-cuvid
#      生成静态库与动态库           --enable-shared  --enable-static
下载测试视频,截取一段转为yuv格式(从第5秒,截取20秒)
[[email protected] ~]# cd /home/
[[email protected] home]# wget http://sh.yinyuetai.com/uploads/videos/common/0E3E014EBF3448D901AF3519C4A1D4E0.mp4
[[email protected] home]# /home/ffmpeg_dev/bin/ffmpeg -ss 5 -t 20 -i 0E3E014EBF3448D901AF3519C4A1D4E0.mp4  -s 1280x720 -pix_fmt yuv420p 1280x720_yuv420p.yuv
[[email protected] home]# /home/ffmpeg_dev/bin/ffmpeg -ss 5 -t 20 -i 0E3E014EBF3448D901AF3519C4A1D4E0.mp4  -s 1280x720 -pix_fmt yuv422p 1280x720_yuv422p.yuv
FFmpeg 常见的结构体
YUV420转h264源程序:
[[email protected] ffmpeg_dev]# cat main.c
#include <stdio.h>
#include <stdlib.h>

#include "libavutil/imgutils.h"
#include "libavutil/samplefmt.h"
#include "libavutil/opt.h"
#include "libavformat/avformat.h"

const char *inputFileName = NULL;
const char *outputFileName = NULL;
int frameWidth = 0;
int frameHeight = 0;
int bitRate = 0;
int frameTotal = 0;
FILE *pFileInput = NULL;
FILE *pFileOutput = NULL;

AVCodec *codec = NULL;
AVCodecContext *codecCtx = NULL;
AVFrame *frame = NULL;
AVPacket pkt;

static int parse_input_paramaters(int argc, char **argv)
{
    inputFileName = argv[1];
    outputFileName = argv[2];

    pFileInput = fopen(inputFileName, "rb");
    if(NULL == pFileInput)
    {
        printf("open file ERR: [%s] \n", inputFileName);
        return -1;
    }

    pFileOutput = fopen(outputFileName, "wb+");
    if(NULL == pFileInput)
    {
        printf("open file ERR: [%s] \n", outputFileName);
        return -1;
    }

    frameWidth = atoi(argv[3]);
    frameHeight = atoi(argv[4]);
    bitRate = atoi(argv[5]);
    frameTotal = atoi(argv[6]);
    return 0;
}

static int read_yuv_data(int color)
{
    //color = 0 -> Y
    //color = 1 -> U
    //color = 2 -> V
    int color_height = color == 0 ? frameHeight : frameHeight / 2;
    int color_width  = color == 0 ? frameWidth  : frameWidth  / 2;
    int color_size = color_height * color_width;
    int color_stride = frame->linesize[color];

    if(color_width == color_stride)
    {
        //printf("color_width == color_stride,color=[%d],color_stride=[%d] \n", color, color_stride);
        fread(frame->data[color], color_size, 1, pFileInput);
    }
    //else
    //{
    //    printf("color_width != color_stride,color=[%d] \n", color);
    //    int i;
    //    for(i = 0; i < color_height; i++)
    //    {
    //        fread(frame->data[color] + i * color_stride, color_width, 1, pFileInput);
    //    }
    //}
    return color_size;
}


int main(int argc, char **argv)
{
    if(parse_input_paramaters(argc, argv) == 0)
    {
        printf("inputFile:%s \n", inputFileName);
        printf("outputFile:%s \n", outputFileName);
        printf("Frame resolution::[%d*%d] \n", frameWidth, frameHeight);
        printf("freamToEncode=%d\n", frameTotal);
        printf("rate:%d \n", bitRate);
    }
    else
    {
        printf("init ERROR\n");
        return -1;
    }


    avcodec_register_all();//注册编解码组件
    codec = avcodec_find_encoder(AV_CODEC_ID_H264);//查找编解码器
    if(NULL == codec)
    {
        printf("find AV_CODEC_ID_H264 fail! \n");
        return -1;
    }

    //分配AVCodecContex实例
    codecCtx = avcodec_alloc_context3(codec);
    if(NULL == codecCtx)
    {
        printf("avcodec_alloc_context3  ERROR\n");
        return -1;
    }

    //设置编解码器的参数
    codecCtx->width = frameWidth;//帧高
    codecCtx->height = frameHeight;
    codecCtx->bit_rate = bitRate;//比特率
    AVRational r = {1, 25};//设置帧率
    codecCtx->time_base = r;//设置帧率
    codecCtx->gop_size =12;
    codecCtx->max_b_frames = 1;
    codecCtx->pix_fmt = AV_PIX_FMT_YUV420P;
    av_opt_set(codecCtx->priv_data, "preset", "slow", 0);

    //打开编码器
    if(avcodec_open2(codecCtx, codec, NULL) < 0)
    {
        printf("avcodec_open2 ERR\n");
    }

    frame = av_frame_alloc();
    if(NULL == frame)
    {
        printf("av_frame_alloc err \n");
        return -1;
    }

    //分配AVframe及像素存储空间
    frame->width = codecCtx->width;
    frame->height = codecCtx->height;
    frame->format = codecCtx->pix_fmt;
    if(av_image_alloc(frame->data, frame->linesize, frame->width, frame->height, frame->format, 32) < 0)//32 表示对齐
    {
        printf("ERROR av_image_alloc\n");
    }

    int i;
    for(i = 0; i < frameTotal; i++)
    {
        av_init_packet(&pkt);
        pkt.data = NULL;
        pkt.size = 0;

        read_yuv_data(0);
        read_yuv_data(1);
        read_yuv_data(2);
        frame->pts = i;

        int got_packet;
        //int avcodec_encode_video2(AVCodecContext *avctx, AVPacket *avpkt, const AVFrame *frame, int *got_packet_ptr);
        if(avcodec_encode_video2(codecCtx, &pkt, (const AVFrame *)frame, &got_packet) < 0)
        {
            printf("avcodec_encodec_video2 ERR \n");
            return -1;
        }
        if(got_packet)
        {
            printf("Write packet of frame [%d], size=[%d] \n", i, pkt.size);
            //size_t fwrite(const void *ptr, size_t size, size_t nmemb, FILE *stream);
            fwrite(pkt.data, 1, pkt.size, pFileOutput);
            av_packet_unref(&pkt);
        }


    }

    int got_packet = 1;
    while(got_packet)
    {
        if(avcodec_encode_video2(codecCtx, &pkt, NULL, &got_packet) < 0)
        {
            printf("avcodec_encodec_video2 ERR \n");
            return -1;
        }
        if(got_packet)
        {
            printf("Write cache packet of frame [%d], size=[%d] \n", i, pkt.size);
            fwrite(pkt.data, 1, pkt.size, pFileOutput);
            av_packet_unref(&pkt);
        }
    }


    fclose(pFileInput);
    fclose(pFileOutput);
    avcodec_close(codecCtx);
    av_free(codecCtx);
    av_freep(&frame->data[0]);
    av_frame_free(&frame);

    return 0;
}

[[email protected] ffmpeg_dev]#
makefile文件
[[email protected] ffmpeg_dev]# cat makefile
FLAGS = -Wall -g
INCLUDEPATH = -I /home/ffmpeg_dev/include/
LIBPATH = -L  /home/ffmpeg_dev/lib/
LIBS= -l avcodec          -l pthread          -l avutil           -l m                -l dl               -l swresample
exe=yuv2h264

$(exe):
	gcc main.c  ${FLAGS}  ${INCLUDEPATH} ${LIBPATH} ${LIBS} -o [email protected]

clean:
	rm -rf ${exe}

[[email protected] ffmpeg_dev]#
编译并运行,将YUV420文件转为H264
[[email protected] ffmpeg_dev]# cat auto.sh
make clean
make
#提示  : Potplayer可以直接播放H264文件
#程序名:  YUV420P文件名, H264输出文件名, YUV的宽与高, 压缩比特率, 需要编码多少帧(不要大于YUV文件的帧数)
./yuv2h264 1280x720_420P.yuv  1280x720.h264 1280 720 819200 250

[[email protected] ffmpeg_dev]#
播放器打开H264文件:
本文出自 “李春利” 博客,请务必保留此出处http://990487026.blog.51cto.com/10133282/1974942
以上是关于FFmpeg简单使用:视频编码 ---- YUV转H264的主要内容,如果未能解决你的问题,请参考以下文章

