android Framework 探究android 13 aosp 全记录 - 编译
Posted lucky_tom
tags:
篇首语:本文由小常识网(cha138.com)小编为大家整理,主要介绍了android Framework 探究android 13 aosp 全记录 - 编译相关的知识,希望对你有一定的参考价值。
写在开始
自从关注Framework这一块儿,就有了自己编译aosp刷机的想法,模拟器当然是可以的,但是体验感还不能和真机想比,于是买一个二手piexl的想法就有了,根据预算选定piexl 5,支持最新的android 13,二手平台挑挑拣拣时间拉的有点长,不如中间就开始先编译好。
过程记录
断断续续利用下班和周末时间,终于编译成功了,下一步就等Piexl 5 到手刷机,今天把整个过程复盘一下,也记录下中间出现的错误和解决方式,方便以后查阅。
一,硬件环境
官网-要求 350G以上硬盘空间 + 16GB以上内存
我的
主机 -> Ubuntu 18.04.6 LTS (自己一直在用着)
内存 -> 16GB (thinkpad t440p ,又在网上买了两根8GB替换了之前的两根4GB)
硬盘 -> 350GB (凑这个删了不少东西)
强烈建议你提前把硬件升级,能省去不必要的麻烦,我原来8GB的内存,只要编译就能死机。
二,软件环境
请根据你的Host主机,查询官网来安装所需的工具。
建立一个Linux构建环境
sudo apt-get install git-core gnupg flex bison build-essential zip curl zlib1g-dev gcc-multilib g++-multilib libc6-dev-i386 libncurses5 lib32ncurses5-dev x11proto-core-dev libx11-dev lib32z1-dev libgl1-mesa-dev libxml2-utils xsltproc unzip fontconfig
三,安装repo
1,mkdir ~/.bin
2,curl https://storage.googleapis.com/git-repo-downloads/repo > ~/.bin/repo
3,chmod a+x ~/.bin/repo
4,sudo vim /etc/profile
添加下面两行
export PATH=~/.bin:$PATH
export REPO_URL=https://mirrors.tuna.tsinghua.edu.cn/git/git-repo/
5,source /etc/profile
四,配置Git用户
wu@wu-pc:~/.bin$ git config --global user.email "your email@qq.com"
wu@wu-pc:~/.bin$ git config --global user.name "your name"
五,查看下要下载的分支
git clone https://aosp.tuna.tsinghua.edu.cn/platform/manifest
cd manifest/
git branch -a
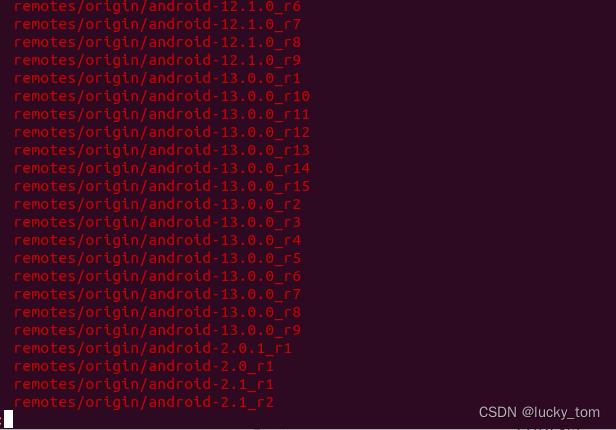
查阅下官网,看看piexl 5支持的最新版本
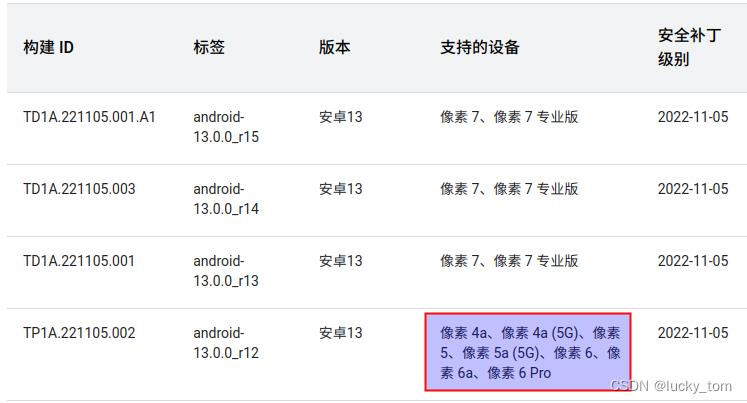
我们就下载最新的android-13.0.0_r12分支好了。
六,下载源代码
1,repo 初始化
repo init -u https://aosp.tuna.tsinghua.edu.cn/platform/manifest -b android-13.0.0_r12
2,下载源码
repo sync -j32
3,下载驱动
找到piexl 5对应的驱动文件
官网
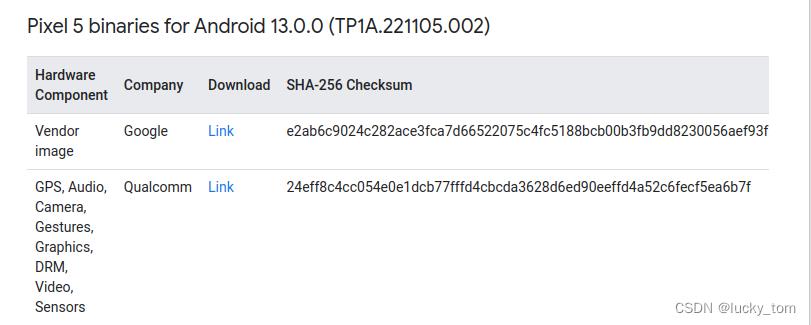 下载成功后,解压到aosp源码根目录。
tar -xvzf qcom-redfin-tp1a.221005.002-e7e20f49.tgz -C ~/GitProjects/aosp/
tar -xvzf google_devices-redfin-tp1a.221005.002-3daf7ea0.tgz  -C ~/GitProjects/aosp/
解压完成后,分别运行一下解压出的脚本。
./extract-qcom-redfin.sh
./extract-google_devices-redfin.sh
执行完,一直enter,大概在8-e处(一不小心就按过了),手动输入” I ACCEPT “ 同意条款。
七,编译
进入源码根目录:分别执行
1,source build/envsetup.sh
2,lunch
piex 5(redfin) 对应的版本:28. aosp_redfin-userdebug
Which would you like? [aosp_arm-eng]
Pick from common choices above (e.g. 13) or specify your own (e.g. aosp_barbet-eng):
填28 ,按enter。
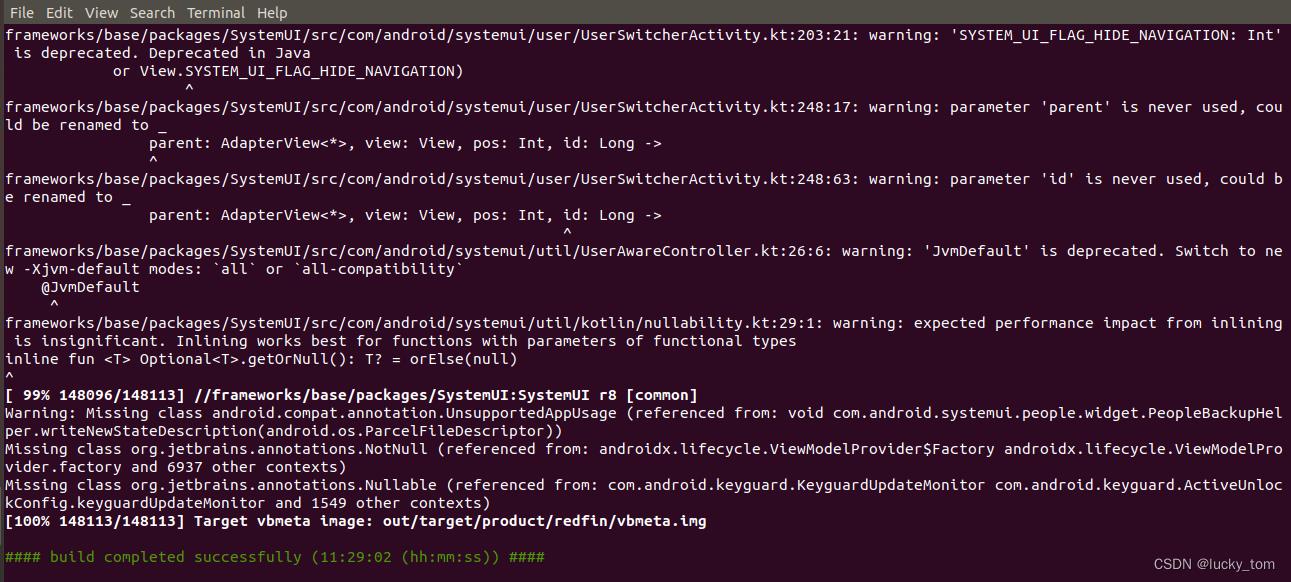
3,make
加不加-j参数,根据CPU性能决定,我的机器太老了,就没加,耗时11个半小时,最后艰难的成功了。
遇到的问题
1,下载源码报 “HTTP 503”
platform/external/glide:
fatal: unable to access ‘https://aosp.tuna.tsinghua.edu.cn/platform/external/glide/’: The requested URL returned error: 503
platform/external/glide: sleeping 4.0 seconds before retrying
error: RPC failed; HTTP 503 curl 22 The requested URL returned error: 503 Service Temporarily Unavailable
fatal: The remote end hung up unexpectedly
解决方法:repo脚本里面替换REPO_URL
 # REPO_URL = 'https://gerrit.googlesource.com/git-repo'
 REPO_URL = 'https://gerrit-google.tuna.tsinghua.edu.cn/git-repo'
2,下载源码报 “Downloading network changes failed”
error: Unable to fully sync the tree.
error: Downloading network changes failed.
Try re-running with “-j1 --fail-fast” to exit at the first error.
解决方法:晚上下,晚上下,晚上下… ,白天就是容易各种网络问题。
3,编译报错 “analyzing Android.bp files and generating ninja file at out/soong”
[ 98% 392/397] analyzing Android.bp files and generating ninja file at out/soong
FAILED: out/soong/build.ninja
cd “KaTeX parse error: Expected 'EOF', got '&' at position 49: …soong_build")" &̲& BUILDER="PWD/KaTeX parse error: Expected 'EOF', got '&' at position 50: …soong_build")" &̲& cd / && env -…BUILDER” --top “$TOP” --soong_out “out/soong” --out “out” -o out/soong/build.ninja --globListDir build --globFile out/soong/globs-build.ninja -t -l out/.module_paths/Android.bp.list --available_env out/soong/soong.environment.available --used_env out/soong/soong.environment.used.build Android.bp
Killed
00:31:16 soong bootstrap failed with: exit status 1
解决方法:1,保证16GB以上内存,加大Swap空间(我增加到了16G)(参考1,参考2)
探究Entity Framework如何在多个仓储层实例之间实现工作单元的实现及原理
前言
1、本文的前提条件:EF上下文是线程唯一,EF版本6.1.3。
2、网上已有相关API的详细介绍,本文更多的是作为我自己的个人学习研究记录。
3、2018-05-31修改DbSession.cs部分严重错误代码!
4、2019-08-16 修改DbContextFactory.cs部分严重错误代码!
疑问
用反编译工具翻开DbContext类可以看到EF本身就是一个实现了工作单元的仓储层,每运行一次DbContext.SaveChanges()便提交一次工作单元,那么本文要探究的问题来了:
- 如何在service层调用多个repository实例时实现工作单元?
- 上述方法的正确性及原理是什么?

service层的工作单元实现
public class UsersService
{
    private BaseRepository<User> userRepositroy = new BaseRepository<User>();
    private BaseRepository<Log> logRepositroy = new BaseRepository<Log>();

    public UsersService()
    {
    }

    public void DoSomething()
    {
        userRepositroy.Insert(new User());
        logRepositroy.Insert(new Log());
    }
}

public class BaseRepository<T> where T : class, new()
{
    public DbContextBase DbContext { get; private set; }

    private readonly DbSet<T> dbSet;

    public BaseRepository()
    {
        DbContext = DbContextFactory.GetDbContext();
        dbSet = DbContext.Set<T>();
     }

     public bool Insert(T entity)
     {
        dbSet.Add(entity);
        int result = DbContext.SaveChanges();
        return result > 0;
    }
}
在开发当中,我们会遇到上面代码这样的情况:在service层中调用多个repository实例的Insert操作时无法作为同一个工作单元提交。本文要介绍的方法是使用EF自带的开启事务方法 DbContext.Database.BeginTransaction() 。话不多说,贴解决方案代码。
DbContextFactory.cs放在repository层,GetDbContext()用于获取线程唯一的EF上下文。我是用HttpContext.Current.Items[]实现EF上下文的线程唯一,大家也使用IOC容器。(2019-08-16 新增Dispose()方法)
public class DbContextFactory
    {
        public static DbContextBase GetDbContext()
        {
            DbContextBase dbContext = HttpContext.Current.Items["dbContext"] as DbContextBase;
            if (dbContext == null)
            {
                dbContext = new DbContextBase();
                HttpContext.Current.Items["dbContext"] = dbContext;
            }
            return dbContext;
        }

        /// <summary>
        /// 2019-08-16 新增此方法,在Globa.asax中的Application_EndRequest方法中调用此方法,释放EF上下文
        /// 即在请求处理结束时,需要手动释放EF实例,否则会造成内存泄漏
        /// </summary>
        public static void Dispose()
        {
            DbContextBase dbContext = HttpContext.Current.Items["dbContext"] as DbContextBase;
            if (dbContext != null)
            {
                dbContext.Dispose();
            }
        }
    }
DbSession.cs同DbContextFactory.cs放在一起,用于向service层提供EF事务的开启、提交功能。(2018-05-31修改了DbSession.cs文件,我之前把transaction.Dispose方法单独拿出来是错误的无法释放事务的,现在改为放入CommitTransaction方法中)
  public class DbSession
    {
     public static void BeginTransaction(IsolationLevel iolationLevel = IsolationLevel.Unspecified)
        {
            DbContextBase dbContext = DbContextFactory.GetDbContext();
            DbContextTransaction transaction = dbContext.Database.CurrentTransaction;
            if (transaction == null)
            {
                dbContext.Database.BeginTransaction(iolationLevel);
            }
        }

        public static void CommitTransaction()
        {
            DbContextTransaction transaction = DbContextFactory.GetDbContext().Database.CurrentTransaction;
            if (transaction != null)
            {
                try
                {
                    transaction.Commit();
                }
                catch (Exception)
                {
                    transaction.Rollback();
                    throw;
                }
                finally
                {
                    transaction.Dispose();
                }
            }
        }
    }
使用示例。
    public class UsersService
    {
        private BaseRepository<User> userRepositroy = new BaseRepository<User>();
        private BaseRepository<Log> logRepositroy = new BaseRepository<Log>();

        public UsersService(){}
        public void DoSomething()
        {
            try
            {
                DbSession.BeginTransaction();
                userRepositroy.Insert(new User());
                logRepositroy.Insert(new Log());
                DbSession.CommitTransaction();
            }
            catch (Exception ex)
            {

            }
        }
    }
方法的正确性及原理
在service层主动调用 DbContext.Database.BeginTransaction(),这个方法会对EF上下文连接开启一个事务。OK,那么问题又来了,SaveChanges()本身也是事务的,BeginTransaction()又开启的事务,那不就形成嵌套事务了?接下来,让我们探讨一下这个问题。
首先,通过反编译工具一层层追踪DbContext.SaveChanges()方法,追踪到ObjectContext.cs是下面这样的。下面这几个方法是依次执行的,不过代码放在页面上不好阅读,嫌麻烦的话可以直接看我接下来对最后一个方法的分析。
public virtual int SaveChanges()
{
  return this.SaveChanges(SaveOptions.AcceptAllChangesAfterSave | SaveOptions.DetectChangesBeforeSave);
}

public virtual int SaveChanges(SaveOptions options)
{
  return this.SaveChangesInternal(options, false);
}

internal int SaveChangesInternal(SaveOptions options, bool executeInExistingTransaction)
{
  this.AsyncMonitor.EnsureNotEntered();
  this.PrepareToSaveChanges(options);
  int num = 0;
  if (this.ObjectStateManager.HasChanges())
  {
    if (executeInExistingTransaction)
       {
      num = this.SaveChangesToStore(options, (IDbExecutionStrategy) null, false);
       }
       else
       {
      IDbExecutionStrategy executionStrategy = DbProviderServices.GetExecutionStrategy(this.Connection, this.MetadataWorkspace);
      num = executionStrategy.Execute<int>((Func<int>) (() => this.SaveChangesToStore(options, executionStrategy, true)));
        }
  }
  return num;
}

private int SaveChangesToStore(SaveOptions options, IDbExecutionStrategy executionStrategy, bool startLocalTransaction)
{
  this._adapter.AcceptChangesDuringUpdate = false;
  this._adapter.Connection = this.Connection;
  this._adapter.CommandTimeout = this.CommandTimeout;
  int num = this.ExecuteInTransaction<int>((Func<int>) (() => this._adapter.Update()), executionStrategy, startLocalTransaction, true);
  if ((SaveOptions.AcceptAllChangesAfterSave & options) != SaveOptions.None)
  {
    try
       {
      this.AcceptAllChanges();
       }
    catch (Exception ex)
    {
      throw new InvalidOperationException(Strings.ObjectContext_AcceptAllChangesFailure((object) ex.Message), ex);
    }
  }
  return num;
}

internal virtual T ExecuteInTransaction<T>(Func<T> func, IDbExecutionStrategy executionStrategy, bool startLocalTransaction, bool releaseConnectionOnSuccess)
{
  this.EnsureConnection(startLocalTransaction);
  bool flag = false;
  EntityConnection connection = (EntityConnection) this.Connection;
  if (connection.CurrentTransaction == null && !connection.EnlistedInUserTransaction && this._lastTransaction == (Transaction) null)
    flag = startLocalTransaction;
  else if (executionStrategy != null && executionStrategy.RetriesOnFailure)
    throw new InvalidOperationException(Strings.ExecutionStrategy_ExistingTransaction((object) executionStrategy.GetType().Name));
  DbTransaction dbTransaction = (DbTransaction) null;
  try
  {
    if (flag)
      dbTransaction = (DbTransaction) connection.BeginTransaction();
    T obj = func();
    if (dbTransaction != null)
      dbTransaction.Commit();
    if (releaseConnectionOnSuccess)
      this.ReleaseConnection();
    return obj;
  }
  catch (Exception ex)
  {
    this.ReleaseConnection();
    throw;
  }
  finally
  {
    if (dbTransaction != null)
      dbTransaction.Dispose();
  }
}
由上向下解读,运行到最后一个方法 ExecuteInTransaction<T>() 时 startLocalTransaction 参数总是为 true,那么这个方法的简要流程解读如下:
- 确保上下文连接Connection处于 opened 状态;
- flag 值设为 false;
- connection.CurrentTransaction 等于 null,那么 flag值 设为 true,开启新事务,执行委托,提交事务,关闭连接,释放事务;
- connection.CurrentTransaction 不等于 null,那么 flag值 仍保持为 false,不开启事务,执行委托,不提交事务,不关闭连接,不释放事务
接着,摸清上方代码中的 ObjectContext.connection.CurrentTransaction 与 DbContext.Database.CurrentTransaction 的关系,我们就解决刚才的问题了:“是不是嵌套事务?”。通过反编译查看 DbContext.Database 的代码图下图所示(其实,github有EF的源码可以下载)。是不是发现它们其实就是同一个家伙,后者其实就是披了件马甲!

最后,到这里可以清楚的得到这么个结论:当我们直接调用DbContext.SaveChanges()时,EF会在底层为我们开启事务并提交;而当我们手动使用 DbContext.Database.BeginTransaction() 开启事务时,EF则会在我们手动提交事务前合并所有的SaveChanges()操作。
另外大家需要注意一下,上面ExecuteInTransaction<T>() 流程4中的“不关闭连接”问题。之所以不会关闭,是因为数据库连接是由我们手动 BeginTransaction() 时打开的。这就需要开发人员在提交事务后及时释放掉事务,以关闭数据库连接。即在调用 DbContext.Database.CurrentTransaction.Commit() 后,一定要 Dispose() 一下!!
实验截图
下面的代码后和对应在数据库中的事务日志,证实了两个Insert操作确实是在同一个事务里的。

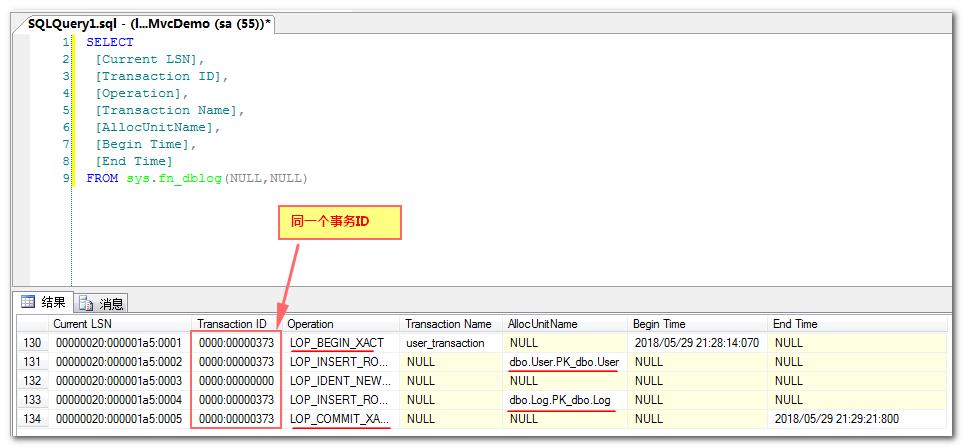
参考引用
EF上下文对象线程内唯一性与优化 :https://blog.csdn.net/qq_29227939/article/details/51713422
了解Entity Framework中事务处理: https://www.cnblogs.com/from1991/p/5423120.html
如何读懂SQL Server的事务日志: https://www.cnblogs.com/Cookies-Tang/p/3750562.html
以上是关于android Framework 探究android 13 aosp 全记录 - 编译的主要内容,如果未能解决你的问题,请参考以下文章
Android Framework实战预制packages/apps下应用源码预制使用Android.bp方式
Android Framework实战预制packages/apps下应用源码预制使用Android.bp方式
Android Framework实战预制packages/apps下应用源码预制使用Android.bp方式
Android Framework实战预制packages/apps下应用源码预制使用Android.bp方式