Unity | 实现面部驱动的两种方式
Posted 烫青菜
tags:
篇首语:本文由小常识网(cha138.com)小编为大家整理,主要介绍了Unity | 实现面部驱动的两种方式相关的知识,希望对你有一定的参考价值。
目录
一、运用unity Live Capture插件与iphone Unity Face Capture软件
(2)创建一个空物体(命名:Recorder),添加Take Recorder组件。
(3)将模型拖入场景,并添加ARKit Face Actor组件,将该模型制作成Prefab。
(4)设置模型ARKit Face Actor组件中的mapper。
(5)设置New FaceDevice的ARKit Face Device组件的Actor值。
3. iphone下载Unity Face Capture软件
一、运用unity Live Capture插件与iphone Unity Face Capture软件
1. 版本要求
- unity版本:Unity Editor 2020.3.16f1 or later version
- iphone版本:ios 14.6 or higher
- 参考文档:About Live Capture | Live Capture | 1.0.1 (unity3d.com)
2. unity中操作:
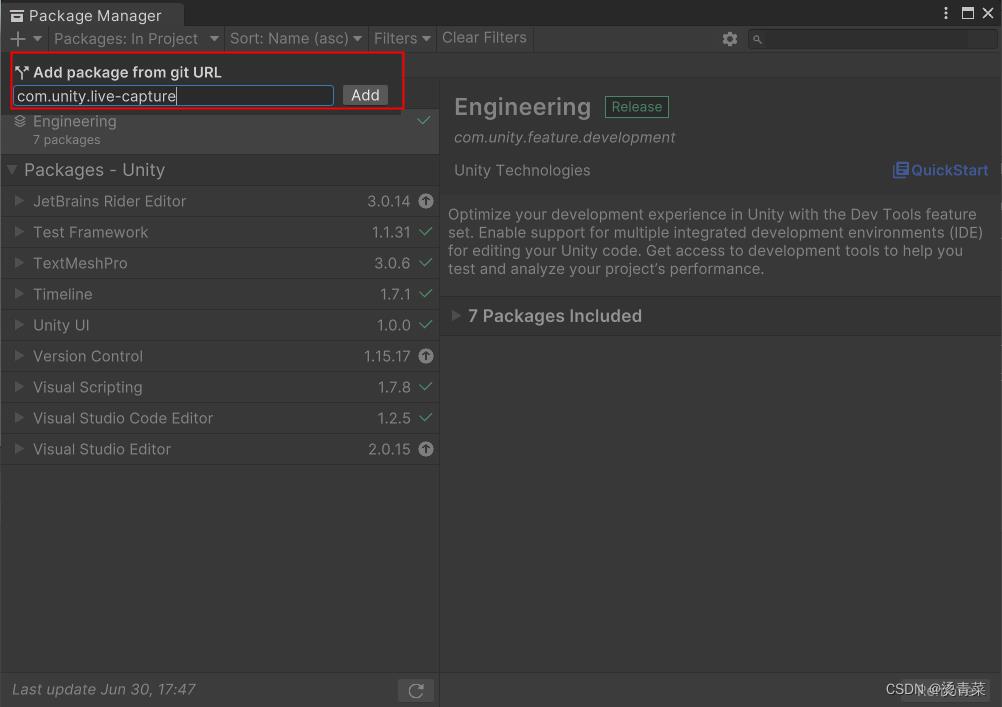
(1)引入Live Capture Package
Live Capture在Package Manager中通过git url的方式进行添加:
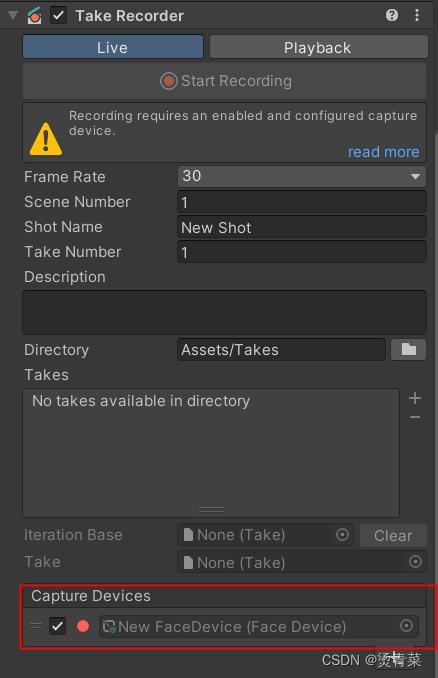
(2)创建一个空物体(命名:Recorder),添加Take Recorder组件。
在该组件下添加ARKit Face Device:此时会在Recorder物体下自动创建New FaceDevice,该物体上有个ARKit Face Device组件。
(3)将模型拖入场景,并添加ARKit Face Actor组件,将该模型制作成Prefab。
注意模型导入Unity时要勾选Import BlendShapes(检查一下即可,unity默认勾选)。
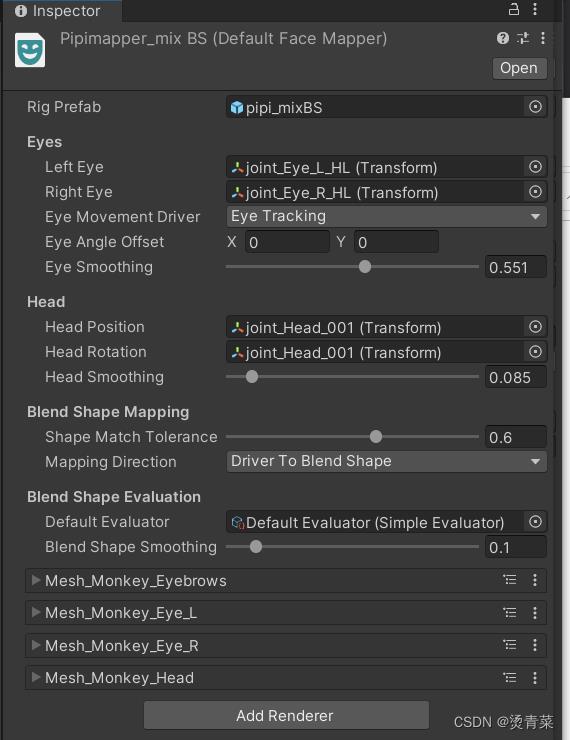
在Project中创建一个mapper(右键/Create/Live Capture / ARKit Face Capture / Mapper),设置mapper相关属性(RigPrefab指定为上一步生成的prefab,LeftEye、RightEye、Head要选择对应的关节。这一步目的是映射BlendShape,如果我们的模型BlendShape名称符合苹果的ARKit要求,则AddRender操作会自动映射,否则需要我们手动设置)。
(4)设置模型ARKit Face Actor组件中的mapper。
(5)设置New FaceDevice的ARKit Face Device组件的Actor值。
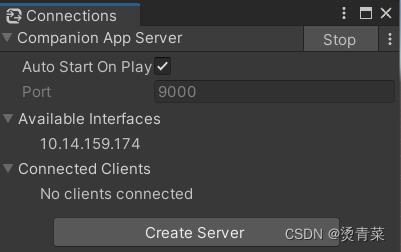
(6)创建服务器。
点击Window/Live Capture/Connections,点击Configure FireWall。点击Create Server/Companion App Server,点击Start开启服务。
3. iphone下载Unity Face Capture软件
打开软件(该软件在iphone 12 Pro Max 15.4.1上亲测稳定,在iphone X上会发热闪退),输入IP及Port,连接之后就可以驱动了~(如果连不上,可能unity版本不符合或者网络不符合,可参考官方文档:About Live Capture | Live Capture | 1.0.1 (unity3d.com))
二、通过算法数据来控制BlendShape数值。
1.相关函数
- 获取BlendShape数量及对应名称。
public sealed class Mesh : Object

    public int blendShapeCount  get;
    public string GetBlendShapeName(int shapeIndex);
- 设置BlendShape权重
public class SkinnedMeshRenderer : Renderer
    public void SetBlendShapeWeight(int index, float value);
2.实现
可能算法提供的数据值范围为0-1,所以在SetBlendShapeWeight时要*100。
Dictionary<string, int> bs_map;//模型上的bs名称-索引
skinnedMeshRenderer.SetBlendShapeWeight(bs_map["eyebrow_BS.Eyebrows_Sad_L"], 20);
Unity实现绘制线断一 ————利用LineRenderer组件划线的两种方式
这几天,做项目的时候需要用到绘制线的功能,我之前做过划线的功能,总体来说就是三种方式,一种是LineRenderer组件,第二种是GL绘制线,第三种就是Vectrosity插件,他可以绘制各种各图形,
1.首先来说一下LineRenderer组件划线的方式,他需要添加LineRenderer组件,也就需要创建空对象,还的创建Plane,在Plane上画线。
第一种方式:
 #region  ---- 划线
    GameObject line;
    LineRenderer wire;
    public Material mline;
    List<Vector3> p;//一条线上的点的位置
    List<List<Vector3>> pos;//若干条线的点的位置
    // Use this for initialization
    void Start()
    {
        pos = new List<List<Vector3>>();//对线的初始化
    }
    // Update is called once per frame
    void Update()
    {
        if (Input.GetMouseButtonDown(0))//判定是否是画的一条新线
        {
            p = new List<Vector3>();//初始化一条新线
            pos.Add(p);             //添加到线的数组
            line = new GameObject();
            wire = line.AddComponent<LineRenderer>();
            wire.material = mline;
            wire.useWorldSpace = false;
            wire.SetWidth(0.1f, 0.1f);
            wire.SetColors(Color.yellow, Color.yellow);
        }
        //画线
        else if (Input.GetMouseButton(0))
        {
            Ray ray = Camera.main.ScreenPointToRay(Input.mousePosition);
            RaycastHit hit;
            if (Physics.Raycast(ray, out hit))
            {
                //存储射线打到palne上面的点
                p.Add(hit.point);
                wire.SetVertexCount(p.Count);
                //画线遍历
                for (int i = 0; i < p.Count; i++)
                {
                    wire.SetPosition(i, p[i]);
                }
            }
        }

    }
    #endregion
第二种方式:
//初始化
public void init ()
    {
        m_buildUpWall = new GameObject ();

        m_pointList = new List<Vector3> ();
        m_outPointList = new List<Vector3> ();
        m_inPointList = new List<Vector3> ();
        m_showLineList = new List<ShowLine> ();

        m_showLinesGojb = new GameObject ();

        m_wallList = new List<Wall> ();

        m_showLinesGojb = new GameObject ();
        m_lineRenderer = m_showLinesGojb.AddComponent<LineRenderer> ();
        m_lineRenderer.SetWidth (0.01f, 0.01f);
        //        m_showLinesGojb.transform.SetParent (transform);


        m_buildUpWall.AddComponent<MeshFilter> ();
        m_buildUpWall.AddComponent<MeshRenderer> ();
        m_buildUpWall.transform.SetParent (gameObject.transform);
        m_buildUpWall.transform.localPosition = new Vector3 (-95.6f, -3.3f, -53.3f);

        m_wallUpNormal = Vector3.up;

//        m_layoutDesign = new GameObject ();

        //transform.SetParent (GameObject.Find ("LayoutDesign").transform);

        m_showPointSphereMat = Resources.Load ("Materials\\BuildwallPointSphere") as Material;
    }

    //画线
    public void allOtherWallCloseHole ()
    {
        foreach (Wall wall in m_wallList) {
            wall.wallInPlane.GetComponent<OpenHoleOnPlane> ().closeHoleNow ();
            wall.wallOutPlane.GetComponent<OpenHoleOnPlane> ().closeHoleNow ();
        }
    }


    //画线
    public void insertNewPoint (Vector3 newPoint)
    {

        m_pointList.Add (newPoint);

        GameObject showPointSphere = GameObject.CreatePrimitive (PrimitiveType.Sphere);
        showPointSphere.transform.position = newPoint;
        showPointSphere.transform.localScale = Vector3.one * DrawPointSphereRadius;
        showPointSphere.GetComponent<Renderer> ().material = m_showPointSphereMat;
        showPointSphere.transform.SetParent (m_showLinesGojb.transform);


        Vector3 linePos = newPoint + LineRendererHigherThanGround * Vector3.up;
         m_lineRenderer.SetVertexCount (m_pointList.Count);
        m_lineRenderer.SetPosition (m_pointList.Count - 1, newPoint);


        if (m_pointList.Count > 1) {

            GameObject lengthText = new GameObject ();
            float lineLength = (m_pointList [m_pointList.Count - 1] - m_pointList [m_pointList.Count - 2]).magnitude;
            lengthText.transform.position = (m_pointList [m_pointList.Count - 1] + m_pointList [m_pointList.Count - 2]) / 2;
            TextMesh textMesh = lengthText.AddComponent<TextMesh> ();
            textMesh.text = lineLength.ToString("F");
            textMesh.alignment = TextAlignment.Center;
            textMesh.fontSize = 50;
            textMesh.fontStyle = FontStyle.BoldAndItalic;
            textMesh.color = Color.red;
            lengthText.transform.localScale = Vector3.one * 0.04f;
            lengthText.transform.Rotate(75f, 270f, 0);
            lengthText.transform.SetParent (m_showLinesGojb.transform);

//            m_lineRenderer.SetPosition (m_pointList.Count - 1, newPoint);


            Vector3 lastPoint = m_pointList [m_pointList.Count - 1];


//            ShowLine showLine = new ShowLine ();
//            showLine.start = lastPoint;
//            showLine.end = newPoint;
//            m_showLineList.Add (showLine);


        }
    }
第一种方式,是绘制曲线,连续的线断,第二种是绘制直线,可画矩形。
GL绘制线断下节我跟大家分享,此次分享希望可以帮助大家
本文出自 “Unity_3D技术探讨” 博客,谢绝转载!
以上是关于Unity | 实现面部驱动的两种方式的主要内容,如果未能解决你的问题,请参考以下文章