centos7安装mysql
Posted BrokenColor
tags:
篇首语:本文由小常识网(cha138.com)小编为大家整理,主要介绍了centos7安装mysql相关的知识,希望对你有一定的参考价值。
1,安装mysql
# 下载mysql源安装包
wget http://dev.mysql.com/get/mysql57-community-release-el7-8.noarch.rpm
如果报错(-bash: wget: command not found),则:安装wget
yum -y install wget
# 安装mysql源
yum localinstall mysql57-community-release-el7-8.noarch.rpm
检查mysql源是否安装成功
yum repolist enabled | grep "mysql.*-community.*"

2,配置允许远程访问mysql
检查mysql是否能正常启动
#启动MySQL服务
systemctl start mysqld #如果失败(yum install mariadb-server -y),笔者执行了了一下安装经可以了,如果执行完了依然不行可以尝试ps(底部内容补充)中的方法

#查看MySQL的启动状态
systemctl status mysqld

#开机启动
systemctl enable mysqld
systemctl daemon-reload
首次登陆配置(如果不需要密码可以直接进入mysql可以跳过此步,但需要进入后修改密码#mysql> set password for root@localhost = password(\'123456\');)
#1、停止mysql服务
service mysqld stop

#2、mysql配置文件修改为免密码登录。
vi /etc/my.cfg
# Disabling symbolic-links is recommended to prevent assorted security risks
skip-grant-tables #添加这句话,这时候登入mysql就不需要密码
symbolic-links=0

#3、启动 mysql 服务
service mysqld start

#4、以root身份登录mysql, 输入密码的时候直接回车
mysql -uroot -p #输入命令回车进入,出现输入密码提示直接回车。
mysql> set password for root@localhost = password(\'123456\');
ERROR 1290 (HY000): The MySQL server is running with the --skip-grant-tables option so it cannot execute this statement
mysql> flush privileges;
Query OK, 0 rows affected (0.00 sec)
mysql> set password for root@localhost = password(\'123456\'); or update user set authentication_string=PASSWORD("123456") where user="root";
Query OK, 0 rows affected, 1 warning (0.00 sec)

mysql>flush privileges; #更新权限
mysql>quit; #退出

service mysqld stop # 停止mysql服务, 恢复mysql配置

vi /etc/my.cfg
# Disabling symbolic-links is recommended to prevent assorted security risks
# skip-grant-tables # 注释掉这句话
symbolic-links=0

service mysqld start # 启动mysql服务
mysql -uroot -p # 输入新密码登录
授权远程登陆
#添加远程登录用户-笔者是直接用的root用户,\'%\'表示允许所有的ip访问
mysql> GRANT ALL PRIVILEGES ON *.* TO \'root\'@\'%\' IDENTIFIED BY \'password\' WITH GRANT OPTION;

#进行刷新
mysql>flush privileges;
查看是否授权成功
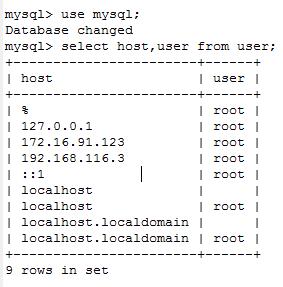
mysql> use mysql;
mysql> select host, user from user;

host改为%,表示允许所有机器访问。
尝试远程访问。如果成功,恭喜你!
如果失败,有可能是因为防火墙没有开启3306端口
添加规则,打开3306端口
iptables -I INPUT -p tcp -m state --state NEW -m tcp --dport 3306 -j ACCEPT
iptables添加/删除规则都是临时的,如果需要重启也生效,就要保存修改:
service iptables save //或者 /etc/init.d/iptables save
如果报错:
The service command supports only basic LSB actions (start, stop, restart, try-restart, reload, force-reload, status). For other actions, please try to use systemctl.
(意思就是 服务命令只支持基本的LSB操作(启动、停止、重新启动、尝试重启、重新加载、强制重新加载、状态)。对于其他操作,请尝试使用systemctl。)
#First, stop and mask the firewalld service:
systemctl stop firewalld
systemctl mask firewalld

#Then, install the iptables-services package:
yum install iptables-services

#Enable the service at boot-time:
systemctl enable iptables

#Managing the service
systemctl [stop|start|restart] iptables

#Saving your firewall rules can be done as follows:
service iptables save
另一种方式:(我没实现,看人品)
vi /etc/sysconfig/iptables //在该文件中加入下面这条规则也是可以生效的
-A INPUT -p tcp -m state --state NEW -m tcp --dport 3306 -j ACCEPT
重启防火墙使之生效
/etc/init.d/iptables restart(重启防火墙使配置生效)
其次还要检查一下my.cnf(my.ini)的配置,这里可以配置绑定ip地址。
bind-address=127.0.0.1
不配置或者IP配置为0.0.0.0,表示监听所有客户端连接。
重启mysql 服务。
尝试远程访问。如果成功,恭喜你!
如果失败,那就重新检查一下刚才的配置吧!^_^
远程连接报错:
解决用navicate远程连接数据库出现1045 access denied for user \'root\'@\'localhost\' using password yes
说明授权有问题
mysql> GRANT ALL PRIVILEGES ON *.* TO \'root\' @\'%\' IDENTIFIED BY \'123456\' WITH GRANT OPTION;
ERROR 1819 (HY000): Your password does not satisfy the current policy requirements

#查看MySQL密码强度验证规则修改密码
mysql> SHOW VARIABLES LIKE \'validate_password%\';
+--------------------------------------+--------+
| Variable_name                        | Value  |
+--------------------------------------+--------+
| validate_password_check_user_name    | OFF    |
| validate_password_dictionary_file    |        |
| validate_password_length             | 8      |
| validate_password_mixed_case_count   | 1      |
| validate_password_number_count       | 1      |
| validate_password_policy             | MEDIUM |
| validate_password_special_char_count | 1      |
+--------------------------------------+--------+

#修改密码
mysql> SET PASSWORD FOR \'root\'@\'localhost\' = PASSWORD(\'P@ssw0rd\');
Query OK, 0 rows affected, 1 warning (0.00 sec)

#重新授权
mysql>  GRANT ALL PRIVILEGES ON *.* TO \'root\' @\'%\' IDENTIFIED BY \'P@ssw0rd\' WITH GRANT OPTION;
Query OK, 0 rows affected, 1 warning (0.00 sec)

mysql> flush privileges;
Query OK, 0 rows affected (0.00 sec)
再次尝试远程连接
ps:
报错 Failed to start mysql.server.service: Unit not found.
# yum install mariadb-server -y //如果已安装可以省略
# systemctl start mariadb.service //启动服务
# systemctl enable mariadb.service //开机启动服务
# mysql -u root -p //登录mysql
(maria DB如同 MySQL 的影子版本,是 MySQL 的一个分支版本(branch),而不是衍生版本(folk),提供的功能可和 MySQL 完全兼容)
以上是关于centos7安装mysql的主要内容,如果未能解决你的问题,请参考以下文章