uniapp 手写canvas海报(兼容android/ios/h5/微信小程序)
Posted 爱学习的蒋大奘
tags:
篇首语:本文由小常识网(cha138.com)小编为大家整理,主要介绍了uniapp 手写canvas海报(兼容android/ios/h5/微信小程序)相关的知识,希望对你有一定的参考价值。
先上成功图
1.在父组件里面定义弹出层,并且调用子组件制作海报的方法
 2.点击显示二维码调用子组件海报方法


showPoster(customerPostId)
// console.log(this.$refs.positionPoster)
this.$refs.positionPoster.createPoster(customerPostId);
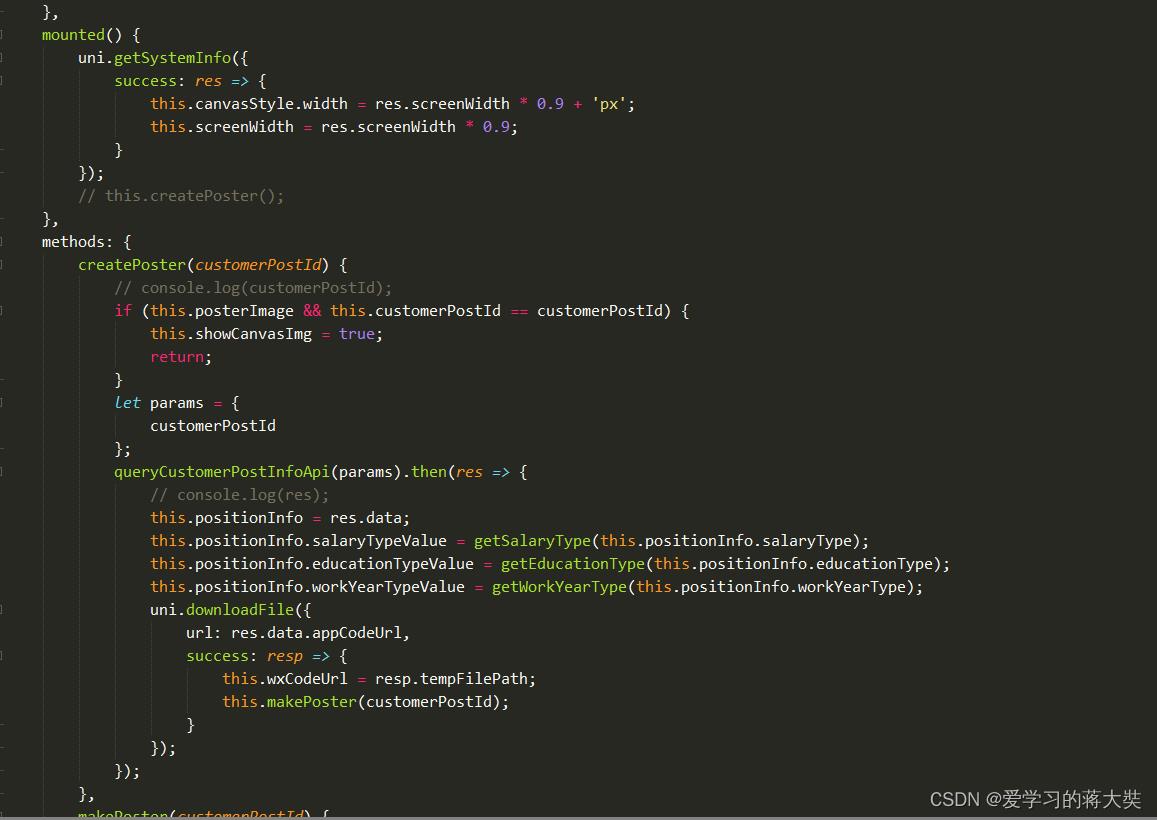
3.mounted方法里面获取手机屏幕的宽度,并且设置canvas的大小

uni.getSystemInfo(
success: res =>
this.canvasStyle.width = res.screenWidth * 0.9 + 'px';
this.screenWidth = res.screenWidth * 0.9;
);
4.调用createPoster获取小程序二维码(小程序地址必须为https,并且需要在小程序管理后台配置白名单,不然downloadFile无效)
5.使用的uview2.0组件库的弹出层,写了二个弹出层,一个是新生成的海报,另一个是生成之后不需要再次生成,直接显示,减少用户等待时间

<template>
<view>
<u-popup :show="showCanvas" :customStyle=" width: canvasStyle.width, 'padding-bottom': '20rpx' " mode="center" round="10" class="position_r">
<view class="position_a close-icon"><u-icon name="close-circle" color="#ffffff" size="25" @click="showCanvas = false"></u-icon></view>
<canvas :style=" height: canvasStyle.height, width: canvasStyle.width " class="whiteBg" canvas-id="myCanvas" @longpress="saveImage"></canvas>
<u-button type="primary" size="mini" icon="photo" color="rgb(38,78,203)" :customStyle=" margin: 'auto', width: '200rpx', height: '60rpx' " @click="saveImage">
生成图片
</u-button>
</u-popup>
<u-popup :show="showCanvasImg" :customStyle=" width: canvasStyle.width, 'padding-bottom': '20rpx' " mode="center" round="10" class="position_r">
<view class="position_a close-icon"><u-icon name="close-circle" color="#ffffff" size="25" @click="showCanvasImg = false"></u-icon></view>
<image :src="posterImage" :style=" height: canvasStyle.height, width: canvasStyle.width " style="display: block;" @longpress="saveImage"></image>
<u-button type="primary" size="mini" icon="photo" color="rgb(38,78,203)" :customStyle=" margin: 'auto', width: '200rpx', height: '60rpx' " @click="saveImage">
生成图片
</u-button>
</u-popup>
</view>
</template>
<script>
import queryCustomerPostInfoApi from '@/apis/customer-position.js';
import getSalaryType, getEducationType, getWorkYearType from '@/filter/filer.js';
import base64ToPath, savePicture from '@/utils/file-utils.js';
export default
data()
return
positionInfo: ,
canvasStyle:
height: '0rpx',
width: '0rpx'
,
imgUrl: 'https://bjbztest.oss-cn-qingdao.aliyuncs.com/master-su-core/image/position-bg.png',
wxCodeUrl: '',
screenWidth: null,
posterImage: null,
customerPostId: 0,
showCanvas: false,
showCanvasImg: false
;
,
6.makePoster方法里面获取背景图片的长宽,算出长宽比,设置canvas的高度,创建canvas的content,this必须添加,且指向vue实列(注意指向问题),不然canvas出不来,ctx.rect设置整体画布大小,ctx.setFillStyle设置背景色,并且填充ctx.fill(),drawImage可以使用本地图片,但是h5对于本地大的图片显示不出来我的超过1M就显示不出来,这边用的是网络图片(网络图片小程序需要配置白名单)

makePoster(customerPostId)
uni.showLoading(
title: '海报生成中'
);
let that = this;
uni.getImageInfo(
src: this.imgUrl,
success: image =>
// console.log(image);
const prop = image.width / image.height;
// 算出底部需要的高度
if (this.positionInfo.content.length > Math.ceil((this.screenWidth - 40) / 16) * 3)
this.canvasStyle.height = this.screenWidth / prop + 250 + 'px';
var ctx = uni.createCanvasContext('myCanvas', this);
ctx.rect(0, 0, this.screenWidth, this.screenWidth / prop + 250);
else
let ceil_integer = Math.ceil(this.positionInfo.content.length / Math.ceil((this.screenWidth - 40) / 16));
this.canvasStyle.height = this.screenWidth / prop + 190 + ceil_integer * 20 + 'px';
var ctx = uni.createCanvasContext('myCanvas', this);
ctx.rect(0, 0, this.screenWidth, this.screenWidth / prop + 190 + ceil_integer * 20);
ctx.setFillStyle('white');
ctx.fill();
// 画布尺寸
// 坐标(0,0) 表示从此处开始绘制,相当于偏移。
// 背景
ctx.drawImage(image.path, 0, 0, this.screenWidth, this.screenWidth / prop);
ctx.font = '25px Arial';
ctx.fillStyle = '#ffffff';
// ctx.fillStyle = '#000000';
ctx.fillText('优质岗位', this.screenWidth / prop / 5, this.screenWidth / prop / 2 - 2.5);
ctx.fillText('职等你来', this.screenWidth / prop / 5, this.screenWidth / prop / 2 + 27.5);
ctx.drawImage(
this.wxCodeUrl,
this.screenWidth / 2 + this.screenWidth / prop / 8,
this.screenWidth / prop / 2 - this.screenWidth / 8,
this.screenWidth / 4,
this.screenWidth / 4
);
7.设置你想生成的canvas图

ctx.font = 'bold 18px Arial';
ctx.fillStyle = '#000000';
ctx.fillText(this.positionInfo.postName, 20, this.screenWidth / prop + 36);
ctx.font = 'bold 20px Arial';
ctx.fillStyle = 'red';
ctx.fillText(
this.positionInfo.salaryValueMinWithUnit + '~' + this.positionInfo.salaryValueMaxWithUnit + '/' + this.positionInfo.salaryTypeValue,
20,
this.screenWidth / prop + 74
);
ctx.font = '14px Arial';
ctx.fillStyle = '#666666';
ctx.fillText(
this.positionInfo.age + ' | ' + this.positionInfo.educationTypeValue + ' | ' + this.positionInfo.workYearTypeValue,
20,
this.screenWidth / prop + 106
);
ctx.drawImage('/static/address.png', 20, this.screenWidth / prop + 134, 13, 16);
ctx.font = '14px Arial';
ctx.fillStyle = '#666666';
ctx.fillText(this.positionInfo.province + '/' + this.positionInfo.city + '/' + this.positionInfo.area, 43, this.screenWidth / prop + 138);
ctx.fillText(this.positionInfo.address, 43, this.screenWidth / prop + 156);
// console.log(this.screenWidth);
// console.log(this.screenWidth - 40);
// console.log(Math.trunc((this.screenWidth - 40) / 16) * 3 - 1);
8.这边因为无法判断岗位的content,需要手动算他的高度和位置(这个和开始的if判断一样,判断长度,然后设置cavans的高度),这边我向上取整,多留一个字

ctx.font = '16px Arial';
ctx.fillStyle = '#666666';
let str;
// 超过三行需要截取
if (this.positionInfo.content.length > Math.ceil((this.screenWidth - 40) / 16) * 3)
str = this.positionInfo.content.substring(0, Math.ceil((this.screenWidth - 40) / 16) * 3 - 1) + '...';
for (let i = 0; i < 3; i++)
let newStr;
if (i == 2)
newStr = str.substring(Math.ceil((this.screenWidth - 40) / 16) * i, str.length);
else
newStr = str.substring(Math.ceil((this.screenWidth - 40) / 16) * i, Math.ceil((this.screenWidth - 40) / 16) * (i + 1));
ctx.fillText(newStr, 20, this.screenWidth / prop + 190 + i * 20);
else
// 未超三行自动截取换行
str = this.positionInfo.content;
let ceil_integer = Math.ceil(str.length / Math.ceil((this.screenWidth - 40) / 16));
for (let i = 0; i < ceil_integer; i++)
let newStr = str.substring(Math.ceil((this.screenWidth - 40) / 16) * i, Math.ceil((this.screenWidth - 40) / 16) * (i + 1));
ctx.fillText(newStr, 20, this.screenWidth / prop + 190 + i * 20);
9.这边画完,显示弹出层,这边一定要加定时器,因为有的还没画上去加个延时的功能,反正有loading没事,draw方法设为fasle,这样他会覆盖之前的canvas,之后canvas转path,保存下来
this.showCanvas = true;
// 开始绘画,必须调用这一步,才会把之前的一些操作实施
setTimeout(() =>
ctx.draw(false, ret =>
uni.hideLoading();
// setTimeout(() =>
uni.canvasToTempFilePath(
canvasId: 'myCanvas',
success: res =>
// console.log(res);
this.posterImage = res.tempFilePath;
this.customerPostId = customerPostId;
,
fail: err =>
// console.log(err);
uni.showToast(
title: '名片加载失败',
icon: 'error'
);
,
this
);
// , 500);
);
, 500);
);
,
10.点击保存图片的时候,H5的uni.saveImageToPhotosAlbum是不支持的,你的写个自己的下载(canvas生成的是base64的)


saveImage()
if (this.posterImage)
// #ifdef H5
// console.log(this.posterImage);
savePicture(this.posterImage);
// let picUrl = base64ToPath(this.posterImage);
// console.log(picUrl);
// #endif
// #ifndef H5
uni.saveImageToPhotosAlbum(
filePath: this.posterImage,
success: res =>
// console.log(res);
this.showCanvas = false;
this.showCanvasImg = false;
uni.showToast(
title: '海报已保存,快去分享给好友吧。',
icon: 'none'
);
,
fail: err =>
// console.log(err);
if (
err.errMsg === 'saveImageToPhotosAlbum:fail:auth denied' ||
err.errMsg === 'saveImageToPhotosAlbum:fail auth deny' ||
err.errMsg === 'saveImageToPhotosAlbum:fail authorize no response'
)
uni.showModal(
title: '提示',
content: '需要您授权保存相册',
showCancel: false,
success: modalSuccess =>
// #ifndef APP-PLUS||H5
uni.openSetting(
success(settingdata)
// console.log('settingdata', settingdata);
if (settingdata.authSetting['scope.writePhotosAlbum'])
uni.showModal(
title: '提示',
content: '获取权限成功,再次点击图片即可保存',
showCancel: false
);
else
uni.showModal(
title: '提示',
content: '获取权限失败,将无法保存到相册哦~',
showCancel: false
);
);
// #endif
);
);
// #endif
else
uni.showToast(
title: '海报生成有误!',
icon: 'error'
);

export function savePicture(base64)
var arr = base64.split(',');
var bytes = atob(arr[1]);
let ab = new ArrayBuffer(bytes.length);
let ia = new Uint8Array(ab);
for (let i = 0; i < bytes.length; i++)
ia[i] = bytes.charCodeAt(i);
var blob = new Blob([ab], type: 'application/octet-stream' );
var url = URL.createObjectURL(blob);
var a = document.createElement('a');
a.href = url;
a.download = new Date().valueOf() + ".png";
var e = document.createEvent('MouseEvents');
e.initMouseEvent('click', true, false, window, 0, 0, 0, 0, 0, false, false, false, false, 0, null);
a.dispatchEvent(e);
URL.revokeObjectURL(url);
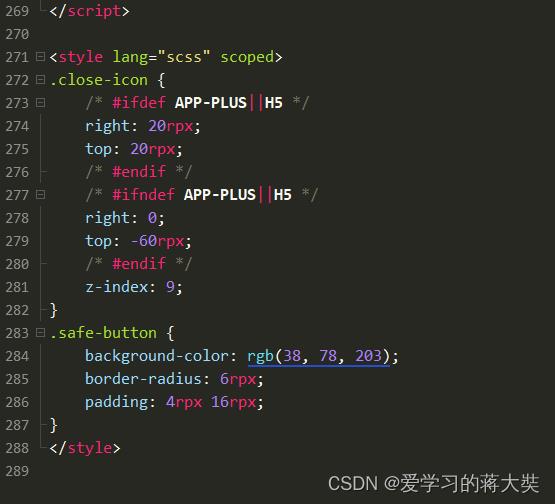
11.微信小程序因为canvas原生层级的问题,导致之前定位的关闭图表总是被覆盖住,我写个条件编译改下定位的位置(使用了cover-view标签包裹,好像没有生效,就写了这个过渡方案,产品认可那就是没问题了,哈哈哈)

.close-icon
/* #ifdef APP-PLUS||H5 */
right: 20rpx;
top: 20rpx;
/* #endif */
/* #ifndef APP-PLUS||H5 */
right: 0;
top: -60rpx;
/* #endif */
z-index: 9;
.safe-button
background-color: rgb(38, 78, 203);
border-radius: 6rpx;
padding: 4rpx 16rpx;
12.下班
uniapp在非tabbar页面中显示tabbar的方法 - 显示底部导航栏
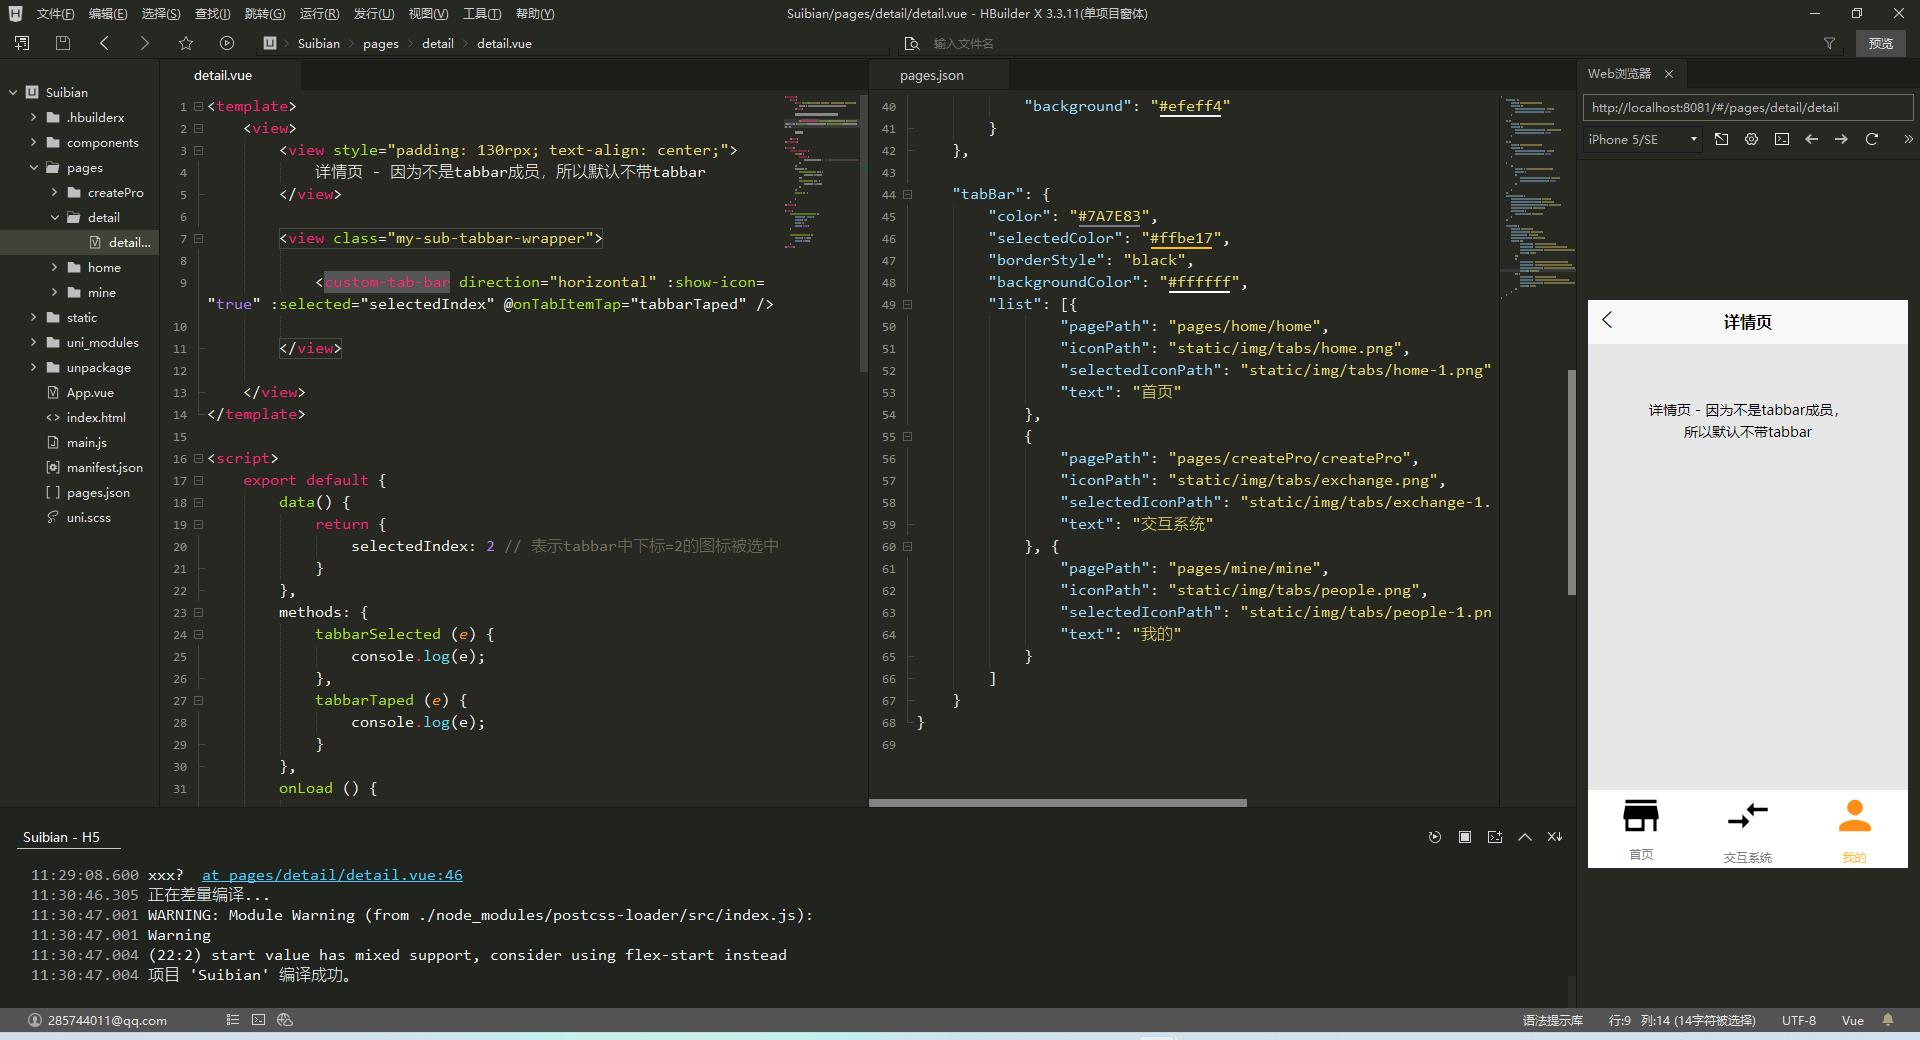
效果


前言
最好是自己手写一个view模仿tabbar,兼容性最好
最好是自己手写一个view模仿tabbar,兼容性最好
最好是自己手写一个view模仿tabbar,兼容性最好
本方法用的是uniapp自带的组件“custom-tab-bar”
兼容性不行,安卓app上就看不到,小程序也看不到,这它喵的....
https://uniapp.dcloud.io/component/custom-tab-bar.html#custom-tab-bar
平台兼容性 仅 H5 支持,HBuilderX 2.9.9 + 。
步骤
以下是custom-tab-bar组件的使用方法,建议不要用,自己在页面底部手写一个view更好
<template>
	<view>
		<view style="padding: 130rpx; text-align: center;">
			详情页 - 因为不是tabbar成员,所以默认不带tabbar
		</view>

		<view class="my-sub-tabbar-wrapper">

			<custom-tab-bar direction="horizontal" :show-icon="true" :selected="selectedIndex" @onTabItemTap="tabbarTaped" />

		</view>

	</view>
</template>

<script>
	export default
		data()
			return
				selectedIndex: 0 // 表示tabbar中下标=0的图标被选中

		,
		methods:
			tabbarSelected (e)
				console.log(e);
			,
			tabbarTaped (e)
				console.log(e);

		,
		onLoad ()


</script>

<style>
	.my-sub-tabbar-wrapper
		position: fixed;
		bottom: 0;
		left: 0;
		width: 100%;


	.uni-tabbar__icon
		height: 20rpx;
		width: 20rpx;

</style>
以上是关于uniapp 手写canvas海报(兼容android/ios/h5/微信小程序)的主要内容,如果未能解决你的问题,请参考以下文章

