使用Zabbix官方模板监控MySQL
Posted
tags:
篇首语:本文由小常识网(cha138.com)小编为大家整理,主要介绍了使用Zabbix官方模板监控MySQL相关的知识,希望对你有一定的参考价值。
关于Zabbix和mysql安装就不在说明,请自行参考相关文档
复制官方MySQL监控的userparameter到安装目录,我这里是采用的3.4.1源码安装,安装目录在/usr/local/zabbix目录,如果你是rpm包安装请自行寻找文件和目录
cp zabbix-3.4.1/conf/zabbix_agentd/userparameter_mysql.conf /usr/local/zabbix/etc/zabbix_agentd.conf.d/
使用root用户登录到MySQL并授权一个专门监控使用的用户,当然也可以直接使用root,但不安全推荐使用普通用户,并且指定需要的权限即可
#登录数据库
mysql -uroot -p
#下面是需要在数据库里面执行的命令,为了安装请不要指定all权限,也不要指定所有库,并且需要有一个安全的密码
grant all on *.* to "username"@"localhost" identified by "USER_PASSWORD";
编辑/usr/local/zabbix/etc/zabbix_agentd.conf.d/userparameter_mysql.conf
[[email protected] ~]# cat /usr/local/zabbix/etc/zabbix_agentd.conf.d/userparameter_mysql.conf
# For all the following commands HOME should be set to the directory that has .my.cnf file with password information.

# Flexible parameter to grab global variables. On the frontend side, use keys like mysql.status[Com_insert].
# Key syntax is mysql.status[variable].
UserParameter=mysql.status[*],echo "show global status where Variable_name=‘$1‘;" | HOME=/var/lib/zabbix mysql -N | awk ‘{print $$2}‘

# Flexible parameter to determine database or table size. On the frontend side, use keys like mysql.size[zabbix,history,data].
# Key syntax is mysql.size[<database>,<table>,<type>].
# Database may be a database name or "all". Default is "all".
# Table may be a table name or "all". Default is "all".
# Type may be "data", "index", "free" or "both". Both is a sum of data and index. Default is "both".
# Database is mandatory if a table is specified. Type may be specified always.
# Returns value in bytes.
# ‘sum‘ on data_length or index_length alone needed when we are getting this information for whole database instead of a single table
UserParameter=mysql.size[*],bash -c ‘echo "select sum($(case "$3" in both|"") echo "data_length+index_length";; data|index) echo "$3_length";; free) echo "data_free";; esac)) from information_schema.tables$([[ "$1" = "all" || ! "$1" ]] || echo " where table_schema=\"$1\"")$([[ "$2" = "all" || ! "$2" ]] || echo "and table_name=\"$2\"");" | HOME=/var/lib/zabbix mysql -N‘

UserParameter=mysql.ping,HOME=/var/lib/zabbix mysqladmin ping | grep -c alive
UserParameter=mysql.version,mysql -V
需要更改的地方:
如果你的zabbix不是yum安装,那么需要更改HOME后面的变量为zabbix配置文件所在目录,如:/usr/local/zabbix/etc
如果你的MySQL不是yum安装,那么需要添加MySQL的可执行文件到环境变量,或者更改为绝对路径
更改默认MySQL访问的用户名
也可以添加自定义Key
更改后的内容如下:(根据自己需求)
[[email protected] ~]# cat /usr/local/zabbix/etc/zabbix_agentd.conf.d/userparameter_mysql.conf
# For all the following commands HOME should be set to the directory that has .my.cnf file with password information.

# Flexible parameter to grab global variables. On the frontend side, use keys like mysql.status[Com_insert].
# Key syntax is mysql.status[variable].
UserParameter=mysql.status[*],echo "show global status where Variable_name=‘$1‘;" | HOME=/usr/local/zabbix/etc mysql -uzabbix -N | awk ‘{print $$2}‘

# Flexible parameter to determine database or table size. On the frontend side, use keys like mysql.size[zabbix,history,data].
# Key syntax is mysql.size[<database>,<table>,<type>].
# Database may be a database name or "all". Default is "all".
# Table may be a table name or "all". Default is "all".
# Type may be "data", "index", "free" or "both". Both is a sum of data and index. Default is "both".
# Database is mandatory if a table is specified. Type may be specified always.
# Returns value in bytes.
# ‘sum‘ on data_length or index_length alone needed when we are getting this information for whole database instead of a single table
UserParameter=mysql.size[*],bash -c ‘echo "select sum($(case "$3" in both|"") echo "data_length+index_length";; data|index) echo "$3_length";; free) echo "data_free";; esac)) from information_schema.tables$([[ "$1" = "all" || ! "$1" ]] || echo " where table_schema=\"$1\"")$([[ "$2" = "all" || ! "$2" ]] || echo "and table_name=\"$2\"");" | HOME=/usr/local/zabbix/etc mysql -uzabbix -N‘

UserParameter=mysql.ping,HOME=/usr/local/zabbix/etc mysqladmin -uzabbix ping | grep -c alive

UserParameter=mysql.version,mysql -V

#下面是自己新增的Key
UserParameter=mysql.variables[*],HOME=/usr/local/zabbix/etc mysql -uzabbix -e "show variables like ‘$1‘;" | tail -n 1 | awk ‘{print $$2}‘
在配置文件指定的HOME目录创建指定的.my.cnf配置文件,主要定义连接MySQL的信息
[[email protected] ~]# vim /usr/local/zabbix/etc/.my.cnf

[mysql]
host=localhost
user=zabbix
password=slf8gadffdasdPRW
port=3387

[mysqladmin]
host=localhost
user=zabbix
password=slf8gadffdasdPRW
port=3387
修改zabbix_agentd配置文件,最文件最后增加一行,如果是yum安装,请根据需求更改
Include=/usr/local/zabbix/etc/zabbix_agentd.conf.d/
重启zabbix agent
/etc/init.d/zabbix_agentd restart
在zabbix监控平台对应的主机添加自带的MySQL监控模板,最一可以就可看监控数据,如果没有数据请根据报错自行解决,大致会碰到以下一些问题
userparameter配置文件修改错误,比如:指定的用户不对,路径不对
授权数据库用户权限不对,无法获取数据
.my.cnf配置文件错误或者路径错误
zabbix_agentd配置文件没有包含userparameter_mysql.conf配置文件
监控效果图如下:
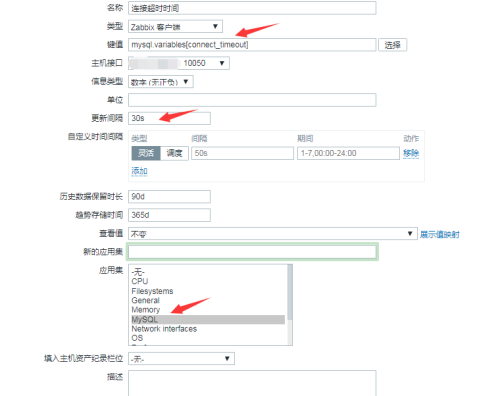
最后我们新增一个自定义的监控,因为我们有一个自定义Key,如下图所示,我们的Key为mysql.variables[variables_name],需要传一个参数,这个参数就相当于show variables like "variables_name";,用于获取指定variables的值,比如:connect_timeout
注意更改间隔,时间间隔根据自己需求更改
最后我们可以根据上一个自定义监控,写一个关于show status;的监控,都没有问题,或者更复杂的一个业务监控,关于zabbix自定义监控还需要读者查阅更多相关文档
本文出自 “蓝色_风暴” 博客,请务必保留此出处http://270142877.blog.51cto.com/12869137/1975010
以上是关于使用Zabbix官方模板监控MySQL的主要内容,如果未能解决你的问题,请参考以下文章
![5K33O`A8_TPVNC]E)Z6$3CT.png 技术分享](https://s1.51cto.com/oss/201710/22/fa3e60ad9e28afe4cc9cd0007680b559.png-wh_500x0-wm_3-wmp_4-s_3293767820.png)
