nginx+tomcat+redis sesson id主从复制
Posted
tags:
篇首语:本文由小常识网(cha138.com)小编为大家整理,主要介绍了nginx+tomcat+redis sesson id主从复制相关的知识,希望对你有一定的参考价值。
Redis与Memcached的区别:
内存利用率:使用简单的key-value存储的话,Memcached的内存利用率更高,而如果Redis采用hash结构来做key-value存储,由于其组合式的压缩,其内存利用率会高于Memcached。
性能对比:由于Redis只使用单核,而Memcached可以使用多核,所以平均每一个核上Redis在存储小数据时比Memcached性能更高。而在100k以上的数据中,Memcached性能要高于Redis,虽然Redis最近也在存储大数据的性能上进行优化,但是比起Memcached,还是稍有逊色。
Redis支持数据的持久化,可以将内存中的数据保持在磁盘中,重启的时候可以再次加载进行使用
Redis支持数据的备份,即master-slave模式的数据备份。
Redis不仅仅支持简单的key-Value类型的数据,同时还提供list,set,zset,hash等数据结构的存储。

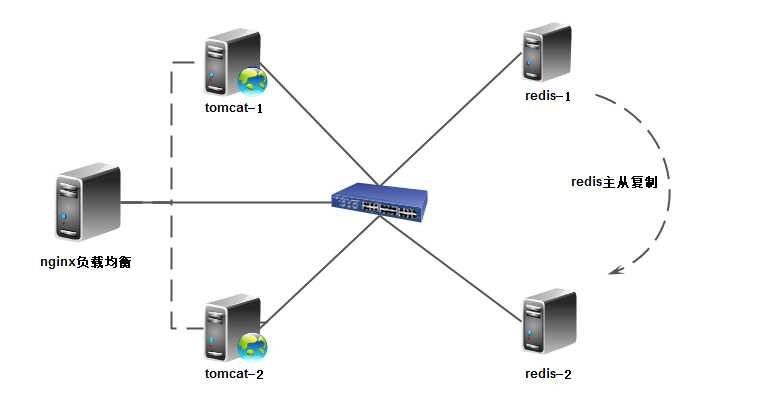
nginx: 192.168.4.4
tomcat-1: 192.168.4.5
tomcat-2: 192.168.4.6
redis-1: 192.168.4.7
redis-2: 192.168.4.8
vip:192.168.4.100
一、nginx安装与配置
1.1 安装nginx
[[email protected] ~]# yum -y install zlib-devel pcre-devel openssl-devel
[[email protected] ~]# tar xf nginx-1.6.2.tar.gz
[[email protected] ~]# cd nginx-1.6.2
[[email protected] nginx-1.6.2]# ./configure && make && make install
[[email protected] nginx-1.6.2]# cd
[[email protected] ~]# ln -s /usr/local/nginx/sbin/nginx /usr/local/sbin/
2.2 配置nginx实现负载均衡
[[email protected] ~]# vim /usr/local/nginx/conf/nginx.conf
…
33 gzip on;
upstream backend {
server 192.168.4.5:8080 weight=1 max_fails=1 fail_timeout=10s;
server 192.168.4.6:8080 weight=1 max_fails=1 fail_timeout=10s;
}
39 server {
40 listen 80;
41 server_name localhost;
42
43 #charset koi8-r;
44
45 #access_log logs/host.access.log main;
46
47 location / {
48 root html;
49 index index.html index.htm;
proxy_pass http://backend;
51 }
…
[[email protected] ~]# nginx -t
nginx: the configuration file /usr/local/nginx/conf/nginx.conf syntax is ok
nginx: configuration file /usr/local/nginx/conf/nginx.conf test is successful
[[email protected] ~]# nginx && netstat -anpt |grep :80
tcp 0 0 0.0.0.0:80 0.0.0.0:* LISTEN 4123/nginx
二、安装tomcat-1\\2
2.1 jdk安装
[[email protected] ~]# tar xf jdk-7u65-linux-x64.gz
[[email protected] ~]# mv jdk1.7.0_65 /usr/local/java
[[email protected] ~]# vim /etc/profile.d/java.sh
export JAVA_HOME=/usr/local/java
export PATH=$PATH:$JAVA_HOME/bin
[[email protected] ~]# source /etc/profile.d/java.sh
2.2 安装tomcat
[[email protected] ~]# tar xf apache-tomcat-7.0.54.tar.gz
[[email protected] ~]# mv apache-tomcat-7.0.54 /usr/local/tomcat
2.3 将tomcat调用redis的包放入tomcat/lib下
[[email protected] ~]# cp tomcat-redis-session-manage-tomcat7.jar tomcat-juli.jar commons-logging-1.1.3.jar commons-pool2-2.2.jar jedis-2.5.2.jar /usr/local/tomcat/lib
2.4 修改context.xml配置文件支持调用redis
[[email protected] ~]# vim /usr/local/tomcat/conf/context.xml
<Context>
…
<Valve className="com.orangefunction.tomcat.redissessions.RedisSessionHandlerValve" />
<Manager className="com.orangefunction.tomcat.redissessions.RedisSessionManager"
host="192.168.4.7" #redis1的ip
port="6379"
database="0"
maxInactiveInterval="60" />
</Context>
2.5 修改server.xml文件以支持调取创建的测试页
[[email protected] ~]# vim /usr/local/tomcat/conf/server.xml
124 <Host name="localhost" appBase="webapps"
125 unpackWARs="true" autoDeploy="true">
<Context docBase="/web/webapp" path="" reloadable="false" >
</Context>
2.6 创建测试页
[[email protected] ~]# mkdir -p /web/webapp
[[email protected] ~]# cd /web/webapp
[[email protected] webapp]# vim index.jsp
Session ID:<%= session.getId() %><BR>
SessionPort:<%= request.getServerPort() %>
<% out.println("This tomcat server 192.168.4.5");%> #tomcat2改成192.168.4.6
2.7 启动tomcat
[[email protected] ~]# /usr/local/tomcat/bin/startup.sh
[[email protected] ~]# netstat -anpt |grep :8080
tcp 0 0 :::8080 :::* LISTEN 26474/java
三、安装redis-1/2
3.1 安装redis
http://download.redis.io/releases/
1和2 安装方式一样,修改的配置文件不一样(下面看)
[[email protected] ~]# tar xf redis-3.2.5.tar.gz
[[email protected] ~]# cd redis-3.2.5
[[email protected] redis-3.2.5]# make
这里如果报错,tclsh8.5: not found 发现少了tcl 报错
解决方法:下载,安装tcl
#wget http://downloads.sourceforge.net/tcl/tcl8.5.9-src.tar.gz
#cd /tcl8.5.9-src/unix
#./configure
#make
#make install
接着make && make install 就没报错了
3.2 创建安装路径
[[email protected] ~]# mkdir -p /usr/local/redis/bin
[[email protected] ~]# mkdir -p /usr/local/redis/etc
[[email protected] ~]# mkdir -p /usr/local/redis/var
src目录下这些文件作用如下
redis-server:Redis服务器的daemon启动程序
redis-cli:Redis命令行操作工具.你也可以用telnet根据其纯文本协议来操作
redis-benchmark:Redis性能测试工具,测试Redis在你的系统及你的配置下的读写性能.
redis-stat:Redis状态检测工具,可以检测Redis当前状态参数及延迟状况
[[email protected] redis-3.2.5]# cd src/
[[email protected] src]# cp redis-benchmark redis-check-aof redis-cli redis-server /usr/local/redis/bin/
[[email protected] src]# cp ../redis.conf /usr/local/redis/etc
3.3 修改配置文件
[[email protected] ~]# vim /usr/local/redis/etc/redis.conf
128 daemonize yes #是否把redis-server启动在后台,默认是“否”。若改成yes,会生成一个pid
61 bind 0.0.0.0 #任意主机都可以访问
3.4 redis的关闭启动
[[email protected] ~]# killall -9 redis-server
[[email protected] ~]# /usr/local/redis/bin/redis-server /usr/local/redis/etc/redis.conf
[[email protected] ~]# netstat -anpt |grep :6379
tcp 0 0 0.0.0.0:6379 0.0.0.0:* LISTEN 29516/redis-server
3.5 监控redis
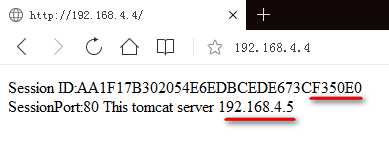
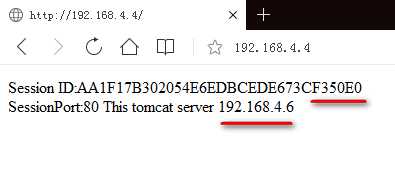
测试:访问192.168.4.4
发现测试页面发生变化, 变得是ip sessionid不变


四、安装keepavlied 实现redis主从高可用
4.1 修改redis-2的配置文件
[[email protected] src]# vim /usr/local/redis/etc/redis.conf
128 daemonize yes
61 bind 0.0.0.0
265 # slaveof <masterip> <masterport>
slaveof 192.168.4.7 6379 #填写redis-1的ip和端口,同步redis-1的信息
4.2 启动并测试
[[email protected] ~]# /usr/local/redis/bin/redis-server /usr/local/redis/etc/redis.conf
[[email protected] ~]# netstat -anpt |grep redis
tcp 0 0 0.0.0.0:6379 0.0.0.0:* LISTEN 29517/redis-server
tcp 0 0 192.168.4.8:42173 192.168.4.7:6379 ESTABLISHED 29517/redis-server
测试主从复制
[[email protected] ~]# /usr/local/redis/bin/redis-cli -h 192.168.4.7
192.168.4.7:6379> set name zhangsan
OK
[[email protected] ~]# /usr/local/redis/bin/redis-cli -h 192.168.4.8
192.168.4.8:6379> get name
"zhangsan"
4.3 安装keepavlied
两台安装方式一样,配置文件不一样
[[email protected] ~]# yum -y install keepalived
[[email protected] ~]# chkconfig keepalived --add
[[email protected] ~]# chkconfig keepalived on
[[email protected] ~]# vim /etc/keepalived/keepalived.conf
! Configuration File for keepalived
global_defs {
notification_email {
}
notification_email_from [email protected]
smtp_server 127.0.0.1
smtp_connect_timeout 30
router_id f-1 #将redis-2改为他的的标识
}
vrrp_script redis {
script /opt/chk_redis.sh
interval 2
weight -10
}
vrrp_instance VI_1 {
state MASTER
interface eth0
virtual_router_id 51
priority 100
advert_int 1
authentication {
auth_type PASS
auth_pass 1111
}
track_script {
redis
}
virtual_ipaddress {
192.168.4.100 #vip
}
}
[[email protected] ~]# /etc/init.d/keepalived start
4.4 keepavlied健康检查脚本
[[email protected] ~]# vim /opt/check_redis.sh
#!/bin/bash
# check redis server st="/usr/local/nginx/sbin/nginx"
REDIS="/usr/local/redis/bin/redis-server /usr/local/redis/etc/redis.conf"
redispid=$(ps -C redis-server --no-header |wc -l)
if [ $redispid -eq 0 ];then
$REDIS
sleep 3
redispid=$(ps -C redis-server --no-header |wc -l)
if [ $redispid -eq 0 ];then
/etc/init.d/keepalived stop
echo "Keepalived stopped ,please check your redis !"|tee -a /var/log/messages
fi
fi
五、修改tomcat支持vip
5.1 在两台tomcat做相同的操作
将redis的ip地址改为vip的ip地址,以支持vip漂移
[[email protected] ~]# vim /usr/local/tomcat/conf/context.xml
…..
36 host="192.168.4.100" # 将192.168.4.7改为 192.168.4.100
……
5.2关闭redis-1的keepavlied和redis服务
[[email protected] ~]# /etc/init.d/keepalived stop
Stopping keepalived: [ OK ]
[[email protected] ~]# killall -9 redis-server
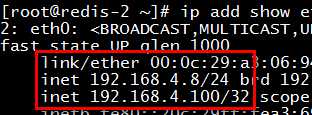
测试vip漂移:

查看redis-2

测试session id主从复制:


以上是关于nginx+tomcat+redis sesson id主从复制的主要内容,如果未能解决你的问题,请参考以下文章