Zabbix 3.2.6 通过Orabbix监控Oracle数据库
Posted
tags:
篇首语:本文由小常识网(cha138.com)小编为大家整理,主要介绍了Zabbix 3.2.6 通过Orabbix监控Oracle数据库相关的知识,希望对你有一定的参考价值。
一、背景
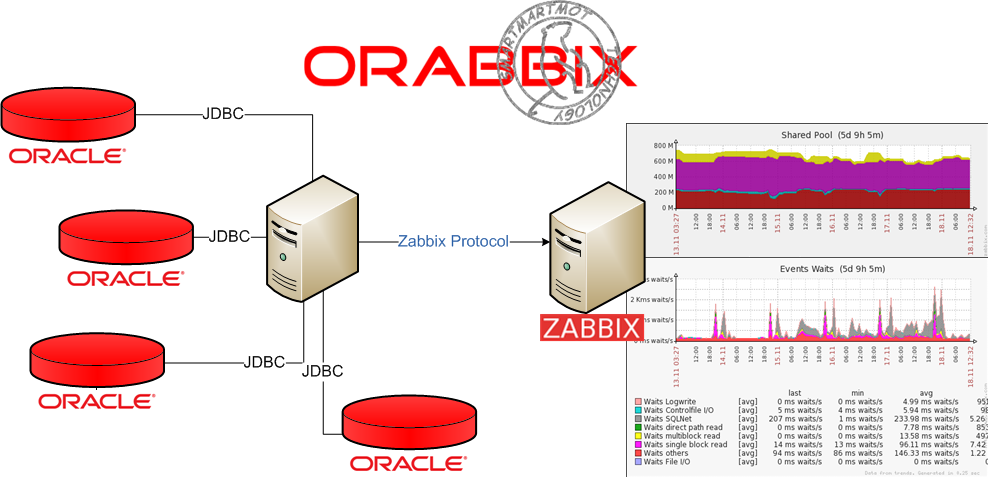
公司业务使用的是一直Oracle数据库,因为多次出现表空间满的时候不能及时发现,每次都是业务组的人员通知处理,这样下来DBA这边就比较被动,所以老大要求监控表空间剩余大小并且当剩余过小时能够及时报警。刚想出来的方案是通过写脚本获取表空间的数据,通脚本中使用expect自动输入密码登陆oracle用户然后再登陆数据库查询数据返回给zabbix_server。但是由于脚本运行时间大概12秒左右,zabbix获取数据总是超时,在网上搜索中发现zabbix插件orabbix,原理是通过orabbix登陆被监控主机oracle数据库,查询数据。个人认为非常好用,包括自定义监控项。唯一的麻烦就是需要在配置文件中添加每一个数据库服务器ip、数据库用户、密码。
二、Orabbix介绍
Orabbix是设计用来为zabbix监控Oracle的数据库的插件,它提供多层次的监控,包括可用性和服务器性能的指标。它提供了从众多Oracle实例采集的有效机制,进而提供此信息的监控和性能指标。然后,您可以利用的zabbix的报告功能为收集的所有数据,并提供分析。目前的发行版中包含了一组预先定义的模板,包括从初始部署报警和图形功能。然而,这些可以进行微调,以满足您额需求和数据/监控要求。
三、Orabbix功能
DB Version (i.e. Validity of package)
Archiving (Archive log production with trend analysis)
Event Waits (Files I/O, single block read, multi-block read, direct path read, SQLNet Messages, Control file I/O, Log Write)
Hit Ratio (Hit Ratio on Triggers, Tables/Procedures, SQL Area, Body)
Logical I/O (Server performance on Logical I/O of: Current Read, Consistent Read, Block Change)
Physical I/O (Redo Writes, Datafile Writes, Datafile Reads)
PGA
SGA (In particular; Fixed Buffer, Java Pool, Large Pool, Log Buffer, Shared Poolm Buffer Cache)
Shared Pool (Pool Dictionary Cache, Pool Free Memory, Library Chache, SQL Area, MISC.)
Pin Hit Ratio (Oracle library cache pin are caused by contention with the library cache, the area used to store SQL executables for re-use)
Sessions / Processes
Sessions (Active Sessions, Inactive Sessions, System Sessions)
DBSize/DBFileSize (DBSize size of database really used space and of Filesize)
四、Orabbix的安装配置
其实orabbix只需要安装在一台服务器即可,我就选择安装在Zabbix Server上,当然上面的jdk是为orabbix服务的,因为orabbix就是一个oracle客户端去查找oracle中的数据,然后传给zabbix。
关于JDK的安装可以参加我其他的博文,安装非常简单,这里不再进行介绍。
1、下载Orabbix
建议使用我修改好的软件,下载地址为http://down.51cto.com/data/2337373。
unzip Orabbix-1.2.3.zip
mv orabbix-1.2.3 /usr/local/orabbix
2、调整配置文件
cd /usr/local/orabbix
cp init.d/orabbix /etc/init.d/
chmod +x /etc/init.d/orabbix
chmod +x /usr/local/orabbix/run.sh
3、创建数据库账号
首先我们需要在被监控的Oracle上面创建一个账号,用于zabbix的数据获取,在oracle的sqlplus里面执行。
CREATE USER ZABBIX
IDENTIFIED BY "zabbix"
DEFAULT TABLESPACE SYSTEM
TEMPORARY TABLESPACE TEMP
PROFILE DEFAULT
ACCOUNT UNLOCK;

#2 Roles for ZABBIX

GRANT CONNECT TO ZABBIX;
GRANT RESOURCE TO ZABBIX;
ALTER USER ZABBIX DEFAULT ROLE ALL;

#5 System Privileges for ZABBIX

GRANT SELECT ANY TABLE TO ZABBIX;
GRANT CREATE SESSION TO ZABBIX;
GRANT SELECT ANY DICTIONARY TO ZABBIX;
GRANT UNLIMITED TABLESPACE TO ZABBIX;
GRANT SELECT ANY DICTIONARY TO ZABBIX;
如果我们的数据库是Oracle 11g,我们还需要执行下面的语句。
exec dbms_network_acl_admin.create_acl(acl => ‘resolve.xml‘,description => ‘resolve acl‘, principal =>‘ZABBIX‘, is_grant => true, privilege => ‘resolve‘);
exec dbms_network_acl_admin.assign_acl(acl => ‘resolve.xml‘, host =>‘*‘);
commit;
4、配置config.props
config.props是Orabbix的配置文件,路径为/usr/local/orabbix/conf。
cp config.props.sample config.props
打开配置文件,修改后内容如下:
#comma separed list of Zabbix servers
ZabbixServerList=ZabbixServer1

ZabbixServer1.Address=10.0.0.14
ZabbixServer1.Port=10051

#pidFile
OrabbixDaemon.PidFile=./logs/orabbix.pid
#frequency of item‘s refresh
OrabbixDaemon.Sleep=300
#MaxThreadNumber should be >= than the number of your databases
OrabbixDaemon.MaxThreadNumber=100

#put here your databases in a comma separated list
DatabaseList=10.0.2.64,10.0.2.63

#Configuration of Connection pool
#if not specified Orabbis is going to use default values (hardcoded)
#Maximum number of active connection inside pool
DatabaseList.MaxActive=10
#The maximum number of milliseconds that the pool will wait
#(when there are no available connections) for a connection to be returned
#before throwing an exception, or <= 0 to wait indefinitely.
DatabaseList.MaxWait=100
DatabaseList.MaxIdle=1

#define here your connection string for each database
10.0.2.64.Url=jdbc:oracle:thin:@10.0.2.64:1521:unicode
10.0.2.64.User=zabbix
10.0.2.64.Password=zabbix
#Those values are optionals if not specified Orabbix is going to use the general values
10.0.2.64.MaxActive=10
10.0.2.64.MaxWait=100
10.0.2.64.MaxIdle=1
10.0.2.64.QueryListFile=./conf/query.props

#define here your connection string for each database
10.0.2.63.Url=jdbc:oracle:thin:@10.0.2.63:1521:orcl
10.0.2.63.User=zabbix
10.0.2.63.Password=zabbix
#Those values are optionals if not specified Orabbix is going to use the general values
10.0.2.63.MaxActive=10
10.0.2.63.MaxWait=100
10.0.2.63.MaxIdle=1
10.0.2.63.QueryListFile=./conf/query.props
备注:
ZabbixServerList:可以设置多个,用","进行分割;
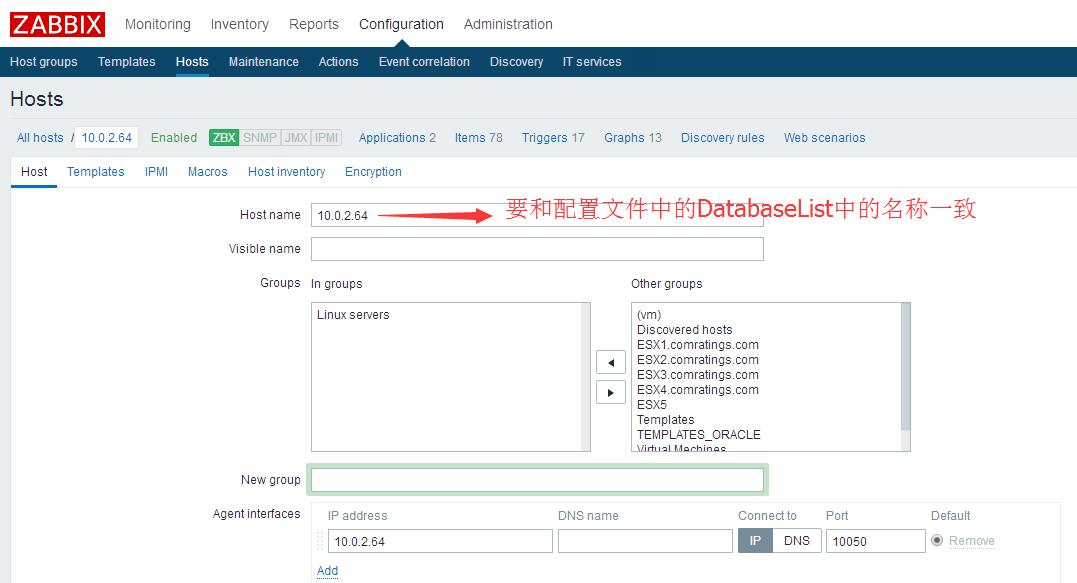
DatabaseList:可以设置多个被监控的Oracle数据库服务器,用","进行分割,该名称要和zabbix server界面中的Host name保持一致,该配置文件中后续所引用的设定都以该名称为准。
五、启动Orabbix服务
service orabbix start
六、配置Zabbix添加监控
1、导入模板
模板在软件包的template目录下面,全部导入即可。
Configuration-->Templates-->Import
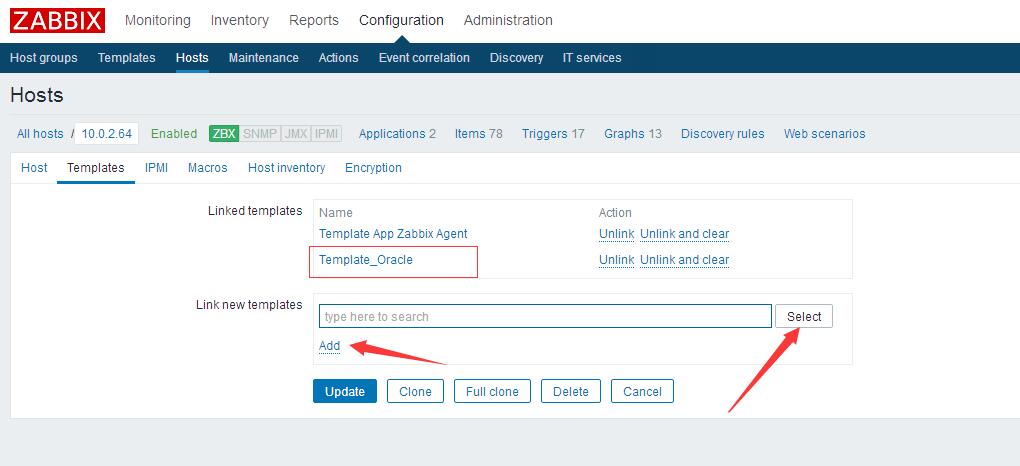
2、Oracle主机添加监控模板
七、验证
参考文档:http://www.smartmarmot.com/wiki/index.php?title=Orabbix
本文出自 “运维点滴记录” 博客,请务必保留此出处http://wzlinux.blog.51cto.com/8021085/1969377
以上是关于Zabbix 3.2.6 通过Orabbix监控Oracle数据库的主要内容,如果未能解决你的问题,请参考以下文章


