Win10专业版 x64系统下安装LoadRunner11后
Posted
tags:
篇首语:本文由小常识网(cha138.com)小编为大家整理,主要介绍了Win10专业版 x64系统下安装LoadRunner11后相关的知识,希望对你有一定的参考价值。
参考技术A • 按win+R键打开运行,输入gpedit.msc,点击确定。• 点击计算机配置,双击“Windows设置”,双击“安全设置”。
• 双击“本地策略”,然后双击“安全选项”,滚轮转动往下拉,找到用户账户控制,选择以管理员模式批准运行所有管理员。
• 双击打开,点击“禁用”,点击确定即可。
在LR的bin目录下,选择Wlrun.exe文件,右键单击,选择属性;在兼容性里面把兼容性模式改为Windows XP (Service Pack 3),应用保存;然后再关闭controller,重新打开运行。
windows下PyCharm安装及使用
一、首先安装pycharm,可以参考这篇文章:http://www.jianshu.com/p/042324342bf4
1、win10_X64,其他Win版本也可以。 2、PyCharm版本:Professional-2016.2.3。
1、到PyCharm官网下载PyCharm安装包。
![技术分享图片](http://upload-images.jianshu.io/upload_images/1152061-af5f47123462aa88.png?imageMogr2/auto-orient/strip%7CimageView2/2/w/1240)
Download
![技术分享图片](http://upload-images.jianshu.io/upload_images/1152061-af5f47123462aa88.png?imageMogr2/auto-orient/strip%7CimageView2/2/w/1240)
Download
2、选择Windows系统的专业版下载。
![技术分享图片](http://upload-images.jianshu.io/upload_images/1152061-d1c6c9303ad5b2c2.png?imageMogr2/auto-orient/strip%7CimageView2/2/w/1240)
下载
![技术分享图片](http://upload-images.jianshu.io/upload_images/1152061-d1c6c9303ad5b2c2.png?imageMogr2/auto-orient/strip%7CimageView2/2/w/1240)
下载
3、下载好的安装包。
安装包信息
安装包信息
1、双击安装包进行安装。
![技术分享图片](http://upload-images.jianshu.io/upload_images/1152061-a3294346b4102626.png?imageMogr2/auto-orient/strip%7CimageView2/2/w/1240)
安装软件
![技术分享图片](http://upload-images.jianshu.io/upload_images/1152061-a3294346b4102626.png?imageMogr2/auto-orient/strip%7CimageView2/2/w/1240)
安装软件
2、自定义软件安装路径(建议路径中不要中文字符)。
![技术分享图片](http://upload-images.jianshu.io/upload_images/1152061-473fe858918d46da.png?imageMogr2/auto-orient/strip%7CimageView2/2/w/1240)
自定义安装路径
![技术分享图片](http://upload-images.jianshu.io/upload_images/1152061-473fe858918d46da.png?imageMogr2/auto-orient/strip%7CimageView2/2/w/1240)
自定义安装路径
3、创建桌面快捷方式并关联*.py文件。
![技术分享图片](http://upload-images.jianshu.io/upload_images/1152061-0dc8a3e19e8ac295.png?imageMogr2/auto-orient/strip%7CimageView2/2/w/1240)
创建快捷方式
![技术分享图片](http://upload-images.jianshu.io/upload_images/1152061-0dc8a3e19e8ac295.png?imageMogr2/auto-orient/strip%7CimageView2/2/w/1240)
创建快捷方式
4、选择开始菜单文件夹(默认即可),点击安装。
![技术分享图片](http://upload-images.jianshu.io/upload_images/1152061-ec05d51d8c387922.png?imageMogr2/auto-orient/strip%7CimageView2/2/w/1240)
选择文件夹
![技术分享图片](http://upload-images.jianshu.io/upload_images/1152061-ec05d51d8c387922.png?imageMogr2/auto-orient/strip%7CimageView2/2/w/1240)
选择文件夹
5、耐心等待安装。
![技术分享图片](http://upload-images.jianshu.io/upload_images/1152061-4c047b85f0c17ffe.png?imageMogr2/auto-orient/strip%7CimageView2/2/w/1240)
等待安装
![技术分享图片](http://upload-images.jianshu.io/upload_images/1152061-4c047b85f0c17ffe.png?imageMogr2/auto-orient/strip%7CimageView2/2/w/1240)
等待安装
6、安装完成,勾选立即运行PyCharm。
![技术分享图片](http://upload-images.jianshu.io/upload_images/1152061-ae2d233d08abc9bb.png?imageMogr2/auto-orient/strip%7CimageView2/2/w/1240)
安装完成
![技术分享图片](http://upload-images.jianshu.io/upload_images/1152061-ae2d233d08abc9bb.png?imageMogr2/auto-orient/strip%7CimageView2/2/w/1240)
安装完成
7、选择是否导入开发环境配置文件,我们选择不导入。
![技术分享图片](http://upload-images.jianshu.io/upload_images/1152061-005719e55dd709b9.png?imageMogr2/auto-orient/strip%7CimageView2/2/w/1240)
导入配置文件
![技术分享图片](http://upload-images.jianshu.io/upload_images/1152061-005719e55dd709b9.png?imageMogr2/auto-orient/strip%7CimageView2/2/w/1240)
导入配置文件
8、阅读协议并同意(少年,选择略过吧)。
![技术分享图片](http://upload-images.jianshu.io/upload_images/1152061-1fa983d52b8106fd.png?imageMogr2/auto-orient/strip%7CimageView2/2/w/1240)
阅读协议
![技术分享图片](http://upload-images.jianshu.io/upload_images/1152061-1fa983d52b8106fd.png?imageMogr2/auto-orient/strip%7CimageView2/2/w/1240)
阅读协议
9、选择输入激活码激活软件(请阅读下一步获取激活码)。
![技术分享图片](http://upload-images.jianshu.io/upload_images/1152061-53453ffc2ec1df04.png?imageMogr2/auto-orient/strip%7CimageView2/2/w/1240)
激活软件
![技术分享图片](http://upload-images.jianshu.io/upload_images/1152061-53453ffc2ec1df04.png?imageMogr2/auto-orient/strip%7CimageView2/2/w/1240)
激活软件
10、软件激活方式 ??1、推荐购买正版软件。 ??2、可以选择下载社区版本,免费的。 ??3、专业版本可以选择试用,免费试用30天。 ??4、网上寻找激活码或授权服务器。 我们使用第4种方法: ??在IntelliJ IDEA 注册码网站,获取激活码,以前允许自定义用户名,现在已经是No了,只能直接获取激活码。
![技术分享图片](http://upload-images.jianshu.io/upload_images/1152061-ca8574ba996fff32.png?imageMogr2/auto-orient/strip%7CimageView2/2/w/1240)
获取注册码
![技术分享图片](http://upload-images.jianshu.io/upload_images/1152061-ca8574ba996fff32.png?imageMogr2/auto-orient/strip%7CimageView2/2/w/1240)
获取注册码
点击获取激活码后,文本默认是全选中的,直接右击选择复制即可。
![技术分享图片](http://upload-images.jianshu.io/upload_images/1152061-60cc9e5bd32f1475.png?imageMogr2/auto-orient/strip%7CimageView2/2/w/1240)
复制激活码
![技术分享图片](http://upload-images.jianshu.io/upload_images/1152061-60cc9e5bd32f1475.png?imageMogr2/auto-orient/strip%7CimageView2/2/w/1240)
复制激活码
11、将激活码粘贴到文本框,点击OK即可。
![技术分享图片](http://upload-images.jianshu.io/upload_images/1152061-8af69f786fe4ccb1.png?imageMogr2/auto-orient/strip%7CimageView2/2/w/1240)
粘贴激活码
![技术分享图片](http://upload-images.jianshu.io/upload_images/1152061-8af69f786fe4ccb1.png?imageMogr2/auto-orient/strip%7CimageView2/2/w/1240)
粘贴激活码
12、PyCharm的欢迎界面。
![技术分享图片](http://upload-images.jianshu.io/upload_images/1152061-18de2e0daaa49f4a.png?imageMogr2/auto-orient/strip%7CimageView2/2/w/1240)
欢迎界面
![技术分享图片](http://upload-images.jianshu.io/upload_images/1152061-18de2e0daaa49f4a.png?imageMogr2/auto-orient/strip%7CimageView2/2/w/1240)
欢迎界面
13、选择IDE主题与编辑区主题,建议Darcula主题(温馨提示:黑色更有利于保护眼睛噢!!!)。
![技术分享图片](http://upload-images.jianshu.io/upload_images/1152061-f0b7599e834fa79b.png?imageMogr2/auto-orient/strip%7CimageView2/2/w/1240)
选择主题
![技术分享图片](http://upload-images.jianshu.io/upload_images/1152061-f0b7599e834fa79b.png?imageMogr2/auto-orient/strip%7CimageView2/2/w/1240)
选择主题
14、由于我们更改主题,故会提示重启IDE,选择Yes。
![技术分享图片](http://upload-images.jianshu.io/upload_images/1152061-2842d3a880be0f41.png?imageMogr2/auto-orient/strip%7CimageView2/2/w/1240)
重启IDE
![技术分享图片](http://upload-images.jianshu.io/upload_images/1152061-2842d3a880be0f41.png?imageMogr2/auto-orient/strip%7CimageView2/2/w/1240)
重启IDE
15、选择创建新项目。
![技术分享图片](http://upload-images.jianshu.io/upload_images/1152061-339c8a1fb47ee99c.png?imageMogr2/auto-orient/strip%7CimageView2/2/w/1240)
创建新项目
![技术分享图片](http://upload-images.jianshu.io/upload_images/1152061-339c8a1fb47ee99c.png?imageMogr2/auto-orient/strip%7CimageView2/2/w/1240)
创建新项目
16、自定义项目存储路径,IDE默认会关联Python解释器。
![技术分享图片](http://upload-images.jianshu.io/upload_images/1152061-3f2c4845eb472943.png?imageMogr2/auto-orient/strip%7CimageView2/2/w/1240)
配置项目
![技术分享图片](http://upload-images.jianshu.io/upload_images/1152061-3f2c4845eb472943.png?imageMogr2/auto-orient/strip%7CimageView2/2/w/1240)
配置项目
17、IDE提供的提示,我选择在启动时不显示提示。
![技术分享图片](http://upload-images.jianshu.io/upload_images/1152061-f7d733ed911cf04a.png?imageMogr2/auto-orient/strip%7CimageView2/2/w/1240)
关闭提示
![技术分享图片](http://upload-images.jianshu.io/upload_images/1152061-f7d733ed911cf04a.png?imageMogr2/auto-orient/strip%7CimageView2/2/w/1240)
关闭提示
编程最常见的是什么?(肯定不是Bug),而是代码了,绝大部分人都一直使用编辑器默认的字体,其实,换一套适合自己的编程字体不仅能让代码看得更舒服,甚至还能提高工作效率的! 那么如何选择编程字体呢?What!!! ??1、等宽字体。 ??2、有辨识度,即0与O,1与l的区别。 推荐一款编程字体Hack,进入Hack官网,点击Download。
![技术分享图片](http://upload-images.jianshu.io/upload_images/1152061-64784c703d148216.png?imageMogr2/auto-orient/strip%7CimageView2/2/w/1240)
Download
![技术分享图片](http://upload-images.jianshu.io/upload_images/1152061-64784c703d148216.png?imageMogr2/auto-orient/strip%7CimageView2/2/w/1240)
Download
选择适合Windows系统的软件包下载。
![技术分享图片](http://upload-images.jianshu.io/upload_images/1152061-0e3f8555fa15c875.png?imageMogr2/auto-orient/strip%7CimageView2/2/w/1240)
选择系统
![技术分享图片](http://upload-images.jianshu.io/upload_images/1152061-0e3f8555fa15c875.png?imageMogr2/auto-orient/strip%7CimageView2/2/w/1240)
选择系统
进入GitHub下载安装程序。
![技术分享图片](http://upload-images.jianshu.io/upload_images/1152061-687c597d2d2348c6.png?imageMogr2/auto-orient/strip%7CimageView2/2/w/1240)
下载安装程序
![技术分享图片](http://upload-images.jianshu.io/upload_images/1152061-687c597d2d2348c6.png?imageMogr2/auto-orient/strip%7CimageView2/2/w/1240)
下载安装程序
下载完成的安装包,双击安装即可。
![技术分享图片](http://upload-images.jianshu.io/upload_images/1152061-63b61c7ef65efee9.png?imageMogr2/auto-orient/strip%7CimageView2/2/w/1240)
安装包
![技术分享图片](http://upload-images.jianshu.io/upload_images/1152061-63b61c7ef65efee9.png?imageMogr2/auto-orient/strip%7CimageView2/2/w/1240)
安装包
1、显示/隐藏功能侧边栏(软件的左下角)。
![技术分享图片](http://upload-images.jianshu.io/upload_images/1152061-04f1ca2b2278333e.png?imageMogr2/auto-orient/strip%7CimageView2/2/w/1240)
功能侧边栏
![技术分享图片](http://upload-images.jianshu.io/upload_images/1152061-04f1ca2b2278333e.png?imageMogr2/auto-orient/strip%7CimageView2/2/w/1240)
功能侧边栏
2、显示项目目录结构。
![技术分享图片](http://upload-images.jianshu.io/upload_images/1152061-0fe5643b3734ac94.png?imageMogr2/auto-orient/strip%7CimageView2/2/w/1240)
项目目录结构
![技术分享图片](http://upload-images.jianshu.io/upload_images/1152061-0fe5643b3734ac94.png?imageMogr2/auto-orient/strip%7CimageView2/2/w/1240)
项目目录结构
3、配置IDE,按照下图,进入Settings。
![技术分享图片](http://upload-images.jianshu.io/upload_images/1152061-d5290f61a0566035.png?imageMogr2/auto-orient/strip%7CimageView2/2/w/1240)
Settings
![技术分享图片](http://upload-images.jianshu.io/upload_images/1152061-d5290f61a0566035.png?imageMogr2/auto-orient/strip%7CimageView2/2/w/1240)
Settings
4、设置显示行号,显示空白字符。
![技术分享图片](http://upload-images.jianshu.io/upload_images/1152061-8854ff179c7689bc.png?imageMogr2/auto-orient/strip%7CimageView2/2/w/1240)
配置行号
![技术分享图片](http://upload-images.jianshu.io/upload_images/1152061-8854ff179c7689bc.png?imageMogr2/auto-orient/strip%7CimageView2/2/w/1240)
配置行号
5、设置编程字体为Hack,字体大小为15。
![技术分享图片](http://upload-images.jianshu.io/upload_images/1152061-8388418eb881a52a.png?imageMogr2/auto-orient/strip%7CimageView2/2/w/1240)
设置编程字体
![技术分享图片](http://upload-images.jianshu.io/upload_images/1152061-8388418eb881a52a.png?imageMogr2/auto-orient/strip%7CimageView2/2/w/1240)
设置编程字体
6、设置控制台字体为Hack,字体大小为15。
![技术分享图片](http://upload-images.jianshu.io/upload_images/1152061-03a6980f6073bfff.png?imageMogr2/auto-orient/strip%7CimageView2/2/w/1240)
设置控制台字体
![技术分享图片](http://upload-images.jianshu.io/upload_images/1152061-03a6980f6073bfff.png?imageMogr2/auto-orient/strip%7CimageView2/2/w/1240)
设置控制台字体
7、修改新建*.py文件的模版,首行添加默认解释器(方便在Linux运行),添加文件编码。
![技术分享图片](http://upload-images.jianshu.io/upload_images/1152061-f694f77a76289ad4.png?imageMogr2/auto-orient/strip%7CimageView2/2/w/1240)
修改模版
![技术分享图片](http://upload-images.jianshu.io/upload_images/1152061-f694f77a76289ad4.png?imageMogr2/auto-orient/strip%7CimageView2/2/w/1240)
修改模版
8、设置Python默认解释器,添加额外的扩展包,
![技术分享图片](http://upload-images.jianshu.io/upload_images/1152061-26a09e44bc15699c.png?imageMogr2/auto-orient/strip%7CimageView2/2/w/1240)
设置默认解释器
![技术分享图片](http://upload-images.jianshu.io/upload_images/1152061-26a09e44bc15699c.png?imageMogr2/auto-orient/strip%7CimageView2/2/w/1240)
设置默认解释器
1、Ctrl + Enter:在下方新建行但不移动光标; 2、Shift + Enter:在下方新建行并移到新行行首; 3、Ctrl + /:注释(取消注释)选择的行; 4、Ctrl + Alt + L:格式化代码(与QQ锁定热键冲突,关闭QQ的热键); 5、Ctrl + Shift + +:展开所有的代码块; 6、Ctrl + Shift + -:收缩所有的代码块; 7、Ctrl + Alt + I:自动缩进行; 8、Alt + Enter:优化代码,添加包; 9、Ctrl + Shift + F:高级查找; 10、Alt + Shift + Q:更新代码到远程服务器;
有时我们需要在Windows上编写代码,在Linux运行代码,或着是团队合作开发项目,我们就需要远程连接Linux服务器进行编程。 ??在这里我使用虚拟机假装远程服务器(尴尬),虚拟机IP地址:192.168.10.50,使用XShell(ssh协议)连接服务器(虚拟机),使用PyCharm(sftp协议)连接服务器(虚拟机)。 1、在XShell上查看虚拟机IP地址。
![技术分享图片](http://upload-images.jianshu.io/upload_images/1152061-6527776403df29e3.png?imageMogr2/auto-orient/strip%7CimageView2/2/w/1240)
查看虚拟机IP地址
![技术分享图片](http://upload-images.jianshu.io/upload_images/1152061-6527776403df29e3.png?imageMogr2/auto-orient/strip%7CimageView2/2/w/1240)
查看虚拟机IP地址
2、在虚拟机上创建项目工作空间。
![技术分享图片](http://upload-images.jianshu.io/upload_images/1152061-35daec61a17a2b81.png?imageMogr2/auto-orient/strip%7CimageView2/2/w/1240)
创建目录
![技术分享图片](http://upload-images.jianshu.io/upload_images/1152061-35daec61a17a2b81.png?imageMogr2/auto-orient/strip%7CimageView2/2/w/1240)
创建目录
3、在PyCharm上配置远程服务器。
![技术分享图片](http://upload-images.jianshu.io/upload_images/1152061-5d050434ce1c14f6.png?imageMogr2/auto-orient/strip%7CimageView2/2/w/1240)
Configuration
![技术分享图片](http://upload-images.jianshu.io/upload_images/1152061-5d050434ce1c14f6.png?imageMogr2/auto-orient/strip%7CimageView2/2/w/1240)
Configuration
4、添加新连接。
![技术分享图片](http://upload-images.jianshu.io/upload_images/1152061-28ba6e0111ad5b9c.png?imageMogr2/auto-orient/strip%7CimageView2/2/w/1240)
添加新连接
![技术分享图片](http://upload-images.jianshu.io/upload_images/1152061-28ba6e0111ad5b9c.png?imageMogr2/auto-orient/strip%7CimageView2/2/w/1240)
添加新连接
5、设置连接名称及使用的协议类型。
![技术分享图片](http://upload-images.jianshu.io/upload_images/1152061-93ec4423df36e08b.png?imageMogr2/auto-orient/strip%7CimageView2/2/w/1240)
配置连接
![技术分享图片](http://upload-images.jianshu.io/upload_images/1152061-93ec4423df36e08b.png?imageMogr2/auto-orient/strip%7CimageView2/2/w/1240)
配置连接
6、设置主机IP地址,工作空间(之前已创建),登录信息。
![技术分享图片](http://upload-images.jianshu.io/upload_images/1152061-a285d4137ec6cef0.png?imageMogr2/auto-orient/strip%7CimageView2/2/w/1240)
配置详细信息
![技术分享图片](http://upload-images.jianshu.io/upload_images/1152061-a285d4137ec6cef0.png?imageMogr2/auto-orient/strip%7CimageView2/2/w/1240)
配置详细信息
7、浏览远程服务器。
![技术分享图片](http://upload-images.jianshu.io/upload_images/1152061-25bb77d93a21d617.png?imageMogr2/auto-orient/strip%7CimageView2/2/w/1240)
浏览远程服务器
![技术分享图片](http://upload-images.jianshu.io/upload_images/1152061-25bb77d93a21d617.png?imageMogr2/auto-orient/strip%7CimageView2/2/w/1240)
浏览远程服务器
8、在服务器上新建文件。
![技术分享图片](http://upload-images.jianshu.io/upload_images/1152061-604e00aec8524754.png?imageMogr2/auto-orient/strip%7CimageView2/2/w/1240)
新建文件
![技术分享图片](http://upload-images.jianshu.io/upload_images/1152061-604e00aec8524754.png?imageMogr2/auto-orient/strip%7CimageView2/2/w/1240)
新建文件
9、编写代码。
![技术分享图片](http://upload-images.jianshu.io/upload_images/1152061-3ecb4cbc3dba08a7.png?imageMogr2/auto-orient/strip%7CimageView2/2/w/1240)
编写代码
![技术分享图片](http://upload-images.jianshu.io/upload_images/1152061-3ecb4cbc3dba08a7.png?imageMogr2/auto-orient/strip%7CimageView2/2/w/1240)
编写代码
10、点击编辑区右上角更新代码到服务器。
![技术分享图片](http://upload-images.jianshu.io/upload_images/1152061-3840662230e80217.png?imageMogr2/auto-orient/strip%7CimageView2/2/w/1240)
更新代码
![技术分享图片](http://upload-images.jianshu.io/upload_images/1152061-3840662230e80217.png?imageMogr2/auto-orient/strip%7CimageView2/2/w/1240)
更新代码
11、设置文件的权限,添加执行权限。
![技术分享图片](http://upload-images.jianshu.io/upload_images/1152061-9aded07b44eb04cb.png?imageMogr2/auto-orient/strip%7CimageView2/2/w/1240)
设置文件的权限
![技术分享图片](http://upload-images.jianshu.io/upload_images/1152061-9aded07b44eb04cb.png?imageMogr2/auto-orient/strip%7CimageView2/2/w/1240)
设置文件的权限
![技术分享图片](http://upload-images.jianshu.io/upload_images/1152061-a6a3f67a0dc97727.png?imageMogr2/auto-orient/strip%7CimageView2/2/w/1240)
添加执行权限
![技术分享图片](http://upload-images.jianshu.io/upload_images/1152061-a6a3f67a0dc97727.png?imageMogr2/auto-orient/strip%7CimageView2/2/w/1240)
添加执行权限
12、使用XShell执行脚本文件。
![技术分享图片](http://upload-images.jianshu.io/upload_images/1152061-8a872858d1e0f8ca.png?imageMogr2/auto-orient/strip%7CimageView2/2/w/1240)
执行脚本文件
![技术分享图片](http://upload-images.jianshu.io/upload_images/1152061-8a872858d1e0f8ca.png?imageMogr2/auto-orient/strip%7CimageView2/2/w/1240)
执行脚本文件
1、安装JDK开发环境
下载网站:http://www.oracle.com/
![技术分享图片](https://image.cha138.com/20210812/b585c02ad59f42fd810ed56d9d16b1ef.jpg)
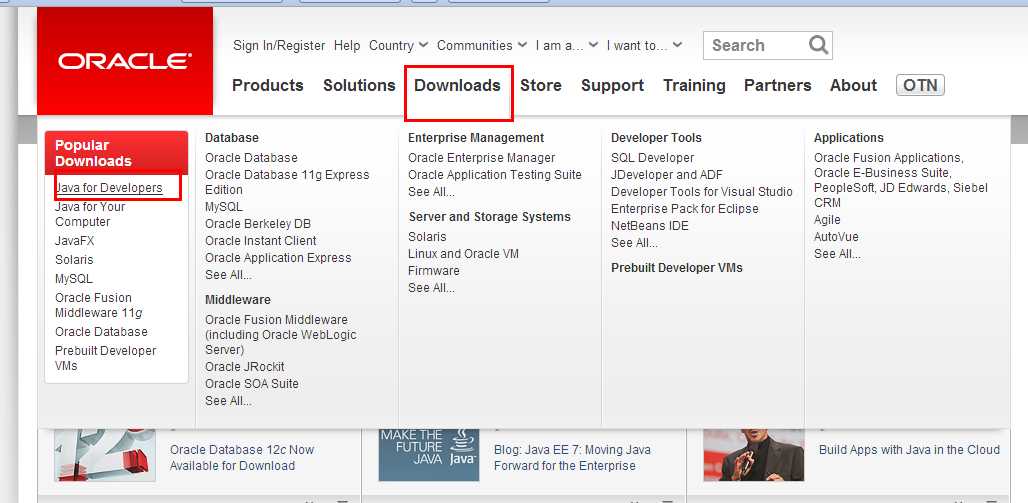
6b9eaac7-7ad0-4267-9319-e6e15b32c9cf[1]
![技术分享图片](https://image.cha138.com/20210812/452159c8f9704a5dba615b4428dd77f3.jpg)
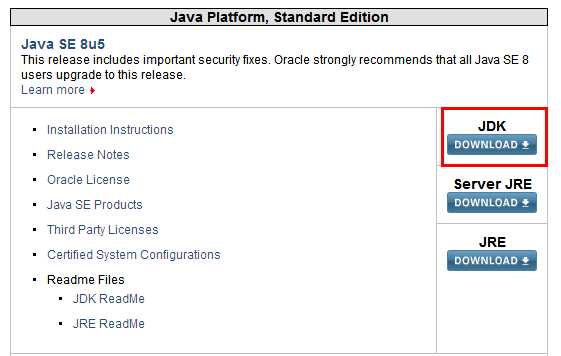
dd697eb7-69ef-4361-9d6a-954cb9816056[1]
![技术分享图片](https://image.cha138.com/20210812/e1c4d9e7e7ab415f9acef7642d33dbf2.jpg)
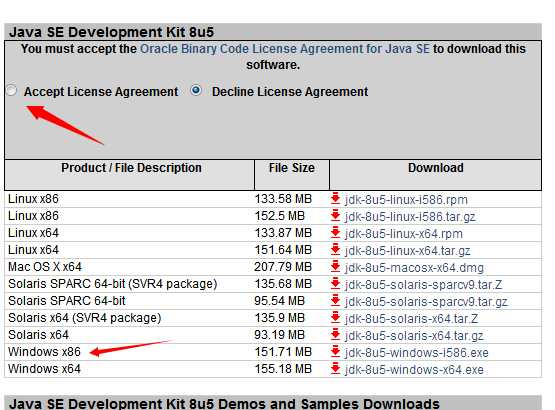
d8902921-5d36-4c68-adf4-b82b56f1c68c
开始安装JDK:
![技术分享图片](https://image.cha138.com/20210812/811633f9bcba4b7ba313097c22ca7998.jpg)
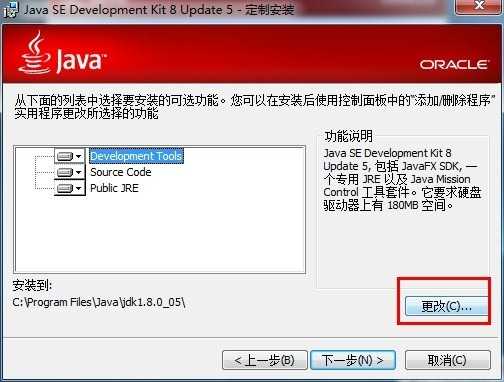
d47ed425-94b4-4413-83dd-c62d8081168f[1]
修改安装目录如下:
![技术分享图片](https://image.cha138.com/20210812/8d799adde9db41c4a22b96632a9d1635.jpg)
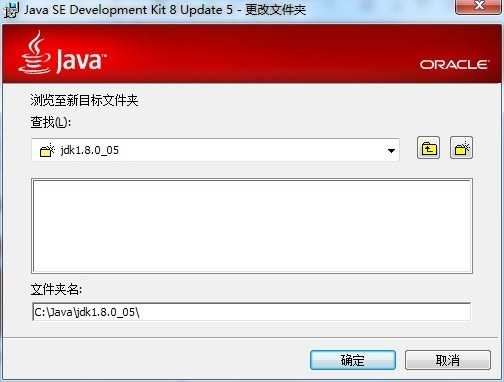
77aa84d8-4f3b-44cd-9461-327a7962286f[2]
确定之后,单击“下一步”。
注:当提示安装JRE时,可以选择不要安装。
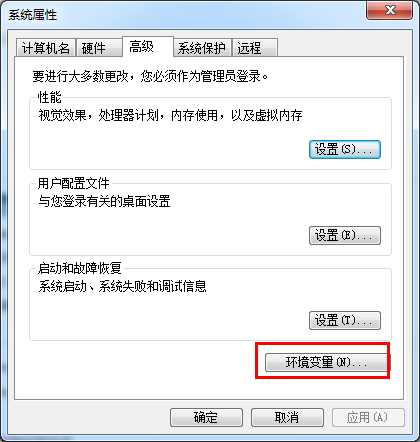
2、配置环境变量:
对于Java程序开发而言,主要会使用JDK的两个命令:javac.exe、java.exe。路径:C:Javajdk 1.7.0 _09in。但是这些命令由于不属于windows自己的命令,所以要想使用,就需要进行路径配置。
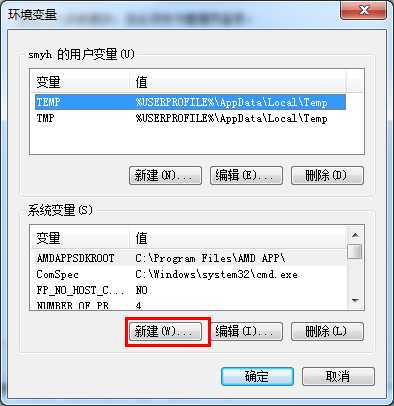
单击“计算机-属性-高级系统设置”,单击“环境变量”。在“系统变量”栏下单击“新建”,创建新的系统环境变量。
![技术分享图片](https://image.cha138.com/20210812/17a1558cec5c464480b2abd562471fcd.jpg)
50aa00df-6bb9-471c-81a7-363845b6f2b3
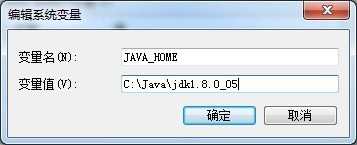
(1)新建->变量名"JAVA_HOME",变量值"C:Javajdk1.8.0_05"(即JDK的安装路径) (2)编辑->变量名"Path",在原变量值的最后面加上“;%JAVA_HOME%in;%JAVA_HOME%jrein” (3)新建->变量名“CLASSPATH”,变量值“.;%JAVA_HOME%lib;%JAVA_HOME%libdt.jar;%JAVA_HOME%lib ools.jar”
如:JAVA_HOME环境变量的操作如下:
![技术分享图片](https://image.cha138.com/20210812/26ffbc1db8ec495da54d1f9c24aba018.jpg)
23f073bb-cc49-43c1-8da1-099f9c18dda3[3]
![技术分享图片](https://image.cha138.com/20210812/cb90fe8000e64e4bbffab98c3a07e26b.jpg)
01747df9-c309-438d-a6f7-ea68f43c416c[1]
3、确认环境配置是否真确:
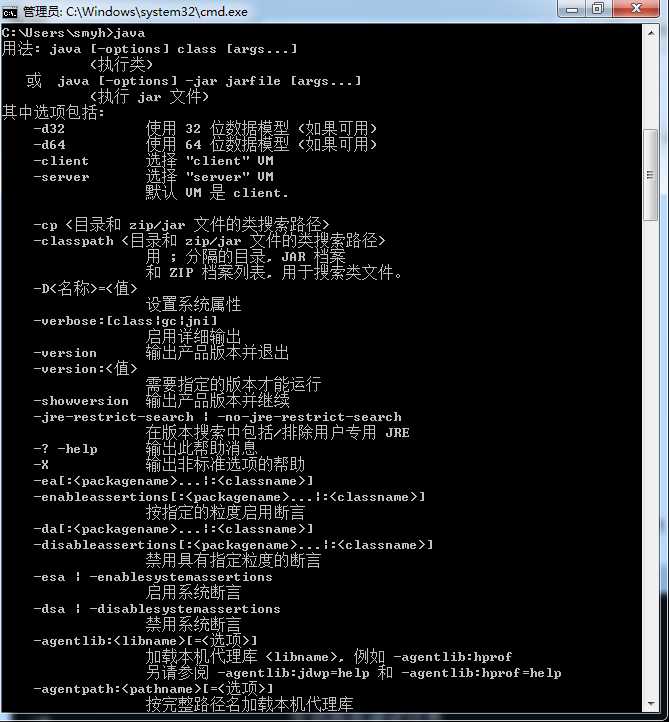
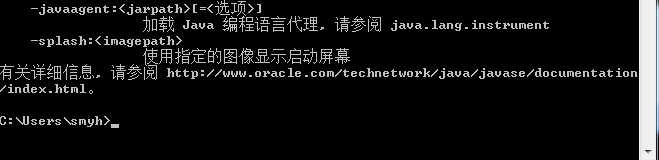
在控制台分别输入java,javac,java -version 命令,出现如下所示的JDK的编译器信息,包括修改命令的语法和参数选项等信息。
java命令:
![技术分享图片](https://image.cha138.com/20210812/2e571fee24c94830beeb04a48c5961d3.jpg)
3aa10479-a799-4805-b97f-c99c9f4c698c[1]
![技术分享图片](https://image.cha138.com/20210812/b1621d4a3d5e4c55902a628c09cb9248.jpg)
08c7092a-0487-46c1-9d45-024867dfc5e2[4]
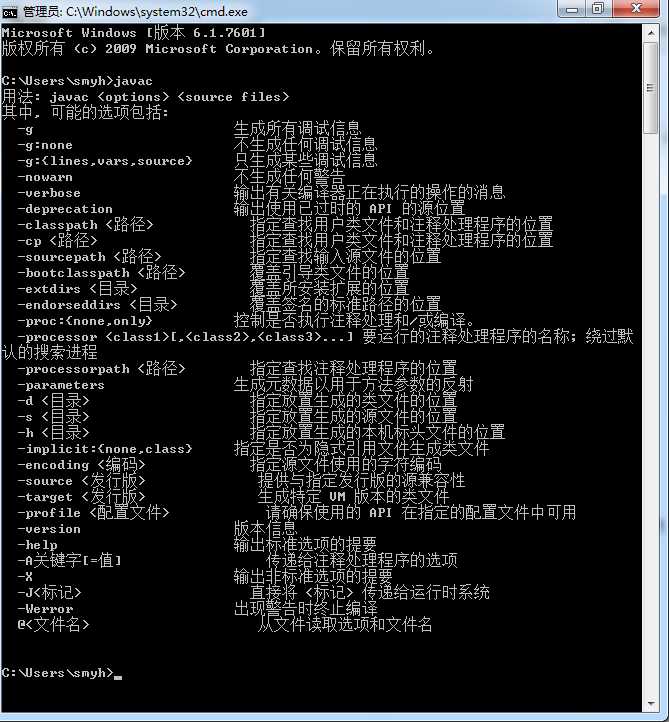
javac命令:
![技术分享图片](https://image.cha138.com/20210812/129e8c9feb974aa18fcf0b110ada7553.jpg)
6fa0a9a4-77f6-413f-bbdc-9f7afe093061[4]
java -version命令:
![技术分享图片](https://image.cha138.com/20210812/51bd5a5cf5804b4a8e5dbbaac59165ef.jpg)
c458fc01-02e6-4c27-b5bb-3fce15202360[4]
4、在控制台下验证第一个java程序:
public class Test { public static void main(String[] args) { Systerm.out.println("Hello Java"); } }
用记事本编写好,点击“保存”,并存入C盘根目录后,输入javac Test.java和java Test命令,即可运行程序(打印出结果“Hello Java”)。注:这两个命令是在D:javajdk1.8.0_20in目录下。
程序解析:
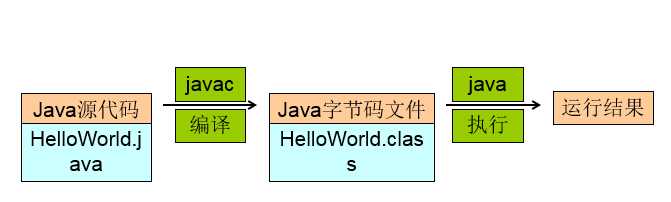
首先编写java源代码程序,扩展名.java;
在命令行模式中,输入命令:javac 源文件名.java,对源代码进行编译,生成class字节码文件;
编译完成后,如果没有报错信息,输入命令:java HelloWorld,对class字节码文件进行解释运行,执行时不需要添加.class扩展名。见下图:
![技术分享图片](https://image.cha138.com/20210812/b3c9b59f7f7b464e99655bb63670d3a1.jpg)
编译完成后,如果没有报错信息,输入命令:java HelloWorld,对class字节码文件进行解释运行,执行时不需要添加.class扩展名。见下图:
注:若在CMD中输入javac test.java命令后,显示‘javac‘不是内部或外部命令,原因是因为没有提前安装好JDK开发环境或环境变量配置有误。
以上是关于Win10专业版 x64系统下安装LoadRunner11后的主要内容,如果未能解决你的问题,请参考以下文章
2017.10.24日更新_ Win10x64x86企业版esd下载_版本号为:1709(10299.19)