Xmemcached学习笔记
Posted
tags:
篇首语:本文由小常识网(cha138.com)小编为大家整理,主要介绍了Xmemcached学习笔记相关的知识,希望对你有一定的参考价值。
memcached有三种java客户端
第一种:Com.danga 包下面的memcached,需引入jar(本人用的是memcached-2.5.2.jar 文末附上附件需要的可以下载)
第二种:spyMemcached
第三种:XMemcached
据说第三种是使用最简单,最好用的,我也只接触并使用过第三种
首先是xmemcached安装
1.memcached和libevent下载:
官网:http://www.monkey.org
2.解压安装libevent:
$ tar zxvf libevent-1.2.tar.gz
$ cd libevent-1.2
$ ./configure –prefix=/usr/libevent //这个prefix就是安装路径
$ make
$ make install
3.测试libevent是否安装成功:
# ls -al /usr/lib | grep libevent
lrwxrwxrwx 1 root root 21 11?? 12 17:38 libevent-1.2.so.1 -> libevent-1.2.so.1.0.3
-rwxr-xr-x 1 root root 263546 11?? 12 17:38 libevent-1.2.so.1.0.3
-rw-r–r– 1 root root 454156 11?? 12 17:38 libevent.a
-rwxr-xr-x 1 root root 811 11?? 12 17:38 libevent.la
lrwxrwxrwx 1 root root 21 11?? 12 17:38 libevent.so -> libevent-1.2.so.1.0.3
基本上如果是这样就是安装上了,如果报错,就一定要主义文件夹的操作权限(读入权限(chmod +r libevent 加入写入权限))
4.安装memcached,同时需要安装中指定libevent的安装位置:
# tar zxvf memcached-1.2.0.tar.gz
# cd memcached-1.2.0
# ./configure –prefix=/usr/memcached –with-libevent=/usr/libevent //同样的指定memcached的安装路径(默认的是在usr/local) 后面的指定为libevent的安装路径
# make
# make install
5.测试是否成功安装memcached:
# ls -al /usr/memcached/bin/mem*
-rwxr-xr-x 1 root root 137986 11?? 12 17:39 /usr/local/bin/memcached
-rwxr-xr-x 1 root root 140179 11?? 12 17:39 /usr/local/bin/memcached-debug
如果这样现实,基本上就成功了
启动服务:
memcached -d -m 100 -u root -c 10 -p 11211 -P /tmp/memcached1.pid
-p 指定端口号(默认11211)
-m 指定最大使用内存大小(默认64MB)
-t 线程数(默认4)
-l 连接的IP地址, 默认是本机
-d start 启动memcached服务
-d restart 重起memcached服务
-d stop|shutdown 关闭正在运行的memcached服务
-m 最大内存使用,单位MB。默认64MB
-M 内存耗尽时返回错误,而不是删除项
-c 最大同时连接数,默认是1024
-f 块大小增长因子,默认是1.25
-n 最小分配空间,key+value+flags默认是48
后面的P用于指定访问id记录,在启动和调用memcached之后生成
如果我们要查看是否有memcached进程:$ps -ef|grep memcached
连接试试看:telnet 服务器ip 端口(eg:telnet 127.0.0.1 11211)
很多人自己摸索学习没有linux服务器,我自己在学习的过程种也在自己电脑(windows系统)上装了一个,所以也简单说一下windows上面的安装(其实有百度教程的):
一:下载
http://downloads.northscale.com/memcached-win64-1.4.4-14.zip 或 www.newasp.net/soft/63735.html
二:安装启动
打开cmd,找到解压的位置,输入memcached.exe -d install 安装 memcached.exe -d start启动服务,如果想启用多个服务:sc create "Memcached Server1" start= auto binPath= "D:\\Memcached\\memcached.exe -d runservice -m 100 -p 11210 -l 127.0.0.1" DisplayName= "Memcached Server1",注意端口号不要重复,使用的时候启动该服务,新建的服务并没有立即启动。
##########################################
好的,基本上我们就装上了memcached
写一个简单的测试类:
package com.memcached.study;
import java.io.IOException;
import java.util.concurrent.TimeoutException;
import net.rubyeye.xmemcached.MemcachedClient;
import net.rubyeye.xmemcached.MemcachedClientBuilder;
import net.rubyeye.xmemcached.XMemcachedClientBuilder;
import net.rubyeye.xmemcached.command.BinaryCommandFactory;
import net.rubyeye.xmemcached.exception.MemcachedException;
import net.rubyeye.xmemcached.utils.AddrUtil;
public class TestXMemcache
{
public static void main(String[] args) {
int[] weight={1,2};
MemcachedClientBuilder builder = new XMemcachedClientBuilder(AddrUtil
.getAddresses("127.0.0.1:11211 127.0.0.1:11210"),weight);
//宕机报警
builder.setFailureMode(true);
//使用二进制协议,默认使用的TextCommandFactory即文本协议
builder.setCommandFactory(new BinaryCommandFactory());
MemcachedClient memcachedClient;
try {
memcachedClient = builder.build();
memcachedClient.set("hello", 0, "Hello,xmemcached");
String value = memcachedClient.get("hello");
System.out.println("hello=" + value);
//memcachedClient.delete("hello");
memcachedClient.set("zlex", 0, "Hello,xmemcached");
value = memcachedClient.get("zlex");
System.out.println("zlex=" + value);
// close memcached client
memcachedClient.shutdown();
} catch (MemcachedException e) {
System.err.println("MemcachedClient operation fail");
e.printStackTrace();
} catch (TimeoutException e) {
System.err.println("MemcachedClient operation timeout");
e.printStackTrace();
} catch (InterruptedException e) {
// ignore
}catch (IOException e) {
System.err.println("Shutdown MemcachedClient fail");
e.printStackTrace();
}
}
}
###忘了说,需要的ja包

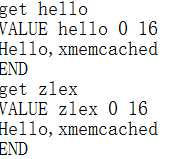
然后我们通过telnet连接到memcached里面去看一下

果然有了,没毛病。
以上是关于Xmemcached学习笔记的主要内容,如果未能解决你的问题,请参考以下文章