2D Procedural Animation小试:尾巴,翅膀,触手等等
Posted u010019717
tags:
篇首语:本文由小常识网(cha138.com)小编为大家整理,主要介绍了2D Procedural Animation小试:尾巴,翅膀,触手等等相关的知识,希望对你有一定的参考价值。
Procedural Animation的百科解释:https://en.wikipedia.org/wiki/Procedural_animation
想深入了解UE4引擎中的: control rig, Unity引擎中的:Animation Rigging
最近在学习Procedural Animation相关的只是,先从2D开始。
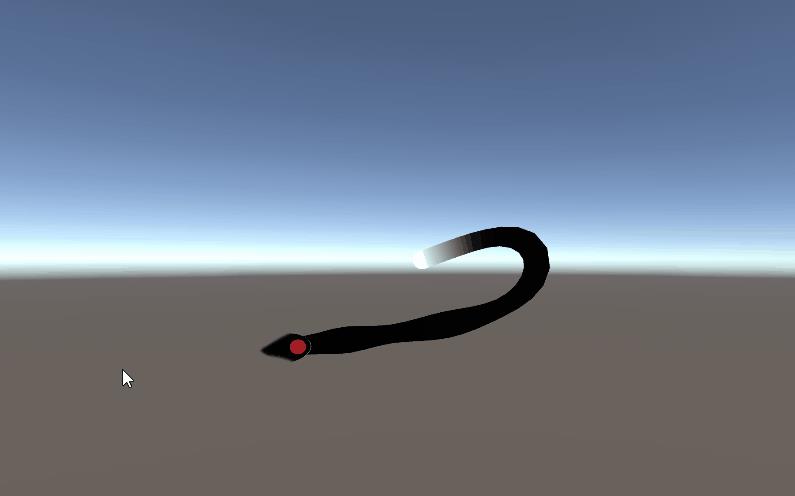
最好理解的程序化动画就是贪吃蛇的运动,在此基础上改造添加身体部分的运动。

先简单代码,转向目标(鼠标位置)并向目标移动

using System.Collections;
using System.Collections.Generic;
using UnityEngine;

[RequireComponent(typeof(Rigidbody))]
public class Controller : MonoBehaviour

    public float _speed = 1f;

    private Rigidbody _rigidbody;

    // Start is called before the first frame update
    void Start()

        _rigidbody = GetComponent<Rigidbody>();


    // Update is called once per frame
    void FixedUpdate()

        float multiplier = 1f;
        if (Input.GetKey(KeyCode.LeftShift))

            multiplier = 2f;
            GetComponentInChildren<ProceduralAnimation>().running = true;

        else
            GetComponentInChildren<ProceduralAnimation>().running = false;

        if (_rigidbody.velocity.magnitude < _speed * multiplier)


            float value = Input.GetAxis("Vertical");
            if (value != 0)
                _rigidbody.AddForce(0, 0, value * Time.fixedDeltaTime * 1000f);
            value = Input.GetAxis("Horizontal");
            if (value != 0)
                _rigidbody.AddForce(value * Time.fixedDeltaTime * 1000f, 0f, 0f);

然后添加触角逻辑:
创建空对象Tentacle,添加LineRenderer 组件并进行设置:
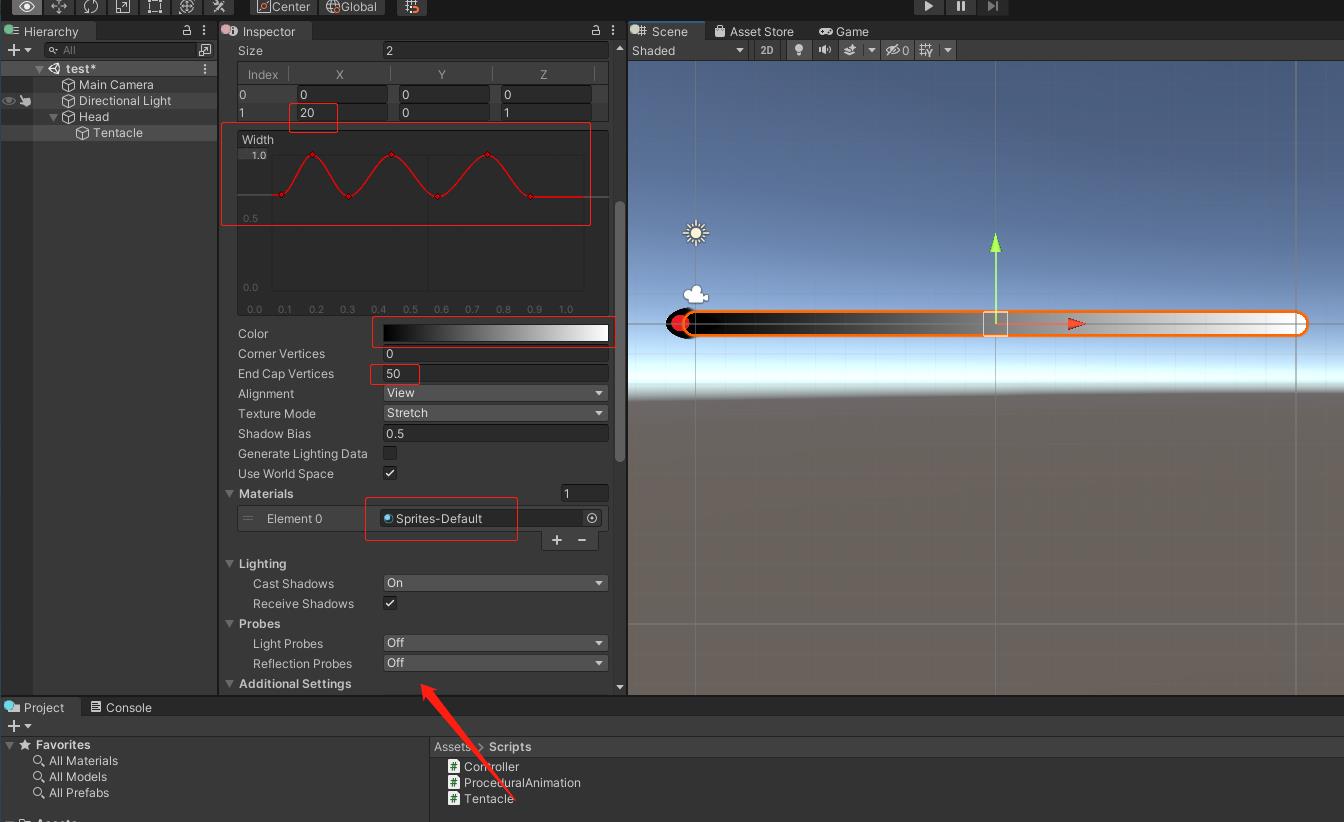
创建脚本Tentacle.cs 并添加到对象上。
using System.Collections;
using System.Collections.Generic;
using UnityEngine;

public class Tentacle : MonoBehaviour

    public int Length;
    public LineRenderer LineRend;
    public Vector3[] SegmentPoses;
    public Transform TargetDir;    // 是头部位置
    public float TargetDist;

    private Vector3[] SegmentV;
    public float SmoothSpeed;
    public float TrailSpeed;

    // Start is called before the first frame update
    void Start()

        LineRend.positionCount = Length;
        SegmentPoses = new Vector3[Length];
        SegmentV = new Vector3[Length];


    // Update is called once per frame
    void Update()

        SegmentPoses[0] = TargetDir.position;
        for (int i = 1; i < SegmentPoses.Length; i++)

            SegmentPoses[i] = Vector3.SmoothDamp(SegmentPoses[i], SegmentPoses[i - 1] + TargetDir.right * TargetDist, ref SegmentV[i], SmoothSpeed + i / TrailSpeed);

        LineRend.SetPositions(SegmentPoses);
需要自己去了解LineRenderer组件的用法。


三条尾巴, 每个尾巴的方向z分别: 180, 135 , 225

3、 给触角添加自身摆动动作。
public float TrailSpeed;
// 摆动速度,摆动幅度, 方向
public float WiggleSpeed;
public float WiggleMagnitude;
public Transform WiggleDir;
// Start is called before the first frame update
void Start()
LineRend.positionCount = Length;
SegmentPoses = new Vector3[Length];
SegmentV = new Vector3[Length];
// Update is called once per frame
void Update()
WiggleDir.localRotation = Quaternion.Euler(0, 0, Mathf.Sin(Time.time * WiggleSpeed) * WiggleMagnitude);
SegmentPoses[0] = TargetDir.position;
for (int i = 1; i < SegmentPoses.Length; i++)
赋值及节点的层级变化;


但是现在有个问题触角的长度在运动或者停止的时候会变长或者变短。 这个后面解决。
比如你可以做成你想要的任何效果:

改变触角的形状,皮肤比如:


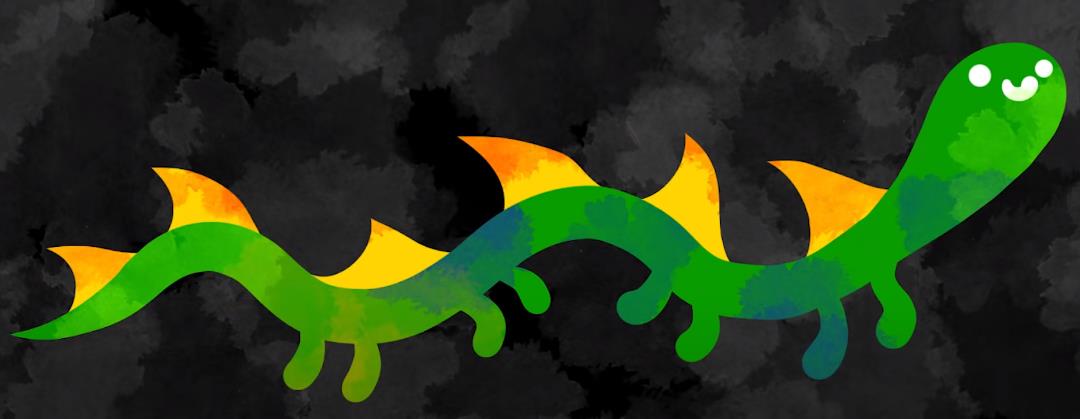
创建新的材质

替换掉 Tentacle 1 中的 LineRenderer 组件中的材质


重新play 就是新的皮肤样式了。

之前提到: 但是现在有个问题触角的长度在运动或者停止的时候会变长或者变短。
public class Tentacle : MonoBehaviour
public int Length;
public LineRenderer LineRend;
public Vector3[] SegmentPoses;
public Transform TargetDir; // 是头部位置
public float TargetDist;
private Vector3[] SegmentV;
public float SmoothSpeed;
// 摆动速度,摆动幅度, 方向
public float WiggleSpeed;
public float WiggleMagnitude;
public Transform WiggleDir;
// Start is called before the first frame update
void Start()
LineRend.positionCount = Length;
SegmentPoses = new Vector3[Length];
SegmentV = new Vector3[Length];
// Update is called once per frame
void Update()
WiggleDir.localRotation = Quaternion.Euler(0, 0, Mathf.Sin(Time.time * WiggleSpeed) * WiggleMagnitude);
SegmentPoses[0] = TargetDir.position;
for (int i = 1; i < SegmentPoses.Length; i++)
// normalized 0~1 达到目标距离时的方向 暂停相同的
Vector3 targetPos = SegmentPoses[i - 1] + (SegmentPoses[i] - SegmentPoses[i - 1]).normalized * TargetDist;
SegmentPoses[i] = Vector3.SmoothDamp(SegmentPoses[i], targetPos, ref SegmentV[i], SmoothSpeed);
LineRend.SetPositions(SegmentPoses);
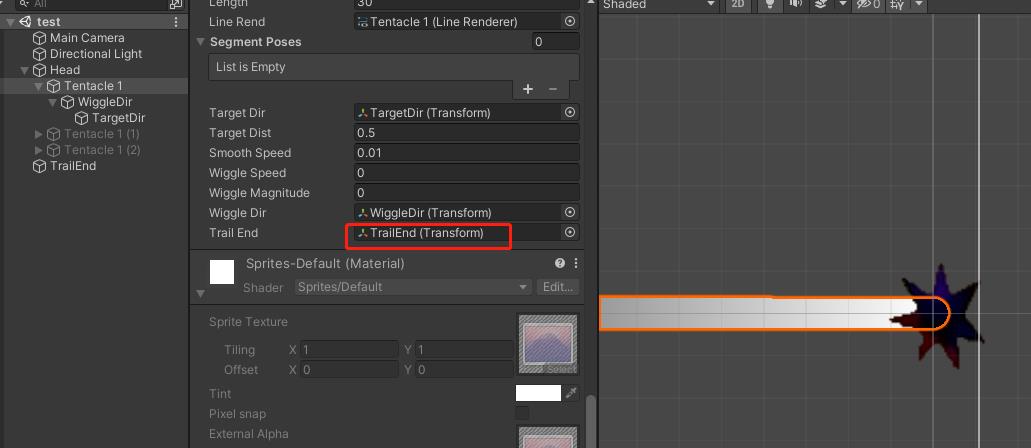
想让角色尾部尖上显示一个刺球:

public float WiggleMagnitude; public Transform WiggleDir;
public Transform TrailEnd;
// Start is called before the first frame update
void Start()
LineRend.positionCount = Length;
SegmentPoses = new Vector3[Length];
SegmentV = new Vector3[Length];
// Update is called once per frame
void Update()
WiggleDir.localRotation = Quaternion.Euler(0, 0, Mathf.Sin(Time.time * WiggleSpeed) * WiggleMagnitude);
SegmentPoses[0] = TargetDir.position;
for (int i = 1; i < SegmentPoses.Length; i++)
// normalized 0~1 达到目标距离时的方向 暂停相同的
Vector3 targetPos = SegmentPoses[i - 1] + (SegmentPoses[i] - SegmentPoses[i - 1]).normalized * TargetDist;
SegmentPoses[i] = Vector3.SmoothDamp(SegmentPoses[i], targetPos, ref SegmentV[i], SmoothSpeed);
LineRend.SetPositions(SegmentPoses);
TrailEnd.position = SegmentPoses[SegmentPoses.Length - 1];
效果:
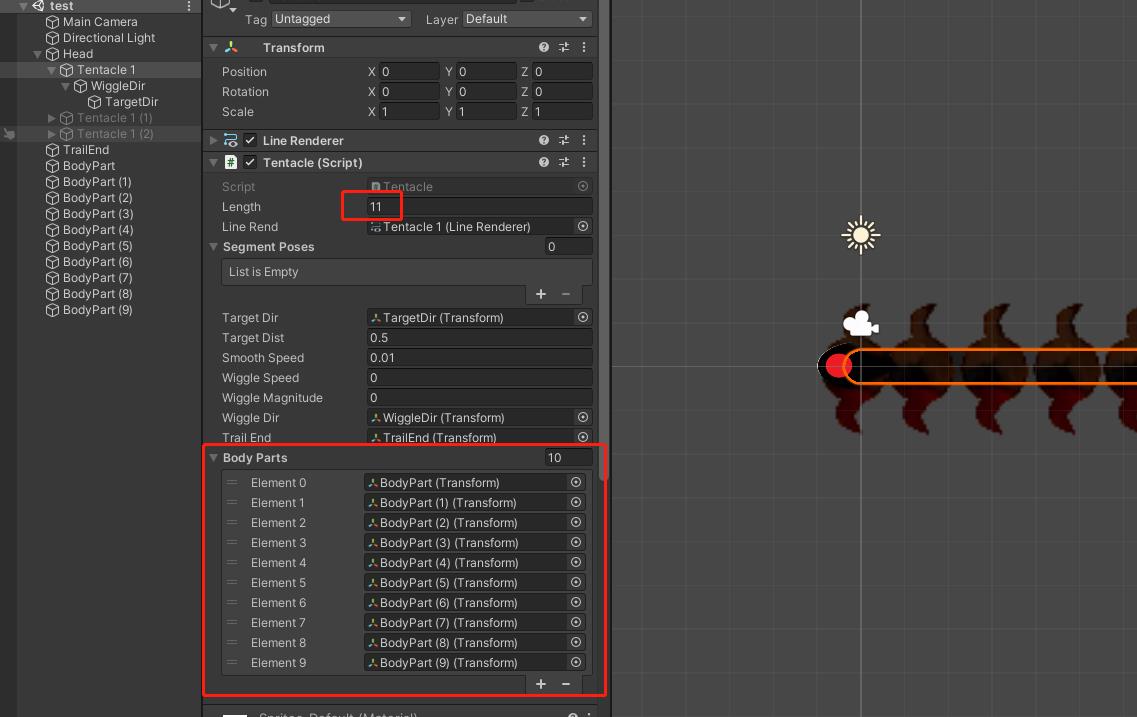
还想弄更多的身体部位:


public Transform TrailEnd;
public Transform[] BodyParts;
// Start is called before the first frame update
void Start()
LineRend.positionCount = Length;
SegmentPoses = new Vector3[Length];
SegmentV = new Vector3[Length];
// Update is called once per frame
void Update()
WiggleDir.localRotation = Quaternion.Euler(0, 0, Mathf.Sin(Time.time * WiggleSpeed) * WiggleMagnitude);
SegmentPoses[0] = TargetDir.position;
for (int i = 1; i < Length; i++)
// normalized 0~1 达到目标距离时的方向 暂停相同的
Vector3 targetPos = SegmentPoses[i - 1] + (SegmentPoses[i] - SegmentPoses[i - 1]).normalized * TargetDist;
SegmentPoses[i] = Vector3.SmoothDamp(SegmentPoses[i], targetPos, ref SegmentV[i], SmoothSpeed);
BodyParts[i - 1].transform.position = SegmentPoses[i];
LineRend.SetPositions(SegmentPoses);
TrailEnd.position = SegmentPoses[SegmentPoses.Length - 1];
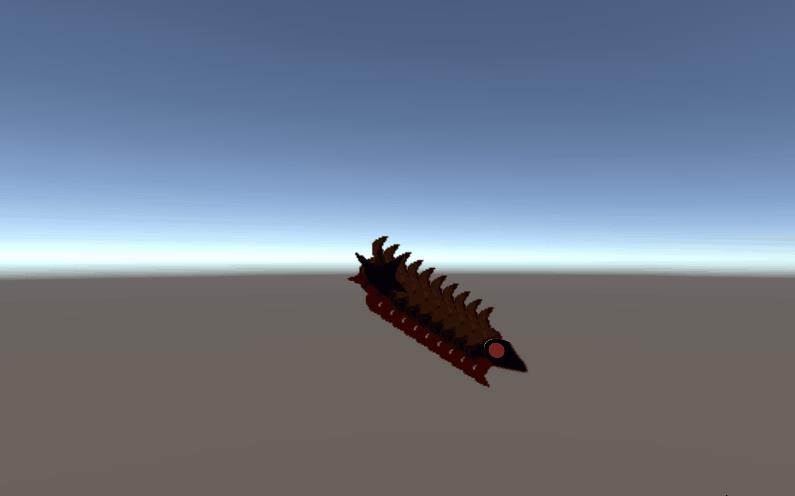
每个身体的部位位置被设置了, 跟随运动。
效果:
新增脚本: BodyRotation.cs
using System.Collections;
using System.Collections.Generic;
using UnityEngine;

public class BodyRotation : MonoBehaviour

    public float Speed;

    private Vector2 direction;
    public Transform Target;


    // Update is called once per frame
    void Update()

        direction = Target.position - transform.position;
        float angle = Mathf.Atan2(direction.y, direction.x) * Mathf.Rad2Deg;
        Quaternion rotation = Quaternion.AngleAxis(angle, Vector3.forward);
        transform.rotation = Quaternion.Slerp(transform.rotation, rotation, Speed * Time.deltaTime);
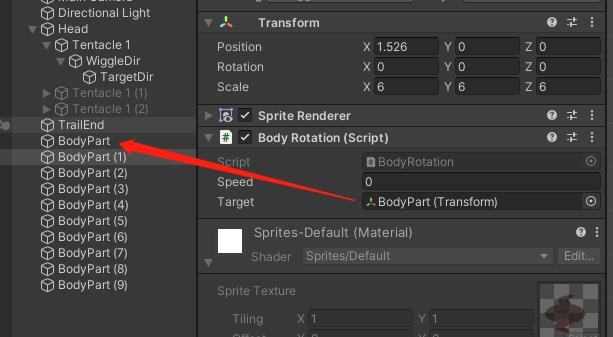
将脚本挂在Body 对象上, 每个Body的target 是前一个body transform , 第一个Body的target 是 Root 节点Head 对象。 Speed 设置为: 10


一开始都是所有部位都是缩成一团的,应该一开始就是正常的状态, 初始化一下
void Start()
LineRend.positionCount = Length;
SegmentPoses = new Vector3[Length];
SegmentV = new Vector3[Length];
ResetPos();
private void ResetPos()
SegmentPoses[0] = TargetDir.position;
for (int i = 1; i < Length; i++)
SegmentPoses[i] = SegmentPoses[i - 1] + TargetDir.right * TargetDist;
LineRend.SetPositions(SegmentPoses);
// Update is called once per frame
void Update()
WiggleDir.localRotation = Quaternion.Euler(0, 0, Mathf.Sin(Time.time * WiggleSpeed) * WiggleMagnitude);
自己各种尝试吧。
完结。
参考:
- https://forum.unity.com/threads/procedural-animation.885007/
- https://80.lv/articles/animating-beasts-using-the-procedural-way-in-unity/
- https://www.weaverdev.io/blog/bonehead-procedural-animation
- https://github.com/willymcgeejr/UnityProceduralAnimation
- pdf: Procedural Locomotion of Multi-Legged Characters in Dynamic Environments
- Inverse Kinematics Unity / Procedural Animation Unity
- COMPLETE PROCEDURAL ANIMATION IN 25 MINUTES
- Part 1. An Introduction to Procedural Animations
- Part 2.The Mathematics of Forward Kinematics
- Part 3.Implementing Forward Kinematics
- Part 4.An Introduction to Gradient Descent
- Part 5.Inverse Kinematics for Robotic Arms
- Part 6.Inverse Kinematics for Tentacles
我试图分十步来解释程序动画。看看我的推特:https://twitter.com/CodeerDev
这个是知乎上已经有人实现的内容: https://zhuanlan.zhihu.com/p/135877690
https://link.zhihu.com/?target=https%3A//github.com/MashiroShina/ProceduralAnimation_Demo


以上是关于2D Procedural Animation小试:尾巴,翅膀,触手等等的主要内容,如果未能解决你的问题,请参考以下文章
