使用python批量裁剪图片为目标大小
Posted Alocus_
tags:
篇首语:本文由小常识网(cha138.com)小编为大家整理,主要介绍了使用python批量裁剪图片为目标大小相关的知识,希望对你有一定的参考价值。

一、背景
当进行深度学习任务如进行训练时,图片的大小可能导致显存不足,一个方法是对图片直接进行resize,这个会导致图片细节不足;另一个是对图片进行裁剪,裁剪成小的尺寸以送入模型训练,这也有一个缺点,就是会丢失上下文信息。现在想使用python对图片批量裁剪,那么设计了如下一个脚本。
二、方法
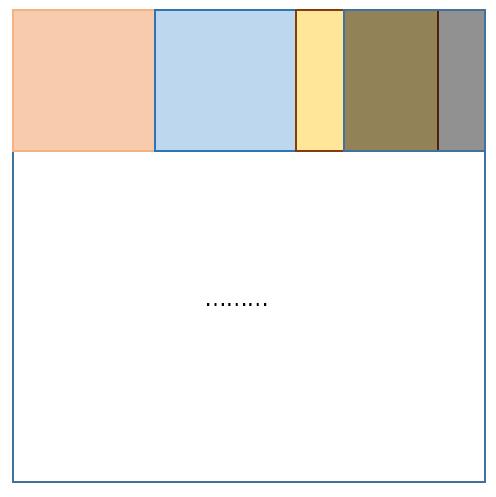
进行裁剪时会面临的首要问题是,宽高不足以整除时,如大小为1024*1024的图像,裁剪为300*300的时候,怎么解决? 我的代码是图片在进行横向切分时,在第四片时,剩下124像素大小,这时我将已经被裁剪的部分补充进去,如下图所示:

纵向也是如此,循环代码即可获得最终的切片效果。
三、代码
#coding=gbk
import cv2
import numpy
import scipy.io as scio
import math
import os
maskFile = r'C:\\Users\\Administrator\\Desktop\\test_labelme\\labelme\\examples\\semantic_segmentation\\DH_voc\\SegmentationClassPNG'   # 待裁剪的mask
imgFile = r'C:\\Users\\Administrator\\Desktop\\test_labelme\\labelme\\examples\\semantic_segmentation\\DH_voc\\SegmentationClassPNG'    #待裁剪的图片 两者实际操作相同,如果只裁剪一类图像,如只有mask,则删除对应的裁剪图片的代码即可
###"C:\\Users\\Administrator\\Desktop\\1" 为保存结果路径,请修改

list_mask = []
list_img = []
for root, _, fnames in sorted(os.walk(maskFile)):
    for fname in fnames:
        path = os.path.join(root, fname)
        list_mask.append(path)
for root, _, fnames in sorted(os.walk(imgFile)):
    for fname in fnames:
        path = os.path.join(root, fname)
        list_img.append(path)

for i in range(len(list_mask)):

    p,n = os.path.split(list_mask[i])
    pro,ext = os.path.splitext(n)
    print(pro)
    mask = cv2.imread(list_mask[i])
    img = cv2.imread(list_img[i])

    (h, w, c) = mask.shape
    h_n = math.ceil(h / 480.0)  #裁剪的高  480修改为想裁剪的大小
    w_n = math.ceil(w / 480.0)  #裁剪的宽  480修改为想裁剪的大小
    (h, w, c) = img.shape

    for i in range(h_n):
        if i < h_n - 1:
            for j in range(w_n):
                if j < w_n - 1:
                    mask_patch = mask[i * 480:(i + 1) * 480, j * 480:(j + 1) * 480,:]
                    img_pathc = img[i * 480:(i + 1) * 480, j * 480:(j + 1) * 480, :]

                    mask_pathname = os.path.join(r"C:\\Users\\Administrator\\Desktop\\1",
                                                  pro[:4]  +'-'+ str(i) + '-' + str(j) + '.png')
                    img_pathname = os.path.join(r"C:\\Users\\Administrator\\Desktop\\1",
                                                pro[:4] +'-'+ str(i) + '-' + str(j) + '.png')
                    cv2.imwrite(mask_pathname, mask_patch)
                    #cv2.imwrite(img_pathname, img_pathc)

                else:
                    mask_patch = mask[i * 480:(i + 1) * 480, (w - 480):, :]
                    img_pathc = img[i * 480:(i + 1) * 480, (w - 480):, :]
                    mask_pathname = os.path.join(r"C:\\Users\\Administrator\\Desktop\\1",
                                                  pro[:4] +'-'+ str(i) + '-' + str(j) + '.png')
                    img_pathname = os.path.join(r"C:\\Users\\Administrator\\Desktop\\1",
                                                pro[:4]  +'-'+ str(i) + '-' + str(j) + '.png')
                    cv2.imwrite(mask_pathname, mask_patch)
                    #cv2.imwrite(img_pathname, img_pathc)

        else:
            for j in range(w_n):
                if j < w_n - 1:
                    mask_patch = mask[(h - 480):, j * 480:(j + 1) * 480, :]
                    img_pathc = img[(h - 480):, j * 480:(j + 1) * 480, :]
                    mask_pathname = os.path.join(r"C:\\Users\\Administrator\\Desktop\\1",
                                                  pro[:4]  + '-'  + str(i) + '-' + str(j) + '.png')
                    img_pathname = os.path.join(r"J:\\dataset\\DH_voc4\\JPEGImages",
                                                pro[:4] +'-'+  str(i) + '-' + str(j) + '.png')
                    cv2.imwrite(mask_pathname, mask_patch)
                    #cv2.imwrite(img_pathname, img_pathc)

                else:
                    mask_patch = mask[(h - 480):, (w - 480):, :]
                    img_pathc = img[(h - 480):, (w - 480):, :]
                    mask_pathname = os.path.join(r"C:\\Users\\Administrator\\Desktop\\1",
                                                  pro[:4]+'-'+ str(i) + '-' + str(j) + '.png')
                    img_pathname = os.path.join(r"C:\\Users\\Administrator\\Desktop\\1",
                                                pro[:4] +'-'+ str(i) + '-' + str(j) + '.png')
                    cv2.imwrite(mask_pathname, mask_patch)
                    #cv2.imwrite(img_pathname, img_pathc)
四、总结
代码中有部分需要修改和优化的地方,请自行优化。如图片的命名,裁剪后拼接的话也需要标记出原始图片的大小才可以进行还原,不赘述。如果有错误,请私信!感谢!!
以上是关于使用python批量裁剪图片为目标大小的主要内容,如果未能解决你的问题,请参考以下文章