Heartbeat+DRBD+MySQL高可用方案
Posted
tags:
篇首语:本文由小常识网(cha138.com)小编为大家整理,主要介绍了Heartbeat+DRBD+MySQL高可用方案相关的知识,希望对你有一定的参考价值。
Heartbeat+DRBD+mysql高可用方案
===============================================================================
概述:
===============================================================================
方案介绍
1.方案介绍及优缺点
★方案介绍
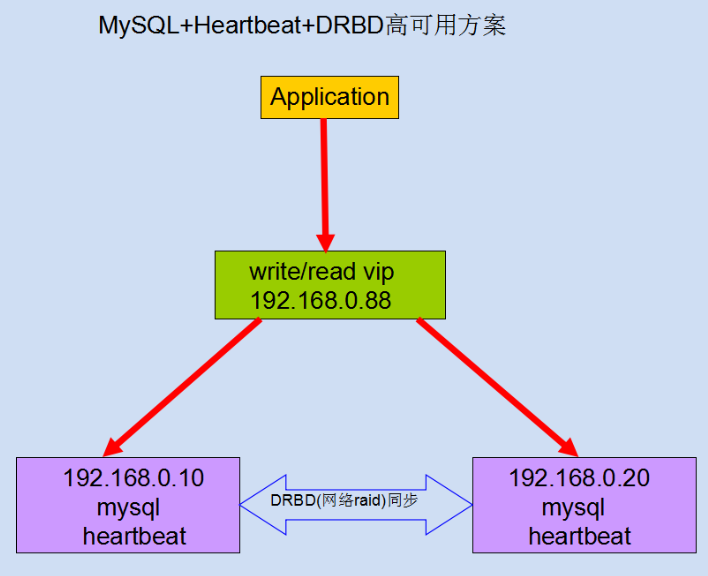
本方案采用Heartbeat双机热备软件来保证数据库的高稳定性和连续性,数据的一致性由DRBD这个工具来保证。默认情况下只有一台mysql在工作,当主mysql服务器出现问题后,系统将自动切换到备机上继续提供服务,当主数据库修复完毕,又将服务切回继续由主mysql提供服务。
★方案优缺点
◆优点:
安全性高、稳定性高、可用性高,出现故障自动切换。
◆缺点:
只有一台服务器提供服务,成本相对较高,不方便扩展,可能会发生脑裂。
2.软件介绍
★Heartbeat介绍
heartbeat可以将资源(VIP地址及程序服务)从一台有故障的服务器快速的转移到另一台正常的服务器提供服务,heartbeat和keepalived相似,heartbeat可以实现failover功能,但不能实现对后端的健康检查;
★DRBD介绍
官方站点:http://www.drbd.org/
DRBD(DistributedReplicatedBlockDevice)是一个基于块设备级别在远程服务器之间同步和镜像数据的软件,用软件实现的、无共享的、服务器之间镜像块设备内容的存储复制解决方案。它可以实现在网络中两台服务器之间基于块设备级别的实时镜像或同步复制(两台服务器都写入成功)/异步复制(本地服务器写入成功),相当于网络的RAID1,由于是基于块设备(磁盘,LVM逻辑卷),在文件系统的底层,所以数据复制要比cp命令更快。DRBD已经被MySQL官方写入文档手册作为推荐的高可用的方案之一;
方案拓扑及适用场景
适用场景:
适用于数据库访问量不太大,短期内访问量增长不会太快,对数据库可用性要求非常高的场景。
安装部署及测试
1.测试环境介绍(均已关闭防火墙和selinux)
| 主机名 | IP地址 | 系统 | DRBD磁盘 | heartbeat版本 |
| per2 | 172.22.144.232 | CentOS 6.5 | /dev/sdb3 | 2.1.4-12 |
| per3 | 172.22.144.233 | CentOS 6.5 | /dev/sdb3 | 2.1.4-12 |
2.测试环境准备:
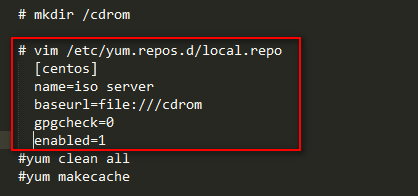
★本地yum源配置
将装系统时使用的光盘上的所有文件拷贝到主机 /cdrom下
★Ntpserver配置
集群服务各节点之间的时间必须是同步的,所以这里需要搭建一台NTP server,这里选择在一台服务器(node1)上搭建,其他节点(配置crontab)用ntpdate serverip进行同步,具体部署步骤如下:
★域名解析配置
将所有的IP和主机名写入一台服务器的/etc/hosts,然后scp到每一台服务器。
★主被服务器件双机互信通信
DRBD安装配置及启动测试:
1.安装依赖包(node1和node2都要做)
yum install -y gcc gcc-c++ make glibc flex kernel-devel kernel-headers PyXML net-snmp-libs tigervnc-server
2.DRBD的安装及配置(node1和node2都要做)
1)安装包准备如下:
[[email protected] heartbeat+drbd+mysql]# cd drbd/
[[email protected] drbd]# ll
总用量 45652
-rw-r--r-- 1 root root   224376 4月  26 17:15 drbd83-utils-8.3.16-1.el6.elrepo.x86_64.rpm
-rw-r--r-- 1 root root   688328 4月  26 17:15 drbd-8.4.3.tar.gz
-rw-r--r-- 1 root root 30514788 4月  26 17:16 kernel-2.6.32-504.12.2.el6.x86_64.rpm
-rw-r--r-- 1 root root 15133064 4月  26 17:16 kernel-firmware-2.6.32-504.12.2.el6.noarch.rpm
-rw-r--r-- 1 root root   177360 4月  26 17:16 kmod-drbd83-8.3.16-3.el6.elrepo.x86_64.rpm
2)解压 drbd-8.4.3.tar.gz的压缩包,并进入到解压后的目录中,执行命令,如下:
# 解压
[[email protected] drbd]# tar -zxvf drbd-8.4.3.tar.gz
[[email protected] drbd]# cd drbd-8.4.3
[[email protected] drbd-8.4.3]# ls
autogen.sh  configure     documentation  drbd-kernel.spec.in  filelist-redhat  preamble         preamble-sles11  scripts
benchmark   configure.ac  drbd           drbd-km.spec.in      filelist-suse    preamble-rhel5   README           user
ChangeLog   COPYING       drbd_config.h  drbd.spec.in         Makefile.in      preamble-sles10  rpm-macro-fixes

[[email protected] drbd-8.4.3]# ./configure --prefix=/usr/local/drbd --with-km --with-heartbeat
[[email protected] drbd-8.4.3]# make KDIR=/usr/src/kernels/`uname -r`
[[email protected] drbd-8.4.3]# make install

# 编译完成后的文件在 /usr/local/drbd 路径下
3)进入 /usr/local/drbd 目录,完成后续操作如下:
[[email protected] drbd]# mkdir -p /usr/local/drbd/var/run/drbd
[[email protected] drbd]# cp /usr/local/drbd/etc/rc.d/init.d/drbd /etc/rc.d/init.d

# 加入到服务中去
[[email protected] init.d]# chkconfig --add drbd
[[email protected] init.d]# chkconfig drbd on
4)加载drbd模块
[[email protected] init.d]# modprobe drbd

# 查看是否加载 drbd 模块
[[email protected] init.d]# lsmod |grep drbd
drbd                  326138  0
libcrc32c               1246  1 drbd
3.DRBD的配置启动
1)编辑drbd的配置文件如下(node1和node2相同):
[[email protected] etc]# pwd
/usr/local/drbd/etc

[[email protected] etc]# vim drbd.conf
# You can find an example in  /usr/share/doc/drbd.../drbd.conf.example

include "drbd.d/global_common.conf";
include "drbd.d/*.res";

resource data{                #创建一个资源,名字叫"data"
	protocol C;           #选择的是drbd的C 协议(数据同步协议,C为收到数据并写入后返回,确认成功)
	startup { wfc-timeout 0; degr-wfc-timeout 120;}
	disk { on-io-error detach;}
	net{
		timeout 60;
		connect-int 10;
		ping-int 10;
		max-buffers 2048;
		max-epoch-size 2048;
	}
	syncer { rate 100M;}
	on node1{			#设定一个节点,分别以各自的主机名命名
		device /dev/drbd0;      #设定资源设备/dev/drbd0 指向实际的物理分区 /dev/sda3
		disk /dev/sdb3;
		address 172.21.1.112:7788;  #设定监听地址以及端口
		meta-disk internal;         #internal表示是在同一个局域网内
	}
	on node2{
		device /dev/drbd0;
		disk /dev/sdb3;
		address 172.21.1.113:7788;
		meta-disk internal;
	}
}
2)初始化资源并启动服务(node1和node2操作相同)
# /dev/sdb3 是 DRBD分区,在实验环境也可能是逻辑卷,依据情况修改。
# 不这样做的话,在创建资源的时候报错
[[email protected] ~]# dd if=/dev/zero of=/dev/sdb3 bs=1M count=100
记录了100+0 的读入
记录了100+0 的写出
104857600字节(105 MB)已复制,3.33403 秒,31.5 MB/秒

[[email protected] ~]# drbdadm create-md data
you are the 57124th user to install this version
Writing meta data...
initializing activity log
NOT initializing bitmap
New drbd meta data block successfully created.
success
3)DRBD的启动与查看
[[email protected] init.d]# pwd
/etc/init.d

# 启动服务
[[email protected] init.d]# ./drbd start
Starting DRBD resources: [
     create res: data
   prepare disk: data
    adjust disk: data
     adjust net: data
]
outdated-wfc-timeout has to be shorter than degr-wfc-timeout
outdated-wfc-timeout implicitly set to degr-wfc-timeout (120s)

# 检查端口7788是否监听
[[email protected] init.d]# netstat -tnp
Active Internet connections (w/o servers)
Proto Recv-Q Send-Q Local Address               Foreign Address             State       PID/Program name
tcp        0    248 172.21.1.112:22             172.21.1.58:52000           ESTABLISHED 3922/sshd
tcp        0      0 172.21.1.112:7788           172.21.1.113:50683          ESTABLISHED -
tcp        0      0 172.21.1.112:22             172.21.1.58:51494           ESTABLISHED 1893/sshd
tcp        0      0 172.21.1.112:37965          172.21.1.113:7788           ESTABLISHED -
4)查看DRBD的状态,可以看到这时还没有主节点,两节点都为Secondary;
[[email protected] init.d]# ./drbd status
drbd driver loaded OK; device status:
version: 8.4.3 (api:1/proto:86-101)
GIT-hash: 89a294209144b68adb3ee85a73221f964d3ee515 build by [email protected], 2017-04-28 10:22:42
m:res   cs         ro                   ds                         p  mounted  fstype
0:data  Connected  Secondary/Secondary  Inconsistent/Inconsistent  C

[[email protected] sbin]# pwd
/usr/local/drbd/sbin
[[email protected] sbin]# ./drbd-overview
  0:data/0  Connected Secondary/Secondary Inconsistent/Inconsistent C r-----
4.设置node1节点为主节点
[[email protected] ~]# drbdsetup /dev/drbd0 primary --force

# 再次查看可以发现数据同步过程已经开始
[[email protected] sbin]# ./drbd-overview
  0:data/0  SyncSource Primary/Secondary UpToDate/Inconsistent C r---n-
	[>....................] sync‘ed:  0.2% (10236/10244)M
[[email protected] sbin]# ./drbd-overview
  0:data/0  SyncSource Primary/Secondary UpToDate/Inconsistent C r---n-
	[>...................] sync‘ed:  7.7% (9464/10244)M

[[email protected] init.d]# ./drbd status
drbd driver loaded OK; device status:
version: 8.4.3 (api:1/proto:86-101)
GIT-hash: 89a294209144b68adb3ee85a73221f964d3ee515 build by [email protected], 2017-04-28 10:22:42
m:res   cs          ro                 ds                     p  mounted  fstype
...     sync‘ed:    22.0%              (8000/10244)M
0:data  SyncSource  Primary/Secondary  UpToDate/Inconsistent  C

# 此时,可以使用 watch -n 1 "./drbd-overview" 监控同步进度
# 等数据同步完成以后再次查看状态,可以发现节点已经牌实时状态,且节点已经有了主从
[[email protected] sbin]# ./drbd-overview
  0:data/0  Connected Primary/Secondary UpToDate/UpToDate C r-----
5.创建文件系统,及查看最大挂载限制并解除
文件系统的挂载只能在Primary节点进行,因此,也只有在设置了主节点后才能对drbd设备进行格式化:
[[email protected] ~]# mkfs.ext4 /dev/drbd0
mke2fs 1.41.12 (17-May-2010)
文件系统标签=
操作系统:Linux
块大小=4096 (log=2)
分块大小=4096 (log=2)
Stride=0 blocks, Stripe width=0 blocks
655776 inodes, 2622521 blocks
131126 blocks (5.00%) reserved for the super user
第一个数据块=0
Maximum filesystem blocks=2688548864
81 block groups
32768 blocks per group, 32768 fragments per group
8096 inodes per group
Superblock backups stored on blocks:
	32768, 98304, 163840, 229376, 294912, 819200, 884736, 1605632

正在写入inode表: 完成
Creating journal (32768 blocks): 完成
Writing superblocks and filesystem accounting information: 完成

This filesystem will be automatically checked every 38 mounts or
180 days, whichever comes first.  Use tune2fs -c or -i to override.

################################################################################
# 查看最大挂载限制
[[email protected] ~]# tune2fs -l /dev/drbd0 | grep ^M
Mount count:              0
Maximum mount count:      38

# 解除最大挂载限制
[[email protected] ~]# tune2fs -i 0 -c 0 /dev/drbd0
tune2fs 1.41.12 (17-May-2010)
Setting maximal mount count to -1
Setting interval between checks to 0 seconds

[[email protected] ~]# tune2fs -l /dev/drbd0 | grep ^M
Mount count:              0
Maximum mount count:      -1
注:
如果drbd是由heartbeat管理,则两台机器都要设置为secondary
从节点(备机)不能mkfs和mount;Secondary节点上不允许对DRBD设备进行任何操作,包括只读,所有的读写操作只能在Primary节点上进行,只有当Primary节点挂掉时,Secondary节点才能提升为Primary节点,继续工作;
6.DRBD主从切换,验证DRBD工作是否正确
1)主节点操作
[[email protected] ~]# mkdir /mydata

[[email protected] ~]# mount /dev/drbd0 /mydata

[[email protected] ~]# df -h
Filesystem      Size  Used Avail Use% Mounted on
/dev/sda3        97G  9.0G   83G  10% /
tmpfs           491M   72K  491M   1% /dev/shm
/dev/sda1       194M   29M  155M  16% /boot
/dev/drbd0      9.9G  151M  9.2G   2% /mydata

[[email protected] ~]# ls /mydata
lost+found

# 创建样例数据
[[email protected] ~]# echo 123456 > /mydata/testfile
[[email protected] ~]# ls /mydata
lost+found  testfile

# 解除主节点的挂载
[[email protected] ~]# umount /mydata
[[email protected] ~]# df
Filesystem     1K-blocks    Used Available Use% Mounted on
/dev/sda3      100944296 9406416  86410152  10% /
tmpfs             502204      72    502132   1% /dev/shm
/dev/sda1         198337   29472    158625  16% /boot

# 主服务节点变成从节点
[[email protected] ~]# drbdsetup /dev/drbd0 secondary
2)从节点操作
# 从节点创建挂载目录
[[email protected] ~]# mkdir /mydata

# 升级从节点服务为主节点
[[email protected] ~]# drbdsetup /dev/drbd0 primary

# 挂载 drbd
[[email protected] ~]# mount /dev/drbd0 /mydata

[[email protected] ~]# df
Filesystem     1K-blocks    Used Available Use% Mounted on
/dev/sda3      100944296 5168556  90648012   6% /
tmpfs             502204      72    502132   1% /dev/shm
/dev/sda1         198337   29472    158625  16% /boot
/dev/drbd0      10325420  154140   9646776   2% /mydata

# 查看样例数据为node1上创建的数据
[[email protected] ~]# ls /mydata/
lost+found  testfile
[[email protected] ~]# cat /mydata/testfile
123456
此时可以说明drbd 配置正确,且工作正常。
==============================================================================
MySQL安装配置及启动(两节点同时安装)
1.mysql安装,我这里为了简单直接安装编译好的二进制软件包(两台服务器都需要安装,操作一样,只是第二台mysql不需要初始化数据)
[[email protected] mysql]# ls
mysql-5.6.36-linux-glibc2.5-x86_64.tar.gz
[[email protected] mysql]# tar xvf mysql-5.6.36-linux-glibc2.5-x86_64.tar.gz -C /usr/local/

[[email protected] local]# cd /usr/local/mysql
[[email protected] local]# ln -s mysql-5.6.36-linux-glibc2.5-x86_64 mysql
[[email protected] local]# ll
总用量 48
drwxr-xr-x.  2 root root 4096 4月  27 10:07 bin
drwxr-xr-x   7 root root 4096 4月  28 10:23 drbd
drwxr-xr-x.  2 root root 4096 9月  23 2011 etc
drwxr-xr-x.  2 root root 4096 9月  23 2011 games
drwxr-xr-x.  3 root root 4096 4月  27 10:07 include
drwxr-xr-x.  4 root root 4096 4月  27 10:07 lib
drwxr-xr-x.  2 root root 4096 9月  23 2011 lib64
drwxr-xr-x.  2 root root 4096 9月  23 2011 libexec
lrwxrwxrwx   1 root root   34 4月  28 14:40 mysql -> mysql-5.6.36-linux-glibc2.5-x86_64
drwxr-xr-x  13 root root 4096 4月  28 14:37 mysql-5.6.36-linux-glibc2.5-x86_64
drwxr-xr-x.  2 root root 4096 9月  23 2011 sbin
drwxr-xr-x.  5 root root 4096 4月   6 18:50 share
drwxr-xr-x.  2 root root 4096 9月  23 2011 src

# 创建 mysql 用户和mysql 组,如果有的话就不需要创建
[[email protected] local]# groupadd mysql
[[email protected] local]# useradd -r -g mysql mysql

[[email protected] mysql]# pwd
/usr/local/mysql
[[email protected] mysql]# chown -R mysql.mysql *
2.创建/mydata/data 目录作为 mysql 数据库的datadir,并修改其属主和属组为mysql
[[email protected] ~]# mkdir /mydata/data
[[email protected] ~]# chown mysql.mysql /mydata/data/
3.初始化mysql数据库目录(只在第一台服务器上做)
注意:初始化数据库之前要挂载镜像分区/dev/drbd0到 /mydata,这里以 node1为例
1)首先提升node1为主节点,并挂载 /dev/drbd0 到 /mydata
[[email protected] ~]# drbdsetup /dev/drbd0 primary
[[email protected] ~]# mount /dev/drbd0 /mydata

[[email protected] ~]# df
Filesystem     1K-blocks     Used Available Use% Mounted on
/dev/sda3      100944296 11479256  84337312  12% /
tmpfs             502204       72    502132   1% /dev/shm
/dev/sda1         198337    29472    158625  16% /boot
/dev/drbd0      10325420   154140   9646776   2% /mydata

[[email protected] sbin]# cd /usr/local/drbd/sbin
[[email protected] sbin]# ./drbd-overview
  0:data/0  Connected Primary/Secondary UpToDate/UpToDate C r----- /mydata ext4 9.9G 151M 9.2G 2%
2)对node1主服务节点上的mysql数据库做初始化,如下:
[[email protected] scripts]# /usr/local/mysql/scripts
[[email protected] scripts]# ./mysql_install_db --user=mysql --datadir=/mydata/data/ --basedir=/usr/local/mysql

[[email protected] scripts]# ls /mydata/
data  lost+found  testfile

[[email protected] scripts]# ll /mydata/data/
总用量 110604
-rw-rw---- 1 mysql mysql 12582912 4月  28 15:24 ibdata1
-rw-rw---- 1 mysql mysql 50331648 4月  28 15:24 ib_logfile0
-rw-rw---- 1 mysql mysql 50331648 4月  28 15:23 ib_logfile1
drwx------ 2 mysql mysql     4096 4月  28 15:23 mysql
drwx------ 2 mysql mysql     4096 4月  28 15:23 performance_schema
drwx------ 2 mysql mysql     4096 4月  28 15:23 test
3)配置mysql启动(两节点同时做)
[[email protected] mysql]# pwd
/usr/local/mysql
[[email protected] mysql]# ls
bin  COPYING  data  docs  include  lib  man  my.cnf  mysql-test  README  scripts  share  sql-bench  support-files
[[email protected] mysql]# ll support-files/
总用量 32
-rwxr-xr-x 1 mysql mysql  1153 3月  18 15:06 binary-configure
-rw-r--r-- 1 mysql mysql   773 3月  18 14:43 magic
-rw-r--r-- 1 mysql mysql  1126 3月  18 15:06 my-default.cnf     # mysql的配置文件
-rwxr-xr-x 1 mysql mysql  1061 3月  18 15:06 mysqld_multi.server
-rwxr-xr-x 1 mysql mysql   894 3月  18 15:06 mysql-log-rotate
-rwxr-xr-x 1 mysql mysql 10565 3月  18 15:06 mysql.server       # mysql的启动脚本

[[email protected] mysql]# cp support-files/my-default.cnf /etc/my.cnf
[[email protected] mysql]# cp support-files/mysql.server /etc/init.d/mysqld
[[email protected] mysql]# chmod 755 /etc/init.d/mysqld
4)修改mysql的启动配置文件 /etc/my.cnf(两节点同时做),并启动mysql服务;
[[email protected] init.d]# cat /etc/my.cnf
[mysqld]
datadir=/mydata/data
socket=/mydata/data/mysql.sock
user=mysql
character_set_server = utf8
init_connect = ‘SET NAMES utf8‘
sql_mode=NO_ENGINE_SUBSTITUTION,STRICT_TRANS_TABLES
# Disabling symbolic-links is recommended to prevent assorted security risks
symbolic-links=0
skip_name_resolve
innodb_file_per_table=ON

[mysqld_safe]
log-error=/var/log/mysqld.log
pid-file=/var/run/mysqld/mysqld.pid

# 启动服务
[[email protected] init.d]# ./mysqld status
MySQL is not running                                       [失败]

[[email protected] init.d]# ./mysqld start
Starting MySQL.........................................    [确定]

# 登录mysql数据库,并创建表
[[email protected] init.d]# mysql
Welcome to the MySQL monitor.  Commands end with ; or \g.
Your MySQL connection id is 1
Server version: 5.6.36 MySQL Community Server (GPL)

Copyright (c) 2000, 2013, Oracle and/or its affiliates. All rights reserved.

Oracle is a registered trademark of Oracle Corporation and/or its
affiliates. Other names may be trademarks of their respective
owners.

Type ‘help;‘ or ‘\h‘ for help. Type ‘\c‘ to clear the current input statement.

mysql> show databases;
+--------------------+
| Database           |
+--------------------+
| information_schema |
| mysql              |
| performance_schema |
| test               |
+--------------------+
4 rows in set (0.00 sec)

mysql> create database db1;
Query OK, 1 row affected (0.01 sec)

mysql> show databases;
+--------------------+
| Database           |
+--------------------+
| information_schema |
| db1                |
| mysql              |
| performance_schema |
| test               |
+--------------------+
5 rows in set (0.01 sec)

mysql> \q
Bye

# 查看数据库目录,db1已经存在
[[email protected] init.d]# ls /mydata/data/
auto.cnf  db1  ibdata1  ib_logfile0  ib_logfile1  mysql  mysql.sock  node1.pid  performance_schema  test
5)执行完以上操作后,在node1上执行以下命令,为部署heartbeat做准备:
# 停止mysql服务;
[[email protected] init.d]# ./mysqld stop
Shutting down MySQL..                                      [确定]

# 解除drbd分区挂载:
[[email protected] ~]# umount /mydata/

# 把node1 降为从节点:
[[email protected] ~]# drbdsetup /dev/drbd0 secondary

[[email protected] ~]# /usr/local/drbd/sbin/drbd-overview
  0:data/0  Connected Secondary/Secondary UpToDate/UpToDate C r-----
==============================================================================
Heartbeat安装配置及启动(node1和node2都要安装)
1.部署确认:
1)mysql 服务关闭,且关闭了开机自启动
[[email protected]~] # /etc/init.d/mysqld stop
[[email protected] init.d]# chkconfig mysqld off
[[email protected] init.d]# chkconfig --list mysqld
mysqld         	0:关闭	1:关闭	2:关闭	3:关闭	4:关闭	5:关闭	6:关闭
2)drbd 服务必须打开,且两个节点都是Secondary状态
[[email protected] ~]# /usr/local/drbd/sbin/drbd-overview
  0:data/0  Connected Secondary/Secondary UpToDate/UpToDate C r-----
3)主备机间的互信通信;
[[email protected] ~]# date;ssh node2 date
2017年 05月 02日 星期二 13:16:06 CST
2017年 05月 02日 星期二 13:16:06 CST
2.安装及配置Heartbeat
1)安装heartbeat(注意,如果此前机器安装过heartbeat其他的版本需要将其卸载之后方可安装heartbeat-2.1.4,卸载时要将其依赖到的安装包一并卸载,否则安装会起冲突)
[[email protected] heartbeat]# ls
heartbeat-2.1.4-12.el6.x86_64.rpm      heartbeat-pils-2.1.4-12.el6.x86_64.rpm     libnet-1.1.6-7.el6.x86_64.rpm
heartbeat-gui-2.1.4-12.el6.x86_64.rpm  heartbeat-stonith-2.1.4-12.el6.x86_64.rpm

[[email protected] heartbeat]# rpm -ivh libnet-1.1.6-7.el6.x86_64.rpm
[[email protected] heartbeat]# rpm -ivh heartbeat-2.1.4-12.el6.x86_64.rpm heartbeat-pils-2.1.4-12.el6.x86_64.rpm heartbeat-stonith-2.1.4-12.el6.x86_64.rpm heartbeat-gui-2.1.4-12.el6.x86_64.rpm
Preparing...                ########################################### [100%]
   1:heartbeat-pils         ########################################### [ 25%]
   2:heartbeat-stonith      ########################################### [ 50%]
   3:heartbeat              ########################################### [ 75%]
   4:heartbeat-gui          ########################################### [100%]
2)配置heartbeat,默认安装好的heartbeat没有配置文件,但是有样例文件,这里只需要两个配置文件ha.cf 和 authkeys
[[email protected] ~]# cp /usr/share/doc/heartbeat-2.1.4/{authkeys,ha.cf} /etc/ha.d/
[[email protected] ~]# cd /etc/ha.d/
[[email protected] ha.d]# ll
总用量 40
-rw-r--r-- 1 root root   645 5月   2 13:33 authkeys
-rw-r--r-- 1 root root 10539 5月   2 13:33 ha.cf
-rwxr-xr-x 1 root root   745 9月  10 2013 harc
drwxr-xr-x 2 root root  4096 5月   2 13:05 rc.d
-rw-r--r-- 1 root root   692 9月  10 2013 README.config
drwxr-xr-x 2 root root  4096 5月   2 13:05 resource.d
-rw-r--r-- 1 root root  7864 9月  10 2013 shellfuncs

# 修改其权限为600
[[email protected] ha.d]# chmod 600 authkeys
[[email protected] ha.d]# ll
总用量 40
-rw------- 1 root root   645 5月   2 13:33 authkeys
-rw-r--r-- 1 root root 10539 5月   2 13:33 ha.cf
-rwxr-xr-x 1 root root   745 9月  10 2013 harc
drwxr-xr-x 2 root root  4096 5月   2 13:05 rc.d
-rw-r--r-- 1 root root   692 9月  10 2013 README.config
drwxr-xr-x 2 root root  4096 5月   2 13:05 resource.d
-rw-r--r-- 1 root root  7864 9月  10 2013 shellfuncs
3)配置文件修改如下:
[[email protected] ha.d]# vim authkeys
 auth 1
 1  md5 91961e19f5730f736d27c07ffbc093d1

[[email protected] ha.d]# vim ha.cf
 logfacility     local0
 keepalive    2                     #>>> 发送心跳的间隔时间
 udpport    694                     #>>> 通信端口
 ucast      eth0 172.22.1.113       #>>>心跳线网口,对方心跳口ip;在psae2配置时写172.21.1.112
 auto_failback    on
 node    psae1                      #>>> 设置集群中的节点,节点名必须与uname -n 一样
 node    psae2
 crm     on                         #>>>启用crm
复制文件到psea2
复制以上2个配置文件到psae2上,并修改/etc/ha.d/ha.cf中的ucastip为psae1的ip
[[email protected] ha.d]# scp -p authkeys ha.cf node2:/etc/ha.d/
[[email protected] ~]# vim /etc/ha.d/ha.cf
 ucast eth0 172.21.1.112
3.检查配置文件没有错误后就可以启动heartbeat
[[email protected] ha.d]# service heartbeat start
Starting High-Availability services:
Done.

[[email protected] ha.d]# service heartbeat start
Starting High-Availability services:
Done.

[[email protected] ha.d]# netstat -unlp | grep 694
udp        0      0 0.0.0.0:694                 0.0.0.0:*                               4035/heartbeat: wri

[[email protected] ha.d]# ss -tunlp |grep 694
udp    UNCONN     0      0                      *:694                   *:*      users:(("heartbeat",11523,9),("heartbeat",11524,9))
3.配置Heartbeat集群资源(只在一台完成即可)需要配置的集群资源:vip、drbd、mysql
1)为客户端连入服务端进行配置的用户设置密码 建议设置成pachira,主备服务器都要操作
[[email protected] ha.d]# passwd hacluster
更改用户 hacluster 的密码 。
新的 密码:
无效的密码: 它基于字典单词
无效的密码: 过于简单
重新输入新的 密码:
passwd: 所有的身份验证令牌已经成功更新。
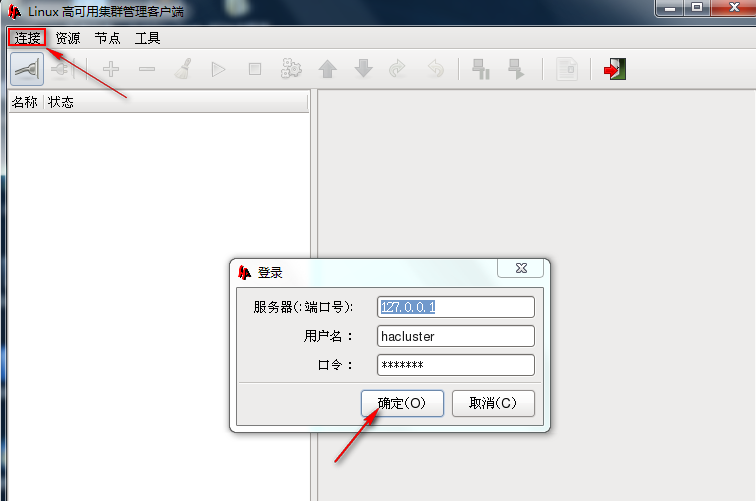
2)执行 # hb_gui & 命令启动heartbeat图形化的客户端程序,用VNC连接linux桌面
资源添加顺序 组 --> vip --> drbd--> mysqld --> p_monitor
本文出自 “逐梦小涛” 博客,请务必保留此出处http://1992tao.blog.51cto.com/11606804/1926830
以上是关于Heartbeat+DRBD+MySQL高可用方案的主要内容,如果未能解决你的问题,请参考以下文章


