mysql安装与调优
Posted
tags:
篇首语:本文由小常识网(cha138.com)小编为大家整理,主要介绍了mysql安装与调优相关的知识,希望对你有一定的参考价值。
mysql安装方法:
1.yum安装
2.rpm安装
3.常规安装 ./configure make makeinstall
4.源码cmake方式编译安装
所需包:
mysql-5.5.32.tar.gz
cmake-2.8.8.tar.gz
包一定要选正确
系统:
[[email protected] ~]# cat /etc/redhat-release
CentOS release 6.5 (Final)
[[email protected] ~]# uname -a
Linux qbPC 2.6.32-431.el6.x86_64 #1 SMP Fri Nov 22 03:15:09 UTC 2013 x86_64 x86_64 x86_64 GNU/Linux
我在6.8系统也装成功了,应该6.x系列应该差不多
准备:
[[email protected] ~]# cat /etc/udev/rules.d/70-persistent-net.rules
[[email protected] ~]#> /etc/udev/rules.d/70-persistent-net.rules
1.3安装相关软件包
1.3.1cmake软件
#cd /home/tools/
#tar xf cmake-2.8.8.tar.gz
#cd cmake-2.8.8
#./configure
------------------------------------------------------------------------------------------
这里可能遇见问题1:
---------------------------------------------
CMake 3.1.1, Copyright 2000-2015 Kitware, Inc.
C compiler on this system is: cc
---------------------------------------------
Error when bootstrapping CMake:
Cannot find appropriate C++ compiler on this system.
Please specify one using environment variable CXX.
See cmake_bootstrap.log for compilers attempted.
解决:
yum install make cmake gcc gcc-c++ -y
------------------------------------------------------------------------------------------
gmake
gmake install
cd ..
1.3.2依赖包
[[email protected] tools]# yum -y install ncurses-devel
不安装会有问题:
1.4开始安装MySQL
1.4.1 创建用户和组
[[email protected] tools]# groupadd mysql
[[email protected] tools]# useradd mysql -s /sbin/nologin -M -g mysql
1.4.2解压编译MySQL
[[email protected] tools]# tar xf mysql-5.5.32.tar.gz
[[email protected] tools]# cd mysql-5.5.32
[[email protected] mysql-5.5.32]#cmake . -DCMAKE_INSTALL_PREFIX=/application/mysql-5.5.32 \ 安装路径
-DMYSQL_DATADIR=/application/mysql-5.5.32/data \ 数据文件路径
-DMYSQL_UNIX_ADDR=/application/mysql-5.5.32/tmp/mysql.sock \ sock路径
-DDEFAULT_CHARSET=utf8 \ m默认字符集
-DDEFAULT_COLLATION=utf8_general_ci \ 默认字符集校对规则
-DEXTRA_CHARSETS=gbk,gb2312,utf8,ascii \
-DENABLED_LOCAL_INFILE=ON \
-DWITH_INNOBASE_STORAGE_ENGINE=1 \
-DWITH_FEDERATED_STORAGE_ENGINE=1 \
-DWITH_BLACKHOLE_STORAGE_ENGINE=1 \
-DWITHOUT_EXAMPLE_STORAGE_ENGINE=1 \
-DWITHOUT_PARTITION_STORAGE_ENGINE=1 \
-DWITH_FAST_MUTEXES=1 \
-DWITH_ZLIB=bundled \
-DENABLED_LOCAL_INFILE=1 \
-DWITH_READLINE=1 \
-DWITH_EMBEDDED_SERVER=1 \
-DWITH_DEBUG=0
[[email protected] mysql-5.5.32]# make && make install
时间比较长
------------------------------------------------------------------------------------------
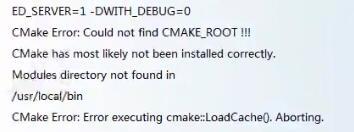
可能遇见问题2
解决
[[email protected] mysql-5.5.32]# which cmake
/usr/local/bin/cmake
检查
cmake安装不正确,重新安装
------------------------------------------------------------------------------------------
编译完成
[[email protected] mysql-5.5.32]# ln -s /application/mysql-5.5.32/ /application/mysql
到此cmake的安装就算成功了!
1.4.3初始化配置MySQL
1.查看默认模版配置文件
2.选择配置文件
[[email protected] tools]# cp mysql-5.5.32/support-files/my-small.cnf /etc/my.cnf
cp: overwrite `/etc/my.cnf‘? y
测试环境选小的,生产环境可以根据硬件选择,例如my-innodb-heavy-4G.cnf
3.配置环境变量
[[email protected] tools]# echo ‘export PATH=/application/mysql/bin:$PATH‘ >> /etc/profile
必须放在PATH的前面,因为以后可能有yum安装的客户端,如果不放在前面,如果使用mysql命令之类的,会调用系统的rpm的命令。
[[email protected] tools]# tail /etc/profile
fi
done
unset i
unset -f pathmunge
export JAVA_HOME=/application/jdk
export CLASSPATH=$CLASSPATH:$JAVA_HOME/lib:$JAVA_HOME/jre/lib
export PATH=$JAVA_HOME/bin:$JAVA_HOME/jre/bin:$PATH:$HOME/bin
export RESIN_HOME=/application/resin
export PATH=/application/mysql/bin:$PATH
[[email protected] tools]# source /etc/profile
[[email protected] tools]# echo $PATH
/application/mysql/bin:/application/jdk/bin:/......
环境变量出错的问题3:
http://oldboy.blog.51cto.com/2561410/1122867
4.初始化数据文件(容易出错的步骤)
[[email protected] tools]# chown -R mysql.mysql /application/mysql/data/
[[email protected] tools]# chmod -R 1777 /tmp/
[[email protected] tools]# cd /application/mysql/scripts/
[[email protected] scripts]# ./mysql_install_db --basedir=/application/mysql/ --datadir=/application/mysql/data/ --user=mysql
出现以下的两个OK即为初始化成功
提示:
WARNING: The host ‘qbPC‘ could not be looked up with resolveip.
This probably means that your libc libraries are not 100 % compatible
with this binary MySQL version. The MySQL daemon, mysqld, should work
normally with the exception that host name resolving will not work.
This means that you should use IP addresses instead of hostnames
when specifying MySQL privileges !
Installing MySQL system tables...
OK
Filling help tables...
OK

To start mysqld at boot time you have to copy
support-files/mysql.server to the right place for your system
启动脚本

PLEASE REMEMBER TO SET A PASSWORD FOR THE MySQL root USER !
To do so, start the server, then issue the following commands:

/application/mysql//bin/mysqladmin -u root password ‘new-password‘
/application/mysql//bin/mysqladmin -u root -h qbPC password ‘new-password‘
修改密码

Alternatively you can run:
/application/mysql//bin/mysql_secure_installation

which will also give you the option of removing the test
databases and anonymous user created by default.  This is
strongly recommended for production servers.

See the manual for more instructions.

启动
You can start the MySQL daemon with:
cd /application/mysql/ ; /application/mysql//bin/mysqld_safe &

测试
You can test the MySQL daemon with mysql-test-run.pl
cd /application/mysql//mysql-test ; perl mysql-test-run.pl

汇报bug
Please report any problems with the /application/mysql//scripts/mysqlbug script!
对于第一句的warning,解决
[[email protected] scripts]# vim /etc/hosts
127.0.0.1 localhost qbPC---加上主机名即可
当各种正常,在mysql的时候或者mysql -uroot -pqinbin123也不能进行,就要想想是不是初始化文件是否正确!
5.设置常规方式启动和关闭脚本
[[email protected] mysql]# cd /home/tools/mysql-5.5.32
[[email protected] mysql-5.5.32]# /bin/cp support-files/mysql.server /etc/init.d/mysqld
[[email protected] mysql-5.5.32]# /etc/init.d/m
mdmonitor multipathd
当tab不出来,说明有问题,进行加权限
[[email protected] mysql-5.5.32]# chmod +x /etc/init.d/mysqld
[[email protected] mysql-5.5.32]# /etc/init.d/mysqld start
Starting MySQL... [ OK ]
[[email protected] mysql-5.5.32]# netstat -ntlup | grep 3306
tcp 0 0 0.0.0.0:3306 0.0.0.0:* LISTEN 28628/mysqld
成功了!
[[email protected] mysql-5.5.32]# chkconfig mysqld on
[[email protected] mysql-5.5.32]# chkconfig --list mysqld
mysqld 0:off 1:off 2:on 3:on 4:on 5:on 6:off
6.登录mysql故障解决
mysql -uroot -p123:这样登录也不行的时候进行下面操作
pkill mysqld
lsof -i :3306
rm -rf /application/mysql/data/*
然后重复4.初始化数据文件(容易出错的步骤)
7.成功登录
先优化,安全,木桶原则
[[email protected] mysql-5.5.32]# mysql
Welcome to the MySQL monitor.  Commands end with ; or \g.
Your MySQL connection id is 2
Server version: 5.5.32 Source distribution

Copyright (c) 2000, 2013, Oracle and/or its affiliates. All rights reserved.

Oracle is a registered trademark of Oracle Corporation and/or its
affiliates. Other names may be trademarks of their respective
owners.

Type ‘help;‘ or ‘\h‘ for help. Type ‘\c‘ to clear the current input statement.

mysql> select user,host from mysql.user;
+------+-----------+
| user | host      |
+------+-----------+
| root | 127.0.0.1 |
| root | ::1       |
|      | localhost |
| root | localhost |
|      | qbPC      |
| root | qbPC      |
+------+-----------+
6 rows in set (0.00 sec)

mysql> delete from mysql.user where user="";
Query OK, 2 rows affected (0.00 sec)

mysql> select user,host from mysql.user;
+------+-----------+
| user | host      |
+------+-----------+
| root | 127.0.0.1 |
| root | ::1       |
| root | localhost |
| root | qbPC      |
+------+-----------+
4 rows in set (0.00 sec)

mysql> delete from mysql.user where host="qbPC";
Query OK, 1 row affected (0.00 sec)

mysql> delete from mysql.user where host="::1";
Query OK, 1 row affected (0.00 sec)

mysql> drop database test;
Query OK, 0 rows affected (0.00 sec)

mysql> show databases;
+--------------------+
| Database           |
+--------------------+
| information_schema |
| mysql              |
| performance_schema |
+--------------------+
3 rows in set (0.00 sec)

mysql>
修改密码
[[email protected] mysql-5.5.32]# /application/mysql//bin/mysqladmin -u root password ‘qb123‘
[[email protected] mysql-5.5.32]# mysql -uroot -pqb123
Welcome to the MySQL monitor. Commands end with ; or \g.
字符集:
[[email protected] ~]# cat /etc/sysconfig/i18n
LANG="en_US.UTF-8"
SYSFONT="latarcyrheb-sun16"
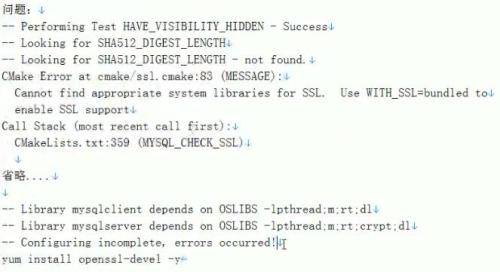
问题:
解决安装;yum -y install openssl-devel
本文出自 “11773640” 博客,谢绝转载!
以上是关于mysql安装与调优的主要内容,如果未能解决你的问题,请参考以下文章


