Android如何通过TextView实现超链接的跳转
Posted zhangjinhuang
tags:
篇首语:本文由小常识网(cha138.com)小编为大家整理,主要介绍了Android如何通过TextView实现超链接的跳转相关的知识,希望对你有一定的参考价值。
前段时间在开发群里看到有人问android的TextView该如何自定义超链接的跳转,如:有字符串“使用该软件,即表示您同意该软件的使用条款和隐私政策”,现希望当点击“使用条款”或“隐私政策”时可以跳转到相应的说明页面,我还记得当时有一大堆人在讨论然后提了一大堆的方法,比如:用多个TextView组合,给相应的TextView添加点击事件、给TextView添加autoLink属性、通过给相应的内容添加<a></a>标签、借助Spannable类、Linkfy类等等,当然最后提问者采用哪种方法我就不得而知了,我呢也刚好最近几天比较有空,然后翻了下Api文档,于是通过几个晚上的总结形成了今天的这篇博客,内容比较多,还望大家能够耐心点,相信大家看完肯定对TextView的各种超链接的跳转及实现水到渠来。
1)autoLink属性
对TextView属性比较熟悉的开发者应该都知道TextView有一个叫做autoLink的属性可以将符合指定格式的文本转换为可单击的超链接形式,在帮助文档中也可以发现Android给我们提供了如下几种格式:
1、none:表示不进行任何匹配,默认;
2、Web:表示匹配Web Url,如:内容中的http://www.baidu.com会成为可单击跳转的超链接;
3、Email:表示匹配邮件地址:如:邮件地址为hello@com.cn会成为可单击的超链接;
4、Phone:表示匹配电话号码:如:点击号码10086会跳到拨号界面;
5、Map:表示匹配地图地址;
6、All:表示将会匹配web、email、phone、map;
为了验证android给我们提供的几种格式,我在布局中添加了几个TextView并且分别设置了autoLink属性及相应的值,运行程序后可以发现,内容中符合格式的都带上了下划线并且有相应的颜色,如下所示:

1)拦截超链接
虽然通过设置autoLink属性可以符合格式的文本转换为可单击的超链接形式,但是,有一点需要注意的是,当点击web地址时打开后跳转的是手机自带的浏览器,如果希望点击web地址时可以跳转到应用本身的一个WebView界面,那么此时又该如何实现呢?如果不知道怎么实现的话,我们可以点击TextView进去查看一下TextView的源码看一下autoLink的是如何实现的,通过ctrl+f查找autoLink可以发现如下代码:
case com.android.internal.R.styleable.TextView_autoLink:
    mAutoLinkMask = a.getInt(attr, 0);
break;if (mAutoLinkMask != 0)
Spannable s2;
if (type == BufferType.EDITABLE || text instanceof Spannable)
s2 = (Spannable) text;
else
s2 = mSpannableFactory.newSpannable(text);
if (Linkify.addLinks(s2, mAutoLinkMask))
text = s2;
type = (type == BufferType.EDITABLE) ? BufferType.EDITABLE : BufferType.SPANNABLE;
/*
* We must go ahead and set the text before changing the
* movement method, because setMovementMethod() may call
* setText() again to try to upgrade the buffer type.
*/
mText = text;
// Do not change the movement method for text that support text selection as it
// would prevent an arbitrary cursor displacement.
if (mLinksClickable && !textCanBeSelected())
setMovementMethod(LinkMovementMethod.getInstance());
public static final boolean addLinks(Spannable text, int mask)
    if (mask == 0)
        return false;


    URLSpan[] old = text.getSpans(0, text.length(), URLSpan.class);

    for (int i = old.length - 1; i >= 0; i--)
        text.removeSpan(old[i]);


    ArrayList<LinkSpec> links = new ArrayList<LinkSpec>();

    if ((mask & WEB_URLS) != 0)
        gatherLinks(links, text, Patterns.WEB_URL,
            new String[]  "http://", "https://", "rtsp://" ,
            sUrlMatchFilter, null);

  ......此处省略若干省略若干行代码
    for (LinkSpec link: links)
        applyLink(link.url, link.start, link.end, text);


    return true;
private static final void applyLink(String url, int start, int end, Spannable text)
    URLSpan span = new URLSpan(url);
    text.setSpan(span, start, end, Spanned.SPAN_EXCLUSIVE_EXCLUSIVE);
public class MainActivity extends AppCompatActivity

    private TextView tv_content;
    @Override
    protected void onCreate(Bundle savedInstanceState)
        super.onCreate(savedInstanceState);
        setContentView(R.layout.activity_main);
        tv_content = (TextView) findViewById(R.id.tv_content);
        interceptHyperLink(tv_content);


    /**
     * 拦截超链接
     * @param tv
     */
    private void interceptHyperLink(TextView tv)
        tv.setMovementMethod(LinkMovementMethod.getInstance());
        CharSequence text = tv.getText();
        if (text instanceof Spannable)
            int end = text.length();
            Spannable spannable = (Spannable) tv.getText();
            URLSpan[] urlSpans = spannable.getSpans(0, end, URLSpan.class);
            if (urlSpans.length == 0)
                return;


            SpannableStringBuilder spannableStringBuilder = new SpannableStringBuilder(text);
            // 循环遍历并拦截 所有http://开头的链接
            for (URLSpan uri : urlSpans)
                String url = uri.getURL();
                if (url.indexOf("http://") == 0)
                    CustomUrlSpan customUrlSpan = new CustomUrlSpan(this,url);
                    spannableStringBuilder.setSpan(customUrlSpan, spannable.getSpanStart(uri),
                            spannable.getSpanEnd(uri), Spannable.SPAN_INCLUSIVE_EXCLUSIVE);


            tv.setText(spannableStringBuilder);
public class CustomUrlSpan extends ClickableSpan

    private Context context;
    private String url;
    public CustomUrlSpan(Context context,String url)
        this.context = context;
        this.url = url;


    @Override
    public void onClick(View widget)
        // 在这里可以做任何自己想要的处理
        Intent intent = new Intent(context,WebViewActivity.class);
        intent.putExtra(WebViewActivity.WEB_URL,url);
        context.startActivity(intent);
2)去除超链接的下划线
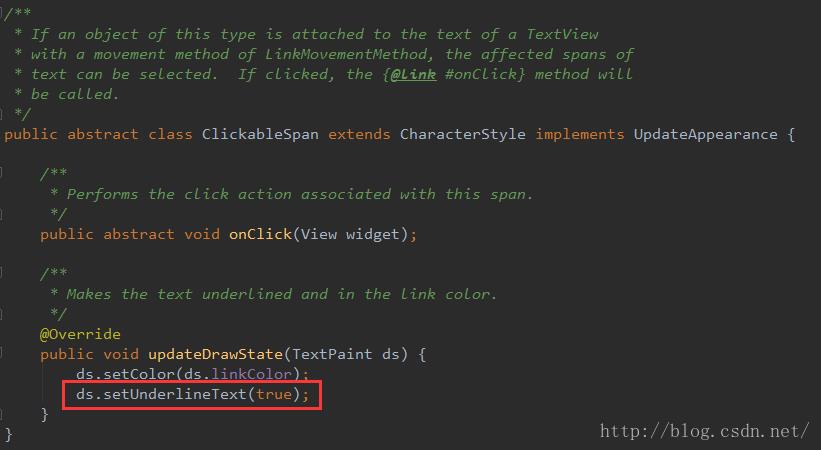
众所周知,超链接都带有一条下划线表示可点击的,那么如果想去除超链接的下划线又该如何实现呢?既然下划线是用来表示可点击的,那么就说明跟点击事件有关,从上面拦截超链接的实现中知道点击超链接进行跳转是借助ClickableSpan类实现的,进到ClickableSpan类中可以发现该类出奇的简单,如下所示:

从源码中可以发现,超链接中的下划线是通过TextPaint的setUnderlineText方法来实现的,也就是说如果我们想去除超链接中的下划线的话可以通过自定义一个继承自ClickableSpan的类然后重写其updateDrawState方法,在该方法中将TextPaint的setUnderlineText方法设为false,最后再将该自定义的ClickableSpan设置到的相应的TextView中即可,原则上来说通过自定义一个继承自ClickableSpan的类是可以去除超链接的下划线,但是,在这里我将使用跟ClickableSpan类似的一个类UnderlineSpan来实现,至于原因想必大家看类名就很容易知道了。
1)首先自定义一个继承自UnderlineSpan类的NoUnderlineSpan类并重写父类的updateDrawState方法,然后在该方法中将TextPaint的setUnderlineText方法设为false,主要代码如下:
public class NoUnderlineSpan extends UnderlineSpan

    @Override
    public void updateDrawState(TextPaint ds)
        ds.setUnderlineText(false);
private void removeHyperLinkUnderline(TextView tv)
    CharSequence text = tv.getText();
    if(text instanceof Spannable)
        Log.i("test","true");
        Spannable spannable = (Spannable) tv.getText();
        NoUnderlineSpan noUnderlineSpan = new NoUnderlineSpan();
        spannable.setSpan(noUnderlineSpan,0,text.length(), Spanned.SPAN_MARK_MARK);

2)自定义链接
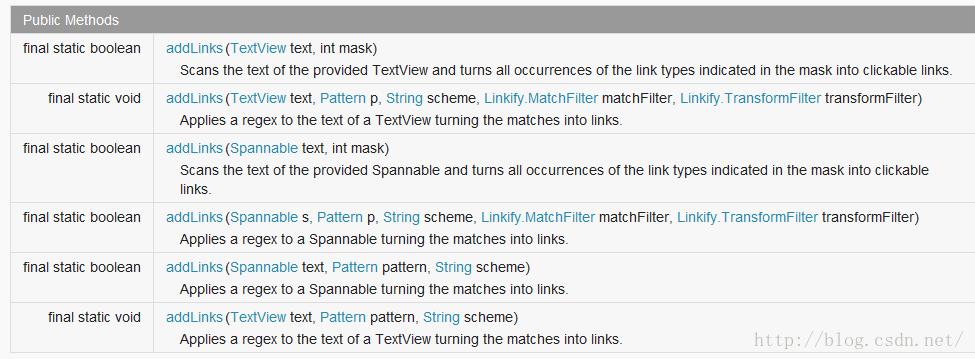
除了以上通过添加autoLink属性并设置web值实现超链接以外,android还给我们提供了一个Linkify类来自定义超链接,并且从帮助文档中可以看出Linkify还提供了一大堆添加自定义模式的方法,如下所示:

这里为了方便,暂且用有3个参数的构造方法即最后一个,其中第一个参数TextView即需要自定义模式的对象,第二个参数Pattern表示自己定义的用来匹配第一个参数TextView中内容的正则表达式,最后一个参数Scheme我理解为当点击自定义链接时跳转的界面,如:在布局文件中新增一个TextView并设置一些默认的内容,然后在代码如下通过如下方式设置自定义链接:
TextView  tv_customHyperLink = (TextView) findViewById(R.id.tv_customHyperLink);
//配置的正则表达式
Pattern p = Pattern.compile("abc://\\\\S*");
Linkify.addLinks(tv_customHyperLink, p, "abc");
<activity android:name=".TargetActivity">
    <intent-filter>
        <action android:name="android.intent.action.VIEW"/>
        <!--隐式调用时,必须声明类别-->
        <category android:name="android.intent.category.DEFAULT"/>
        <!--必须和代码中设置scheme一样-->
        <data android:scheme="abc"/>
    </intent-filter>
</activity>
点击链接跳转后的页面为:

当然,我们也可以通过这种方法实现上面所实现的拦截超链接的功能,这里就不再详细说明了,另外,当一个TextView即需要使用内置模式又需要使用自定义模式时必须先声明内置模式然后再声明自定义模式,并且经测试发现:不能在xml布局文件中通过autoLink属性来声明内置模式,否则自定义模式不起作用,据说是因为:在设置内置模式时会先删除已有的模式,那么此时就只能通过在代码中设置了,主要代码如下所示:
//多种模式
TextView  tv_multiHyperLink = (TextView) findViewById(R.id.tv_multiHyperLink);
Linkify.addLinks(tv_multiHyperLink,Linkify.PHONE_NUMBERS);
Pattern pattern = Pattern.compile("abc://\\\\S*");
Linkify.addLinks(tv_multiHyperLink, pattern, "abc");
运行程序,结果如下所示:

3)借助html实现文字的超链接
细心的你们也许会发现以上都是对一些链接进行的操作,当然你们也许会说可以通过自定义链接的形式对指定的文字进行正则匹配来实现,但是通过正则匹配中文的话应该比较难实现吧,所以,我们可以通过类似于html中超链接(即a标签)的方式来实现,考虑到字符串的来源及格式,于是总结出了比较常用的以下3种,主要代码如下所示:
//通过html的形式实现超链接
String csdnLink1 = "<a href=\\"http://blog.csdn.net/zhangjinhuang\\">我的CSDN博客</a>";
TextView  tv_html1 = (TextView) findViewById(R.id.tv_html1);
tv_html1.setText(Html.fromHtml(csdnLink1));
//设置超链接可点击
tv_html1.setMovementMethod(LinkMovementMethod.getInstance());

String csdnLink2 = "http://blog.csdn.net/zhangjinhuang我的CSDN博客";
TextView  tv_html2 = (TextView) findViewById(R.id.tv_html2);
tv_html2.setText(Html.fromHtml(csdnLink2));
//设置超链接可点击
tv_html2.setMovementMethod(LinkMovementMethod.getInstance());

String csdnLink3 = getResources().getString(R.string.csdn);
TextView  tv_html3 = (TextView) findViewById(R.id.tv_html3);
tv_html3.setText(Html.fromHtml(csdnLink3));
//设置超链接可点击
tv_html3.setMovementMethod(LinkMovementMethod.getInstance());
4)借助SpannableString定制超链接的跳转
在上面我们通过Html类的fromHtml方法来格式化a标签中的内容从而实现文字的超链接,但是依旧还是跟web地址关联在一起,也就是说如果只是单纯的点击某个文字然后跳转到指定某个界面的话还是无法实现的,因此,在这里我将通过SpannableString类来实现类似文章开头谈到的 当点击“使用该软件,即表示您同意该软件的使用条款和隐私政策”,中的“使用条款”或“隐私政策”时可以跳转到相应的说明页面的功能。相信很多人都对SpannableString并不陌生,因为当想让一个字符串中的指定字符变大或者改变颜色再或者设置下划线等时都需要借助该类来实现,其实在一开始讲解“拦截超链接”时就已经使用了相应的功能了,但是在这里还是通过代码来着重的实现一下,首先对相应的TextView进行如下设置:
//借助SpannableString类实现超链接文字
tv_customMultiHyperLink = (TextView) findViewById(R.id.tv_customMultiHyperLink);
tv_customMultiHyperLink.setText(getClickableSpan());
//设置超链接可点击
tv_customMultiHyperLink.setMovementMethod(LinkMovementMethod.getInstance());
/**
 * 获取可点击的SpannableString
 * @return
 */
private SpannableString getClickableSpan()
    SpannableString spannableString = new SpannableString("使用该软件,即表示您同意该软件的使用条款和隐私政策");
    //设置下划线文字
    spannableString.setSpan(new UnderlineSpan(), 16, 20, Spanned.SPAN_EXCLUSIVE_EXCLUSIVE);
    //设置文字的单击事件
    spannableString.setSpan(new ClickableSpan()
        @Override
        public void onClick(View widget)
            Toast.makeText(MainActivity.this,"使用条款",Toast.LENGTH_SHORT).show();

    , 16, 20, Spanned.SPAN_EXCLUSIVE_EXCLUSIVE);
    //设置文字的前景色
    spannableString.setSpan(new ForegroundColorSpan(Color.RED), 16, 20, Spanned.SPAN_EXCLUSIVE_EXCLUSIVE);

    //设置下划线文字
    spannableString.setSpan(new UnderlineSpan(), 21, 25, Spanned.SPAN_EXCLUSIVE_EXCLUSIVE);
    //设置文字的单击事件
    spannableString.setSpan(new ClickableSpan()
        @Override
        public void onClick(View widget)
            Toast.makeText(MainActivity.this,"隐私政策",Toast.LENGTH_SHORT).show();

    , 21, 25, Spanned.SPAN_EXCLUSIVE_EXCLUSIVE);
    //设置文字的前景色
    spannableString.setSpan(new ForegroundColorSpan(Color.RED), 21, 25, Spanned.SPAN_EXCLUSIVE_EXCLUSIVE);
    return spannableString;

以上是关于Android如何通过TextView实现超链接的跳转的主要内容,如果未能解决你的问题,请参考以下文章