ActiveMQ-与SpringBoot整合-队列篇
Posted 闲言博客
tags:
篇首语:本文由小常识网(cha138.com)小编为大家整理,主要介绍了ActiveMQ-与SpringBoot整合-队列篇相关的知识,希望对你有一定的参考价值。
1.创建生产者项目
1.1 添加依赖
    <dependencies>
        <dependency>
            <groupId>org.springframework.boot</groupId>
            <artifactId>spring-boot-starter-test</artifactId>
            <scope>test</scope>
        </dependency>
        <dependency>
            <groupId>org.springframework.boot</groupId>
            <artifactId>spring-boot-starter-web</artifactId>
        </dependency>

        <dependency>
            <groupId>org.springframework.boot</groupId>
            <artifactId>spring-boot-starter</artifactId>
        </dependency>
        <!--spring boot整合activemq的jar包-->
        <dependency>
            <groupId>org.springframework.boot</groupId>
            <artifactId>spring-boot-starter-activemq</artifactId>
            <version>2.1.5.RELEASE</version>
        </dependency>
    </dependencies>
1.2 配置yml文件
server:
  port: 7777
spring:
  activemq:
    # activemq的broker的url
    broker-url: tcp://127.0.0.1:61616
    # 连接activemq的broker所需的账号和密码
    user: admin
    password: admin
  jms:
    # 目的地是queue还是topic, false(默认) = queue    true =  topic
    pub-sub-domain: false
#  自定义队列名称
myqueue: boot-activemq-queue
1.3 编写生产者启动类
@SpringBootApplication
@EnableScheduling
public class AppProduce
    public static void main(String[] args)
        SpringApplication.run(AppProduce.class,args);
1.4 编写生产者配置类,将ActiveMQQueue 添加到容器中
@Component
// 开启jms适配
@EnableJms
public class ConfigBean

    // 注入配置文件中的 myqueue[消息目的地]
    @Value("$myqueue")
    private String myQueue ;

    @Bean
    public ActiveMQQueue queue()
        return  new ActiveMQQueue(myQueue);
1.5 发送消息
这里我用了一个定时任务,定时往队列里发送消息
@Component
public class QueueProduce
    // JMS模板
    @Autowired
    private JmsMessagingTemplate  jmsMessagingTemplate ;

    // 队列目的地
    @Autowired
    private Queue queue ;

    // 发送消息
    public void produceMessage()
        // 一参是目的地,二参是消息的内容
        jmsMessagingTemplate.convertAndSend(queue,"****"+ UUID.randomUUID().toString().substring(0,6));

    // 定时任务。每3秒执行一次
    @Scheduled(fixedDelay = 3000)
    public void produceMessageScheduled()
        produceMessage();
1.6 启动生产者工程

1.7 查看后台
由于每3秒发送一条消息,现在待消费的消息已经有37条了

2.创建消费者项目
2.1 添加依赖
同上
2.2 配置yml文件
同上(如果需要同时启动生产者和消费者,这里需要修改项目的端口号,否则端口冲突)
2.3 编写消费者启动类
@SpringBootApplication
public class AppConsumer
    public static void main(String[] args)
        SpringApplication.run(AppConsumer.class,args);
2.4 编写消费者消费方法类
@Component
public class QueueConsumer

    // 注册一个监听器。destination指定监听的主题。
    @JmsListener(destination = "$myqueue")
    public void receive(TextMessage textMessage) throws  Exception
        System.out.println(" ***  消费者收到消息  ***"+textMessage.getText());
2.5 启动消费者工程
这里我用了一个定时任务,定时往队列里发送消息

2.6 查看后台

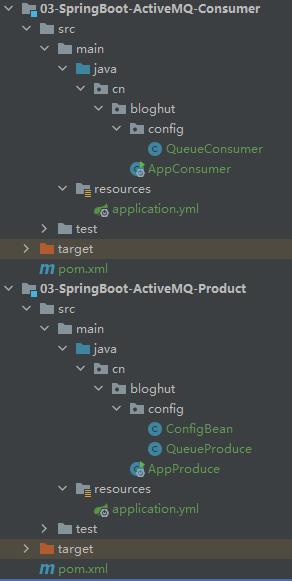
3.项目结构

以上是关于ActiveMQ-与SpringBoot整合-队列篇的主要内容,如果未能解决你的问题,请参考以下文章