鸟哥杂谈腾讯云 CentOS8 Linux环境下通过docker安装mysql
Posted 单片机菜鸟哥
tags:
篇首语:本文由小常识网(cha138.com)小编为大家整理,主要介绍了鸟哥杂谈腾讯云 CentOS8 Linux环境下通过docker安装mysql相关的知识,希望对你有一定的参考价值。
忘记过去,超越自己
- ❤️ 博客主页 单片机菜鸟哥,一个野生非专业硬件IOT爱好者 ❤️
- ❤️ 本篇创建记录 2023-01-15 ❤️
- ❤️ 本篇更新记录 2023-01-15 ❤️
- 🎉 欢迎关注 🔎点赞 👍收藏 ⭐️留言📝
- 🙏 此博客均由博主单独编写,不存在任何商业团队运营,如发现错误,请留言轰炸哦!及时修正!感谢支持!
- 🔥 Arduino ESP8266教程累计帮助过超过1W+同学入门学习硬件网络编程,入选过选修课程,刊登过无线电杂志 🔥
目录
1. 前言
之前在腾讯云服务器上也搭建使用了docker。
这节就在docker环境下搭建mysql环境。
2. 获取mysql镜像
2.1 查看镜像版本
在官网上查找mysql镜像版本。

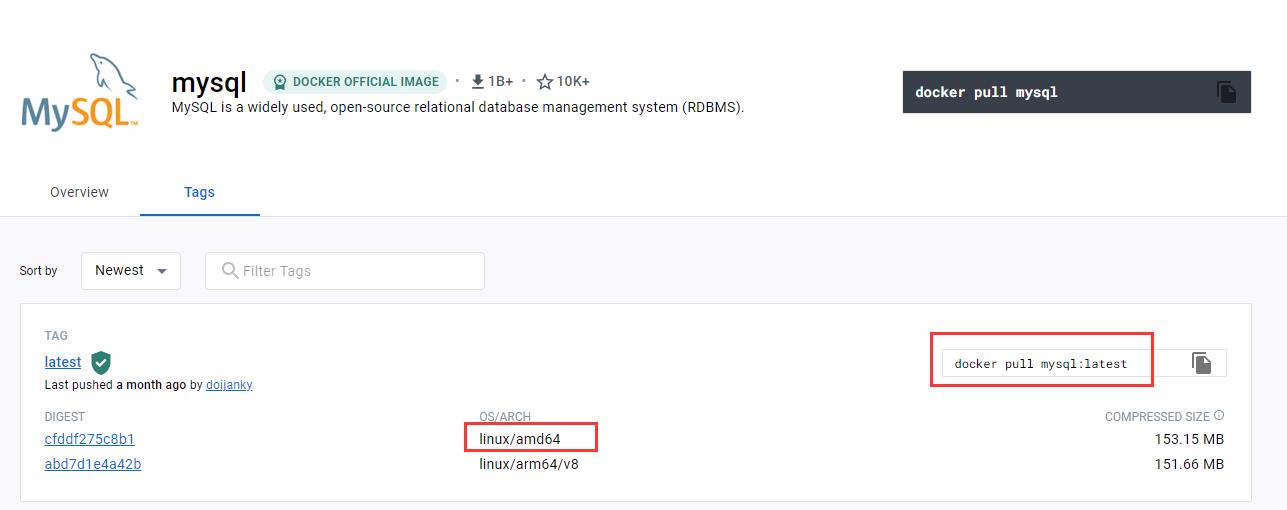
点击官方版本后,切换到tag标签可以看到不同的版本(由于我们是腾讯云amd的os,需要关注这个):

右侧对应各个版本的拉取命令可以直接复制使用即可:

这里区分了不同的linux发行版本,这里我们不需要debian系统。
2.2 拉取镜像
这里我们选择第一个镜像。

输入命令开始拉取镜像。
docker pull mysql:latest
查看镜像
docker images
3. 运行mysql容器
因为这里我们需要挂载mysql的一些文件以及配置在外部目录,所以在home下创建mysql目录,并且在mysql目录下创建 data 和 config目录。
[root@VM-8-12-centos home]# mkdir -p  mysql
[root@VM-8-12-centos home]# ls -al
总用量 32
drwxr-xr-x.  8 root       root       4096 1月  16 09:26 .
dr-xr-xr-x. 23 root       root       4096 12月 12 15:51 ..
drwx------   2       1004       1004 4096 12月 20 16:37 dpj1
drwx------   2       1005       1005 4096 12月 20 16:37 dpj2
drwx------   2       1003       1003 4096 12月 15 00:22 dpjcn
drwx------  10 lighthouse lighthouse 4096 10月 22 19:40 lighthouse
drwxr-xr-x   2 root       root       4096 1月  16 09:26 mysql
drwx------   2 www        www        4096 6月   4 2022 www
[root@VM-8-12-centos home]# cd mysql/
[root@VM-8-12-centos mysql]# ls -al
总用量 8
drwxr-xr-x  2 root root 4096 1月  16 09:26 .
drwxr-xr-x. 8 root root 4096 1月  16 09:26 ..
[root@VM-8-12-centos mysql]# mkdir data
[root@VM-8-12-centos mysql]# mkdir config
[root@VM-8-12-centos mysql]# ls -al
总用量 16
drwxr-xr-x  4 root root 4096 1月  16 09:28 .
drwxr-xr-x. 8 root root 4096 1月  16 09:26 ..
drwxr-xr-x  2 root root 4096 1月  16 09:28 config
drwxr-xr-x  2 root root 4096 1月  16 09:28 data
[root@VM-8-12-centos mysql]#
运行容器需要执行以下命令:
docker run -it -d --name mysql --net=host \\
-m 500m -v /home/mysql/data:/var/lib/mysql \\
-v /home/mysql/config:/etc/mysql/conf.d  \\
-e MYSQL_ROOT_PASSWORD=abc123456 \\
-e TZ=Asia/Shanghai mysql:latest \\
--lower_case_table_names=1
命令含义:
docker run -p 本地主机端口号:容器服务端口号 --name 容器名字 [-e 配置信息修改] -d 镜像名字
- v 挂载卷,前面是docker外面的文件夹,:后面是docker内对应的文件夹
conf.d是数据库的配置文件- e 修改配置,一些参数可以参考 https://hub.docker.com/_/mysql
MYSQL_ROOT_PASSWORD指定数据库密码,账户名默认是root- lower_case_table_names=1关闭数据库名大小写区分
[root@VM-8-12-centos mysql]# docker run -it -d --name mysql --net=host \\
> -m 500m -v /home/mysql/data:/var/lib/mysql \\
> -v /home/mysql/config:/etc/mysql/conf.d  \\
> -e MYSQL_ROOT_PASSWORD=abc123456 \\
> -e TZ=Asia/Shanghai mysql:latest \\
> --lower_case_table_names=1
71fe5ff2e32e365ea8f19ef10828a11f737f9186945e8c139166f980fb7b116f
[root@VM-8-12-centos mysql]#
查看docker运行命令
[root@VM-8-12-centos mysql]# docker ps -a
CONTAINER ID        IMAGE               COMMAND                  CREATED             STATUS              PORTS               NAMES
71fe5ff2e32e        mysql:latest        "docker-entrypoint..."   55 seconds ago      Up 54 seconds                           mysql
[root@VM-8-12-centos mysql]#
表示正常运行。
4. 进入mysql容器
docker exec -it mysql /bin/bash
[root@VM-8-12-centos data]# docker exec -it mysql /bin/bash
bash-4.4#
5. 操作mysql
5.1 输入用户密码进入mysql
输入命令
mysql -uroot -p密码
bash-4.4# mysql -uroot -pabc123456
mysql: [Warning] Using a password on the command line interface can be insecure.
Welcome to the MySQL monitor.  Commands end with ; or \\g.
Your MySQL connection id is 8
Server version: 8.0.31 MySQL Community Server - GPL

Copyright (c) 2000, 2022, Oracle and/or its affiliates.

Oracle is a registered trademark of Oracle Corporation and/or its
affiliates. Other names may be trademarks of their respective
owners.

Type 'help;' or '\\h' for help. Type '\\c' to clear the current input statement.

mysql>
这里表示mysql正常运行起来。
5.2 常用命令
参考 【NodeJs-5天学习】第四天存储篇① ——安装使用mysql 8.0 常用命令部分。
6. mysql占用内存高
5.6.6以后mysql默认打开了performance_schema,那么启动内存大概就是450M;
而如果关闭这个参数的话,启动内存就是100多M。
使用命令来查看 MySQL 默认配置文件位置
mysql --help|grep ‘cnf’
bash-4.4# mysql --help|grep 'cnf'
                      order of preference, my.cnf, $MYSQL_TCP_PORT,
/etc/my.cnf /etc/mysql/my.cnf /usr/etc/my.cnf ~/.my.cnf
bash-4.4#
看看配置文件有什么内容?
# For advice on how to change settings please see
# http://dev.mysql.com/doc/refman/8.0/en/server-configuration-defaults.html

[mysqld]
#
# Remove leading # and set to the amount of RAM for the most important data
# cache in MySQL. Start at 70% of total RAM for dedicated server, else 10%.
# innodb_buffer_pool_size = 128M
#
# Remove leading # to turn on a very important data integrity option: logging
# changes to the binary log between backups.
# log_bin
#
# Remove leading # to set options mainly useful for reporting servers.
# The server defaults are faster for transactions and fast SELECTs.
# Adjust sizes as needed, experiment to find the optimal values.
# join_buffer_size = 128M
# sort_buffer_size = 2M
# read_rnd_buffer_size = 2M

# Remove leading # to revert to previous value for default_authentication_plugin,
# this will increase compatibility with older clients. For background, see:
# https://dev.mysql.com/doc/refman/8.0/en/server-system-variables.html#sysvar_default_authentication_plugin
# default-authentication-plugin=mysql_native_password
skip-host-cache
skip-name-resolve
datadir=/var/lib/mysql
socket=/var/run/mysqld/mysqld.sock
secure-file-priv=/var/lib/mysql-files
user=mysql

pid-file=/var/run/mysqld/mysqld.pid
[client]
socket=/var/run/mysqld/mysqld.sock

!includedir /etc/mysql/conf.d/
我们把 performance_schema 关掉。
[mysqld]
performance_schema=OFF
然后重启mysql,你会发现内存消耗会里面降下来。
以上是关于鸟哥杂谈腾讯云 CentOS8 Linux环境下通过docker安装mysql的主要内容,如果未能解决你的问题,请参考以下文章

