paper:Traffic Flow Prediction With Big Data: A Deep Learning Approach SAE模型
Posted David_7788
tags:
篇首语:本文由小常识网(cha138.com)小编为大家整理,主要介绍了paper:Traffic Flow Prediction With Big Data: A Deep Learning Approach SAE模型相关的知识,希望对你有一定的参考价值。
Autoencoder
理论讲解
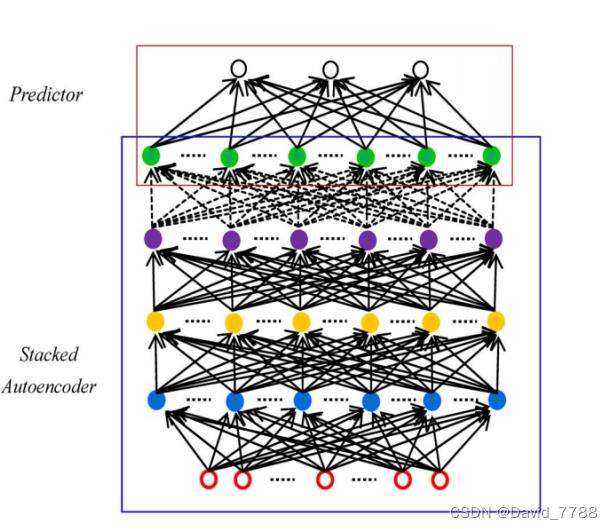
paper的任务是基于历史的交通数据预测未来的交通流量数据,并且发现交通流量的数据是具有一定的周期性的,因此其提出了 SAE的模型,其希望可以先记住交通流量的数据,然后在进行推导
paper提出的SAE的流程图

通过堆叠的Autoencoder自编码器来进行预测的任务
Autoencoder 的模型

y ( x ) = f ( W 1 x + b ) Z ( x ) = g ( W 2 y ( x ) + c ) y(x)=f(W_1x+b)~~~~~~Z(x)=g(W_2y(x)+c) y(x)=f(W1x+b) Z(x)=g(W2y(x)+c)

预训练
Autoencoder自编码器在预训练的时候是一个逐层贪心算法,而且是无监督的算法,在预训练阶段,自编码器的目标就是可以重现输入,即输出和输入要尽可能相同,并且在训练阶段,其每一次只训练一个网络层,训练好了该层,然后再训练下一个网络层,直到整个网络所有的层都训练完成后,才开始整个网络一起进行训练微调。
但是由于输入的维度可能会隐藏层的维度要小,导致直接记住每一个数据,只有部分权重起作用,但是paper不希望这样,因此他在loss中加入了KL散度,来惩罚这样的事情。
S
A
O
=
L
(
X
,
Z
)
+
γ
∑
j
=
1
H
D
K
L
(
ρ
∣
∣
ρ
^
j
)
K
L
(
(
ρ
∣
∣
ρ
^
j
)
=
ρ
l
o
g
ρ
ρ
j
^
+
(
1
−
ρ
)
l
o
g
1
−
ρ
1
−
ρ
j
^
L
(
X
,
Z
)
表示的就是
l
o
s
s
,
γ
是一个平衡参数,
ρ
是一个超参数,
ρ
^
是数据进过了该层后的平均值
SAO=L(X,Z)+γ∑^H_D_j=1KL(ρ||\\hatρ_j) \\\\ KL((ρ||\\hatρ_j)=ρlog\\fracρ\\hatρ_j+(1-ρ)log\\frac1-ρ1-\\hatρ_j\\\\ L(X,Z)表示的就是loss,γ是一个平衡参数,ρ是一个超参数,\\hatρ是数据进过了该层后的平均值
SAO=L(X,Z)+γj=1∑HDKL(ρ∣∣ρ^j)KL((ρ∣∣ρ^j)=ρlogρj^ρ+(1−ρ)log1−ρj^1−ρL(X,Z)表示的就是loss,γ是一个平衡参数,ρ是一个超参数,ρ^是数据进过了该层后的平均值
KL散度(相对熵),用来衡量两个分布之间的差异(分布1:以超参数ρ为均值对构成的伯努利分布,分布2:所有的训练集的data通过hidden_layer后的值的平均为均值的伯努利分布,之间的差异)由于loss函数中有使用所有训练集data在通过hidden_layer后的平均值后计算的,因此得先过一遍训练集,然后才可以正常预训练
真正训练
真正训练的时候就是有监督的算法,输入数据,输出预测,与label进行计算loss,然后反向传播,更新参数,与普通的网络算法没什么区别
但是注意Autoencoder预训练时候包括x–>y,输入到隐藏层;y–>z,隐藏层到输出层,但是真正训练的时候只有x–>y,而y–>z则不包含。
代码讲解
参数
sae=SAE()
loss_fn=nn.MSELoss()
optimizer=optim.Adam(sae.parameters(),lr=1e-3)
seq_len=96  # 已知的时间序列的长度
pred_len=96 # 预测的时间序列的长度
epoches=10
rou=0.005
预训练代码
计算经过该层网络后的平均激活,也就是计算过了该层网络后的数据的平均值
# 计算平均激活,就是经过当前层后的值的平均值,在计算KL散度的时候会使用
def rou_hat_cala(i,self,xx):
    '''
    Args:
        (i//2)+1 是训练哪一层fc
        self是使用哪个网络(sae)
        xx是输入数据
    '''
    if i == 0:
        pred = torch.sigmoid(self.fc1(xx))
        rou_hat1 = torch.mean(pred) + 1e-5  # 计算loss时需要使用,加上一个很小的数,防止为0
    elif i == 2:
        pred = torch.sigmoid(self.fc1(xx))
        pred = torch.sigmoid(self.fc2(pred))
        rou_hat1 = torch.mean(pred) + 1e-5  # 计算loss时需要使用,加上一个很小的数,防止为0
    elif i == 4:
        pred = torch.sigmoid(self.fc1(xx))
        pred = torch.sigmoid(self.fc2(pred))
        pred = torch.sigmoid(self.fc3(pred))
        rou_hat1 = torch.mean(pred) + 1e-5  # 计算loss时需要使用,加上一个很小的数,防止为0
    elif i == 6:
        pred = torch.sigmoid(self.fc1(xx))
        pred = torch.sigmoid(self.fc2(pred))
        pred = torch.sigmoid(self.fc3(pred))
        pred = torch.sigmoid(self.fc4(pred))
        rou_hat1 = torch.mean(pred) + 1e-5  # 计算loss时需要使用,加上一个很小的数,防止为0

    elif i == 8:
        pred = torch.sigmoid(self.fc1(xx))
        pred = torch.sigmoid(self.fc2(pred))
        pred = torch.sigmoid(self.fc3(pred))
        pred = torch.sigmoid(self.fc4(pred))
        pred = torch.sigmoid(self.fc5(pred))
        rou_hat1 = torch.mean(pred) + 1e-5  # 计算loss时需要使用,加上一个很小的数,防止为0
    else:rou_hat1=0
    return rou_hat1
预训练的完整代码
首先先把所有的层都冻住,requires_grad=False,这里我和理论讲解处不同的地方在于,我是经过整个网络后计算输出和输入的loss,而不是经过一层计算输入和输出的loss,即我这里不会而外增加从隐藏层到输出的FC
开始进行逐层训练,一次只训练一层网络,require_gard=Ture,然后都是根据公式按部就班的计算,改层网络训练50个epoches,然后就把这一层网络冻住,开始训练下一层网络
#预训练,把不训练的其它层全部冻住(requires_grad=Fasle)
def pre_train(self,train_data):
    rou_hat = 0
    param_lst=[] #把每一层的权重的名字装起来
    #将所有的可训练参数全部设置为False
    for param in self.named_parameters(): #name_parameters()会返回层名字和权重
        param[1].requires_grad=False
        param_lst.append(param[0])

    for i in range(len(param_lst)):
        lst=list(self.named_parameters())#得到网络权重和名称
        if i%2==0:
            lst[i][1].requires_grad=True
            lst[i+1][1].requires_grad=True #逐层训练

            total_len= pred_len + seq_len

            #把训练集的数据都经过一遍网络,然后在计算经过隐藏层的平均激活
            for j in range(train_data.shape[0] // total_len):  # 总共可以取多少个total_len
                x = train_data[j * total_len:(j + 1) * total_len, :]  # 每一次取total长度
                xx = x[:seq_len, :].clone()  # 每一次已知的时间序列(seq_len,dim)
                xx = xx.unsqueeze(0)  # 升维度(1,seq_len,dim)
                xx = xx.permute(0, 2, 1)  # 输出维度是(1,dim,seq_len)

                #计算rou_hat,平均激活
                rou_hat+=rou_hat_cala(i,self,xx)
            rou_hat=rou_hat/(j+1)+1e-5 # +1e-5是为了为0
            for epoch in range(epoches):
                runing_loss = 0
                for j in range(train_data.shape[0] // total_len):  # 总共可以取多少个total_len
                    x = train_data[i * total_len :(i + 1) * total_len, :]  # 每一次取total_len长度
                    xx = x[:seq_len, :].clone()  # 每一次已知的时间序列(seq_len,dim)
                    xx = xx.unsqueeze(0)  # 升维度(1,seq_len,dim)
                    xx = xx.permute(0, 2, 1)  # 输出维度是(1,dim,seq_len)
                    pred = sae(xx)  # 输出是(1,dim,seq_len)
                    optimizer.zero_grad()
                    pred = pred.squeeze()
                    pred=pred.permute(1,0)#输出是(seq-len,dim)
                    kl=rou*torch.log(rou/rou_hat)+(1-rou)*torch.log((1-rou)/(1-rou_hat)) #计算KL散度
                    loss = loss_fn(pred, x[seq_len:, :])+kl  # 计算loss
                    loss.backward()
                    runing_loss += loss
                    optimizer.step()
                    rou_hat = rou_hat_cala(i, self, xx)
                print('第0个epoch的loss:1'.format(epoch + 1, round((runing_loss / (i + 1)).item(), 2)))
            lst[i][1].requires_grad = False
            lst[i + 1][1].requires_grad = False # 把训练好的层再次冻住
逐层训练完毕后,整一个网络整体进行训练,进行微调,这一部分就和普通的网络进行训练一样
def train(net,loss_fn,optimizer,train_data,seq_len,pred_len,epoches):
    '''
    Args:
        net是需要训练的网络
        loss_fn是使用的损失函数,train_data是整个训练集
        seq_len是已知的时间序列的长度,pred_len是需要预测的时间序列长度
        epoches是外循环多少次,
    '''
    net.train()
    total_len=pred_len+seq_len
    for epoch in range(epoches):
        runing_loss = 0
        for i in range(train_data.shape[0] // total_len):  # 总共可以取多少个total_len
            x=train_data[i*total_len:(i+1)*total_len,:]#每一次取total_len长度
            xx=x[:seq_len,:].clone()#每一次已知的时间序列(seq_len,dim)
            xx=xx.unsqueeze(0)#升维度(1,seq_len,dim)

            xx=xx.permute(0,2,1)#输出维度是(1,dim,seq_len)
            pred=net(xx)#输出是(1,dim,pred_len)
            optimizer.zero_grad()
            pred=pred.contiguous().squeeze(0).permute(1,0)#输出是(pred_len,dim)
            loss=loss_fn(pred,x[seq_len:,:])#计算loss
            loss.backward()
            runing_loss+=loss
            optimizer.step()
        print('第0个epoch的loss:1'.format(epoch+1,round((runing_loss/(i+1)).item(),2)))
预训练完毕后,把相应的权重进行保存
正式训练的时候可以直接调用预训练的权重
Autoencoder正式训练的代码
模型初始化
初始化五个全连接层,这一个也没什么特别的,这里可以调用之前预训练好的权重
class Autoencoder(nn.Module): #输入是已知的时间序列,输出是预测时间序列
    def __init__(self,args,hidden_size=300):
        '''
        Arg:
        seq_len=96代表输入数据的第二个维度(时间维度:已知多长的时间序列)
        pred_len=96代表预测时间有多长,hidden_size=300是隐藏层的神经元数量
        '''
        super(Autoencoder, self).__init__()
        seq_len=args.seq_len
        pred_len=args.pred_len
        # 输入是(batch_size,dim,seq_len)-->输出为(batch_size,dim,hidden_size)
        self.fc1=nn.Linear(seq_len,hidden_size)
        # 输入是(batch_size,dim,hidden_size)-->输出为(batch_size,dim,hidden_size)
        self.fc2=nn.Linear(hidden_size,hidden_size)
        # 输入是(batch_size,dim,hidden_size)-->输出为(batch_size,dim,hidden_size)
        self.fc3=nn.Linear(hidden_size,hidden_size)
       # 输入是(batch_size,dim,hidden_size)-->输出为(batch_size,dim,hidden_size)
        self.fc4=nn.Linear(hidden_size,hidden_size)
        # 输入是(batch_size,dim,hidden_size)-->输出为(batch_size,dim,pred_len)
        self.fc5=nn.Linear(hidden_size,pred_len)
forward部分的代码,把五个全连接连接在一起,最后输出预测值
def forward(self, enc_x, enc_mark, y, y_mark):
    '''
    Args:
    :param enc_x: 已知的时间序列 (batch_size,seq_len,dim)
    以下的 param本 model未使用,不做过多介绍
    :param enc_mark: 已知的时序序列的时间对应的时间矩阵,
    :param y:
    :param y_mark:
    :return:  x_cat_pred[:,-self.pred_len:,:] 将预测的时间序列的部分返回回去 (batch_size,pred)len,dim)
    '''
    enc_x=enc_x.permute(0,2,1) # 输入为(batch_size,seq_len,dim)--》输出为(batch_size,dim,seq_len)
    x=torch.sigmoid(self.fc1(enc_x)) # 输入是(batch_size,dim,seq_len)-->输出为(batch_size,dim,hidden_size)
    x=torch.sigmoid(self.fc2(x)) # 输入是(batch_size,dim,hidden_size)-->输出为(batch_size,dim,hidden_size)
    x=torch.sigmoid(self.fc3(x)) # 输入是(batch_size,dim,hidden_size)-->输出为(batch_size,dim,hidden_size)
    x=torch.sigmoid(self.fc4(x)) # 输入是(batch_size,dim,hidden_size)-->输出为(batch_size,dim,hidden_size)
    x=self.fc5(x)  # 输入是(batch_size,dim,hidden_size)-->输出为(batch_size,dim,pred_len)
    x=x.permute(0,2,1)#输入是(batch_size,dim,pred_len)输出是(batch_size,pred_len,dim)
    return x #返回值的shape是(batch_size,pred_len,dim)
数据压缩网络
根据Autoencoder的特性,另一个思路就是根据Auencoder进行数据压缩,压缩过后的数据在送入LSTM中进行预测任务
class SAE(nn.Module):
    def __init__(self,arg):
        super(SAE, self).__init__()
        self.arg=arg
        # 先使用SAE_encoder把数据的时间维度进行压缩,压缩为hidden_size2,即从seq_len-->hidden_size2
        self.SAE_encoder=SAE_encoder(seq_len=self.arg.seq_len,hidden_size1=72,hidden_size2=48)
        # 将经过SAE_encoder压缩过后的数据,放入LSTM中进行预测任务
        self.LSTM=LSTM(seq_len=48,pred_len=self.arg.pred_len,dim=self.arg.d_feature,hidden_size=128,num_layers=1,batch_size=self.arg.batch_size)

    def forward(self,enc_x, enc_mark, y, y_mark):
        '''
        :param enc_x: 已知的时间序列 (batch_size,seq_len,dim)
        以下的 param本 model未使用,不做过多介绍
        :param enc_mark: 已知的时序序列的时间对应的时间矩阵,
        :param y:
        :param y_mark:
        :return:  x 将预测的时间序列的部分返回回去 (batch_size,pred_len,dim)
        '''
        # 其中预训练是使用自编码器的方法进行预训练
        self.SAE_encoder.load_state_dict(torch.load('./checkpoint/SAE/SAE_encoder')) # 使用预训练的SAE_encoder的权重
        x=self.SAE_encoder(enc_x) # x shape(batch_size,dim,hidden_size2),seq_len被压缩为hidden_size2, 为了方便后面的seq_len都是表示hidden_size2
        x=x.permute(2,0,1)#输出为(seq_len,batch_size,dim)
        x=self.LSTM(x)#输出是(pred_len,batch_size,dim)
        x=x.permute(1,0,2)#输出是(batch_size,pred_len,dim)
        return x
首先数据压缩网络也没有什么特别的,就是几个全连接神经网络将数据的时间维度进行了压缩
class SAE_encoder(nn.Module):
    def __init__(self,seq_len=96,hidden_size1=72,hidden_size2=48):
        '''
        Arg:
        seq_len=96代表输入数据的第二个维度(时间维度:已知多长的时间序列)
        hidden_size1=72是隐藏层1的神经元数量,hidden_size2=48是隐藏层2的神经元数量
        其中hidden_size2就是经过SAE_encoder压缩过后的数据的时间维度
        '''
        super(SAE_encoder, self).__init__()
        # 输入是(batch_size,in_channels,seq_len)-->输出为(batch_size,in_channels,hidden_size1)
        # 其中in_channels表示的是数据的特征维度,本任务中为7
        self.hidden1=nn.Linear(seq_len,hidden_size1)
        # 输入是(batch_size,in_channels,hidden_size1)-->输出为(batch_size,in_channels,hidden_size2)
        self.hidden2=nn.Linear(hidden_size1,hidden_size2)
    def forward(self,x):
        x=x.permute(0,2,1) # 对输入数据x进行转置,处理的是seq_len维度
        x=torch.relu(self.hidden1(x)) # 输出为(batch_size,in_channels,hidden_size1)
        x=self.hidden2(x) # 输出为(batch_size,in_channels,hidden_size2)
        return x
数据压缩过后送入LSTM网络中
初始化LSTM网络
class LSTM(nn.Module):#输入的数据维度(seq_len,batch_size,dim),因为使用了SAE进行数据压缩,把时间维度从seq_len变成hidden_size2

    def __init__以上是关于paper:Traffic Flow Prediction With Big Data: A Deep Learning Approach SAE模型的主要内容,如果未能解决你的问题,请参考以下文章