Unity3DShaderLab实战
Posted nobcaup
tags:
篇首语:本文由小常识网(cha138.com)小编为大家整理,主要介绍了Unity3DShaderLab实战相关的知识,希望对你有一定的参考价值。
【Unity3D】ShaderLab实战
1、第一个Vertex/Fragment着色器:
脑海中时刻要明确GPU渲染管线的顺序。可以通过SubShader的CommonState改变一些固定渲染管线的状态,如Material, Lighting, Culling & Depth Testing, Fog, Alpha Testing, Blending等。更加个性化的编程,我们需要在Vertex和Fragment Shader里面实现。
Vertex的输入一般是我们对外开放的接口,即2D纹理,Color等,Vertex的输出做为Fragment的输入。Fragment的输出送到渲染管线的下一步,最后显示器提取Buffer中像素的值,显示出我们想要的效果。
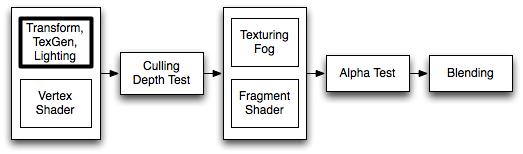
U3D中渲染管线
代码实现:
Shader "Custom/Simple"

	Properties

		_Color("Base Color", Color) = (1,1,1,1)
		_MainTex("Base(RGB)", 2D) = "white"


	SubShader

		tags"Queue" = "Transparent" "RenderType" = "Transparent" "IgnoreProjector" = "True"
		Blend SrcAlpha OneMinusSrcAlpha

		Pass

			Name "Simple"
			Cull off

			CGPROGRAM
			#pragma vertex vert //定义顶点着色器函数名为vert
			#pragma fragment frag //定义片段着色器函数名为frag
			#include "UnityCG.cginc"

			float4 _Color;
			sampler2D _MainTex;

			//顶点着色器处理之后,ShaderLab自动传送给片段着色器的变量的结构体
			struct v2f

				float4 pos:POSITION;
				float4 uv:TEXCOORD0;
				float4 col:COLOR;
			;

			//appdate_base定义在UnityCG.cginc中,包含了基础的顶点结构,如位置、贴图、法向量、颜色等,具体可以参考上一篇关于ShaderLab的基础学习笔记
			v2f vert(appdata_base v)

				v2f o;
				//从CPU顶点缓冲区拿到的vertex是局部坐标系的顶点坐标,需要通过变换矩阵计算后转换为最终投影坐标系的顶点坐标,模型坐标系+观察坐标系+投影坐标系矩阵
				o.pos = mul(UNITY_MATRIX_MVP, v.vertex);
				o.uv = v.texcoord;
				o.col.xyz = v.normal * 0.5 + 0.5;
				o.col.w = 1.0;
				return o;


			half4 frag(v2f i):COLOR

			    //i.uv.xy:转换后的顶点uv坐标值
				//tex2D(_MainTex ,i.uv.xy):根据uv坐标,拿到贴图上相应坐标上的颜色值。
				//_Color:外部输入的颜色值
				//i.col:vertex阶段计算出来的颜色值,为顶点法线融合的计算结果。
				half4 c = tex2D(_MainTex ,i.uv.xy) * _Color * i.col;
				//half4 c = i.col;
				return c;


			ENDCG
旋转可以有两个方式,一个是改变物体的postion,这个比较困难。另一个是改变贴图的uv,这个实现起来相对简单。
核心算法:
half4 frag(v2f i):COLOR

	float2 uv = i.uv.xy - float2(0.5, 0.5);

	//float2 rotate = float2(cos(_RSpeed * _Time.x), sin(_RSpeed * _Time.x));
	//向量旋转一定角度的公式
	// x' = xcosn - ysinn;
	// y' = xsinn + ycosn;
	uv = float2(uv.x * cos(_RSpeed * _Time.x) - uv.y * sin(_RSpeed * _Time.x),
				uv.x * sin(_RSpeed * _Time.x) + uv.y * cos(_RSpeed * _Time.x));

	uv += float2(0.5, 0.5);

	half4 c = tex2D(_MainTex , uv) * _Color;
	return c;
_NameTex_ST
Tiling:贴图的重复次数,有x、y两个维度
Offset:贴图的偏移量,也是有x、y两个维度
uv.xy乘以一个float2的常量,就可以做x、y上做相应的重复。
uv.xy加上一个float2的常量,就可以在x、y上做相应的偏移。
核心算法:
struct v2f

	float4 pos:POSITION;
	float2 uv:TEXCOORD0;
;
float4 _MainTex_ST;
v2f vert(appdata_base v)

	v2f o;
	o.pos = mul(UNITY_MATRIX_MVP, v.vertex);
	o.uv = TRANSFORM_TEX(v.texcoord, _MainTex);
	//上面的TRANSFORM_TEX展开了即:o.uv = v.texcoord.xy * _MainTex_ST.xy + _MainTex_ST.zw;
	return o;
4、序列帧动画:
贴图中有12个火焰的效果,循环播放就可以实现动画效果。
算法就是使用上面介绍的UV重复和UV偏移的方法。
5、LightMap:
灯光贴图:光照射到静态物体上,可以把光照射的明暗信息保存起来,形成一张灯光贴图,这个过程叫做烘焙。
优点:省去复杂的光照计算;可以对贴图进行二次处理。
缺点:多了一层纹理;通常需要额外的UV;静态贴图无法动态改变光的方向等。
如何制作LightMap:
需要制作灯光贴图的物体,在Inspector面板上勾选上Static。
打开Window-->LightMapping面板,配置参数,点击Bake就可以烘焙出灯光贴图了。
参数的配置这里不做详细讨论。
U3D烘焙出来的灯光贴图会直接作用到场景中。
如果是从外部导入的灯光贴图,就需要自己写一个Shader运用到场景中。
算法实现:
struct v2f

	float4 pos:POSITION;
	float4 uv:TEXCOORD0;
	float2 uvLM:TEXCOORD1;
;
v2f vert(appdata_full v)

	v2f o;
	o.pos = mul(UNITY_MATRIX_MVP, v.vertex);
	o.uv = v.texcoord;
	o.uvLM = v.texcoord1.xy;
	return o;

half4 frag(v2f i):COLOR

    //两张贴图的uv坐标对应的Color值叠加在一起。Alpha值为MainTex
	half4 c = tex2D(_MainTex , i.uv.xy) * _Color;
	half3 l = 2.0 * tex2D(_LightMap, i.uvLM).rgb;
	//half4 lm= tex2D(_LightMap, i.uvLM);
	//half3 l = 8.0 * lm.a * lm.rgb;
	c.rgb *= l;

	return c;
6、UV、纹理、三维模型的关系:
纹理即二位的图像,具有二维的UV坐标。
三维模型有三维顶点坐标,但是如果要对其贴图,必须要有二维的UV坐标。
二维的UV坐标使纹理和三维模型能够映射起来,即贴图,否则无法映射。
7、Shader中调用GLSL代码的方法:
使用opengl打开u3d:"C:\\Program Files\\Unity\\Editor\\Unity.exe" -force-opengl
Shader "GLSL basic shader"  // defines the name of the shader
   SubShader  // Unity chooses the subshader that fits the GPU best
      Pass  // some shaders require multiple passes
         GLSLPROGRAM // here begins the part in Unity's GLSL

         #ifdef VERTEX // here begins the vertex shader

         void main() // all vertex shaders define a main() function

            gl_Position = gl_ModelViewProjectionMatrix * gl_Vertex;
               // this line transforms the predefined attribute
               // gl_Vertex of type vec4 with the predefined
               // uniform gl_ModelViewProjectionMatrix of type mat4
               // and stores the result in the predefined output
               // variable gl_Position of type vec4.


         #endif // here ends the definition of the vertex shader


         #ifdef FRAGMENT // here begins the fragment shader

         void main() // all fragment shaders define a main() function

            gl_FragColor = vec4(1.0, 0.0, 0.0, 1.0);
               // this fragment shader just sets the output color
               // to opaque red (red = 1.0, green = 0.0, blue = 0.0,
               // alpha = 1.0)


         #endif // here ends the definition of the fragment shader

         ENDGLSL // here ends the part in GLSL
以上是关于Unity3DShaderLab实战的主要内容,如果未能解决你的问题,请参考以下文章