Android音视频硬解码播放H264
Posted 顾修忠
tags:
篇首语:本文由小常识网(cha138.com)小编为大家整理,主要介绍了Android音视频硬解码播放H264相关的知识,希望对你有一定的参考价值。
人间观察
穷人家的孩子真的是在社会上瞎混
遥远的2020年马上就过去了,天呐!!!
前两篇介绍了下H264的知识和码流结构,本篇就拿上篇从抖音/快手抽离的h264文件实现在android中进行解码播放&以及介绍所涉及的知识。
本文代码用kotlin来写,最近在学习ing,加油吧,打工人,你要悄悄打工。
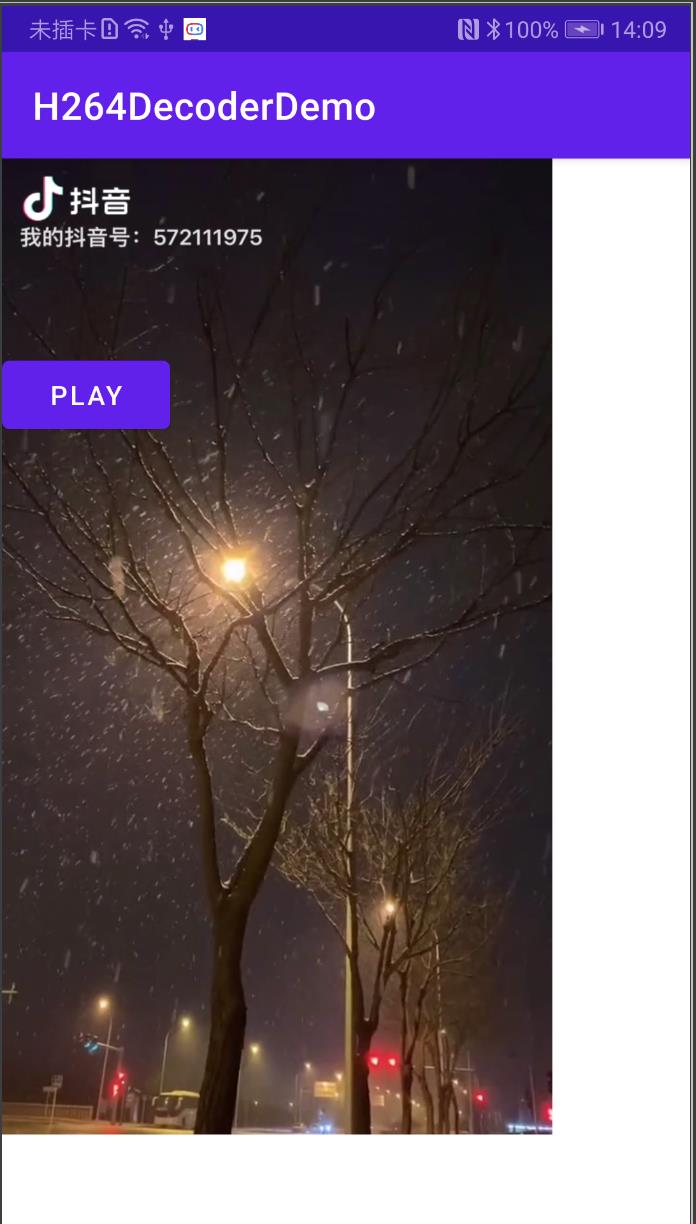
视频效果
文章搞不了视频,贴个图吧。

软硬编解码
在介绍前我们需要知道什么是软硬编解码?
1.软编解码:是利用软件本身或者说是使用CPU对原视频进行编解码的方式。
优点:兼容性好。
缺点:CPU占用率高,app内存占用率变高,可能会因CPU发热而降频、卡顿,无法流畅录制、播放视频等问题。
2.硬编解码:使用非CPU进行编码,如显卡GPU、专用的DSP芯片、厂商芯片等。一般编解码算法固定所以采用芯片处理。
优点:编码速度非常快且效率极高,CPU的占用率低,就算长时间高清录制视频手机也不会发烫。
缺点:但是兼容性不好,往往画面不够精细也很难解决(但是还可以没到不能看的程度)。
MediaCodec硬编解码
一般Android中直播采集端/短视频的编辑软件都是默认采用硬编解码,如果手机不支持再采用软编解码。硬编解码是王道。
在Android中是使用MediaCodec类进行编解码。MediaCodec是什么呢? MediaCodec是Android提供的用于对音视频进行编解码的类,它通过访问底层的codec来实现编解码的功能,比如你要把摄像头的视频yuv数据编码为h264/h265,pcm编码为aac,h264/h265解码为yuv,aac解码为pcm等等。MediaCodec是Android 4.1 API16引入的,在Android 5.0 API21加入了异步模式。
MediaCodec调用的是系统注册过的编解码器,硬件厂商把自己的硬编解码器注册到系统中就是硬编解码,如果硬件厂商注册的是软编解码就是软解码。往往不同的硬件厂商是不一样的。然后MediaCodec负责调用。
获取手机所支持的编解码器
不同的手机不一样所支持的编解码器不同,如何获取手机支持哪些编解码器呢?如下:
    @RequiresApi(Build.VERSION_CODES.LOLLIPOP)
    private fun getSupportCodec()
        val list = MediaCodecList(MediaCodecList.REGULAR_CODECS)
        val codecs = list.codecInfos
        Log.d(TAG, "Decoders:")
        for (codec in codecs)
            if (!codec.isEncoder) Log.d(TAG, codec.name)

        Log.d(TAG, "Encoders:")
        for (codec in codecs)
            if (codec.isEncoder) Log.d(TAG, codec.name)
输出
2020-12-25 19:16:00.914 13115-13115/com.bj.gxz.h264decoderdemo D/H264: Decoders:
2020-12-25 19:16:00.914 13115-13115/com.bj.gxz.h264decoderdemo D/H264: OMX.google.aac.decoder
2020-12-25 19:16:00.914 13115-13115/com.bj.gxz.h264decoderdemo D/H264: OMX.google.amrnb.decoder
2020-12-25 19:16:00.915 13115-13115/com.bj.gxz.h264decoderdemo D/H264: OMX.google.amrwb.decoder
2020-12-25 19:16:00.915 13115-13115/com.bj.gxz.h264decoderdemo D/H264: OMX.google.flac.decoder
2020-12-25 19:16:00.915 13115-13115/com.bj.gxz.h264decoderdemo D/H264: OMX.google.g711.alaw.decoder
2020-12-25 19:16:00.915 13115-13115/com.bj.gxz.h264decoderdemo D/H264: OMX.google.g711.mlaw.decoder
2020-12-25 19:16:00.915 13115-13115/com.bj.gxz.h264decoderdemo D/H264: OMX.google.gsm.decoder
2020-12-25 19:16:00.915 13115-13115/com.bj.gxz.h264decoderdemo D/H264: OMX.google.mp3.decoder
2020-12-25 19:16:00.915 13115-13115/com.bj.gxz.h264decoderdemo D/H264: OMX.google.opus.decoder
2020-12-25 19:16:00.915 13115-13115/com.bj.gxz.h264decoderdemo D/H264: OMX.google.raw.decoder
2020-12-25 19:16:00.915 13115-13115/com.bj.gxz.h264decoderdemo D/H264: OMX.google.vorbis.decoder
2020-12-25 19:16:00.915 13115-13115/com.bj.gxz.h264decoderdemo D/H264: OMX.hisi.video.decoder.avc
2020-12-25 19:16:00.915 13115-13115/com.bj.gxz.h264decoderdemo D/H264: OMX.google.h264.decoder
2020-12-25 19:16:00.915 13115-13115/com.bj.gxz.h264decoderdemo D/H264: OMX.google.h263.decoder
2020-12-25 19:16:00.915 13115-13115/com.bj.gxz.h264decoderdemo D/H264: OMX.hisi.video.decoder.hevc
2020-12-25 19:16:00.915 13115-13115/com.bj.gxz.h264decoderdemo D/H264: OMX.google.hevc.decoder
2020-12-25 19:16:00.915 13115-13115/com.bj.gxz.h264decoderdemo D/H264: OMX.hisi.video.decoder.mpeg2
2020-12-25 19:16:00.915 13115-13115/com.bj.gxz.h264decoderdemo D/H264: OMX.hisi.video.decoder.mpeg4
2020-12-25 19:16:00.915 13115-13115/com.bj.gxz.h264decoderdemo D/H264: OMX.google.mpeg4.decoder
2020-12-25 19:16:00.915 13115-13115/com.bj.gxz.h264decoderdemo D/H264: OMX.hisi.video.decoder.vp8
2020-12-25 19:16:00.915 13115-13115/com.bj.gxz.h264decoderdemo D/H264: OMX.google.vp8.decoder
2020-12-25 19:16:00.915 13115-13115/com.bj.gxz.h264decoderdemo D/H264: OMX.google.vp9.decoder
2020-12-25 19:16:00.915 13115-13115/com.bj.gxz.h264decoderdemo D/H264: Encoders:
2020-12-25 19:16:00.915 13115-13115/com.bj.gxz.h264decoderdemo D/H264: OMX.google.aac.encoder
2020-12-25 19:16:00.915 13115-13115/com.bj.gxz.h264decoderdemo D/H264: OMX.google.amrnb.encoder
2020-12-25 19:16:00.915 13115-13115/com.bj.gxz.h264decoderdemo D/H264: OMX.google.amrwb.encoder
2020-12-25 19:16:00.915 13115-13115/com.bj.gxz.h264decoderdemo D/H264: OMX.google.flac.encoder
2020-12-25 19:16:00.915 13115-13115/com.bj.gxz.h264decoderdemo D/H264: OMX.hisi.video.encoder.avc
2020-12-25 19:16:00.915 13115-13115/com.bj.gxz.h264decoderdemo D/H264: OMX.google.h264.encoder
2020-12-25 19:16:00.915 13115-13115/com.bj.gxz.h264decoderdemo D/H264: OMX.google.h263.encoder
2020-12-25 19:16:00.915 13115-13115/com.bj.gxz.h264decoderdemo D/H264: OMX.hisi.video.encoder.hevc
2020-12-25 19:16:00.915 13115-13115/com.bj.gxz.h264decoderdemo D/H264: OMX.google.mpeg4.encoder
2020-12-25 19:16:00.915 13115-13115/com.bj.gxz.h264decoderdemo D/H264: OMX.google.vp8.encoder
2020-12-25 19:16:00.915 13115-13115/com.bj.gxz.h264decoderdemo D/H264: OMX.google.vp9.encoder
看一下命名方式,软解码器通常是OMX.google开头的,比如上面的OMX.google.h264.decoder。硬解码器是以OMX.[hardware_vendor]开头的,比如上面的OMX.hisi.video.decoder.avc 其中hisi应该是海思芯片。当然也有一些不按照这个规则来的,系统会认为他是软解码器。 编码器的命名也是一样的。
从Android系统的源码可以判断出规则,
源码地址:http://androidos.net.cn/android/6.0.1_r16/xref/frameworks/av/media/libstagefright/OMXCodec.cpp
static bool IsSoftwareCodec(const char *componentName)
    if (!strncmp("OMX.google.", componentName, 11))
        return true;


    if (!strncmp("OMX.", componentName, 4))
        return false;


    return true;
MediaCodec处理数据的类型
MediaCodec非常强大,支持的编解码数据类型有: 压缩的音频数据、压缩的视频数据、原始音频数据和原始视频数据,以及支持不同的封装格式的编解码,如前文所诉如果是硬解码当然也是需要手机厂商支持的。可以设置Surface来获取/呈现原始的视频数据。MediaCodec的有关API的方法和每个方法的参数都有它的含义。可以在使用的时候慢慢深究。
MediaCodec的编解码流程
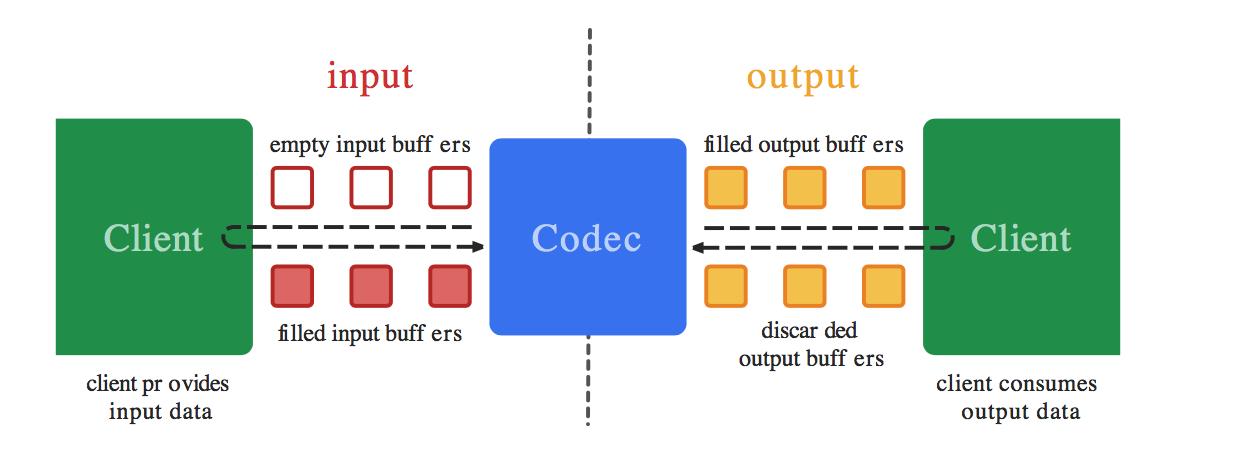
下图是Android官方文档提供的,官方文档很详细了。
https://developer.android.google.cn/reference/android/media/MediaCodec?hl=en

MediaCodec处理输入数据产生输出数据,当异步处理数据时,使用一组输入输出ByteBuffer.流程通常是
- 将数据填入到预先设定的输入缓冲区(ByteBuffer),
- 输入缓冲区填满数据后将其传给MediaCodec进行编解码处理。编解码处理完后它又填充到一个输出ByteBuffer中。
- 然后使用方就可以获取编解码后的数据,再把ByteBuffer释放回MediaCodec,往复循环。
需要注意的是Bufffer队列不是我们自己new对象后塞给MediaCodec,而是MediaCodec为了更好的控制Bufffer的处理,我们需要使用MediaCodec提供的方法获取然后塞给它数据并取出数据。
MediaCodec API
- MediaCodec的创建
- createDecoderByType/createEncoderByType:根据特定MIME类型(比如"video/avc")创建codec。Decoder就是解码器,Encoder就是编码器。
- createByCodecName:知道组件的确切名称(如OMX.google.h264.decoder)的时候,根据组件名创建codec。使用MediaCodecList可以获取组件的名称,如上文所介绍。
- configure:配置解码器或者编码器。比如你可以配置把解码的数据通过surface进行展示,本文的后续就是解码h264的demo就是配置surface来把yuv数据渲染到此surface上。
- start:开始编解码,处于等待数据的到来。
- 数据的处理,开始编解码
- dequeueInputBuffer:返回有效的输入buffer的索引
- queueInputBuffer:输入流入队列。一般是把数据塞给它
- dequeueOutputBuffer:从输出队列中取出编/解码后的数据,如果输入的数据多,你可能要循环读取,一般在写代码的时候是需要循环调用的
- releaseOutputBuffer:释放ByteBuffer数据返回给MediaCodec
- getInputBuffers:获取需要编解码数据的输入流队列,返回的是一个ByteBuffer数组
- getOutputBuffers:获取编解码之后的数据输出流队列,返回的是一个ByteBuffer数组
- flush:清空的输入和输出队列buffer
- stop: 停止编解码器进行编解码
- release:释放编解码器
从上面的api中也大概看到了MediaCodec编解码器API的生命周期,具体的可以再看下官网。
MediaCodec的同步异步编解码
同步方式
官方示例
MediaCodec codec = MediaCodec.createByCodecName(name);
 codec.configure(format, …);
 MediaFormat outputFormat = codec.getOutputFormat(); // option B
 codec.start();
 for (;;)
  int inputBufferId = codec.dequeueInputBuffer(timeoutUs);
  if (inputBufferId >= 0)
    ByteBuffer inputBuffer = codec.getInputBuffer(…);
    // fill inputBuffer with valid data
    …
    codec.queueInputBuffer(inputBufferId, …);

  int outputBufferId = codec.dequeueOutputBuffer(…);
  if (outputBufferId >= 0)
    ByteBuffer outputBuffer = codec.getOutputBuffer(outputBufferId);
    MediaFormat bufferFormat = codec.getOutputFormat(outputBufferId); // option A
    // bufferFormat is identical to outputFormat
    // outputBuffer is ready to be processed or rendered.
    …
    codec.releaseOutputBuffer(outputBufferId, …);
   else if (outputBufferId == MediaCodec.INFO_OUTPUT_FORMAT_CHANGED)
    // Subsequent data will conform to new format.
    // Can ignore if using getOutputFormat(outputBufferId)
    outputFormat = codec.getOutputFormat(); // option B


 codec.stop();
 codec.release();
流程大概如下:
- 创建并配置MediaCodec对象
- 循环直到完成:
  - 如果输入buffer准备好了
    - 读取一段输入,将其填充到输入buffer中进行编解码
  - 如果输出buffer准备好了:
    - 从输出buffer中获取编解码后数据进行处理。
- 处理完毕后,销毁 MediaCodec 对象。
异步方式
在Android 5.0, API21,引入了异步模式。官方示例:
MediaCodec codec = MediaCodec.createByCodecName(name);
 MediaFormat mOutputFormat; // member variable
 codec.setCallback(new MediaCodec.Callback()
  @Override
  void onInputBufferAvailable(MediaCodec mc, int inputBufferId)
    ByteBuffer inputBuffer = codec.getInputBuffer(inputBufferId);
    // fill inputBuffer with valid data
    …
    codec.queueInputBuffer(inputBufferId, …);


  @Override
  void onOutputBufferAvailable(MediaCodec mc, int outputBufferId, …)
    ByteBuffer outputBuffer = codec.getOutputBuffer(outputBufferId);
    MediaFormat bufferFormat = codec.getOutputFormat(outputBufferId); // option A
    // bufferFormat is equivalent to mOutputFormat
    // outputBuffer is ready to be processed or rendered.
    …
    codec.releaseOutputBuffer(outputBufferId, …);


  @Override
  void onOutputFormatChanged(MediaCodec mc, MediaFormat format)
    // Subsequent data will conform to new format.
    // Can ignore if using getOutputFormat(outputBufferId)
    mOutputFormat = format; // option B


  @Override
  void onError(…)
    …

 );
 codec.configure(format, …);
 mOutputFormat = codec.getOutputFormat(); // option B
 codec.start();
 // wait for processing to complete
 codec.stop();
 codec.release();
- 创建并配置MediaCodec对象。
- 给MediaCodec对象设置回调MediaCodec.Callback
- 在onInputBufferAvailable回调中:
    - 读取一段输入,将其填充到输入buffer中进行编解码
- 在onOutputBufferAvailable回调中:
    - 从输出buffer中获取进行编解码后数据进行处理。
- 处理完毕后,销毁 MediaCodec 对象。
解码h264视频
我们就解码一个h264的视频(拿上篇从抖音/快手抽离的h264文件)。h265也一样,只要你明白了h264。h265的编码方式和原理和码流结构,都是小菜一碟。为了更明白h264的码流数据,我们demo就一次性把文件读如刀内存的byte数据中。
处理我们分两种方式,都能正常播放,只是我们更清楚的了解h264码流数据。
- 是我们按照h264的码流结构,每次截取一个NAL单元(NALU)塞给MediaCodec,包含最开始的SPS,PPS。
- 是我们就固定截取几k,然后塞给MediaCodec
首先 初始化MediaCodec
    var bytes: ByteArray? = null
    var mediaCodec: MediaCodec
    init
        // demo测试,为方便一次性读取到内存
        bytes = FileUtil.getBytes(path)
        // video/avc就是H264,创建解码器
        mediaCodec = MediaCodec.createDecoderByType("video/avc")
        val mediaFormat = MediaFormat.createVideoFormat("video/avc", width, height)
        mediaFormat.setInteger(MediaFormat.KEY_FRAME_RATE, 15)
        mediaCodec.configure(mediaFormat, surface, null, 0)
方式一:分割NAL单元(NALU)方式
    private fun decodeSplitNalu()
        if (bytes == null)
            return

        // 数据开始下标
        var startFrameIndex = 0
        val totalSizeIndex = bytes!!.size - 1
        Log.i(TAG, "totalSize=$totalSizeIndex")
        val inputBuffers = mediaCodec.inputBuffers
        val info = MediaCodec.BufferInfo()
        while (true)
            // 1ms=1000us 微妙
            val inIndex = mediaCodec.dequeueInputBuffer(10_000)
            if (inIndex >= 0)
                // 分割出一帧数据
                if (totalSizeIndex == 0 || startFrameIndex >= totalSizeIndex)
                    Log.e(TAG, "startIndex >= totalSize-1 ,break")
                    break

                val nextFrameStartIndex: Int =
                    findNextFrame(bytes!!, startFrameIndex + 1, totalSizeIndex)
                if (nextFrameStartIndex == -1)
                    Log.e(TAG, "nextFrameStartIndex==-1 break")
                    break

                // 填充数据
                val byteBuffer = inputBuffers[inIndex]
                byteBuffer.clear()
                byteBuffer.put(bytes!!, startFrameIndex, nextFrameStartIndex - startFrameIndex)

                mediaCodec.queueInputBuffer(inIndex, 0, nextFrameStartIndex - startFrameIndex, 0, 0)

                startFrameIndex = nextFrameStartIndex


            var outIndex = mediaCodec.dequeueOutputBuffer(info, 10_000)

            while (outIndex >= 0)
                // 这里用简单的时间方式保持视频的fps,不然视频会播放很快
                // demo 的H264文件是30fps
                try
                    sleep(33)
                 catch (e: InterruptedException)
                    e.printStackTrace()

                // 参数2 渲染到surface上,surface就是mediaCodec.configure的参数2
                mediaCodec.releaseOutputBuffer(outIndex, true)
                outIndex = mediaCodec.dequeueOutputBuffer(info, 0)
NALU分割方法
    private fun findNextFrame(bytes: ByteArray, startIndex: Int, totalSizeIndex: Int): Int
        for (i in startIndex..totalSizeIndex)
            // 00 00 00 01 H264的启始码
            if (bytes[i].toInt() == 0x00 && bytes[i + 1].toInt() == 0x00 && bytes[i + 2].toInt() == 0x00 && bytes[i + 3].toInt() == 0x01)
//                Log.e(TAG, "bytes[i+4]=0X$Integer.toHexString(bytes[i + 4].toInt())")
//                Log.e(TAG, "bytes[i+4]=$(bytes[i + 4].toInt().and(0X1F))")
                return i
                // 00 00 01 H264的启始码
             else if (bytes[i].toInt() == 0x00 && bytes[i + 1].toInt() == 0x00 && bytes[i + 2].toInt() == 0x01)
//                Log.e(TAG, "bytes[i+3]=0X$Integer.toHexString(bytes[i + 3].toInt())")
//                Log.e(TAG, "bytes[i+3]=$(bytes[i + 3].toInt().and(0X1F))")
                return i


        return -1
方式一:固定字节数据塞入
    private fun findNextFrameFix(bytes: ByteArray, startIndex: Int, totalSizeIndex: Int): Int
        // 每次最好数据里大点,不然就像弱网的情况,数据流慢导致视频卡
        val len = startIndex + 40000
        return if (len > totalSizeIndex) totalSizeIndex else len
说明:在真实的项目中一般是网络/数据流的方式塞入,这里只是为了demo演示MediaCodec解码h264文件进行播放。
保存解码h264视频的yuv数据为图片
我们在哪里进行保存里,就如前问所说,肯定是在h264解码后进行保存,解码后的数据为yuv数据。也就是在dequeueOutputBuffer后取出解码后的数据,然后用YuvImage类的compressToJpeg保存为Jpeg图片即可。我们3s保存一张吧。
局部代码:
                // 3s 保存一张图片
                if (System.currentTimeMillis() - saveImage > 3000)
                    saveImage = System.currentTimeMillis()

                    val byteBuffer: ByteBuffer = mediaCodec.outputBuffers[outIndex]
                    byteBuffer.position(info.offset)
                    byteBuffer.limit(info.offset + info.size)
                    val ba = ByteArray(byteBuffer.remaining())
                    byteBuffer.get(ba)

                    try
                        val parent =
                            File(Environment.getExternalStorageDirectory().absolutePath + "/h264pic/")
                        if (!parent.exists())
                            parent.mkdirs()
                            Log.d(TAG, "parent=$parent.absolutePath")


                        // 将NV21格式图片,以质量70压缩成Jpeg
                        val path = "$parent.absolutePath/$System.currentTimeMillis()-frame.jpg"
                        Log.e(TAG, "path:$path")
                        val fos = FileOutputStream(File(path))
                        val yuvImage = YuvImage(ba, ImageFormat.NV21, width, height, null)
                        yuvImage.compressToJpeg(
                            Rect(0, 0, yuvImage.getWidth(), yuvImage.getHeight()),
                            80, fos)
                        fos.flush()
                        fos.close()
                     catch (e: IOException)
                        e.printStackTrace()
最后说明一点就是硬解码是非常快,很高效率的,播放视频是需要PTS时间戳处理的。demo的处理方法就是让它渲染慢一点(demo视频文件是30fps,也就是1000ms/30=33ms一帧yuv数据),所以在mediaCodec.releaseOutputBuffer(outIndex, true)前在sleep(33ms)来达到正常的播放速度。
文章源代码
https://github.com/ta893115871/H264DecoderDemo
如果描述不正确的,欢迎指正。
以上是关于Android音视频硬解码播放H264的主要内容,如果未能解决你的问题,请参考以下文章
Android自带的浏览器是不是支持h264编码的html5视频?
安卓mediasoup webrtc h264 软编解码相关源码分析