Django入门基础知识
Posted Sicc1107
tags:
篇首语:本文由小常识网(cha138.com)小编为大家整理,主要介绍了Django入门基础知识相关的知识,希望对你有一定的参考价值。
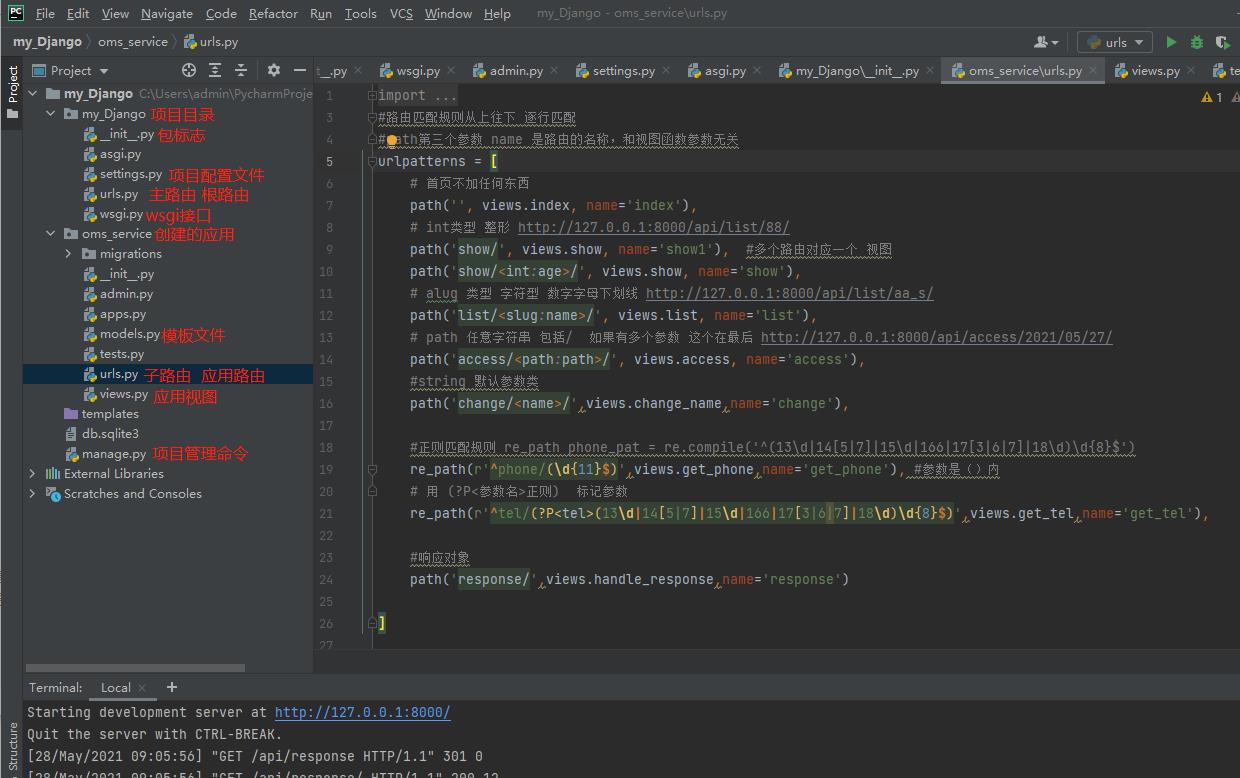
manage.py 命令
#manage.py 是Django用于管理本项目的命令行工具,之后进行站点运行,数据库字典生成等通过manage.py进行管理
python manage.py runserver                 #启动项目 可以之间在后面加 IP 和端口
python manage.py runserver 127.0.0.1:8080
python manage.py  startapp App            #创建一个项目 相当于一个模块 一个应用一个模块
python manage.py makemigrations           #将你的数据库变动记录到一个小本本上(并不会帮你创建表)
python manage.py migrate                  #就是将对数据库的更改,主要是数据表设计的更改,在数据库中真实执行。
#仅对部分app进行作用的话  则执行如下命令:
python manage.py makemigrations appname1 appname2
python manage.py migrate appname1 appname2
#如果要想精确到某一个迁移文件则可以使用:
python manage.py migrate appname 文件名
#启动带有Django环境的Python交互式解释器,也就是命令行环境。
python manage.py shell
settings.py 配置文件说明
from pathlib import Path
# 项目的 根目录
BASE_DIR = Path(__file__).resolve().parent.parent
#加密密钥
SECRET_KEY = 'django-insecure-9n7+hk9hk@)vnq7h69mb0f!3e37*dk34vitmf@1t@#&@fjo*#m'
# SECURITY WARNING: don't run with debug turned on in production!
DEBUG = True
# 允许访问的地址
ALLOWED_HOSTS = ['*']
#安装应用的注册
INSTALLED_APPS = [
    'django.contrib.admin',
    'django.contrib.auth',
    'django.contrib.contenttypes',
    'django.contrib.sessions',
    'django.contrib.messages',
    'django.contrib.staticfiles',
    'oms_service' #把自己的应用进行注册
]
# 中间件
MIDDLEWARE = [
    'django.middleware.security.SecurityMiddleware',
    'django.contrib.sessions.middleware.SessionMiddleware',
    'django.middleware.common.CommonMiddleware',
    # 'django.middleware.csrf.CsrfViewMiddleware',   # 限制POST访问的中间件
    'django.contrib.auth.middleware.AuthenticationMiddleware',
    'django.contrib.messages.middleware.MessageMiddleware',
    'django.middleware.clickjacking.XFrameOptionsMiddleware',
]
#根路由
ROOT_URLCONF = 'djangoProject.urls'
# 模板配置 默认templates
TEMPLATES = [

        'BACKEND': 'django.template.backends.django.DjangoTemplates',
        'DIRS': [BASE_DIR / 'templates']
        ,
        'APP_DIRS': True,
        'OPTIONS':
            'context_processors': [
                'django.template.context_processors.debug',
                'django.template.context_processors.request',
                'django.contrib.auth.context_processors.auth',
                'django.contrib.messages.context_processors.messages',
            ],
        ,
    ,
]
WSGI_APPLICATION = 'djangoProject.wsgi.application'
# 数据库配置Database# https://docs.djangoproject.com/en/3.2/ref/settings/#databases
DATABASES =
    'default':
        'ENGINE': 'django.db.backends.mysql',    # 数据库引擎
        'NAME': 'test', # 数据库名称
        'HOST': '192.168.137.130', # 数据库地址,本机 ip 地址 127.0.0.1
        'PORT': 3306, # 端口
        'USER': 'root',  # 数据库用户名
        'PASSWORD': '1qaz@WSX', # 数据库密码


# Password validation
# https://docs.djangoproject.com/en/3.2/ref/settings/#auth-password-validators
# 认证
AUTH_PASSWORD_VALIDATORS = [

        'NAME': 'django.contrib.auth.password_validation.UserAttributeSimilarityValidator',
    ,

        'NAME': 'django.contrib.auth.password_validation.MinimumLengthValidator',
    ,

        'NAME': 'django.contrib.auth.password_validation.CommonPasswordValidator',
    ,

        'NAME': 'django.contrib.auth.password_validation.NumericPasswordValidator',
    ,
]
# Internationalization
# https://docs.djangoproject.com/en/3.2/topics/i18n/
# 语言
LANGUAGE_CODE = 'zh-hans'#'en-us'
# 时区
TIME_ZONE = 'Asia/Shanghai'
USE_I18N = True
USE_L10N = True
# 是否使用世界时间 不改数据库时间会差8 小时
USE_TZ = False
# Static files (CSS, javascript, Images)
# https://docs.djangoproject.com/en/3.2/howto/static-files/
#静态资源路径
STATIC_URL = '/static/'
# Default primary key field type
# https://docs.djangoproject.com/en/3.2/ref/settings/#default-auto-field
DEFAULT_AUTO_FIELD = 'django.db.models.BigAutoField'
数据库模型 models.py
from django.db import models

# Create your models here.

class Test(models.Model):    #Test表名
    name = models.CharField(max_length=20)  #字段名

class Student(models.Model):  #Student表名
    name = models.CharField(max_length=20) #字段名
    age = models.CharField(max_length=20)
class User(models.Model):
    uname = models.CharField(max_length=20) #字段名
    passwd = models.CharField(max_length=20)

#数据库创建  终端运行
python manage.py makemigrations           #将你的数据库变动记录到一个小本本上(并不会帮你创建表)
python manage.py migrate                  #就是将对数据库的更改,主要是数据表设计的更改,在数据库中真实执行。
views
# Create your views here.  查询使用数据库的  数据
def index(request):
    #查询数据
    users = User.objects.all()
    print(users)
    for i in users:
        print(i.uname,i.passwd)
    return render(request, 'index.html', "title": "Django", 'name': '中国','users': users)
    # return HttpResponse('index')
index.html
<!DOCTYPE html>
<html lang="en">
<head>
    <meta charset="UTF-8">
    <title> title </title>
</head>
<body>
</p>
    hello, name
</p>
% for user in users %
<li> user.uname </li>
% endfor %
</body>
</html>
urls.py 路由配置说明
#主路由项目根路由
from django.contrib import admin
from django.urls import path, include
urlpatterns = [
    path('admin/', admin.site.urls),
    path('api/', include('oms_service.urls')),    #用include引用 oms_service应用的路由
]


# oms_service 应用路由   路由与视图对应 返回 接收请求
from django.urls import path, re_path
from oms_service import views
#路由匹配规则从上往下 逐行匹配
#path第三个参数 name 是路由的名称,和视图函数参数无关
urlpatterns = [
    # 首页不加任何东西
    path('', views.index, name='index'),
    # int类型 整形 http://127.0.0.1:8000/api/list/88/
    path('show/', views.show, name='show1'),  #多个路由对应一个 视图
    path('show/<int:age>/', views.show, name='show'),
    # alug 类型 字符型 数字字母下划线 http://127.0.0.1:8000/api/list/aa_s/
    path('list/<slug:name>/', views.list, name='list'),
    # path 任意字符串 包括/  如果有多个参数 这个在最后 http://127.0.0.1:8000/api/access/2021/05/27/
    path('access/<path:path>/', views.access, name='access'),
    #string 默认参数类
    path('change/<name>/',views.change_name,name='change'),

    #正则匹配规则 re_path phone_pat = re.compile('^(13\\d|14[5|7]|15\\d|166|17[3|6|7]|18\\d)\\d8$')
    re_path(r'^phone/(\\d11$)',views.get_phone,name='get_phone'), #参数是()内
    # 用 (?P<参数名>正则)  标记参数
    re_path(r'^tel/(?P<tel>(13\\d|14[5|7]|15\\d|166|17[3|6|7]|18\\d)\\d8$)',views.get_tel,name='get_tel')
]
views.py视图说明
from django.http import HttpResponse
from django.shortcuts import render
# Create your views here.
#视图函数的第一个参数 request 就是是请求对象,有Django框架传递
def index(request):
    return HttpResponse('首页')   #返回给用户的是响应对象
def show(request, age=0):
    print(age, type(age))
    return HttpResponse(str(age))
def list(request, name='aa'):   #使用aa为默认
    print(name, type(name))
    return HttpResponse(name)
def access(request, path='//'):
    return HttpResponse(path)
def get_phone(request,phone):
    # HttpRequest是从web服务器传递过来的请求对象 有Django封装成了原始的Http请求
    #Request 常用属性
    print(request.method)# 获取请求方式
    print(request.META.get('REMOTE_ADDR')) #客户端地址
    print(request.META.get('HTTP_REFERE')) #从其他什么页面跳转
    # get 传参的获取
    print(request.GET)   # 是一个字典 Dict
    print(request.GET.get('name'))  # 获取单个值 http://127.0.0.1:8000/api/phone/12345678199?name=sicc
    print(request.GET.getlist('age')) #多个值是列表 http://127.0.0.1:8000/api/phone/12345678199?name=sicc,aa&age=17&age=18
    # POST传参
    print(request.POST)
    print(request.POST.get('name'))  # 获取单个值 http://127.0.0.1:8000/api/phone/13845678199?name=sicc
    print(request.POST.getlist('age'))  # http://127.0.0.1:8000/api/phone/13845678199  body中加
    #常用方法
    print(request.get_full_path())       #路径 不带域名IP
    print(request.get_host())            #地址
    print(request.get_port())            #端口
    print(request.build_absolute_uri())  #完整请求路径
    print(request.GET.dict())            #将请求参数转为字典
    return HttpResponse(phone)
def get_tel(request,tel):
    return HttpResponse(tel)
def change_name(request, name):
    return HttpResponse(name)
客户端请求对象
例子看 views中的get_phone(request,phone)
视图的第一个参数必须是HttpRequest对象
在视图函数中,接收的request有如下属性:
- path:一个字符串,表示请求的页面的完整路径,不包含域名。
- method:一个字符串,表示请求使用的HTTP方法,常用值包括:‘GET’、‘POST’。
- 在浏览器中给出地址发出请求采用get方式,如超链接。
- 在浏览器中点击表单的提交按钮发起请求,如果表单的method设置为post则为post请求。
- encoding:一个字符串,表示提交的数据的编码方式。
- 如果为None则表示使用浏览器的默认设置,一般为utf-8。
- 这个属性是可写的,可以通过修改它来修改访问表单数据使用的编码,接下来对属性的任何访问将使用新的encoding值。
- GET:一个类似于字典的对象,包含get请求方式的所有参数。
- POST:一个类似于字典的对象,包含post请求方式的所有参数。
- FILES:一个类似于字典的对象,包含所有的上传文件。
- COOKIES:一个标准的Python字典,包含所有的cookie,键和值都为字符串。
- session:一个既可读又可写的类似于字典的对象,表示当前的会话,只有当Django
具体案例看views.py视图说明
响应对象
HttpResponse对象创建
每个视图必须返回一个响应函数
content 字节字符串
charset 字符编码
status_code http 状态码
content_type MIME类型用于生成文档
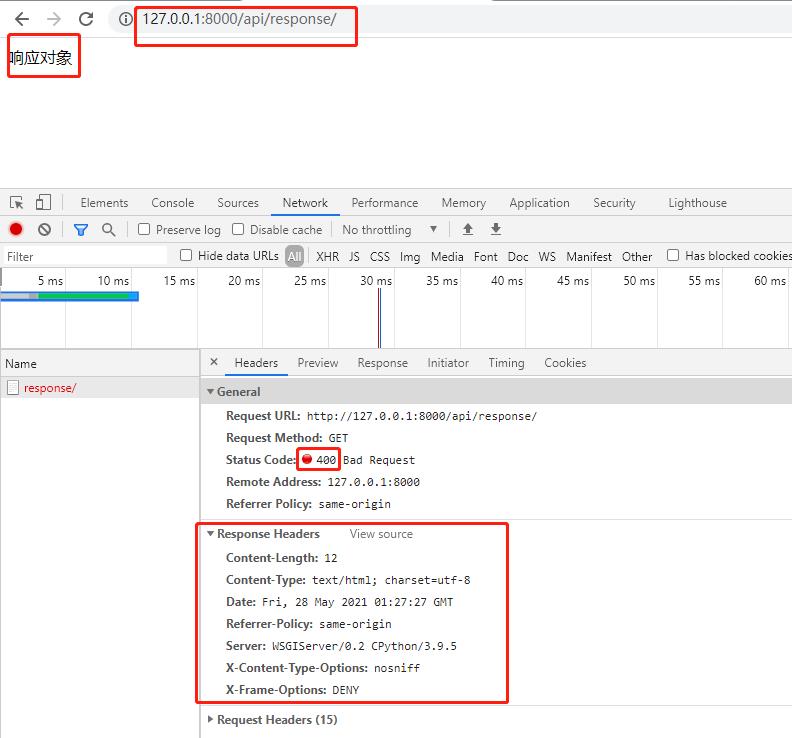
#测试
#urls  path增加
path('response/',views.handle_response,name='response')

#views.py 增加
def handle_response(request):
    res = HttpResponse('响应对象')
    res._content_type = 'text.html'
    res.status_code = 400            #人为设定状态码
    return res

#访问127.0.0.1:8000/api/response  #路径为什么要api 看urls.py 路由配置主路由配置
render 模块本身也是 返回HttpResponse
一般用render 函数返回 render 是HttpResponse的包装
#template_name 模板名称 context字典键值对 content_type MIME类型用于生成文档 status 状态码
def render(request, template_name, context=None, content_type=None, status=None, using=None):
    """
    Return a HttpResponse whose content is filled with the result of calling
    django.template.loader.render_to_string() with the passed arguments.
    """
    content = loader.render_to_string(template_name, context, request, using=using)
    return HttpResponse(content, content_type, status)

#views 修改
def handle_response(request):
    # res = HttpResponse('响应对象')
    # res._content_type = 'text.html'
    # res.status_code = 400            #人为设定状态码
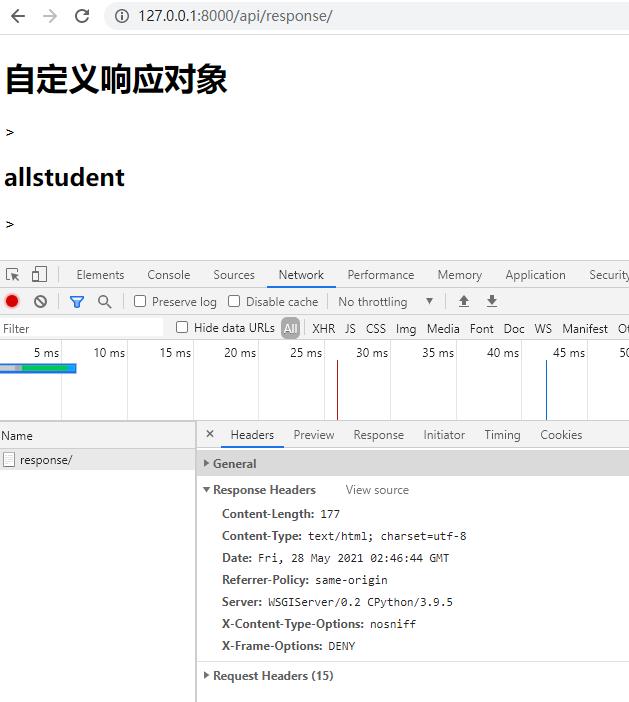
    res = render(request, 'example.html')
    return res
template 目录下新增模板文件example.html 默认模板文件目录配置在setting 修改
<!DOCTYPE html>
<html lang="en">
<head>
    <meta charset="UTF-8">
    <title>Title</title>
</head>
<body>
 <h1>自定义响应对象</h1>>
 <h2> data </h2>>
</body>
</html>
访问127.0.0.1:8000/api/response
JsonResponse
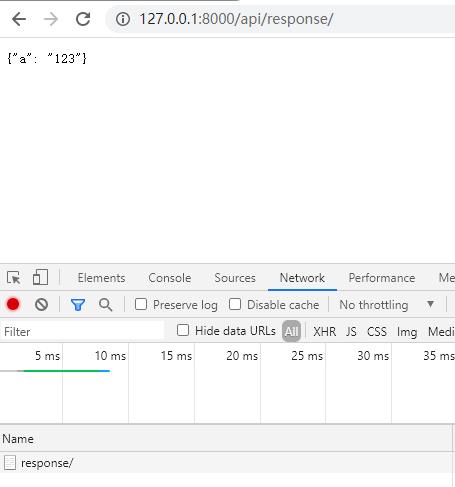
可以直接返回json字符串
#需要导入 JsonResponse 模块
#修改views
def handle_response(request):
    # res = HttpResponse('响应对象')
    # res._content_type = 'text.html'
    # res.status_code = 400            #人为设定状态码
    # res = render(request, 'example.html',context='data': 'allstudent')
    return JsonResponse('name' : 'tom')
#直接对字典返回
#可以直接打开JsonResponse 查看源码  如果不是字典数据 则设置safe=False
# return JsonResponse([1,2,3,4])
# 一般是可以把 字典 列表 转换为json 返回
HttpResponseRedirect重定向
#应用 oms_service  urls  path增加
path('red/',views.handle_redirect,name='redirect')

#应用views 增加 HttpResponseRedirect 需要次模块
from django.http import HttpResponse, JsonResponse, HttpResponseRedirect

def handle_redirect(request):
    return HttpResponseRedirect('/api/') #参数为路由 重定向到指定路由 ctrl+回车查看具体代码   前面加/ 整个替换 http://127.0.0.1:8000/api/red -> http://127.0.0.1:8000/api 前面不加 / http://127.0.0.1:8000/api/red -> http://127.0.0.1:8000/api/red/api
	# from django.shortcuts import render, redirect
	# return redirect('/api/') #是redirect HttpResponseRedirect 快捷方式 功能一样
    # return redirect('https://www.baidu.com/')可以是绝对地址
反向解析
根据namespace 和name 查找真实路径
namespace 在根URL包含 子url时指定
name 是在具体的函数后指定,子url指定
#子oms_service urls 中加入 app_name
app_name ='oms_service'

urlpatterns = [
    # 首页不加任何东西
    path('', views.index, name='index'),
    # int类型 整形 http://127.0.0.1:8000/api/list/88/
    path('red/',views.handle_redirect,name='redirect'),
    path('show/<int:age>/', views.show, name='show'),
    re_path(r'^phone/(\\d11$)',views.get_phone,name='get_phone'), #参数是()内

#oms_service views 中加入 反向解析
from django.urls import reverse
def handle_redirect(request):
    #return HttpResponseRedirect('/api/')
    #return redirect('https://www.baidu.com/')
    #print(reverse('oms_service:index'))          # 这里的结果就是/api/
    #return redirect(reverse('oms_service:index'))
    #print(reverse('oms_service:show',kwargs='age' :20))
    #参数有名字用列表
    #return redirect(reverse('oms_service:show',kwargs='age' :20))
    #如果参数没有名字 可以用元组
    return redirect(reverse('oms_service:get_phone',args=('13221231231',)))

#访问 http://127.0.0.1:8000/api/red  跳转值index
#反向解析就是: 视图函数 根据 路由的name 去获取 路径访问
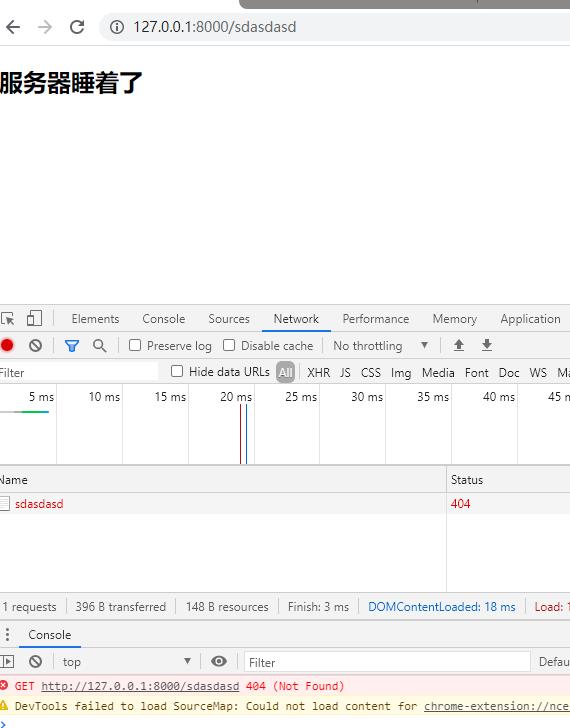
错误视图处理
#settings.py中 修改
DEBUG = False

#在template中新增404.html
<!DOCTYPE html>
<html lang="en">
<head>
    <meta charset="UTF-8">
    <title>404</title>
</head>
<body>
<h2>服务器睡着了</h2>
</body>
</html>

#访问http://127.0.0.1:8000/sdasdasd 不存在的路径
#任何错误 直接在template 中加就型  500 就加500.html
以上是关于Django入门基础知识的主要内容,如果未能解决你的问题,请参考以下文章