自定义控件Paint,Canvas 基础用法 - drawBitmap(),drawText() 详解
Posted Ruffian-痞子
tags:
篇首语:本文由小常识网(cha138.com)小编为大家整理,主要介绍了自定义控件Paint,Canvas 基础用法 - drawBitmap(),drawText() 详解相关的知识,希望对你有一定的参考价值。
本篇博客继续学习 Paint 和 Canvas 的基础用法,上一篇博客学习了基础API使用( 基础几何图形,Path 路径 ),接下来学习 绘制文本 和 绘制图片
上一篇文章,没看的有必要先了解一下:
自定义控件(一)Paint,Canvas 基础用法 - Path函数大全,Canvas绘制基本几何图形
canvas 绘制 图片Bitmap
drawBitmap
void drawBitmap(Bitmap bitmap, float left, float top, Paint paint)
参数
float left:距离控件左边缘距离 类似起始坐标X
float top:距离控件上边缘距离 类似起始坐标Y
这个函数很简单,直接指定 top ,left 值,将整个图片绘制出来
    Paint mPaint = new Paint();

    Bitmap bitmap = BitmapFactory.decodeResource(getResources(), R.mipmap.icon_man);
    canvas.drawBitmap(bitmap, 50, 50, mPaint);

void drawBitmap(Bitmap bitmap, Rect src, RectF dst, Paint paint)
参数
Rect src:对原图片的裁剪区域
RectF dst:将(裁剪完的)原图片绘制到View控件上的区域
第2个参数:需要将图片哪个区域进行裁剪,如果传
null或者bitmap.getWidth/bitmap.getHeight表示不裁剪,将原图完整绘制
第3个参数:处理后的图片需要绘制到View控件上的哪个区域,图片小于指定区域-放大;图片大于指定区域-缩小
    Paint mPaint = new Paint();
    Bitmap bitmap = BitmapFactory.decodeResource(getResources(), R.mipmap.icon_man);
    canvas.drawBitmap(bitmap, null, new RectF(0, 0, getWidth() / 2, getHeight() / 2), mPaint);
获取一张图片,将原图片绘制在 new RectF(0, 0, getWidth() / 2, getHeight() / 2) View宽高一半的矩形区域里

    Paint mPaint = new Paint();
    Bitmap bitmap = BitmapFactory.decodeResource(getResources(), R.mipmap.icon_man);
    canvas.drawBitmap(bitmap, new Rect(50, 50, 100, 100), new RectF(0, 0, getWidth() / 2, getHeight() / 2), mPaint);
获取一张图片,在原图片上截取内容 new Rect(50, 50, 100, 100) ,绘制在View宽高一半的矩形区域里


Matrix
void drawBitmap(Bitmap bitmap, Matrix matrix, Paint paint)
参数
Matrix matrix:矩阵 最根本的作用就是坐标转换
这是一个大学问啊,涉及到数学,就单单android的Matrix单独一篇博文都说不完,这里先忽略不是重点可以查看Android Matrix
基本变换有4种:
- 平移(Translate)
- 缩放(Scale)
- 旋转(Rotate)
- 倾斜(Skew)
boolean postScale(float sx, float sy)
boolean postScale(float sx, float sy, float px, float py)
参数
float sx:X轴缩放倍数 大于1放大,小于1缩小 小于0对称变化(镜子,倒影)
float sy:Y轴缩放倍数 同上
float px:缩放的中心点X 默认原点(0,0)
float py:缩放的中心点Y 同上
    Paint mPaint = new Paint();
    Bitmap bitmap = BitmapFactory.decodeResource(getResources(), R.mipmap.icon_man);
    Matrix matrix = new Matrix();
    matrix.postScale(2, 2);
    //放大2倍效果
    canvas.drawBitmap(bitmap, matrix, mPaint);
    //绘制原图
    canvas.drawBitmap(bitmap, 0, 0, mPaint);
将图像放大2倍绘制,后面再绘制原图做对比

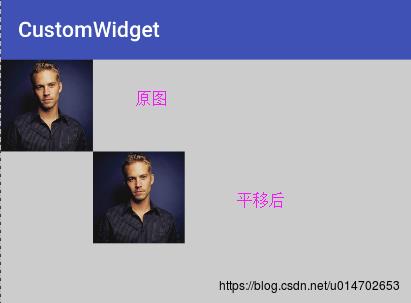
boolean postTranslate(float dx, float dy)
参数
float dx:X轴位移数值
float dy:Y值位移数值
    Paint mPaint = new Paint();
    Bitmap bitmap = BitmapFactory.decodeResource(getResources(), R.mipmap.icon_man);
    //绘制原图
    canvas.drawBitmap(bitmap, 0, 0, mPaint);
    //平移图片
    Matrix matrix = new Matrix();
    matrix.postTranslate(bitmap.getWidth(), bitmap.getHeight());
    canvas.drawBitmap(bitmap, matrix, mPaint);

boolean postRotate(float degrees)
boolean postRotate(float degrees, float px, float py)
参数
float degrees:旋转角度
float px:旋转中心X坐标 默认(0,0)
float py:旋转中心Y坐标 默认(0,0)
    Paint mPaint = new Paint();
    Bitmap bitmap = BitmapFactory.decodeResource(getResources(), R.mipmap.icon_man);
    //绘制原图
    canvas.drawBitmap(bitmap, 0, 0, mPaint);
    //绘制边框区分原图
    mPaint.setColor(Color.RED);
    mPaint.setStyle(Paint.Style.STROKE);
    mPaint.setStrokeWidth(5);
    canvas.drawRect(new RectF(0, 0, bitmap.getWidth(), bitmap.getHeight()), mPaint);
    //旋转图片
    Matrix matrix = new Matrix();
    matrix.postRotate(45, bitmap.getWidth() / 2, bitmap.getHeight() / 2);
    canvas.drawBitmap(bitmap, matrix, mPaint);
代码很简单,先绘制一张原图,然后重新设置画笔,绘制边框用来区分底部的原图,最后绘制旋转后的图片

boolean postSkew(float kx, float ky)
boolean postSkew(float kx, float ky, float px, float py)
参数
float kx:X轴倾斜值 大于0向左倾斜,小于0向右倾斜
float ky:Y轴倾斜值 大于0向下倾斜,小于0向上倾斜
float px:倾斜依据点X,默认(0,0)左上角
float py:倾斜依据点Y,默认(0,0)左上角
    Paint mPaint = new Paint();
    Bitmap bitmap = BitmapFactory.decodeResource(getResources(), R.mipmap.icon_man);
    //绘制原图
    canvas.drawBitmap(bitmap, 0, 0, mPaint);
    //绘制边框区分原图
    mPaint.setColor(Color.RED);
    mPaint.setStyle(Paint.Style.STROKE);
    mPaint.setStrokeWidth(5);
    canvas.drawRect(new RectF(0, 0, bitmap.getWidth(), bitmap.getHeight()), mPaint);
    //倾斜图片
    Matrix matrix = new Matrix();
    matrix.postSkew(-0.5f, 0, 0, bitmap.getHeight());
    canvas.drawBitmap(bitmap, matrix, mPaint);
绘制一张原图,加上边框区分,变换矩阵,以图片左下角为依据点,只倾斜X轴 效果如下

canvas 绘制 文本
文本绘制是自定义控件中最常用的功能,这里分两部分讲 paint 和 canvas
paint 画笔属性也可以改变很多文本的属性和样式 ( 摘自网络 )
    Paint paint=new Paint();
    paint.setColor(Color.RED);  //设置画笔颜色

    //普通设置
    paint.setStrokeWidth (5);//设置画笔宽度
    paint.setAntiAlias(true); //指定是否使用抗锯齿功能
    paint.setStyle(Paint.Style.FILL);//绘图样式,对于设文字和几何图形都有效
    paint.setTextAlign(Paint.Align.CENTER);//设置文字对齐方式,取值:align.CENTER、align.LEFT或align.RIGHT
    paint.setTextSize(12);//设置文字大小

    //样式设置
    paint.setFakeBoldText(true);//设置是否为粗体文字
    paint.setUnderlineText(true);//设置下划线
    paint.setTextSkewX((float) -0.25);//设置字体水平倾斜度,普通斜体字是-0.25
    paint.setStrikeThruText(true);//设置带有删除线效果

    //其它设置
    paint.setTextScaleX(2);//只会将水平方向拉伸,高度不会变
这个是画笔 paint 相关的 api 都比较简单,多用记住就好了,就不一一贴效果图了(好多,懒了),其中设置下划线 setUnderlineText ,删除线 setStrikeThruText 应该会用的比较多。
绘制文本drawText
void drawText(String text, float x, float y, Paint paint)
参数
String text:目标文本
float x:绘制原点 x 坐标
float y:绘制原点 y 坐标
    Paint mPaint = new Paint();
    mPaint.setColor(Color.BLACK);
    mPaint.setStyle(Paint.Style.STROKE);
    mPaint.setStrokeWidth(2);
    mPaint.setTextSize(60);

    //垂直方向中线
    canvas.drawLine(0, getHeight() / 2, getWidth(), getHeight() / 2, mPaint);

    mPaint.setColor(Color.RED);

    String text = "Loading";
    float x = getWidth() / 2;//宽度一半
    float y = getHeight() / 2;//高度一半
    canvas.drawText(text, x, y, mPaint);
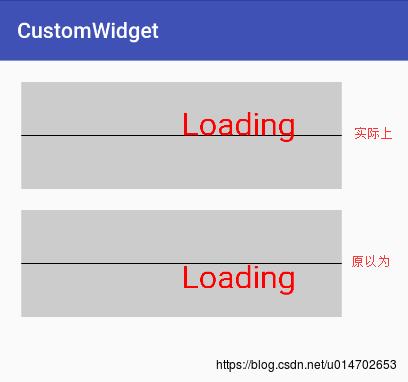
这段代码是在控件宽度1/2,高度1/2处开始绘制文本,中间添加一条中线作为辅助理解

一般而言,(x,y)所代表的位置是所画图形对应的矩形的左上角点。通过上图,可以看出我们实际画出的效果并不是我们想象的那样,因为在 drawText 这个 y 非常特殊,它代表的是基线的位置
那么问题来了什么是基线? 小时候我们写拼音用的本子四线格,我们都是从第三行开始写的,这一行就是基线。 (图片来源于网络)

对于这个函数的深入用法和基线的详解请参考博主另一篇博客
Android 自定义View-怎么绘制居中文本?
其他函数
void drawText(char[] text, int index, int count, float x, float y, Paint paint)
void drawText(String text, int start, int end, float x, float y, Paint paint)
void drawText(CharSequence text, int start, int end, float x, float y, Paint paint)
参数
char[] text:字符数组
int index:开始下标
int count:参与绘制的字符个数
int start:起始下标
int end:结束下标
这几个函数比较简单,常用来截取字符或者字符串,不再示例
根据路径绘制文本 drawTextOnPath
void drawTextOnPath(String text, Path path, float hOffset, float vOffset, Paint paint)
void drawTextOnPath(char[] text, int index, int count, Path path, float hOffset, float vOffset, Paint paint)
参数
Path path:路径 前面说过,参考前面
float hOffset:与路径起始点的水平偏移距离
float vOffset:与路径中心的垂直偏移量
    Paint mPaint = new Paint();
    mPaint.setColor(Color.RED);
    mPaint.setStyle(Paint.Style.STROKE);
    mPaint.setStrokeWidth(5);
    mPaint.setTextSize(50);

    Path path = new Path();
    path.addRect(100, 200, 300, 600, Path.Direction.CCW);//逆时针

    Path path2 = new Path();
    path2.addRect(600, 200, 800, 600, Path.Direction.CCW);//逆时针

    canvas.drawPath(path, mPaint);
    canvas.drawPath(path2, mPaint);

    mPaint.setColor(Color.BLACK);

    canvas.drawTextOnPath("幸福别等", path, 0, 0, mPaint);
    canvas.drawTextOnPath("幸福别等", path2, 100, 100, mPaint);
绘制第一个圆形路径,然后根据原型路径绘制文本,绘制第二个圆形路径,设置偏移量,再根据路径绘制文本。

字体样式设置(Typeface)
字体样式设置,这个功能很常用,系统默认会有一个字体样式,如果开发者想要设置文本字体,需要引入一个字体文件,根据路径获取字体,然后设置 Typeface
创建
    Typeface    create(String familyName, int style) //直接通过指定字体名来加载系统中自带的文字样式
    Typeface    create(Typeface family, int style)     //通过其它Typeface变量来构建文字样式
    Typeface    createFromAsset(AssetManager mgr, String path) //通过从Asset中获取外部字体来显示字体样式
    Typeface    createFromFile(String path)//直接从路径创建
    Typeface    createFromFile(File path)//从外部路径来创建字体样式
    Typeface    defaultFromStyle(int style)//创建默认字体
Style枚举值
Typeface.NORMAL  //正常体
Typeface.BOLD    //粗体
Typeface.ITALIC  //斜体
Typeface.BOLD_ITALIC //粗斜体
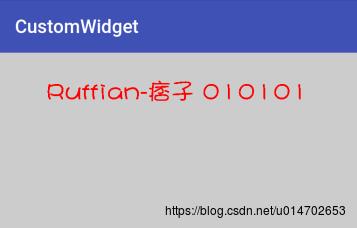
如果是自定义字体样式,首先在 assets 下建一个文件夹,命名为 fonts,然后将字体文件huakangshaonv.ttf 放入其中,网上可以下载各种各样的字体
    Paint mPaint = new Paint();
    mPaint.setColor(Color.RED);
    mPaint.setStyle(Paint.Style.STROKE);
    mPaint.setStrokeWidth(5);
    mPaint.setTextSize(50);

    AssetManager assetManager = getResources().getAssets();//得到AssetManager
    Typeface typeface = Typeface.createFromAsset(assetManager, "fonts/huakangshaonv.ttf");//获取字体
    mPaint.setTypeface(typeface);//设置字体样式

    canvas.drawText("Ruffian-痞子 010101", 100, 100, mPaint);

很简单也和使用,很自然的我又要安利一下我的一个开源项目了,很轻便的一个TextView封装,其中也用到了字体样式设置 RTextView
好了基础的用法就先到这里吧,把这些基础的学会了,基本的绘图应该没什么问题,如果有,那就继续博主的后续文章,会不断更新自定义控件绘制方面的知识
由于都是基础API的说明和示例,本人也是根据网络学习参考而来,写作思路参考了 启舰
很喜欢他对这种基础API的说明方式,图文并茂,深入浅出,如果写作思路的参考造成了对 启舰 的侵权,我将关闭相关博客
以上是关于自定义控件Paint,Canvas 基础用法 - drawBitmap(),drawText() 详解的主要内容,如果未能解决你的问题,请参考以下文章