iOS UIBezierPath绘图相关问题
Posted wwwwwwwwwwwwdi
tags:
篇首语:本文由小常识网(cha138.com)小编为大家整理,主要介绍了iOS UIBezierPath绘图相关问题相关的知识,希望对你有一定的参考价值。
我们都知道可以通过UIBezierPath+CAShapeLayer来绘制我们想要的各种效果,本篇文章不再赘述这些问题,就说一下在使用这些类的时候,遇到的一些问题:
1. 在UIView或者其子类中,如果要使用CAShapeLayer,那么:不要使用懒加载!!不要使用懒加载!!不要使用懒加载
今天在项目中如此写的时候,懒加载了ShapeLayer,然后Layer就不能正常的绘制上去了
2. - (void)layoutSublayersOfLayer:(CALayer *)layer方法的使用
遇到在初始化的时候没有使用initWithFrame方法的情况,或者在外部使用Masonry设置约束的情况,
此时,我们可以在View的- (void)layoutSublayersOfLayer:(CALayer *)layer方法中设置frame相关参数
- (void)layoutSublayersOfLayer:(CALayer *)layer
    _frameW = layer.frame.size.width;
    _frameH = layer.frame.size.height;
    _bigRadius = _frameH/2;
    _smallRadius = _bigRadius - kPVRadiusOffSet;

    [self setupLayers];
    self.progress = _progress;


- (void)setupLayers
    self.backLayer = [CAShapeLayer layer];
    self.backLayer.fillColor = kPVBackgroundColor.CGColor;
    UIBezierPath *backPath = [UIBezierPath bezierPathWithRoundedRect: CGRectMake(0, kPVRadiusOffSet, _frameW, _smallRadius*2) cornerRadius: _smallRadius];
    self.backLayer.path = backPath.CGPath;
    [self.layer addSublayer:self.backLayer];


- (void)setProgress:(CGFloat)progress
    _progress = progress;

    CGFloat currentX = _frameW * progress/100;

    self.gradientLayer = [CAShapeLayer layer];
    self.gradientLayer.fillColor = [UIColor yellowColor].CGColor;
    UIBezierPath *colorPath = [UIBezierPath bezierPath];
    [colorPath moveToPoint:CGPointMake(0, _bigRadius)];
    [colorPath addArcWithCenter:CGPointMake(_smallRadius, _bigRadius) radius:_smallRadius startAngle:M_PI endAngle:3*M_PI_2 clockwise:YES];
    [colorPath addLineToPoint:CGPointMake(currentX-20-2, kPVRadiusOffSet)];
3. UIBezierPath提供的绘制曲线的API
一共有两种:
* addQuadCurveToPoint:controlPoint
此方法绘制的是二次曲线,入参只需要一个controlPoint(控制点)
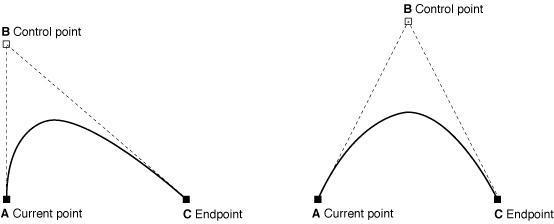

addCurveToPoint:controlPoint1:controlPoint2:
此方法绘制的是三次曲线,所以需要两个controlPoint

控制点
贝塞尔曲线本质
本质上,贝塞尔曲线就是数学问题,我们可以使用公式来计算的
1. 线性曲线

2. 二阶曲线

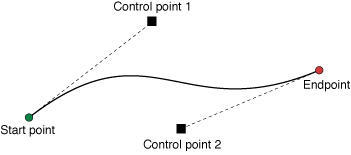
- 三阶曲线
摘自Wikipedia
Four points P0, P1, P2 and P3 in the plane or in higher-dimensional space define a cubic Bézier curve. The curve starts at P0 going toward P1 and arrives at P3 coming from the direction of P2. Usually, it will not pass through P1 or P2; these points are only there to provide directional information. The distance between P1 and P2 determines "how far" and "how fast" the curve moves towards P1 before turning towards P2.

Writing BPi,Pj,Pk(t) for the quadratic Bézier curve defined by points Pi, Pj, and Pk, the cubic Bézier curve can be defined as an affine combination of two quadratic Bézier curves:
大致意思如下:英语渣就不翻译了。。
四个点p0,p1,p2,p3能决定一个三阶曲线,
曲线从P0点开始,到P3结束,中间不会经过P1和P2点,P1,P2点只会提供一些方向性的信息,
P1P2之间的距离决定了曲线由向着P1转向P2的距离和速度

4. 高阶曲线。。。

大佬们自己去研究吧。。。
4. 提供一些网址,可以直观的展现贝塞尔曲线的效果
http://blogs.sitepointstatic.com/examples/tech/canvas-curves/bezier-curve.html
5. CAGradientLayer和CAShapeLayer的结合使用(做一个有渐变色底色不规则形状的进度条)
思路如下:
UIView和CALayer都有一个属性: mask
我们可以先使用CAShapeLayer绘制出个性形状的图像之后,
然后把这个图像当成view(或者Layer)的蒙版 –类似Sketch的遮罩
CALayer.h
/* A layer whose alpha channel is used as a mask to select between the
 * layer's background and the result of compositing the layer's
 * contents with its filtered background. Defaults to nil. When used as
 * a mask the layer's `compositingFilter' and `backgroundFilters'
 * properties are ignored. When setting the mask to a new layer, the
 * new layer must have a nil superlayer, otherwise the behavior is
 * undefined. Nested masks (mask layers with their own masks) are
 * unsupported. */

@property(nullable, strong) CALayer *mask;


UIView.h

@property(nullable, nonatomic,strong) UIView *maskView NS_AVAILABLE_ios(8_0);
CGFloat currentX = _frameW * progress/100;
self.gradientLayer = [CAShapeLayer layer];
self.gradientLayer.fillColor = [UIColor yellowColor].CGColor;
UIBezierPath *colorPath = [UIBezierPath bezierPath];
[colorPath moveToPoint:CGPointMake(0, _bigRadius)];
[colorPath addArcWithCenter:CGPointMake(_smallRadius, _bigRadius) radius:_smallRadius startAngle:M_PI endAngle:3*M_PI_2 clockwise:YES];
[colorPath addLineToPoint:CGPointMake(currentX-20-2, kPVRadiusOffSet)];
//405 - 385 = 20px 的曲线
//二阶曲线
// [colorPath addQuadCurveToPoint:CGPointMake(currentX - 2, 0) controlPoint:CGPointMake(currentX - 10, kPVRadiusOffSet)];
// [colorPath addLineToPoint:CGPointMake(currentX, 0)];
// [colorPath addArcWithCenter:CGPointMake(currentX, bigRadius) radius:bigRadius startAngle:3*M_PI_2 endAngle:5*M_PI_2 clockwise:YES];
// [colorPath addLineToPoint:CGPointMake(currentX - 2, frameH)];
// [colorPath addQuadCurveToPoint:CGPointMake(currentX - 20 - 2, frameH - kPVRadiusOffSet) controlPoint:CGPointMake(currentX - 10, frameH - kPVRadiusOffSet)];
//三阶曲线
[colorPath addCurveToPoint:CGPointMake(currentX, 0) controlPoint1:CGPointMake(currentX - 15, kPVRadiusOffSet) controlPoint2:CGPointMake(currentX - 5, 0)];
[colorPath addArcWithCenter:CGPointMake(currentX, _bigRadius) radius:_bigRadius startAngle:3*M_PI_2 endAngle:5*M_PI_2 clockwise:YES];
[colorPath addCurveToPoint:CGPointMake(currentX - 20, _frameH - kPVRadiusOffSet) controlPoint1:CGPointMake(currentX - 5, _frameH) controlPoint2:CGPointMake(currentX - 15, _frameH - kPVRadiusOffSet)];
[colorPath addLineToPoint:CGPointMake(_smallRadius, _frameH - kPVRadiusOffSet)];
[colorPath addArcWithCenter:CGPointMake(_smallRadius, _bigRadius) radius:_smallRadius startAngle:M_PI_2 endAngle:M_PI clockwise:YES];
[colorPath closePath];
self.gradientLayer.path = colorPath.CGPath;
//渐变色layer
CAGradientLayer *gradientLayer = [CAGradientLayer layer];
gradientLayer.colors = @[(__bridge id)[UIColor colorWithRed:76/255.0 green:194/255.0 blue:255/255.0 alpha:1].CGColor, (__bridge id)[UIColor colorWithRed:75/255.0 green:137/255.0 blue:230/255.0 alpha:1].CGColor];
gradientLayer.locations = @[@0.3, @1.0];
gradientLayer.startPoint = CGPointMake(0, 0);
gradientLayer.endPoint = CGPointMake(1.0, 0);
gradientLayer.frame = CGRectMake(0, 0, currentX+_bigRadius, _frameH);
gradientLayer.mask = self.gradientLayer;
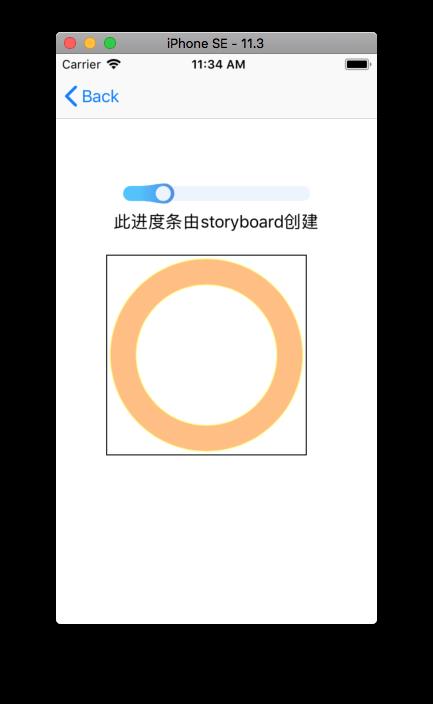
[self.layer addSublayer:gradientLayer];效果图如下:
6.两个UIBezierPath存在交叉的情况,或者要做一些“镂空”的效果,例如如下效果

此时,就会涉及到两个属性:
CAShapeLayer.h中

/* The fill rule used when filling the path. Options are `non-zero' and
 * `even-odd'. Defaults to `non-zero'. */

此处也有extern的const定义的名
/* `fillRule' values. */
CA_EXTERN NSString *const kCAFillRuleNonZero
    CA_AVAILABLE_STARTING (10.6, 3.0, 9.0, 2.0);
CA_EXTERN NSString *const kCAFillRuleEvenOdd
    CA_AVAILABLE_STARTING (10.6, 3.0, 9.0, 2.0);

@property(copy) NSString *fillRule;

和
UIBezierPath.h

@property(nonatomic) BOOL usesEvenOddFillRule;
// Default is NO. When YES, the even-odd fill rule is used for drawing, clipping, and hit testing.
由此可以看到:
usesEvenOddFillRule属性默认为NO,如果为YES的时候,会用于绘制,剪切和响应链的判断
关于fillRule 摘自stackoverflow
The even-odd fill rule is one way to determine what regions of a path are “inside” the path vs “outside” the path, which is important to know when filling the interior of the path. They usually only differ when a path cuts holes in itself. The even-odd rule will usually not shade those regions, while the other option usually will.
The even-odd rule is simply this:
As you progress in a straight line across the canvas containing the path,
count the number of times you cross the path.
If you have crossed an odd number of times,
you are "inside" the path.
If you have crossed an even number of times,
you are outside the path.
Another option is called the non-zero winding rule. (This is used if usesEvenOddFillRule is NO). The non-zero again considers a straight line across the path, but counts the intersections a bit differently. It takes into account the direction the path was drawn in. (i.e. a counter-clockwise circle is not the same as a clockwise circle.) It is thus:
As you progress in a straight line across the canvas containing the path,
keep a counter, starting at 0.
Every time you cross a portion of the path where the path progresses from your left to your right
(as observed from the line crossing the path),
add one to the counter.
Every time you cross a line where the path progresses from your right to your left,
subtract one from the counter.
If the counter is non-zero, you are inside the path. Otherwise, you are outside.
简单来说:
fillRule属性,一共有两个值:
* kCAFillRuleEvenOdd 和 even-odd相同
我们把想要判断的点标注上去,然后从该点开始,做任意方向的射线,我们来查询射线与绘制的path的相交点,
如果交点个数为奇数,则该点在path内部
如果交点个数为偶数,则该点在path外部

- kCAFillRuleNonZero 和 non-zero相同
该模式,需要考虑绘图路径的方向
我们还是从测试点出一个任意方向的射线,然后与path相交。计数从0开始
我们查看绘制路径的方向,相对于射线的方向,
如果绘制路径方向相对于射线是从左往右,则count加1
如果绘制路径方向相对于射线是从右向左,则count减1
计算最后Count的值,
如果count为0,则该点在路径外边
如果count不为0,则该点在路径里边

下面是一个五角星的实例,我们来看下两种规则的判断:

* 先看nozero时,怎么判断点是否在内部区域。
射线1和图形线段只有一个交点,为从左到右,所以结果是1,判定为内部区域;射线2有两个交点,都是从左到右,结果是2,内部区域;射线3有三个交点,两个从左到右,一个从右到左,结果是1,内部区域;射线4有四个交点,两个从左到右,两个从右到左,结果是0,所以是外部区域。
- evenodd时,
只判断交点个数,所以1,3都是内部区域,2,4都是外部区域。
一般来说,kCAFillRuleNonZero和kCAFillRuleEvenOdd的结果是相反的(非常复杂的图形除外)
下面是上图所示的橘黄色圆环的实现:
    CAShapeLayer *shapelayer = [CAShapeLayer layer];

    UIBezierPath *bezierPath = [UIBezierPath bezierPath];
    UIBezierPath *outerCircle = [UIBezierPath bezierPathWithOvalInRect:CGRectInset(self.bounds, 4, 4)];
    [outerCircle setLineWidth:2.0];
    [bezierPath appendPath:outerCircle];

    UIBezierPath *innerCircle = [UIBezierPath bezierPathWithOvalInRect:CGRectInset(self.bounds, 30, 30)];
    [innerCircle setLineWidth:2.0];
    [bezierPath appendPath:innerCircle];
//    bezierPath.usesEvenOddFillRule = YES;

    shapelayer.path = bezierPath.CGPath;
    shapelayer.fillRule = @"even-odd";
//    shapelayer.fillRule = kCAFillRuleEvenOdd;
    shapelayer.fillColor = [UIColor orangeColor].CGColor;
    shapelayer.strokeColor = [UIColor yellowColor].CGColor;
    shapelayer.opacity = 0.5;
    [self.layer addSublayer:shapelayer];
如果有想要看源码的,请移步GitHub
如果您觉得此篇文章帮到了您,请给个Star,谢谢!
参考资料
https://zhuanlan.zhihu.com/p/23381083
https://github.com/darkjoin/Learning/wiki/UIBezierPath%E7%BB%98%E5%9B%BE
https://stackoverflow.com/questions/14840563/how-does-usesevenoddfillrule-work
https://blog.csdn.net/mishiwjp/article/details/53484235
以上是关于iOS UIBezierPath绘图相关问题的主要内容,如果未能解决你的问题,请参考以下文章