一键部署msql主从,redis主从,mongodb主从
Posted 运维.大白
tags:
篇首语:本文由小常识网(cha138.com)小编为大家整理,主要介绍了一键部署msql主从,redis主从,mongodb主从相关的知识,希望对你有一定的参考价值。
本次实战环境为ubuntu系统,线上测试了两三天,终于全部测试通过了
现在分享给需要的小伙伴
| 角色 | ip |
|---|---|
| ansible管理节点 | 192.168.1.14 |
| master节点 | 192.168.1.30 |
| slave节点 | 192.168.1.31 |
ansble到每个节点配置免密登录

二级目录

分别执行安装,配置主从等功能
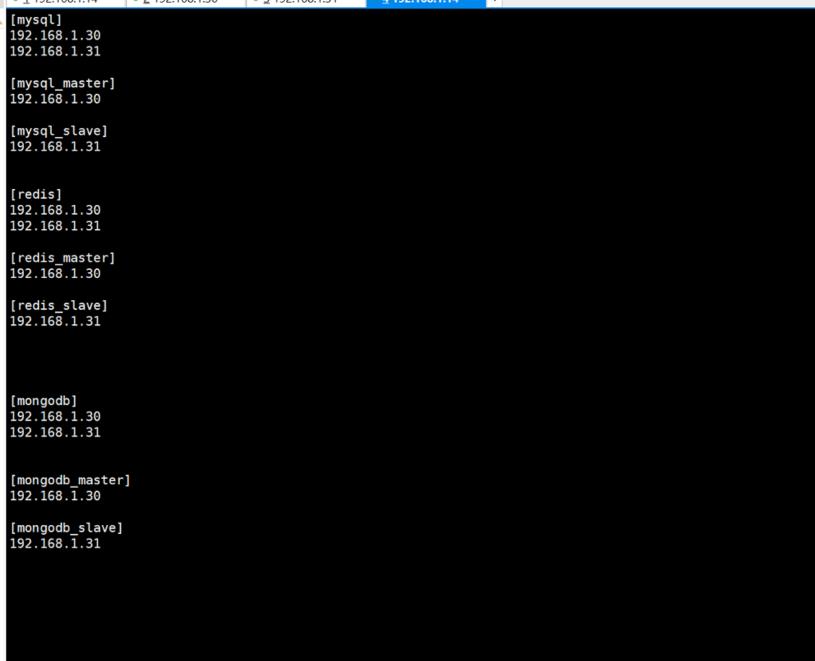
hosts主机清单配置如下,按功能分组
下面以其中一个部署具体说明
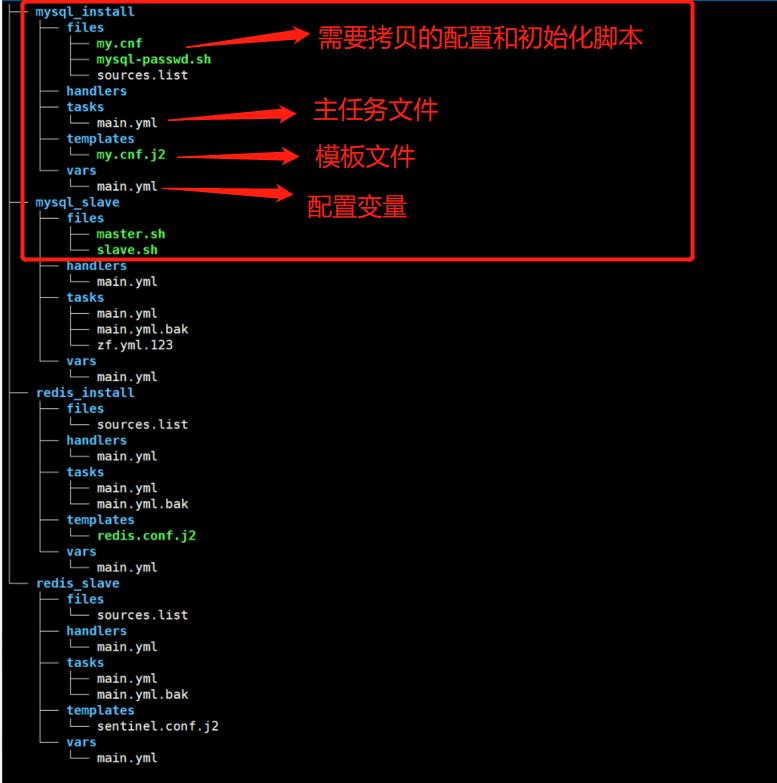
#六个任务模块都是如此配置
root@zhangfan:~/ansible# cat  01-mysql_install.yml
---
- hosts: mysql
  gather_facts: no

  roles:
  - mysql_install
#查看初始化脚本
cat files/mysql-passwd.sh
#!/bin/bash
#初始化密码
systemctl restart mysqld.service
/usr/local/mysql/bin/mysql -e "update mysql.user  set  authentication_string=password('root')  where user='root' and host='localhost';"
/usr/local/mysql/bin/mysql -e "flush privileges;"
sed -i '/skip-grant-tables/d'  /etc/my.cnf

/usr/local/mysql/bin/mysql -uroot -proot --connect-expired-password  -e   "alter  user    user()  identified by 'root';"
root@zhangfan:~/ansible/roles/mysql_install# cat files/sources.list
#配置阿里源
deb http://mirrors.aliyun.com/ubuntu focal main restricted
deb http://mirrors.aliyun.com/ubuntu focal-updates main restricted
deb http://mirrors.aliyun.com/ubuntu focal universe
deb http://mirrors.aliyun.com/ubuntu focal-updates universe
deb http://mirrors.aliyun.com/ubuntu focal multiverse
deb http://mirrors.aliyun.com/ubuntu focal-updates multiverse
deb http://mirrors.aliyun.com/ubuntu focal-backports main restricted universe multiverse
deb http://mirrors.aliyun.com/ubuntu focal-security main restricted
deb http://mirrors.aliyun.com/ubuntu focal-security universe
deb http://mirrors.aliyun.com/ubuntu focal-security multiverse
主任务文件如下
---
- name: "01删除旧源"
  file: dest=/etc/apt/sources.list state=absent

- name: "02安装阿里源"
  copy: src=sources.list  dest=/etc/apt

- name: "copy mysql-passwd.sh"
  copy: src=mysql-passwd.sh dest=/tmp

- name: ceshi
  debug: msg= mysql_version

- name: "下载mysql源码包"
  get_url:
    url: https://downloads.mysql.com/archives/get/p/23/file/ mysql_version -linux-glibc2.12-x86_64.tar.gz
    dest: /tmp/ mysql_version -linux-glibc2.12-x86_64.tar.gz
    force: yes
    validate_certs: no
- name: "03更新源"
  shell: apt  update   ||  apt  upgrade  &&
         tar -xf  /tmp/mysql_version-linux-glibc2.12-x86_64.tar.gz   -C /tmp  &&
         mv /tmp/ mysql_version -linux-glibc2.12-x86_64   mysql_dir  &&
         mkdir -p /usr/local/mysql/data  &&
         mkdir -p /usr/local/mysql/logs

- name: "04安装mysql依赖包"
  apt: name= item  state=present
  with_items:
    - cmake
    - bison
    - build-essential
    - libncurses5-dev
    - libssl-dev
    - pkg-config
    - libncurses5

- name: "05编译安装mysql"
  shell: cd   mysql_dir   &&
         groupadd mysql &&  useradd -r -g mysql -s /bin/false mysql &&
         nohup  mysql_dir /bin/mysqld --initialize --user=mysql --basedir= mysql_dir  --datadir= mysq_dir_date


- name: "07-copy主配置文件"
  template: src=my.cnf.j2  dest=/etc/my.cnf  backup=yes
  #  notify:
  #    - restart mysqld

- name: "08-配置启动mysql服务"
  shell: cp  mysql_dir /support-files/mysql.server  /etc/init.d/mysqld        &&
         cp  mysql_dir /support-files/mysql.server  /usr/lib/systemd/system/  &&
         chmod +x /etc/init.d/mysqld && update-rc.d mysqld defaults &&
         echo  'PATH=/usr/local/mysql/bin:$PATH\\n' >> /etc/profile  &&
         export PATH=/usr/local/mysql/bin:$PATH

- name: "09-启动mysql"
  systemd:
    name: mysqld
    enabled: yes
    state: restarted

- name: "10-创建mysql密码"
  shell: /bin/sh /tmp/mysql-passwd.sh
模板本文件
root@zhangfan:~/ansible/roles/mysql_install# cat templates/my.cnf.j2
[client]
port= mysql_port
default-character-set=utf8
socket=/tmp/mysql.sock

[mysql]
no-auto-rehash

[mysqld]
basedir= mysql_dir
port= mysql_port
datadir= mysq_dir_date
socket=/tmp/mysql.sock
max_connections=2000
default-storage-engine=INNODB
max_allowed_packet=16M
innodb_buffer_pool_size=128M

explicit_defaults_for_timestamp=true

skip-grant-tables
这里配置了免密登录 所以file下就不用
cat vars/main.yml
---
#配置变量
mysql_version: mysql-5.7.33
mysql_dir: /usr/local/mysql
mysq_dir_date: /usr/local/mysql/data
mysql_port: 3306
mysql_user: root
mysql_passwd: root
开始部署
ansible-playbook -i hosts 01-mysql_install.yml
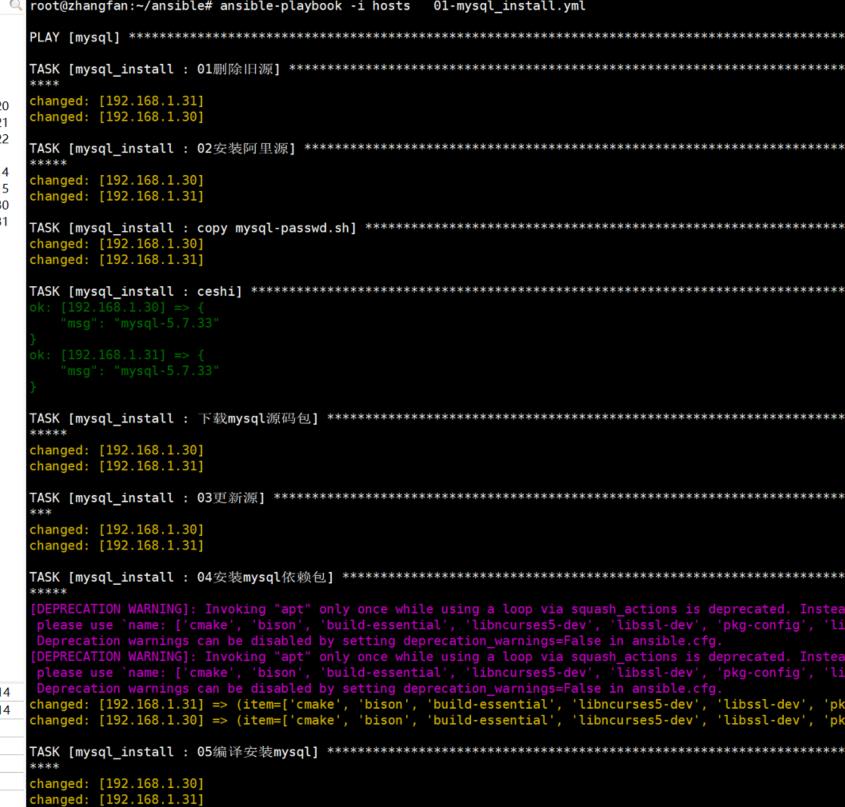
运行完成后无报错说明部署成功
然后开始部署msql主从,一样的原理
ansible-playbook -i hosts 02-mysql_slave.yml
分享下mysql主从的主配置文件
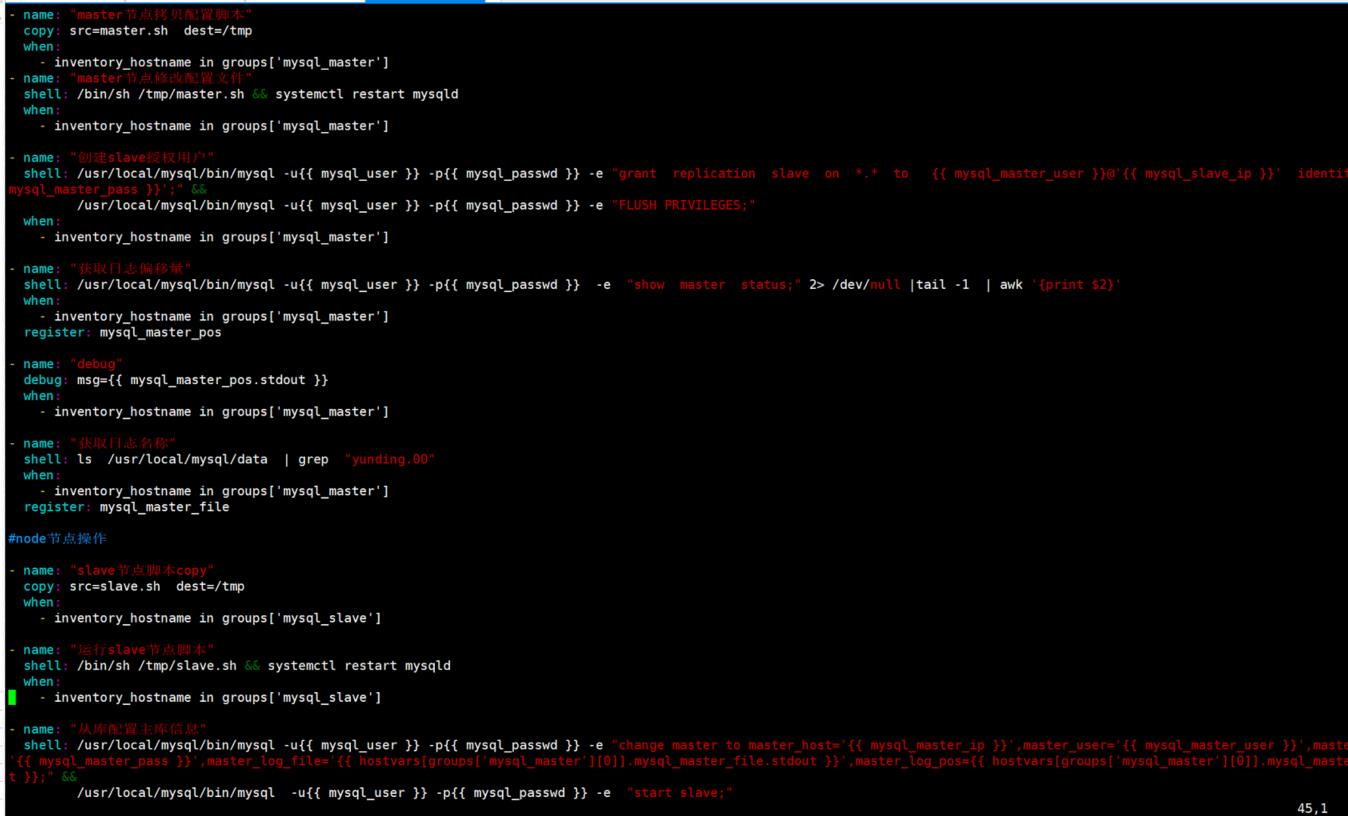
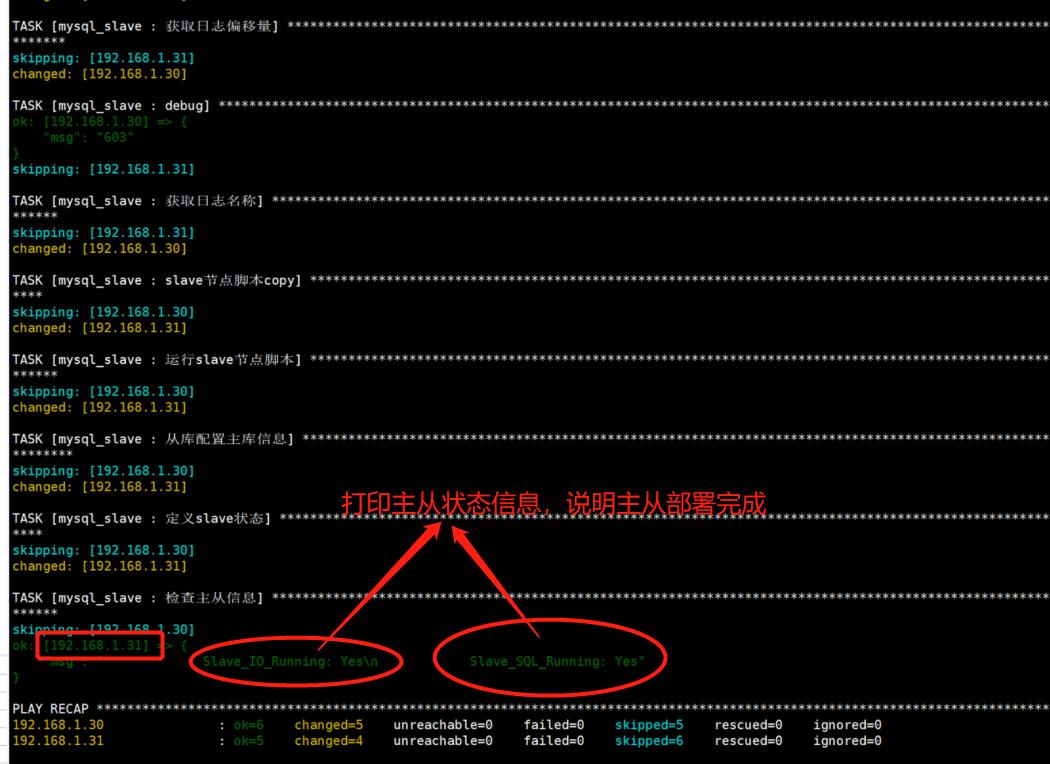
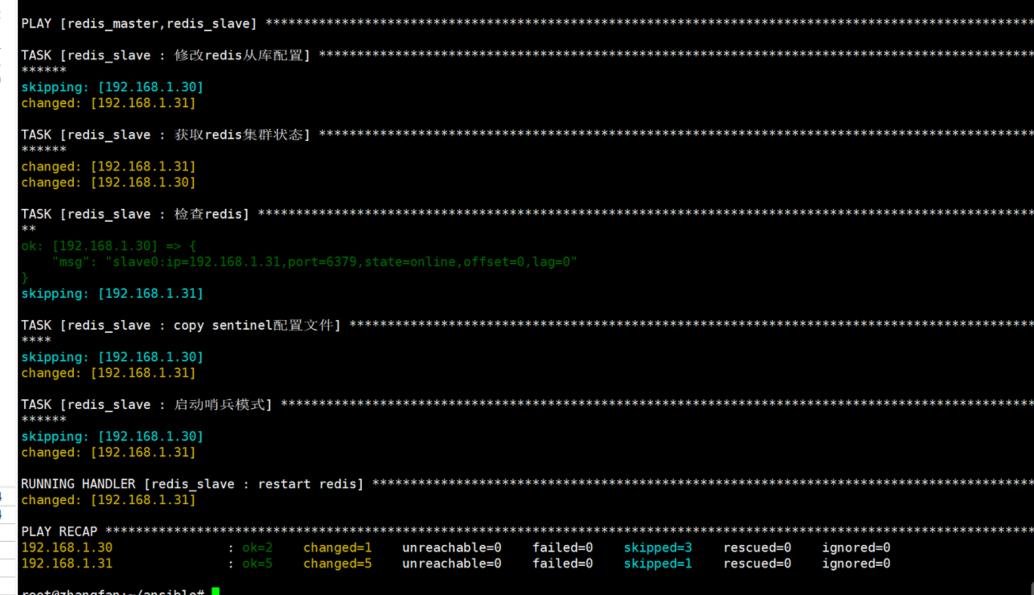
mongodb和redis部署主从也是一样的原理
相应资源有需要可以找我拿去
部署方法如下
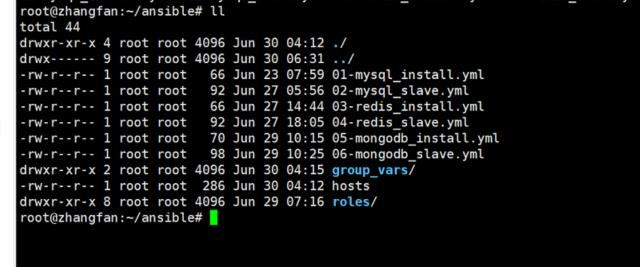
1.0目录结构如图所示
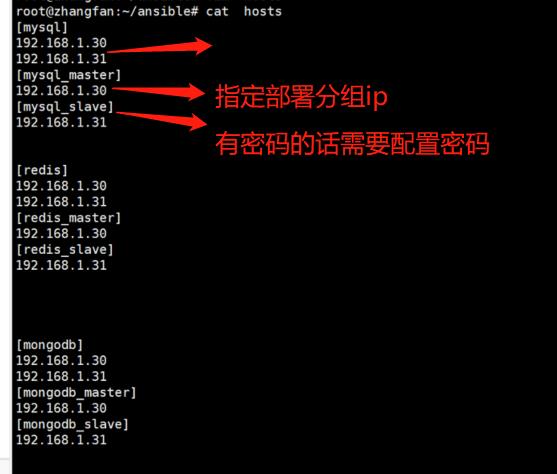
2.0修改配置
root@zhangfan:~/ansible# cat  hosts
[mysql]
192.168.1.30
192.168.1.31
[mysql_master]
192.168.1.30
[mysql_slave]
192.168.1.31
3.0配置参数变量
cat group_vars/all
mysql_version: mysql-5.7.33
mysql_dir: /usr/local/mysql
mysq_dir_date: /usr/local/mysql/data
mysql_port: 3306
mysql_user: root
mysql_passwd: root

mysql_master_user: yunding
mysql_master_pass: 123456
mysql_master_ip: 192.168.1.30
mysql_slave_ip: 192.168.1.31

redis_port: 6379
redis_master: 192.168.1.30
redis_slave: 192.168.1.31
redis_pass: 123456

mongodb_ip: 192.168.1.30
mongodb_port: 27017
4.0开始部署
ansible-playbook -i hosts 01-mysql_install.yml
ansible-playbook -i hosts 02-mysql_slave.yml
ansible-playbook -i hosts 03-redis_install.yml
ansible-playbook -i hosts 04-redis_slave.yml
ansible-playbook -i hosts 05-mongodb_install.yml
ansible-playbook -i hosts 06-mongodb_slave.yml
以上是关于一键部署msql主从,redis主从,mongodb主从的主要内容,如果未能解决你的问题,请参考以下文章