自定义PopWindow模仿微信拍照上传头像
Posted 阿蛮家
tags:
篇首语:本文由小常识网(cha138.com)小编为大家整理,主要介绍了自定义PopWindow模仿微信拍照上传头像相关的知识,希望对你有一定的参考价值。
一、自定义布局 res/layout/popwindow_takephoto.xml
<?xml version="1.0" encoding="utf-8"?>
<LinearLayout xmlns:android="http://schemas.android.com/apk/res/android"
    android:orientation="vertical" android:layout_width="match_parent"
    android:background="@color/gray"
    android:layout_height="wrap_content">

    <TextView
        android:layout_width="match_parent"
        android:text="拍照"
        android:id="@+id/btnTakePhoto"
        android:textColor="@color/black"
        android:background="@color/white"
        android:layout_height="wrap_content"
        android:padding="@dimen/dimen16"
        android:gravity="center" />
    <TextView
        android:layout_marginTop="1px"
        android:layout_width="match_parent"
        android:text="从手机相册选择"
        android:id="@+id/btnChooseFromAlbum"
        android:textColor="@color/black"
        android:background="@color/white"
        android:layout_height="wrap_content"
        android:padding="@dimen/dimen16"
        android:gravity="center" />
    <TextView
        android:layout_marginTop="@dimen/dimen6"
        android:layout_width="match_parent"
        android:text="取消"
        android:id="@+id/btnCancle"
        android:textColor="@color/black"
        android:background="@color/white"
        android:layout_height="wrap_content"
        android:padding="@dimen/dimen16"
        android:gravity="center" />

</LinearLayout>
二、自定义PopWindow
public class PhotoPopwindow extends PopupWindow implements View.OnClickListener

    private Context mContext;

    private Handler mHandler;

    public PhotoPopwindow(Context mContext, Handler handler)
        this.mContext = mContext;
        this.mHandler = handler;
        View view = LayoutInflater.from(mContext).inflate(R.layout.popwindow_takephoto, new LinearLayout(mContext), false);
        setContentView(view);
        //设置点击事件
        TextView btnTakePhoto = (TextView) view.findViewById(R.id.btnTakePhoto);
        TextView btnChooseFromAlbum = (TextView) view.findViewById(R.id.btnChooseFromAlbum);
        TextView btnCancle = (TextView) view.findViewById(R.id.btnCancle);
        btnTakePhoto.setOnClickListener(this);
        btnChooseFromAlbum.setOnClickListener(this);
        btnCancle.setOnClickListener(this);
        //设置宽高
        setWidth(ScreenUtils.getDeviceWidth(mContext));
        setHeight(LinearLayout.LayoutParams.WRAP_CONTENT);

        setBackgroundDrawable(new BitmapDrawable());
        //设置外部点击消失
        setOutsideTouchable(true);
        setFocusable(true);
        //设置动画
        setAnimationStyle(R.style.take_photo_anim);


    @Override
    public void onClick(View v)
        switch (v.getId())
            case R.id.btnTakePhoto:
                mHandler.sendEmptyMessage(110);
                break;
            case R.id.btnChooseFromAlbum:
                mHandler.sendEmptyMessage(111);
                break;
            case R.id.btnCancle:
                this.dismiss();
                break;
            default:
                break;
如果需要设置背景为透明色,可以这样设置背景矢量图:
ColorDrawable dw = new ColorDrawable(0xb0000000);
setBackgroundDrawable(dw);
这里,我们使用Handler实现popwindow和Activity通信,也可以用接口实现。
popwindow_show.xml
<?xml version="1.0" encoding="utf-8"?>
<set xmlns:android="http://schemas.android.com/apk/res/android">
    <translate
        android:duration="500"
        android:fromYDelta="0"
        android:toYDelta="100%" />

    <alpha
        android:duration="500"
        android:fromAlpha="1.0"
        android:toAlpha="1.0" />
</set>
popwindow_exit.xml
<?xml version="1.0" encoding="utf-8"?>
<set xmlns:android="http://schemas.android.com/apk/res/android">
    <translate
        android:duration="500"
        android:fromYDelta="100%"
        android:toYDelta="0" />

    <alpha
        android:duration="500"
        android:fromAlpha="1.0"
        android:toAlpha="1.0" />
</set>
在res/values/styles.xml文件中新建一个 take_photo_anim 样式:
<!-- 拍照popwindow -->
    <style name="take_photo_anim" parent="Animation.AppCompat.DropDownUp">
        <item name="android:windowEnterAnimation">@anim/popwindow_exit</item>
        <item name="android:windowExitAnimation">@anim/popwindow_show</item>
    </style>
setAnimationStyle(R.style.take_photo_anim);
注意:设置View动画属性配置时,需要注意fromYDelta的参数值是否加f,也就是是否相对于父容器的位置,如果该例使用fromYDelta="100%f",实际效果会发现popwindow动画会出现闪烁的情况,不是我们想要的平滑效果,如果去掉f,即动画位置不相对于父容器,动画效果就可以正常显示。
四、自定义PopWindow在Activity中的使用
import android.app.Activity;
import android.os.Bundle;
import android.os.Handler;
import android.os.Message;
import android.view.Gravity;
import android.view.View;
import android.widget.RelativeLayout;

import com.zw.android.healthdoctor.R;
import com.zw.android.healthdoctor.utils.ToastUtils;
import com.zw.android.healthdoctor.weidgt.PhotoPopwindow;

/**
 * Created by licheng on 16/8/16.
 */
public class PhotoActivity extends Activity

    private PhotoPopwindow mPhotoPopwindow;

    private RelativeLayout rlHeadImg;

    /** 处理照片popwindow点击回调 **/
    private Handler mHandler = new Handler()
        @Override
        public void handleMessage(Message msg)
            switch (msg.what)
                case 110:
                    ToastUtils.show(PhotoActivity.this, "拍照");
                    break;
                case 111:
                    ToastUtils.show(PhotoActivity.this, "从相册中选择");
                    break;
                default:
                    break;


    ;

    @Override
    protected void onCreate(Bundle savedInstanceState)
        super.onCreate(savedInstanceState);
        setContentView(R.layout.activity_editpersonalinfo);

        rlHeadImg = (RelativeLayout) findViewById(R.id.rlHeadImg);

        mPhotoPopwindow = new PhotoPopwindow(PhotoActivity.this, mHandler);

        /** 点击上传头像弹出popwindow **/
        rlHeadImg.setOnClickListener(new View.OnClickListener()
            @Override
            public void onClick(View v)
                if(mPhotoPopwindow != null)
                    if(!mPhotoPopwindow.isShowing())
                        mPhotoPopwindow.showAtLocation(findViewById(R.id.rlContainer),
                                Gravity.BOTTOM | Gravity.CENTER_HORIZONTAL, 0, 0);
                    else
                        mPhotoPopwindow.dismiss();


        );
注意:这里使用的是popwindow的showAtLocation方法,在方法中,我们指定了popwindow弹出的容器范围,以及popwindow在容器中的位置,这里我们设置在容器的底部弹出。
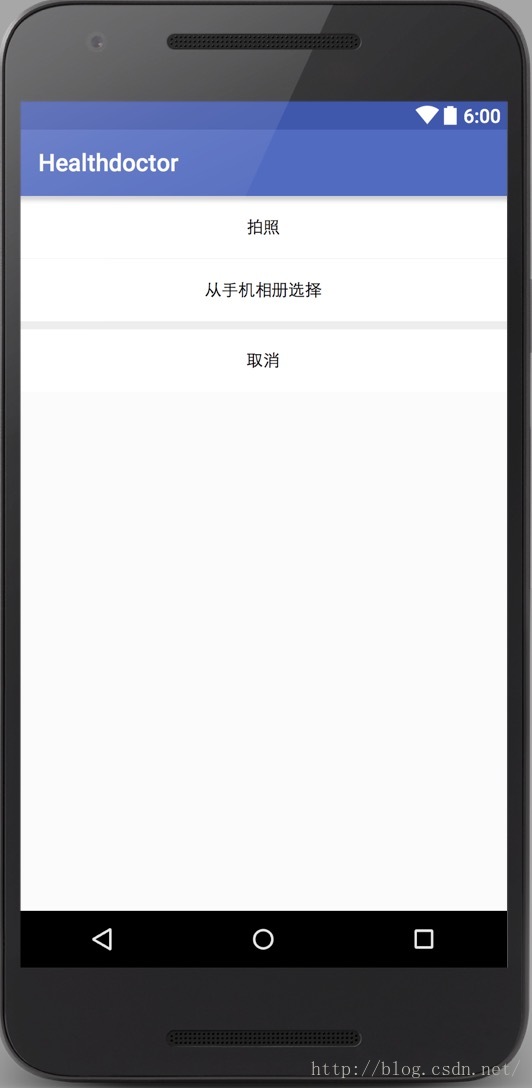
效果图如下:

以上是关于自定义PopWindow模仿微信拍照上传头像的主要内容,如果未能解决你的问题,请参考以下文章
相册选择头像或者拍照 上传头像以NSData 图片二进制格式 表单上传