自定义seekbar详解
Posted TC风之翼
tags:
篇首语:本文由小常识网(cha138.com)小编为大家整理,主要介绍了自定义seekbar详解相关的知识,希望对你有一定的参考价值。
自定义view之seekbar
本文简介:在github上找了不少seekbar,有些库具备相当复杂的功能,所以我想自己写一个简单易用的seekbar。本文主要讲述为什么要自定义view,自定义view的大体步骤,编写重难点。
1、为什么要自定义view
由于工作上的需要,我们往往需要实现某种特殊的布局或者界面效果,这时候官方没有提供相应的控件支持,需要我们继承view或者其它view类扩展。一般初学者入门可以先尝试组合view,即先自己利用多个官方控件拼装成需要的效果,然后内置逻辑(参考本人的数量加减view)。也就是把abc等多个view组合在一起使用,比include方式多了内置逻辑的好处。(具体范例参考本人其它博客)
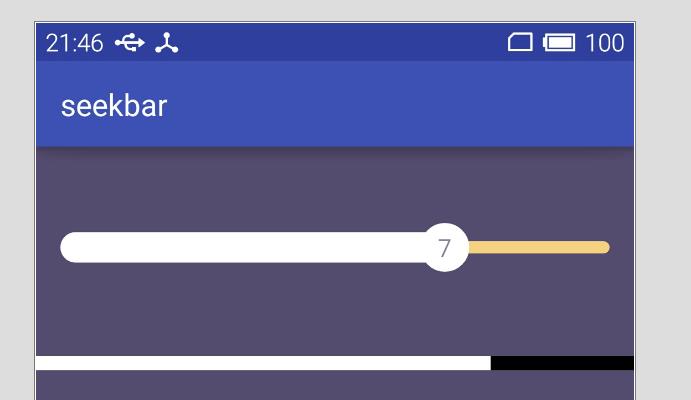
接下来本文讲述的是如何自定义一个seekbar。先看效果图,如下。

2、分析要绘制的自定义view
1)根据最终效果图或者需求方提供的功能说明等,去分析界面效果包含哪些动作,比如手势(点击,触摸移动),要显示的图形形状、文本(矩形,原型,弧形,随图形一起绘制的文本等等,都要仔细分析),拆解view图形为小的模块。
2)比如本文的seekbar,明显分为3个部分,一个是后面刻度的进度条,一个是当前的进度条。还有一个圆形按钮。然后手指点击刻度条,会根据点击位置当前进度跳转至此,并且圆形按钮也是如此。有一个特殊的需求是可以圆角也可以无圆角,并且圆形按钮可有可无。所以需要2个标记boolean去区分。需要注意的一点是,按照习惯一般圆形按钮的圆心的x所在坐标应该是在白色的当前进度的最右边x坐标。
3)根据图片,我们可以得出,3个模块的绘制都是自己有自身的大小控制,而为了适配左右padding,所以的绘制进度条时,要预留padding。
而上下padding,我不准备处理,直接让seekbar绘制在纵向的中间即可。即纵坐标y中心点都是height/2,并且限制3个模块的最大高度为view的高度,避免绘制出界。
3、自定义view主要方法介绍
主要方法有onmeasure、ondraw、ontouchevent、构造函数。自定义view一般围绕这几个方法进行处理,构造函数里获取自定义属性的值,初始化paint等对象,初始化一些view参数。ondraw进行绘制图形,这个主要有drawarc等方法,这个不多讲,自行搜索相关方法总览。ontouchevent就是处理点击坐标,然后触发一些绘制操作或响应某个方法动作。对于viewgroup的话还有onlayout等方法。
4、开始绘制
先准备本view需要的自定义属性,3个模块的高度大小、是否圆角、颜色等。tickBar是刻度条,circlebutton是圆形按钮,progress就是当前进度,代码如下。
 <!--自定义 seekbar-->
    <declare-styleable name="NumTipSeekBar">
        <attr name="tickBarHeight" format="dimension"/>
        <attr name="tickBarColor" format="color"/>
        <attr name="circleButtonColor" format="color"/>
        <attr name="circleButtonTextColor" format="color"/>
        <attr name="circleButtonTextSize" format="dimension"/>
        <attr name="circleButtonRadius" format="dimension"/>
        <attr name="progressHeight" format="dimension"/>
        <attr name="progressColor" format="color"/>
        <attr name="selectProgress" format="integer"/>
        <attr name="startProgress" format="integer"/>
        <attr name="maxProgress" format="integer"/>
        <attr name="isShowButtonText" format="boolean"/>
        <attr name="isShowButton" format="boolean"/>
        <attr name="isRound" format="boolean"/>
    </declare-styleable>
接下来就是获取自定义属性,然后初始化view参数了。TypedArray对象一定要记得attr.recycle();关闭,一般textsize是getDimension,而高度大小什么的是获取getDimensionPixelOffset,view本身测试出来的也是px值,但是settextsize的方法需要传入dp或者sp值。我在initview方法里初始化所需要的paint对象,避免ondraw反复绘制里new对象耗费不必要的内存。可能初学者不清楚RectF是什么东西,你百度一下会死啊。。。代码如下。
 public NumTipSeekBar(Context context)
        this(context, null);


    public NumTipSeekBar(Context context, AttributeSet attrs)
        this(context, attrs, 0);

 public NumTipSeekBar(Context context, AttributeSet attrs, int defStyleAttr)
        super(context, attrs, defStyleAttr);
        init(context, attrs);


    /**
     * 初始化view的属性
     *
     * @param context
     * @param attrs
     */
    private void init(Context context, AttributeSet attrs)

        TypedArray attr = context.obtainStyledAttributes(attrs, R.styleable.NumTipSeekBar);
        mTickBarHeight = attr.getDimensionPixelOffset(R.styleable
                .NumTipSeekBar_tickBarHeight, getDpValue(8));
        mTickBarColor = attr.getColor(R.styleable.NumTipSeekBar_tickBarColor, getResources()
                .getColor(R.color.orange_f6));
        mCircleButtonColor = attr.getColor(R.styleable.NumTipSeekBar_circleButtonColor,
                getResources().getColor(R.color.white));
        mCircleButtonTextColor = attr.getColor(R.styleable.NumTipSeekBar_circleButtonTextColor,
                getResources().getColor(R.color.purple_82));
        mCircleButtonTextSize = attr.getDimension(R.styleable
                .NumTipSeekBar_circleButtonTextSize, getDpValue(16));
        mCircleButtonRadius = attr.getDimensionPixelOffset(R.styleable
                .NumTipSeekBar_circleButtonRadius, getDpValue(16));
        mProgressHeight = attr.getDimensionPixelOffset(R.styleable
                .NumTipSeekBar_progressHeight, getDpValue(20));
        mProgressColor = attr.getColor(R.styleable.NumTipSeekBar_progressColor,
                getResources().getColor(R.color.white));
        mSelectProgress = attr.getInt(R.styleable.NumTipSeekBar_selectProgress, 0);
        mStartProgress = attr.getInt(R.styleable.NumTipSeekBar_startProgress, 0);
        mMaxProgress = attr.getInt(R.styleable.NumTipSeekBar_maxProgress, 10);
        mIsShowButtonText = attr.getBoolean(R.styleable.NumTipSeekBar_isShowButtonText, true);
        mIsShowButton = attr.getBoolean(R.styleable.NumTipSeekBar_isShowButton, true);
        mIsRound = attr.getBoolean(R.styleable.NumTipSeekBar_isRound, true);
        initView();

        attr.recycle();


     private void initView()
        mProgressPaint = new Paint();
        mProgressPaint.setColor(mProgressColor);
        mProgressPaint.setStyle(Paint.Style.FILL);
        mProgressPaint.setAntiAlias(true);

        mCircleButtonPaint = new Paint();
        mCircleButtonPaint.setColor(mCircleButtonColor);
        mCircleButtonPaint.setStyle(Paint.Style.FILL);
        mCircleButtonPaint.setAntiAlias(true);

        mCircleButtonTextPaint = new Paint();
        mCircleButtonTextPaint.setTextAlign(Paint.Align.CENTER);
        mCircleButtonTextPaint.setColor(mCircleButtonTextColor);
        mCircleButtonTextPaint.setStyle(Paint.Style.FILL);
        mCircleButtonTextPaint.setTextSize(mCircleButtonTextSize);
        mCircleButtonTextPaint.setAntiAlias(true);

        mTickBarPaint = new Paint();
        mTickBarPaint.setColor(mTickBarColor);
        mTickBarPaint.setStyle(Paint.Style.FILL);
        mTickBarPaint.setAntiAlias(true);

        mTickBarRecf = new RectF();//矩形,一会根据这个绘制刻度条在这个矩形内
        mProgressRecf = new RectF();
        mCircleRecf = new RectF();
由于本view没有太大必要编写onmeasure方法去适配wrapcontent。所以接下来就是ondraw里进行绘制了。首先我们先绘制刻度条,首先获取当前view的高宽,刻度条设置的高宽,然后计算y坐标中心,计算出刚才RectF矩形范围。要设置上下左右的坐标起点,左就是getPaddingLeft()作为起点,即默认自定义view支持paddingleft的设置。top的起点就是(mViewHeight - mTickBarHeight) / 2,即含义是绘制在view纵坐标y的中心点,然后tickbar高度从此点分为上下2半。同理求出横向的终点的x坐标以及底部坐标等
  @Overrid
    protected void onDraw(Canvas canvas)
        super.onDraw(canvas);
        int width = getWidth();
        int height = getHeight();
        initValues(width, height);
        // do........


  private void initValues(int width, int height)
        mViewWidth = width - getPaddingRight() - getPaddingLeft();
        mViewHeight = height;
        if (mTickBarHeight > mViewHeight)
            //如果刻度条的高度大于view本身的高度的1/2,则显示不完整,所以处理下。
            mTickBarHeight = mViewHeight;

        mTickBarRecf.set(getPaddingLeft(), (mViewHeight - mTickBarHeight) / 2,
                mViewWidth + getPaddingLeft(), mTickBarHeight / 2 +
                        mViewHeight / 2);
同理处理进度条部分的绘制,这个比刚才多了一层逻辑,起点依旧,但是终点x(矩形的right坐标)需要根据当前进度计算。mSelectProgress 是当前进度值,mMaxProgress 是最大值,mStartProgress是默认起点代表多少刻度值,比如1-10的seekbar效果(起点是1,终点是10)。求出比值然后乘以view本身的实际绘制范围的宽度(上面代码有计算),加上paddingleft,得出矩形的终点x。
  mCirclePotionX = (float) (mSelectProgress - mStartProgress) /
                (mMaxProgress - mStartProgress) * mViewWidth + getPaddingLeft();
  if (mProgressHeight > mViewHeight)
            //如果刻度条的高度大于view本身的高度的1/2,则显示不完整,所以处理下。
            mProgressHeight = mViewHeight;


        mProgressRecf.set(getPaddingLeft(), (mViewHeight - mProgressHeight) / 2,
                mCirclePotionX, mProgressHeight / 2 + mViewHeight / 2);
同理求出圆形按钮的坐标范围
    if (mCircleButtonRadius > mViewHeight / 2)
            //如果圆形按钮的半径大于view本身的高度的1/2,则显示不完整,所以处理下。
            mCircleButtonRadius = mViewHeight / 2;

        mCircleRecf.set(mCirclePotionX - mCircleButtonRadius, mViewHeight / 2 -
                        mCircleButtonRadius / 2,
                mCirclePotionX + mCircleButtonRadius, mViewHeight / 2 +
                        mCircleButtonRadius / 2);
开始绘制,mIsRound控制圆角。重点说明的是 Paint.FontMetricsInt处理文本的居中显示。
代码如下。
  @Override
    protected void onDraw(Canvas canvas)
        super.onDraw(canvas);
        int width = getWidth();
        int height = getHeight();
        initValues(width, height);

        if (mIsRound)
            canvas.drawRoundRect(mTickBarRecf, mProgressHeight / 2, mProgressHeight / 2,
                    mTickBarPaint);
            canvas.drawRoundRect(mProgressRecf, mProgressHeight / 2, mProgressHeight / 2,
                    mProgressPaint);
         else
            canvas.drawRect(mTickBarRecf, mTickBarPaint);
            canvas.drawRect(mProgressRecf, mProgressPaint);

//        canvas.drawArc(mCircleRecf, 0, 360, true, mCircleButtonPaint);
        if (mIsShowButton)
            canvas.drawCircle(mCirclePotionX, mViewHeight / 2, mCircleButtonRadius,
                    mCircleButtonPaint);

        if (mIsShowButtonText)
            Paint.FontMetricsInt fontMetrics = mCircleButtonTextPaint.getFontMetricsInt();
            int baseline = (int) ((mCircleRecf.bottom + mCircleRecf.top - fontMetrics.bottom -
                    fontMetrics
                            .top) / 2);
            // 下面这行是实现水平居中,drawText对应改为传入targetRect.centerX()
            canvas.drawText(String.valueOf(mSelectProgress), mCircleRecf.centerX
                            (), baseline,
                    mCircleButtonTextPaint);
5、处理触摸逻辑
这里主要是依赖onTouchEvent判断手势,当event满足某个触摸条件就进行获取当前坐标计算进度。本view是ACTION_MOVE、ACTION_DOWN时触发。isEnabled判断是否设置setEnabled属性,如果设置则屏蔽触摸绘制,这是我的特殊需求。judgePosition()主要是根据x坐标进行计算进度。BigDecimal 是处理四舍五入,大概发生进度变化时重新绘制自身view。return true;是为了消费触摸事件。(触摸事件分发机制,请移步大牛的博客)
   @Override
    public boolean onTouchEvent(MotionEvent event)
        if (!isEnabled())
            //如果设置不可用,则禁用触摸设置进度
            return false;

        float x = event.getX();
        float y = event.getY();
//        Log.i(TAG, "onTouchEvent: x:" + x);
        switch (event.getAction())
            case MotionEvent.ACTION_MOVE:
                judgePosition(x);
                return true;
            case MotionEvent.ACTION_DOWN:
                judgePosition(x);
                return true;
            case MotionEvent.ACTION_UP:
                if (mOnProgressChangeListener != null)
                    Log.i(TAG, "onTouchEvent: 触摸结束,通知监听器-mSelectProgress:"+mSelectProgress);
                    mOnProgressChangeListener.onChange(mSelectProgress);

                return true;
            default:
                break;


        return super.onTouchEvent(event);


    private void judgePosition(float x)
        float end = getPaddingLeft() + mViewWidth;
        float start = getPaddingLeft();
        int progress = mSelectProgress;
//        Log.i(TAG, "judgePosition: x-start:" + (x - start));
//        Log.i(TAG, "judgePosition: start:" + start + "  end:" + end + "  mMaxProgress:" +
//                mMaxProgress);
        if (x >= start)
            double result = (x - start) / mViewWidth * (float) mMaxProgress;
            BigDecimal bigDecimal = new BigDecimal(result).setScale(0, BigDecimal.ROUND_HALF_UP);
//            Log.i(TAG, "judgePosition: progress:" + bigDecimal.intValue() + "  result:" + result
//                    + "  (x - start) / end :" + (x - start) / end);
            progress = bigDecimal.intValue();
            if (progress > mMaxProgress)
//                Log.i(TAG, "judgePosition:x > end  超出坐标范围:");
                progress = mMaxProgress;

         else if (x < start)
//            Log.i(TAG, "judgePosition: x < start 超出坐标范围:");
            progress = 0;

         if (progress != mSelectProgress)
            //发生变化才通知view重新绘制
            setSelectProgress(progress, false);
下面是一些主要的set方法,用来更新view。
      /**
     * 设置当前选中的值
     *
     * @param selectProgress 进度
     */
    public void setSelectProgress(int selectProgress)
        this.setSelectProgress(selectProgress, true);


    /**
     * 设置当前选中的值
     *
     * @param selectProgress   进度
     * @param isNotifyListener 是否通知progresschangelistener
     */
    public void setSelectProgress(int selectProgress, boolean isNotifyListener)
        getSelectProgressValue(selectProgress);
        Log.i(TAG, "mSelectProgress: " + mSelectProgress + "  mMaxProgress: " +
                mMaxProgress);
        if (mOnProgressChangeListener != null && isNotifyListener)
            mOnProgressChangeListener.onChange(mSelectProgress);

        invalidate();


    /**
     * 计算当前选中的进度条的值
     *
     * @param selectProgress 进度
     */
    private void getSelectProgressValue(int selectProgress)
        mSelectProgress = selectProgress;
        if (mSelectProgress > mMaxProgress)
            mSelectProgress = mMaxProgress;
         else if (mSelectProgress <= mStartProgress)
            mSelectProgress = mStartProgress;
自此本seekbar基本讲述完毕,观看下面源码,可以了解详细的内容,每个字段都有注释,初学者可以进行源码查看。
源码地址:https://github.com/389273716/highscalabilityseekbar
下一篇预告:
刻度盘view,支持外部倒计时控制,支持触摸移动,点击,带动画,支持配置界面元素,适配屏幕。

以上是关于自定义seekbar详解的主要内容,如果未能解决你的问题,请参考以下文章