海思3861环境搭建
Posted 耳 东
tags:
篇首语:本文由小常识网(cha138.com)小编为大家整理,主要介绍了海思3861环境搭建相关的知识,希望对你有一定的参考价值。
开发环境
ubuntu18.04
DOPI3861开发板
Q群:735884031
一.安装编译工具
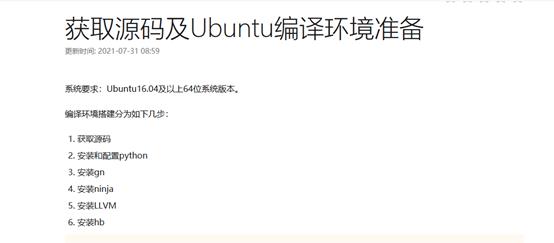
1.按照官方文档下载编译工具并添加到环境变量中
2.切换本地python / python3 环境
3861编译环境最低要求python3.7环境,先查看系统已安装的python环境
/usr/bin# ls python*
python  python2  python2.7  python3  python3.6  python3.6-config  python3.6m  python3.6m-config  python3.8  python3-config  python3m  python3m-config
笔者系统已经安装了python2.7 、python3.6 和 python3.8版本,如果有小伙伴的系统里没有安装3.8以上版本的请自行更新旧版本python或重新安装新版本的python。
先查看系统默认使用的python版本
/usr/bin# python --version
Python 2.7.17
/usr/bin# python3 --version
Python 3.6.9
这里默认使用的版本显然是不符合3861编译的要求的,接下来将系统默认的版本切换到python3.8,先建立python组添加而可选项
sudo update-alternatives --install /usr/bin/python python /usr/bin/python3.8 1 # 添加Python可选项,优先级为1
sudo update-alternatives --install /usr/bin/python3 python3 /usr/bin/python3.8 1 # 添加Python2可选项,优先级为1
执行完之后可以看到python和python3均链接到 /etc/alternatives/ 下了
/usr/bin# ls -l python*
lrwxrwxrwx 1 root root      24 8月   3 22:21 python -> /etc/alternatives/python
lrwxrwxrwx 1 root root       9 4月  16  2018 python2 -> python2.7
-rwxr-xr-x 1 root root 3633000 2月  27 23:10 python2.7
lrwxrwxrwx 1 root root      25 8月   3 22:26 python3 -> /etc/alternatives/python3
-rwxr-xr-x 2 root root 4526456 1月  26  2021 python3.6
lrwxrwxrwx 1 root root      33 1月  26  2021 python3.6-config -> x86_64-linux-gnu-python3.6-config
-rwxr-xr-x 2 root root 4526456 1月  26  2021 python3.6m
lrwxrwxrwx 1 root root      34 1月  26  2021 python3.6m-config -> x86_64-linux-gnu-python3.6m-config
-rwxr-xr-x 1 root root 5203488 2月  26 06:10 python3.8
lrwxrwxrwx 1 root root      16 10月 25  2018 python3-config -> python3.6-config
lrwxrwxrwx 1 root root      10 10月 25  2018 python3m -> python3.6m
lrwxrwxrwx 1 root root      17 10月 25  2018 python3m-config -> python3.6m-config
切换python使用版本,选择对应的python版本就可以了
/usr/bin# update-alternatives --config python
有 3 个候选项可用于替换 python (提供 /usr/bin/python)。

  选择       路径              优先级  状态
------------------------------------------------------------
  0            /usr/bin/python2.7   1         自动模式
* 1            /usr/bin/python2.7   1         手动模式
  2            /usr/bin/python3.6   1         手动模式
  3            /usr/bin/python3.8   1         手动模式

要维持当前值[*]请按<回车键>,或者键入选择的编号:3
查看下当前使用的python版本(将python3也使用同样的方式切换至3.8版本),至此python环境就搭建好了,可以安心的编译了
/usr/bin# python --version
Python 3.8.0
3.安装交叉编译链,下载sdk
交叉编译链下载:
sdk下载
https://device.harmonyos.com/cn/docs/start/get-code/sourcecode-acquire-0000001050769927
解压交叉编译链,笔者喜欢把交叉编译链放在/opt下,有其他爱好的小伙伴也可以在sdk目录下
/home/cjx/fdsk/hi3861/tools# ls
gn-linux-x86-1717.tar.gz  hcc_riscv32.tar.gz  llvm.tar.gz  ninja.1.9.0.tar
/home/cjx/fdsk/hi3861/tools# tar -zxvf hcc_riscv32.tar.gz -C /opt/
在 /etc/profile 文件的最后添加,也可以在sdk目录下新建一个shll脚本,开发前先source下该脚本
export PATH="/opt/hcc_riscv32/bin:$PATH"4.编译
解压sdk后再根目录下执行make,全编译
# ls
app  boot  build  build_patch.sh  build.sh  components  config  factory.mk  include  Makefile  non_factory.mk  output  platform  SConstruct  third_party  tools
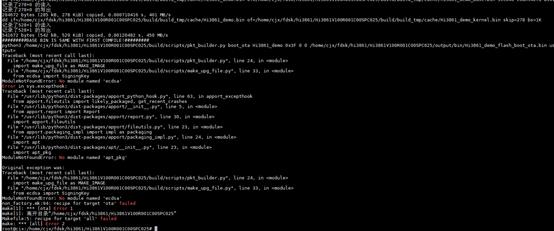
编译的过程当然不会是一帆风顺了,报错查找不到ecdsa编译工具
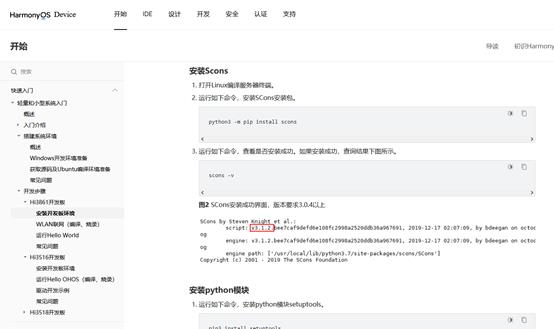
在官方文档中开发步骤,安装开发板环境中,按照文档安装python依赖库
安装完成后重新编译,编译完成
-------------/home/cjx/fdsk/hi3861/Hi3861V100R001C00SPC025/output/bin/Hi3861_demo_ota.bin image info print start-------------
[image_id=0x3c78961e][struct_version=0x0]]
[section_offset=0x280][section_len=0x55780]
[file_type=0xf0][file_version=0x0][encrypt_flag=0x42]
[file_len=0x55a00][key_len=0x120]
[file_attr=0x44]
[hash_alg=0x0][sign_alg=0x3f][sign_param=0x0]
[aes_key[0-1-14-15]=[0x0][0x0][0x0][0x0]]
[aes_iv [0-1-14-15]=[0x0][0x0][0x0][0x0]]
[common key][00]=[0x0]
[common key][01]=[0x0]
[common key][30]=[0x0]
[common key][31]=[0x0]
[common sign][00]=[0x3a]
[common sign][01]=[0xb5]
[common sign][30]=[0xa7]
[common sign][31]=[0xdf]
[section sign][00]=[0x7c]
[section sign][01]=[0x30]
[section sign][30]=[0xbc]
[section sign][31]=[0x6c]
[image_id=0x3c78961e][struct_version=0x0]]
[hash_alg=0x0][sign_alg=0x3f][sign_param=0x0]
[section_count=0x1]
[section0_compress=0x1][section0_offset=0x3c0][section0_len=0x55639]
[section1_compress=0x0][section1_offset=0x0][section1_len=0x0]
-------------/home/cjx/fdsk/hi3861/Hi3861V100R001C00SPC025/output/bin/Hi3861_demo_ota.bin image info print end--------------
< ^^^^^^^^^^^^^^^^^^^^^^^^^^^^^^^^^^^^^^^^^^^^^^^^^^^^^^^^^^^^^^^^^^^^^ >
                              BUILD SUCCESS
< ^^^^^^^^^^^^^^^^^^^^^^^^^^^^^^^^^^^^^^^^^^^^^^^^^^^^^^^^^^^^^^^^^^^^^ >
make[1]: 离开目录“/home/cjx/fdsk/hi3861/Hi3861V100R001C00SPC025”
/home/cjx/fdsk/hi3861/Hi3861V100R001C00SPC025#
5.烧录
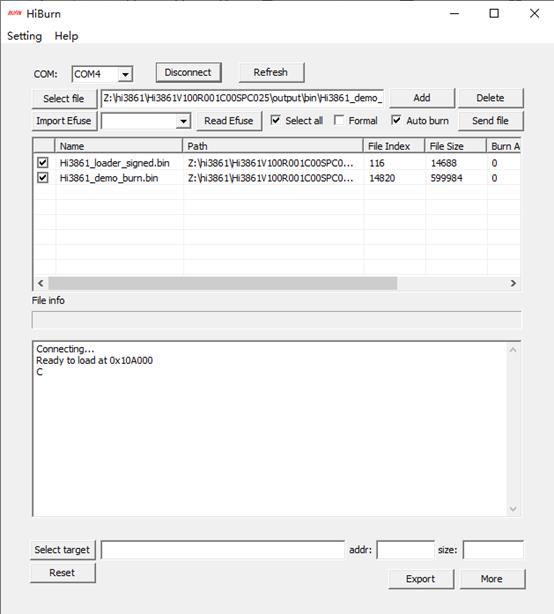
选择 output/bin/Hi3861_xxx_allinone.bin,勾选Auto burn
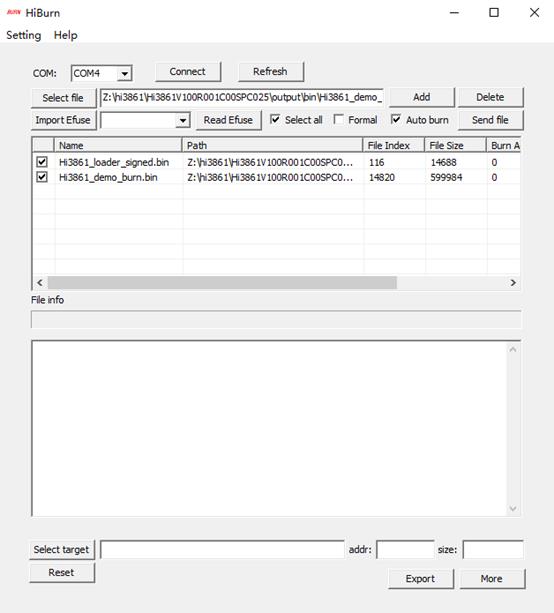
点击connect后按下开发板的复位按键,等待下载完成,下载完成后点击disconnect

5.添加helloword
在app下新建一个hello_word的文件夹,hello_word下新建一个src用于存放源代码
拷贝app/demo/app.json和SConscript到hello_word下
拷贝app/demo/src/SConscript到hello_word/src下
hello_word# tree
.
├── app.json
├── SConscript
└── src
    ├── helloword.c
    └── SConscript
修改app.json,该文件用于指定工程的源文件和头文件路径
    "TARGET_LIB": "demo",
    "APP_SRCS": [
        "src"
    ],
    "INCLUDE": [
        "components/iperf2/include",
        "config/app",
        "config/diag",
        "platform/os/Huawei_LiteOS/net/ripple/exports",
        "components/ripple/exports",
        "components/hilink/include",
        "third_party/mbedtls/include/mbedtls/",
        "include/OHOS"
    ],
    "CC_FLAGS": [
    ],
    "DEFINES": [
        "_PRE_WLAN_FEATURE_CSI",
        "_PRE_WLAN_FEATURE_P2P",
        "LWIP_ENABLE_DIAG_CMD=0"
    ],
    "AR_FLAGS": [],
    "LD_FLAGS": [],
    "AS_FLAGS": [],
    "LD_DIRS": [],
    "CLEAN": []
helloword.c文件
hi_void app_main(hi_void)

 	while(1)

		printf("hello word\\n");
		sleep(1);
SConscript文件不做修改,回到sdk的根目录下使用build.sh单独编译helloword
# ./build.sh hello_word查看output/bin目录下,生成了hello_word对应的固件
# ll
总用量 29320
drwxrwxrwx 2 root root     4096 8月   6 22:55 ./
drwxrwxrwx 3 1014 1014     4096 8月   5 22:49 ../
-rwxrwxrwx 1 root root    24576 8月   6 22:24 Hi3861_boot_signed_B.bin*
-rw-r--r-- 1 root root    23312 8月   6 22:24 Hi3861_boot_signed.bin
-rwxrwxrwx 1 root root   614820 8月   6 22:24 Hi3861_demo_allinone.bin*
-rwxrwxrwx 1 root root 13982586 8月   6 22:24 Hi3861_demo.asm*
-rwxrwxrwx 1 root root   599984 8月   6 22:24 Hi3861_demo_burn.bin*
-rwxrwxrwx 1 root root    24272 8月   6 22:24 Hi3861_demo_flash_boot_ota.bin*
-rwxrwxrwx 1 root root  2090180 8月   6 22:24 Hi3861_demo.map*
-rwxrwxrwx 1 root root   350720 8月   6 22:24 Hi3861_demo_ota.bin*
-rwxr-xr-x 1 root root  1396384 8月   6 22:24 Hi3861_demo.out*
-rwxrwxrwx 1 root root        8 8月   6 22:24 Hi3861_demo_vercfg.bin*
-rw-r--r-- 1 root root   224324 8月   6 22:55 Hi3861_hello_word_allinone.bin
-rw-r--r-- 1 root root  7575499 8月   6 22:55 Hi3861_hello_word.asm
-rw-r--r-- 1 root root   209488 8月   6 22:55 Hi3861_hello_word_burn.bin
-rw-r--r-- 1 root root    24272 8月   6 22:55 Hi3861_hello_word_flash_boot_ota.bin
-rw-r--r-- 1 root root  1900185 8月   6 22:55 Hi3861_hello_word.map
-rw-r--r-- 1 root root    99024 8月   6 22:44 Hi3861_hello_word_ota.bin
-rwxr-xr-x 1 root root   825080 8月   6 22:55 Hi3861_hello_word.out*
-rw-r--r-- 1 root root        8 8月   6 22:55 Hi3861_hello_word_vercfg.bin
-rw-r--r-- 1 root root    14688 8月   6 22:24 Hi3861_loader_signed.bin
选择Hi3861_hello_word_allinone.bin进行烧录
ready to OS start
hello word
hello word
hello word
hello word
以上是关于海思3861环境搭建的主要内容,如果未能解决你的问题,请参考以下文章