Android 实现FlowLayout流式布局(类似热门标签)
Posted 峰子_it
tags:
篇首语:本文由小常识网(cha138.com)小编为大家整理,主要介绍了Android 实现FlowLayout流式布局(类似热门标签)相关的知识,希望对你有一定的参考价值。
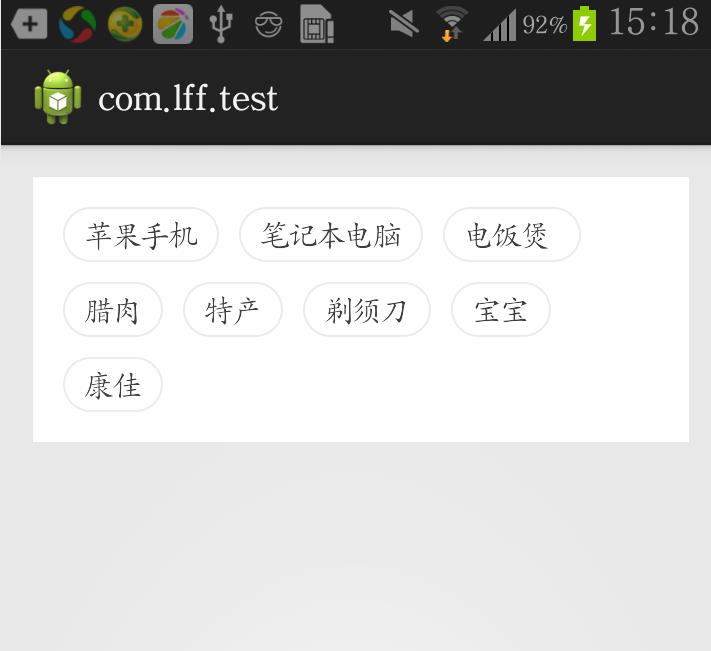
今天跟大家分享一下FlowLayout,最近项目中有遇到热门标签这个样的布局(文章末尾可下载源码),如下图:

一,创建FlowLayout并继承ViewGroup
FlowLayout 类主要实现onMeasure,onLayout和generateLayoutParams方法,具体如下看代码注释;
public class FlowLayout extends ViewGroup


    public FlowLayout(Context context, AttributeSet attrs, int defStyle)

        super(context, attrs, defStyle);


    public FlowLayout(Context context, AttributeSet attrs)

        this(context, attrs, 0);


    public FlowLayout(Context context)

        this(context, null);


    @Override
    protected void onMeasure(int widthMeasureSpec, int heightMeasureSpec)


        int sizeWidth = MeasureSpec.getSize(widthMeasureSpec);
        int modeWidth = MeasureSpec.getMode(widthMeasureSpec);
        int sizeHeight = MeasureSpec.getSize(heightMeasureSpec);
        int modeHeight = MeasureSpec.getMode(heightMeasureSpec);

        // 如果是warp_content情况下,记录宽和高
        int width = 0;
        int height = 0;

        // 记录每一行的宽度与高度
        int lineWidth = 0;
        int lineHeight = 0;

        // 得到内部元素的个数
        int cCount = getChildCount();

        for (int i = 0; i < cCount; i++)

            // 通过索引拿到每一个子view
            View child = getChildAt(i);
            // 测量子View的宽和高,系统提供的measureChild
            measureChild(child, widthMeasureSpec, heightMeasureSpec);
            // 得到LayoutParams
            MarginLayoutParams lp = (MarginLayoutParams) child
                                                                .getLayoutParams();

            // 子View占据的宽度
            int childWidth = child.getMeasuredWidth() + lp.leftMargin
                                + lp.rightMargin;
            // 子View占据的高度
            int childHeight = child.getMeasuredHeight() + lp.topMargin
                                + lp.bottomMargin;

            // 换行 判断 当前的宽度大于 开辟新行
            if (lineWidth + childWidth > sizeWidth - getPaddingLeft() - getPaddingRight())

                // 对比得到最大的宽度
                width = Math.max(width, lineWidth);
                // 重置lineWidth
                lineWidth = childWidth;
                // 记录行高
                height += lineHeight;
                lineHeight = childHeight;

            else
            // 未换行

                // 叠加行宽
                lineWidth += childWidth;
                // 得到当前行最大的高度
                lineHeight = Math.max(lineHeight, childHeight);

            // 特殊情况,最后一个控件
            if (i == cCount - 1)

                width = Math.max(lineWidth, width);
                height += lineHeight;


        setMeasuredDimension(
                                modeWidth == MeasureSpec.EXACTLY ? sizeWidth : width + getPaddingLeft() + getPaddingRight(),
                                modeHeight == MeasureSpec.EXACTLY ? sizeHeight : height + getPaddingTop() + getPaddingBottom()//
        );


    /**
     * 存储所有的View
     */
    private List<List<View>>    mAllViews   = new ArrayList<List<View>>();
    /**
     * 每一行的高度
     */
    private List<Integer>       mLineHeight = new ArrayList<Integer>();

    @Override
    protected void onLayout(boolean changed, int l, int t, int r, int b)

        mAllViews.clear();
        mLineHeight.clear();

        // 当前ViewGroup的宽度
        int width = getWidth();

        int lineWidth = 0;
        int lineHeight = 0;

        // 存放每一行的子view
        List<View> lineViews = new ArrayList<View>();

        int cCount = getChildCount();

        for (int i = 0; i < cCount; i++)

            View child = getChildAt(i);
            MarginLayoutParams lp = (MarginLayoutParams) child
                                                                .getLayoutParams();

            int childWidth = child.getMeasuredWidth();
            int childHeight = child.getMeasuredHeight();

            // 如果需要换行
            if (childWidth + lineWidth + lp.leftMargin + lp.rightMargin > width - getPaddingLeft() - getPaddingRight())

                // 记录LineHeight
                mLineHeight.add(lineHeight);
                // 记录当前行的Views
                mAllViews.add(lineViews);

                // 重置我们的行宽和行高
                lineWidth = 0;
                lineHeight = childHeight + lp.topMargin + lp.bottomMargin;
                // 重置我们的View集合
                lineViews = new ArrayList<View>();

            lineWidth += childWidth + lp.leftMargin + lp.rightMargin;
            lineHeight = Math.max(lineHeight, childHeight + lp.topMargin
                                                + lp.bottomMargin);
            lineViews.add(child);

        // for end
            // 处理最后一行
        mLineHeight.add(lineHeight);
        mAllViews.add(lineViews);

        // 设置子View的位置

        int left = getPaddingLeft();
        int top = getPaddingTop();

        // 行数
        int lineNum = mAllViews.size();

        for (int i = 0; i < lineNum; i++)

            // 当前行的所有的View
            lineViews = mAllViews.get(i);
            lineHeight = mLineHeight.get(i);

            for (int j = 0; j < lineViews.size(); j++)

                View    child = lineViews.get(j);
                // 判断child的状态
                if (child.getVisibility() == View.GONE)

                    continue;


                MarginLayoutParams lp = (MarginLayoutParams) child
                                                                    .getLayoutParams();

                int lc = left + lp.leftMargin;
                int tc = top + lp.topMargin;
                int rc = lc + child.getMeasuredWidth();
                int bc = tc + child.getMeasuredHeight();

                // 为子View进行布局
                child.layout(lc, tc, rc, bc);

                left += child.getMeasuredWidth() + lp.leftMargin
                        + lp.rightMargin;

            left = getPaddingLeft();
            top += lineHeight;


    /**
     * 与当前ViewGroup对应的LayoutParams
     */
    @Override
    public LayoutParams generateLayoutParams(AttributeSet attrs)

        return new MarginLayoutParams(getContext(), attrs);
二,在MainActivity调用实现
public class MainActivity extends ActionBarActivity
    private String[] mVals = new String[]  "苹果手机", "笔记本电脑", "电饭煲 ", "腊肉",
            "特产", "剃须刀", "宝宝", "康佳" ;
    private LayoutInflater mInflater;
    private FlowLayout mFlowLayout;

    @Override
    protected void onCreate(Bundle savedInstanceState)
        super.onCreate(savedInstanceState);
        setContentView(R.layout.activity_main);
        mInflater = LayoutInflater.from(this);
        mFlowLayout = (FlowLayout) findViewById(R.id.id_flowlayout);
        initData();

    public void initData()
        /**
         * 找到搜索标签的控件
         */
        for (int i = 0; i < mVals.length; i++)
            TextView tv = (TextView) mInflater.inflate(
                    R.layout.search_label_tv, mFlowLayout, false);
            tv.setText(mVals[i]);
            final String str = tv.getText().toString();
            //点击事件
            tv.setOnClickListener(new OnClickListener()
                @Override
                public void onClick(View v)


            );
            mFlowLayout.addView(tv);//添加到父View
1,MainActivity的xml布局
注意 布局当中的com.example.com.lff.test.FlowLayout
activity_main.xml
<RelativeLayout xmlns:android="http://schemas.android.com/apk/res/android"
    xmlns:tools="http://schemas.android.com/tools"
    android:layout_width="match_parent"
    android:layout_height="match_parent"
    android:paddingBottom="@dimen/activity_vertical_margin"
    android:paddingLeft="@dimen/activity_horizontal_margin"
    android:paddingRight="@dimen/activity_horizontal_margin"
    android:paddingTop="@dimen/activity_vertical_margin"
    tools:context="com.example.com.lff.test.MainActivity" >

    <TextView
        android:layout_width="wrap_content"
        android:layout_height="wrap_content"
        android:text="@string/hello_world" />
    <com.example.com.lff.test.FlowLayout
          android:id="@+id/id_flowlayout"
                android:layout_width="fill_parent"
                android:layout_height="wrap_content"
                android:background="#FFFFFF"
                android:padding="10dp" >
    </com.example.com.lff.test.FlowLayout>
</RelativeLayout>
2,单个标签空间的布局,也就是上述Activity中的search_label_tv.xml
search_label_tv
<?xml version="1.0" encoding="utf-8"?>
<TextView xmlns:android="http://schemas.android.com/apk/res/android"
    android:layout_width="wrap_content"
    android:layout_height="wrap_content"
    android:layout_margin="5dp"
    android:textColor="#3f3e3e"
    android:background="@drawable/search_label_bg"
    android:textSize="14sp"
    android:text="Helloworld" >

</TextView>
结束语:简单,清晰,明了。欢迎大家指正吐槽。
源码奉上!!!
点击下载源码
以上是关于Android 实现FlowLayout流式布局(类似热门标签)的主要内容,如果未能解决你的问题,请参考以下文章
Android view的测绘练习-流式布局-FlowLayout
text Android的流式布局的FlowLayout,一款针对标签的布局