Nginx + tomcat + Memcached(session共享)
Posted
tags:
篇首语:本文由小常识网(cha138.com)小编为大家整理,主要介绍了Nginx + tomcat + Memcached(session共享)相关的知识,希望对你有一定的参考价值。
Nginx + tomcat + Memcached(session共享)
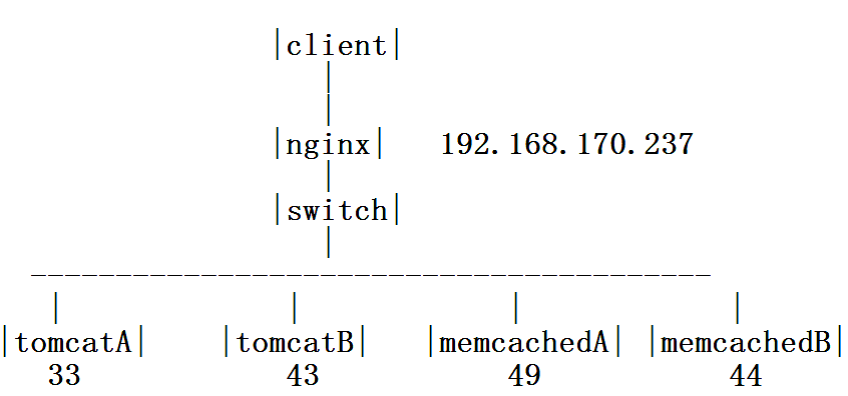
实验拓扑
nginx 实现负载
tomcat 实现web功能
memcached 实现会话共享
安装Nginx
[[email protected] ~]# yum -y install pcre pcre-devel
[[email protected] ~]# tar -zxvf nginx-1.0.5.tar.gz
[[email protected] ~]# cd nginx-1.0.5
[[email protected] nginx-1.0.5]# ./configure --prefix=/usr/local/nginx --with-pcre
[[email protected] nginx-1.0.5]# make
[[email protected] nginx-1.0.5]# make install
配置Nginx
[[email protected] ~]# ls -Z /var/ftp/rt.txt
upstream tomcatgrp {
server 192.168.170.33:8080;
server 192.168.170.43:8080;
}
server {
listen 80;
server_name nginx.tutu.com;
location / {
root html;
index index.html
index.htm;
proxy_pass http://tomcatgrp;
}
}
启动Nginx
[[email protected] ~]# /usr/local/nginx/sbin/nginx –t
nginx: ...... /usr/local/nginx/conf/nginx.conf syntax is ok
nginx: ...... /usr/local/nginx/conf/nginx.conf test is successful
[[email protected] ~]# /usr/local/nginx/sbin/nginx -c /usr/local/nginx/conf/nginx.conf
安装jdk
[[email protected] ~]# chmod +x jdk-6u27-linux-i586.bin
[[email protected] ~]# ./jdk-6u27-linux-i586.bin
[[email protected] ~]# mv jdk1.6.0_27 /usr/local/jdk
[[email protected] ~]# vim /etc/bashrc //定义环境变量
export JAVA_HOME=/usr/local/jdk
export JAVA_BIN=/usr/local/jdk/bin
export PATH=$JAVA_HOME/bin:$PATH
export CLASSPATH=.:$JAVA_HOME/lib/dt.jar:$JAVA_HOME/lib/tools.jar
export JAVA_HOME JAVA_BIN PATH CLASSPATH
[[email protected] ~]# source /etc/bashrc //初始化环境变量
验证jdk
[[email protected] ~]# java -version
java version "1.6.0_27"
Java(TM) SE Runtime Environment (build 1.6.0_27-b07)
Java HotSpot(TM) Client VM (build 20.2-b06, mixed mode, sharing)
[[email protected] ~]#
启动tomcat
[[email protected] ~]# /usr/local/tomcat/bin/shutdown.sh //停止tomcat
[[email protected] ~]# /usr/local/tomcat/bin/startup.sh //启动tomcat
Using CATALINA_BASE: /usr/local/tomcat
Using CATALINA_HOME: /usr/local/tomcat
Using CATALINA_TMPDIR: /usr/local/tomcat/temp
Using JRE_HOME: /usr/local/jdk
Using CLASSPATH: /usr/local/tomcat/bin/bootstrap.jar
[[email protected] ~]# netstat -utnalp | grep :8080 //监听端口
tcp 0 0 :::8080 :::* LISTEN 3181/java
[[email protected] ~]#
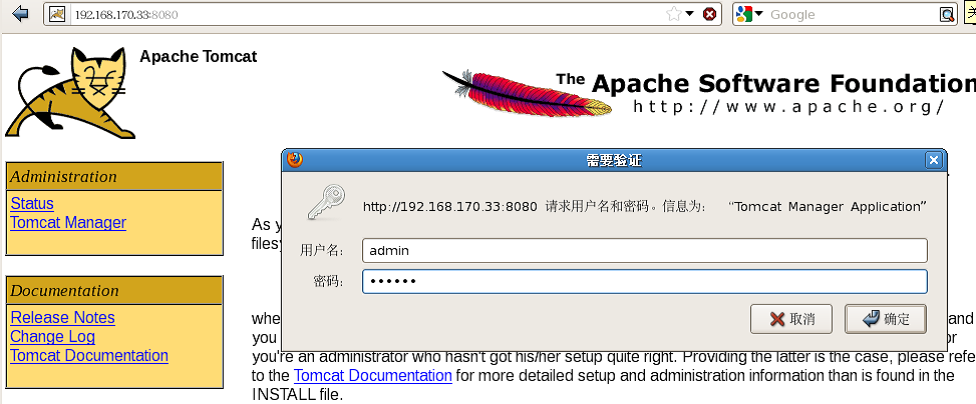
配置验证用户
[[email protected] ~]# vim /usr/local/tomcat/conf/tomcat-users.xml
<tomcat-users>
<role rolename="manager"/>
<user username="admin" password="123456" roles="manager"/> //用户身份:manager
</tomcat-users>
[[email protected] ~]# /usr/local/tomcat/bin/shutdown.sh
[[email protected] ~]# /usr/local/tomcat/bin/startup.sh
访问tomcat
编写网页文件
[[email protected] ~]# vim /usr/local/tomcat/webapps/ROOT/test.jsp
<html>
<body bgcolor=“red”> //指定网页背景颜色
<center>
<%= request.getSession().getId() %> //获取sessionID
<h1>tomcatA 33</h1>
</center>
</body>
</html>
[[email protected] ~]#
测试nginx负载均衡
http://192.168.170.33:8080/test.jsp
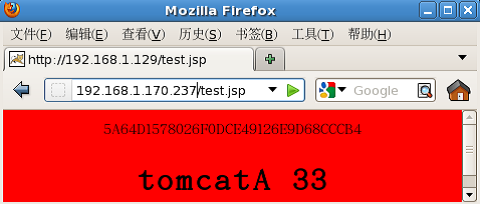
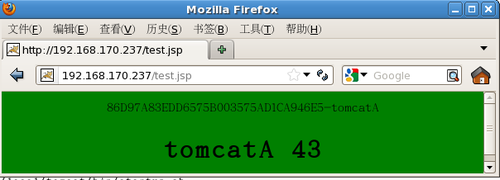
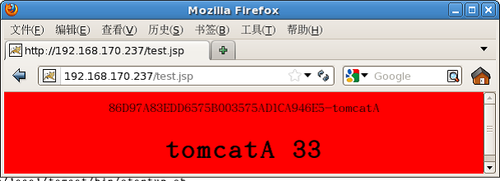
每刷新一次就会访问到不同的tomcat上,但会话ID不一样,下面就解决会话ID不同的问题
在tomcat上部署msm
[[email protected] session]# ls
kryo-1.04.jar memcached-session-manager-1.5.1.jar msm-kryo-serializer-1.5.1.jar
kryo-serializers-0.9.jar memcached-session-manager-tc6-1.5.1.jar reflectasm-1.01.jar
memcached-2.5.jar minlog-1.2.jar
[[email protected] session]# cp *.jar /usr/local/tomcat/lib/
连接memcached
[[email protected] ~]# vim /usr/local/tomcat/conf/context.xml
</Context>
<Manager className="de.javakaffee.web.msm.MemcachedBackupSessionManager" memcachedNodes=“memA:192.168.170.44:11211,memB:192.168.170.49:11211" failoverNodes=“memB“ //指定memB为备用服务器
REQUESTuRILGNOREpATTERN=".*\(ico|png|gif|jpg|css|js)$" transcoderFactoryClass="de.javakaffee.web.msm.serializer.kryo.KryoTranscoderFactory" /> </Context>
[[email protected] ~]# /usr/local/tomcat/bin/shutdown.sh
[[email protected] ~]# /usr/local/tomcat/bin/startup.sh
安装事件库
[[email protected] ~]# tar –zxvf libevent-2.0.15-stable.tar.gz
[[email protected] ~]# cd libevent-2.0.15-stable
[[email protected] libevent-2.0.15-stable]# ./configure
[[email protected] libevent-2.0.15-stable]# make
[[email protected] libevent-2.0.15-stable]# make install
[[email protected] ~]# echo "/usr/local/lib" > /etc/ld.so.conf.d/libevent.conf
[[email protected] ~]# ldconfig //更新链接库
安装memcached
[ro[email protected] ~]# tar -zxvf memcached-1.4.5.tar.gz
[[email protected] ~]# cd memcached-1.4.5
[[email protected] memcached-1.4.5]# ./configure
[[email protected] memcached-1.4.5]# make
[[email protected] memcached-1.4.5]# make install
[[email protected] ~ ]# /usr/local/bin/memcached -l 192.168.170.44 -p 11211 -u root -m 200 -c 150 -n 10 -f 1.5 -vvv -d //启动
测试memcached
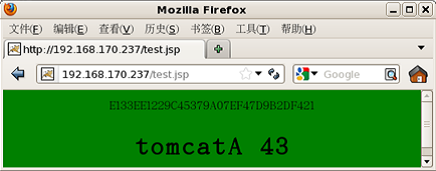
如下图可见,实现负载的同时,会话ID也一样了,说明实现了会话共享
本文出自 “Dave-技术博客” 博客,请务必保留此出处http://davewang.blog.51cto.com/6974997/1857081
以上是关于Nginx + tomcat + Memcached(session共享)的主要内容,如果未能解决你的问题,请参考以下文章
haproxy+nginx+tomcat+memcache实现动静分离会话同步集群
