使用IBM Cloud Schematics部署云资源
Posted koolincn
tags:
篇首语:本文由小常识网(cha138.com)小编为大家整理,主要介绍了使用IBM Cloud Schematics部署云资源相关的知识,希望对你有一定的参考价值。
本文将介绍如何使用IBM Cloud Schematics的强大工具来构建和加速IBM云环境,自动化云资源操作,安装软件,并在云资源上运行多层应用程序。
IBM Cloud Schematics的底层是使用Terraform和Ansible来进行基础架构资源的部署的,提供了Terraform-as-a-Service服务。通过使用Terraform中的IBM Cloud Provider plug-in快速部署并启动一个可运行在多区域的多层应用。您可以指定所需的云资源,并查看IBM Cloud Schematics的供应状态、更新、扩展和删除IBM云资源。
在Schematics中使用Ansible playbooks构建、更新、扩展和删除多层应用程序和应用程序运行时环境。您还可以使用Ansible为应用程序设置连续部署管道或自动化云资源操作。以及使用我们的软件目录中的模板,在IBM云群集上的IBM Cloud Kubernetes服务或Red Hat OpenShift或其他IBM云资源中安装IBM和第三方的软件。
完成文中所述操作需要具备的先决条件如下:
IBM Cloud的账号(有操作和部署经典环境和VPC环境下虚拟机的权限)
注:(对云资源的部署将会产生一定的费用)
IBM Cloud Schematics模板是一组文件,用于定义要创建、更新或删除的IBM Cloud的资源。创建指向模板的Schematics工作区,并使用Terraform的IBM Cloud Provider插件的内置功能来提供IBM云资源。本文我们将使用Schematics创建一套包含经典架构环境下的虚拟机和VPC环境下虚拟机的应用场景。
由于我们的环境需要部署经典架构下的虚拟机,所以我们需要获取经典基础架构下的用户名和API key,用于部署经典架构下的虚拟机,而VPC环境下的虚拟机则是直接继承当前用户的权限进行资源的部署。
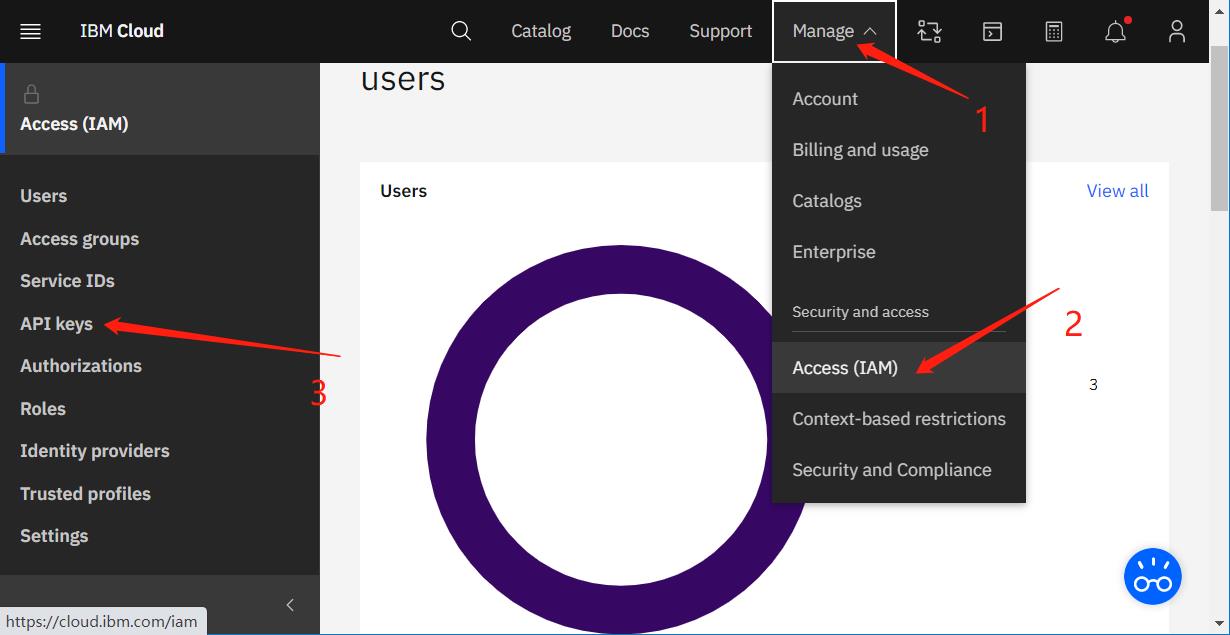
如下图所示,按步骤点开相应菜单,获取APIkey
选到“Classic Infrastructure API Keys“如下图
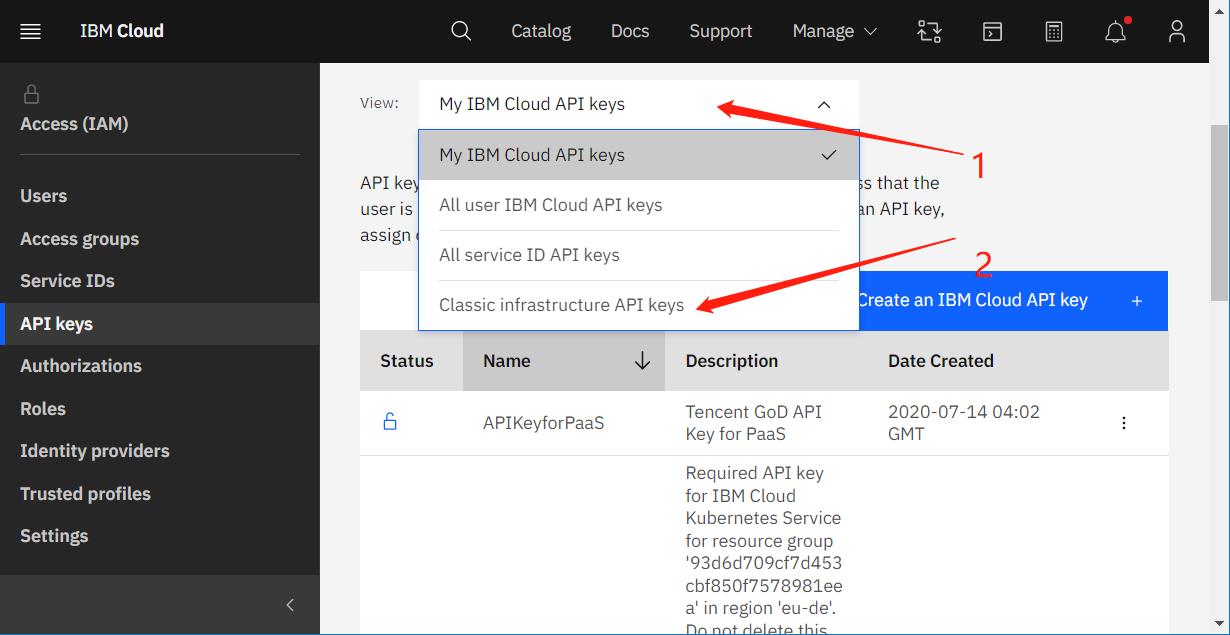

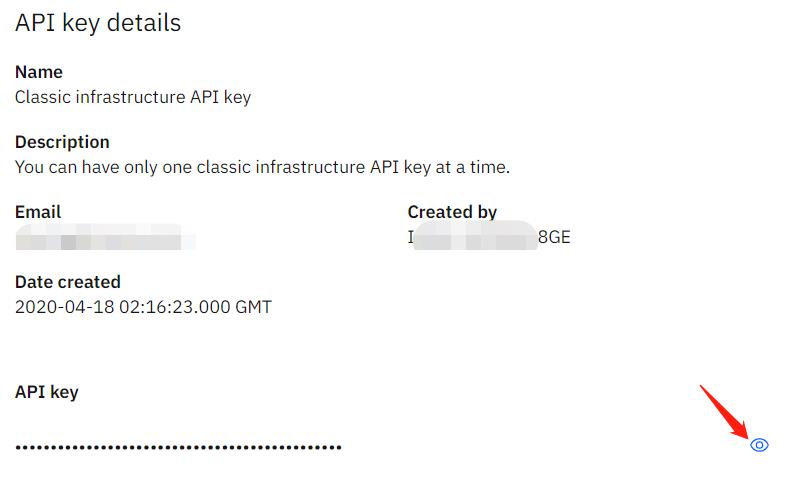
若之前还没有创建过经典基础架构的API key,可以点击创建即可。
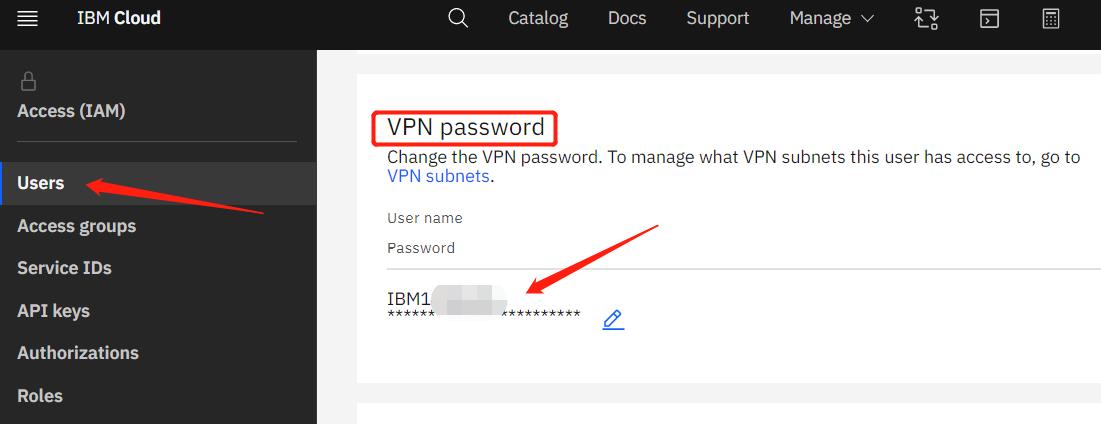
用户名可在Users下面,点选具体用户名进入用户详细页面后,滚动到下面“VPN password”区域处查看,如图所示:
准备好之后,我们需要再准备我们的Terraform Code,这也是IBM Cloud Schematics的核心部分,采用Infrastructure as Code的方式,对资源进行部署。
我这里将Terraform的代码存储在Github仓库,这里相关Terraform Code的主要文件有几个:
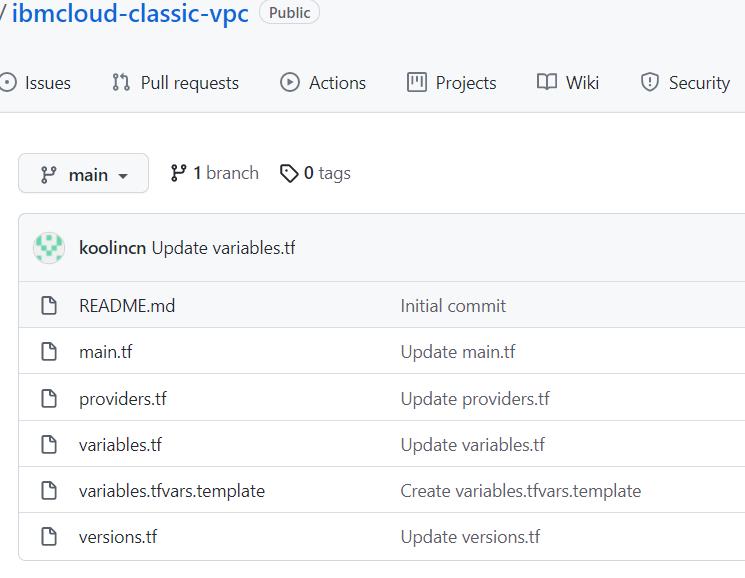
README.md – 我们可以将我们这个代码库里面的Code所作的事情做一个详细的描述,对初始化环境的要求做一个详细的描述,以方便用户了解你这个代码的用途和如何使用。
main.tf – 主要的资源定义
providers.tf – 定义云环境,提供用户和API key等等,当然这些也都可以放到main.tf文件里面,但是为了代码的可读性和后期的管理,还是建议分门别类的存放不同类型,不同用途的Code。
variables.tf – 定义了部署资源过程中,需要用到和输入的变量
versions.tf – 对Terraform版本的指定
当然,我们还可以有更多的一些自己的文件,其中,上面提到的文件也不一定每个都必须要有(像providers.tf;versions.tf可以没有)。
我们先来看一下providers.tf文件的内容:
provider "ibm"
  region           = var.region
  generation       = 2
  iaas_classic_username = var.iaas_classic_username
  iaas_classic_api_key  = var.iaas_classic_api_key
  ibmcloud_timeout = var.ibmcloud_timeout
这里定义需要在哪个Cloud上部署资源,我们这里的是IBM Cloud,你也可以是其他Cloud环境。然后是部署到哪个区域(这个是指定VPC资源部署的区域),再后面的iaas_clasic_username和apikey这两个变量用于部署经典基础架构的资源时使用。如果我们没有经典基础架构下的资源需要部署,这两个变量可以不需要。
我们再来看下variables.tf的内容:
variable "ibmcloud_timeout"
  description = "Timeout for API operations in seconds."
  default     = 3600


variable "iaas_ssh_key"
  description = "Classic environment SSH public Key"
  default = "ssh public key detail information"


variable "iaas_ssh_label"
  description = "Classic environment SSH's Label"
  default = "ClassicSSHKey"


variable "iaas_ssh_notes"
  description = "Classic environment SSH Notes"
  default = "IaaS SSH Notes"


variable "iaas_classic_username"
  description = "Please provide the IBM Cloud User ID, if you want to create classic resources such as BMS or VSIs"

variable "iaas_classic_api_key"
  description = "This is the IBM Cloud User ID's Infrastructure API Key"


variable "vpc_name"
  description = “Give the name of the VPC will be created.”


variable "basename"
  description = "Prefix used for all resource names in the VPC environment"


variable "region"
  default = "us-south"
  description = "Where the VPC will be created, such as us-south; us-east; jp-tok; jp-osa etc"


variable "subnet_zone"
  default = "us-south-1"
  description = "subnets within the VPC will be created"


variable "ssh_keyname"
  default = ""
  description = "The sshkey name tat will be used to create vsis in the VPC. Required for users to specify."


variable vpc_instance_count
  default = 1


variable "vpc_vsi_instance_name"
  default     = "my-test"
  description = "The name of the virtual server instance in the VPC. Required for users to specify."

variable "vpc_vsi_profile"
  default     = "cx2-2x4"
  description = "The profile of compute CPU and memory resources to use when creating the virtual server instance in VPC. To list available profiles, run the `ibmcloud is instance-profiles` command."


variable "baremetal_hostname"
  default = "bms-demo"
  description = "The name of the Bare Metal server in the Classic environment. Required for users to specify."


variable "vsi_hostname"
  default = "vsi-demo"
  description = "The name of the virtual server instance in the Classic environment. Required for users to specify."


variable "computers_datacenter"
  default = "dal12"
  description = "The DataCenter where the classic VSI will be created"
这个文件定义各个变量,我们可以给某些变量设置一些默认值,当然这些值在后面部署前也可以由用户修改。
然后我们再看一下main.tf文件,这里定义我们需要在云环境中交付的资源:
data "ibm_is_image" "ds_image"
  name = "ibm-centos-7-6-minimal-amd64-2"


data "ibm_is_ssh_key" "ds_key"
  name = var.ssh_keyname


data "ibm_resource_group" "group"
  is_default = "true"


resource "ibm_compute_ssh_key" "ssh_key"
  label      = "$var.iaas_ssh_label"
  notes      = "$var.iaas_ssh_notes"
  public_key = "$var.iaas_ssh_key"


resource "ibm_is_vpc" "vpc"
  name           = var.vpc_name
  resource_group = data.ibm_resource_group.group.id


resource "ibm_is_security_group" "sg1"
  name = "$var.basename-sg1"
  vpc  = ibm_is_vpc.vpc.id


# allow all incoming ping
resource "ibm_is_security_group_rule" "ingress_imp"
  group     = ibm_is_security_group.sg1.id
  direction = "inbound"
  remote    = "0.0.0.0/0"

  icmp
    type = 8


# allow all incoming network traffic on port 22
resource "ibm_is_security_group_rule" "ingress_ssh_all"
  group     = ibm_is_security_group.sg1.id
  direction = "inbound"
  remote    = "0.0.0.0/0"

  tcp
    port_min = 22
    port_max = 22


# allow all incoming network traffic on port 80
resource "ibm_is_security_group_rule" "ingress_web_all"
  group     = ibm_is_security_group.sg1.id
  direction = "inbound"
  remote    = "0.0.0.0/0"

  tcp
    port_min = 80
    port_max = 80


# allow all incoming network traffic on port 443
resource "ibm_is_security_group_rule" "ingress_secweb_all"
  group     = ibm_is_security_group.sg1.id
  direction = "inbound"
  remote    = "0.0.0.0/0"

  tcp
    port_min = 443
    port_max = 443


# allow all incoming network traffic on port 3306 (mysql port)
resource "ibm_is_security_group_rule" "ingress_db_all"
  group     = ibm_is_security_group.sg1.id
  direction = "inbound"
  remote    = "0.0.0.0/0"

  tcp
    port_min = 3306
    port_max = 3306


# allow all outcoming network traffic on port 80
resource "ibm_is_security_group_rule" "egress_all_web"
  group     = ibm_is_security_group.sg1.id
  direction = "outbound"

  tcp
    port_min = 80
    port_max = 80


resource "ibm_is_security_group_rule" "egress_all_secweb"
  group     = ibm_is_security_group.sg1.id
  direction = "outbound"

  tcp
    port_min = 443
    port_max = 443


resource "ibm_is_security_group_rule" "egress_all_dns_tcp"
  group     = ibm_is_security_group.sg1.id
  direction = "outbound"

  tcp
    port_min = 53
    port_max = 53


resource "ibm_is_security_group_rule" "egress_all_dns_udp"
  group     = ibm_is_security_group.sg1.id
  direction = "outbound"

  udp
    port_min = 53
    port_max = 53


resource "ibm_is_security_group_rule" "egress_all_range"
  group     = ibm_is_security_group.sg1.id
  direction = "outbound"

  tcp
    port_min = 1024
    port_max = 32768


resource "ibm_is_public_gateway" "cloud"
  vpc   = ibm_is_vpc.vpc.id
  name  = "$var.basename-pubgw"
  zone  = var.subnet_zone


resource "ibm_is_vpc_address_prefix" "vpc_address_prefix"
  name = "$var.basename-prefix"
  zone = var.subnet_zone
  vpc  = ibm_is_vpc.vpc.id
  cidr = "192.168.0.0/24"


resource "ibm_is_subnet" "subnet"
  name            = "$var.basename-subnet"
  vpc             = ibm_is_vpc.vpc.id
  zone            = var.subnet_zone
  resource_group  = data.ibm_resource_group.group.id
  public_gateway  = ibm_is_public_gateway.cloud.id
  ipv4_cidr_block = ibm_is_vpc_address_prefix.vpc_address_prefix.cidr


resource "ibm_is_instance" "instance"
  count          = var.vpc_instance_count
  name           = "$var.vpc_vsi_instance_name-$count.index"
  vpc            = ibm_is_vpc.vpc.id
  zone           = var.subnet_zone
  profile        = var.vpc_vsi_profile
  image          = data.ibm_is_image.ds_image.id
  keys           = [data.ibm_is_ssh_key.ds_key.id]
  resource_group = data.ibm_resource_group.group.id

  primary_network_interface
    subnet = ibm_is_subnet.subnet.id
    security_groups = [ibm_is_security_group.sg1.id]


resource "ibm_is_floating_ip" "fip1"
  name   = "$var.basename-fip1"
  target = ibm_is_instance.instance[0].primary_network_interface[0].id


output "sshcommand"
  value = "ssh root@$ibm_is_floating_ip.fip1.address"


/* Feild to Edit transit gateway */
# resource "ibm_tg_gateway" "new_tg_gw"
#  name = "tg_demo"
#  location = var.region
#  global = true
#  resource_group = data.ibm_resource_group.group.id
#
# resource "ibm_tg_connection" "ibm_tg_vpc_connection"
#  gateway = ibm_tg_gateway.new_tg_gw.id
#  network_type = "vpc"
#  name = "vpc_tg"
#  network_id = ibm_is_vpc.vpc.resource_crn
#
# Classic transit gate connect need VRF enabled
# resource "ibm_tg_connection" "ibm_tg_clasic_connection"
#  gateway = ibm_tg_gateway.new_tg_gw.id
#  network_type = "classic"
#  name = "classic_tg"
#

/* Feilds to Edit while provisioning Virtual Machine */

 resource "ibm_compute_vm_instance" "vsi-provisions"
  hostname = "$var.vsi_hostname"
  domain = "zhutingsh.com"
  network_speed = 1000
  hourly_billing = true
  os_reference_code = "CENTOS_7_64"
  cores = 1
  memory = 2048
  disks = [25]
  local_disk = false
  datacenter = "$var.computers_datacenter"
  private_network_only = false
  ssh_key_ids = ["$ibm_compute_ssh_key.ssh_key.id"]


/* Feilds to Edit while provisioning Bare Metal */

# resource "ibm_compute_bare_metal" "bm-provisions"
#  hostname = "$var.baremetal_hostname"
#  domain = "zhutingsh.com"
#  network_speed = 1000
#  hourly_billing = true
#  os_reference_code = "UBUNTU_20_64"
#  fixed_config_preset = "1U_1270_V6_2X2TB_NORAID"
#  datacenter = "$var.computers_datacenter"
#  private_network_only = false
#
# output "classic_bms_ips"
#   value = "ibm_compute_bare_metal.bm-provisions.public_ipv4_address"
#
 output "classic_vsi_ips"
   value = ibm_compute_vm_instance.vsi-provisions.ipv4_address
这里我们先是创建了一个VPC环境,然后再VPC里面创建了一个Server,Server的系统,大小,配置我们通过“data "ibm_is_image" "ds_image"”和variable 中的"vpc_vsi_profile" 来确定, 我们在变量定义的时候设置了默认值 default = "cx2-2x4"。接下来创建对应的安全组,公共网关,再绑定到我们创建的VPC虚拟实例上。后面再创建浮动外网IP,Bind到VPC的虚拟实例,使得我们VPC中的虚拟机可以被外网用户访问。之前的公共网关用于VPC中整个子网的外网访问(也就是说在这个绑定了公共网关的子网中的所有虚拟实例都可以通过这个公共网关连上互联网,进行一些软件包的下载等等。这个公共网关我们可以简单的理解成我们家里的路由器),而浮动IP是给外面的用户一个可访问到VPC中该实例的一个对外地址。
最后面我们创建了一个经典基础架构下的虚拟机,在经典基础架构下的虚拟机的配置我们是直接在这里进行定义的,当然我们也可以用变量的形式传入。这里,很多读者也许会问,这些需要输入/传入的值我要如何填写,又是在哪里可以查到。推荐大家看下我之前有关如何使用IBM CLI的几篇文章,在那里我有简单说明。(https://blog.csdn.net/koolincn/article/details/104492312)
我们看到,在代码的最后部分,我有几块区域的注释,这里是创建了一个“交换网关“,这个是用于经典基础架构下的资源与VPC环境里面的实例通过IBM Cloud内网进行通讯的一个交换网关,也是不同区域的VPC之间进行内部通讯需要用到的网关。以及进行物理机的部署。
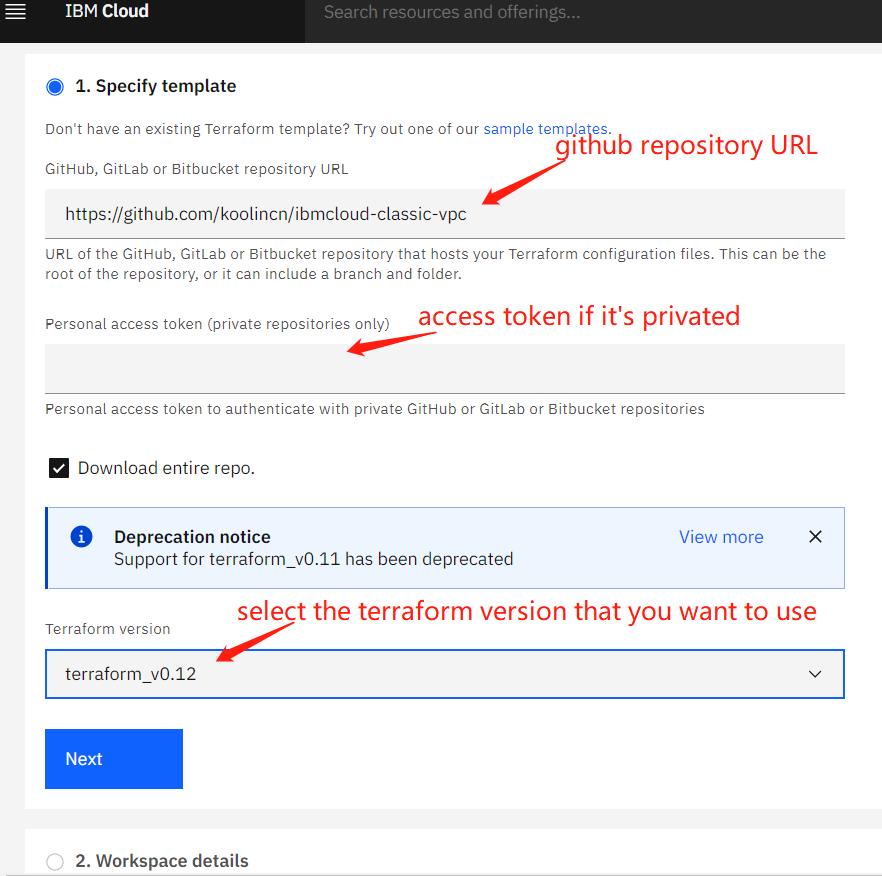
准备好代码之后,我们就可以开始用Schematics对资源进行部署了。打开Schematics创建配置界面:


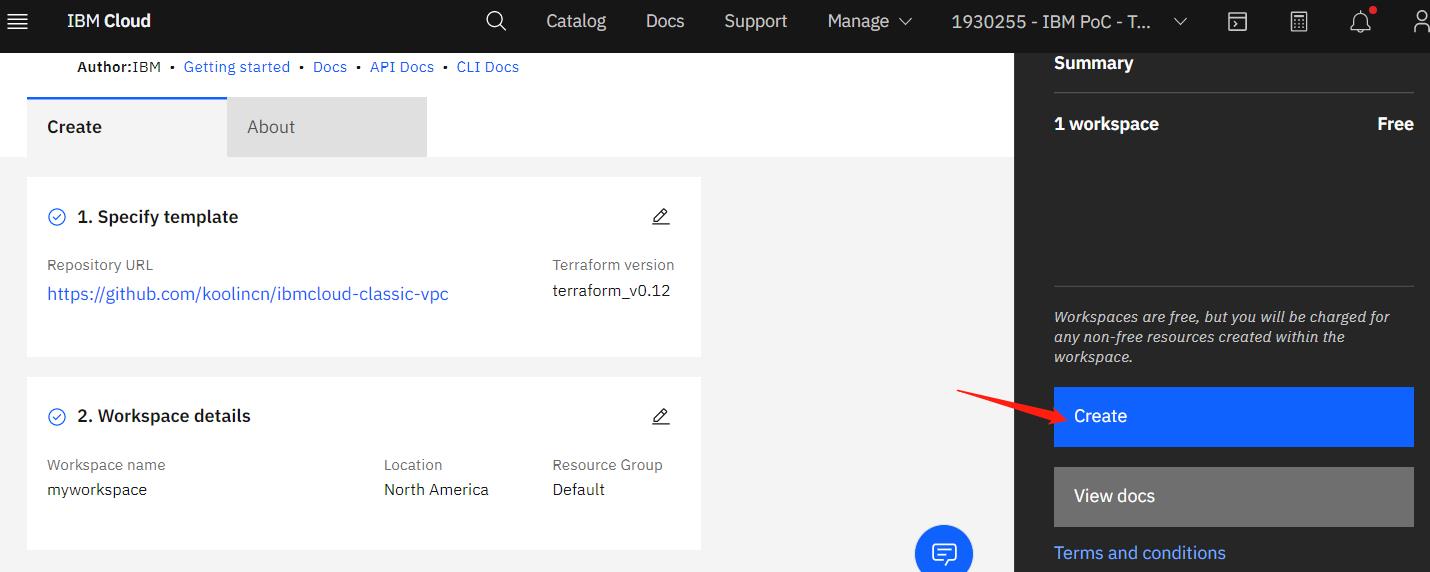
输入Terraform代码的URL,访问令牌(如果需要的话,通常如果允许public访问的话,这里不需要输入),期望使用的Terraform的版本,然后点击继续,输入workspace name,选择Schematics运行location等等。

最后点击“创建”,之后Schematics会加载Terraform整个代码。
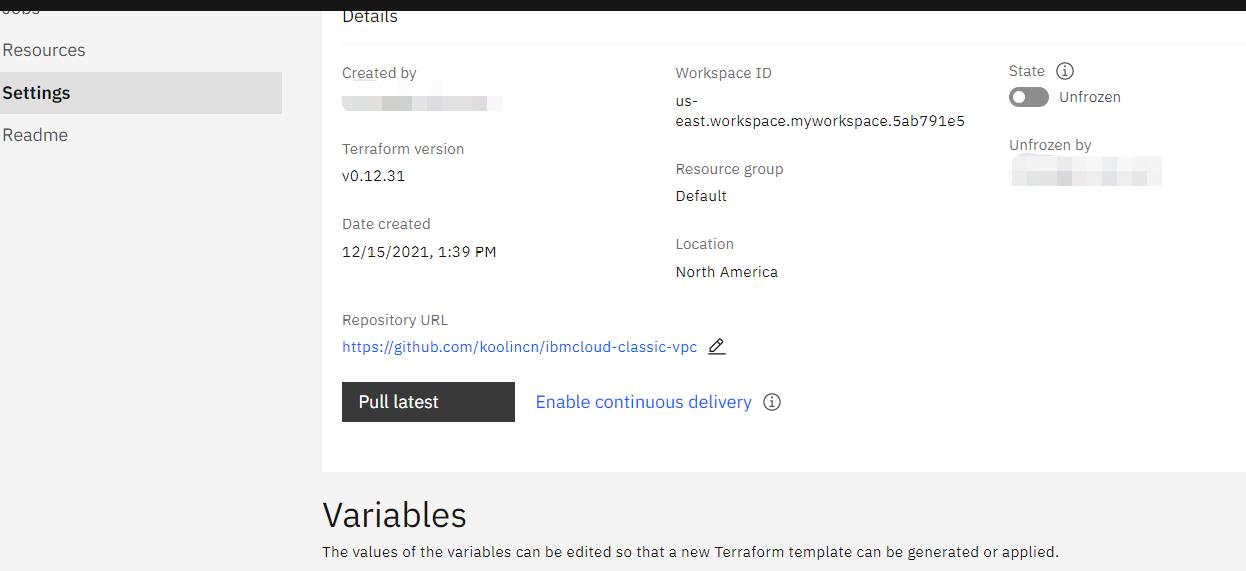
在下面Variables区域输入完相应的变量值之后,就可以点击上方的生成计划了,这个步骤是验证输入的数据和代码段中是否存在错误。

如果存在错误,可以在log窗口查看详细信息,以帮助我们定位问题并修正。

等待生成计划成功后,我们就可以执行计划,生成我们需要的云资源了。

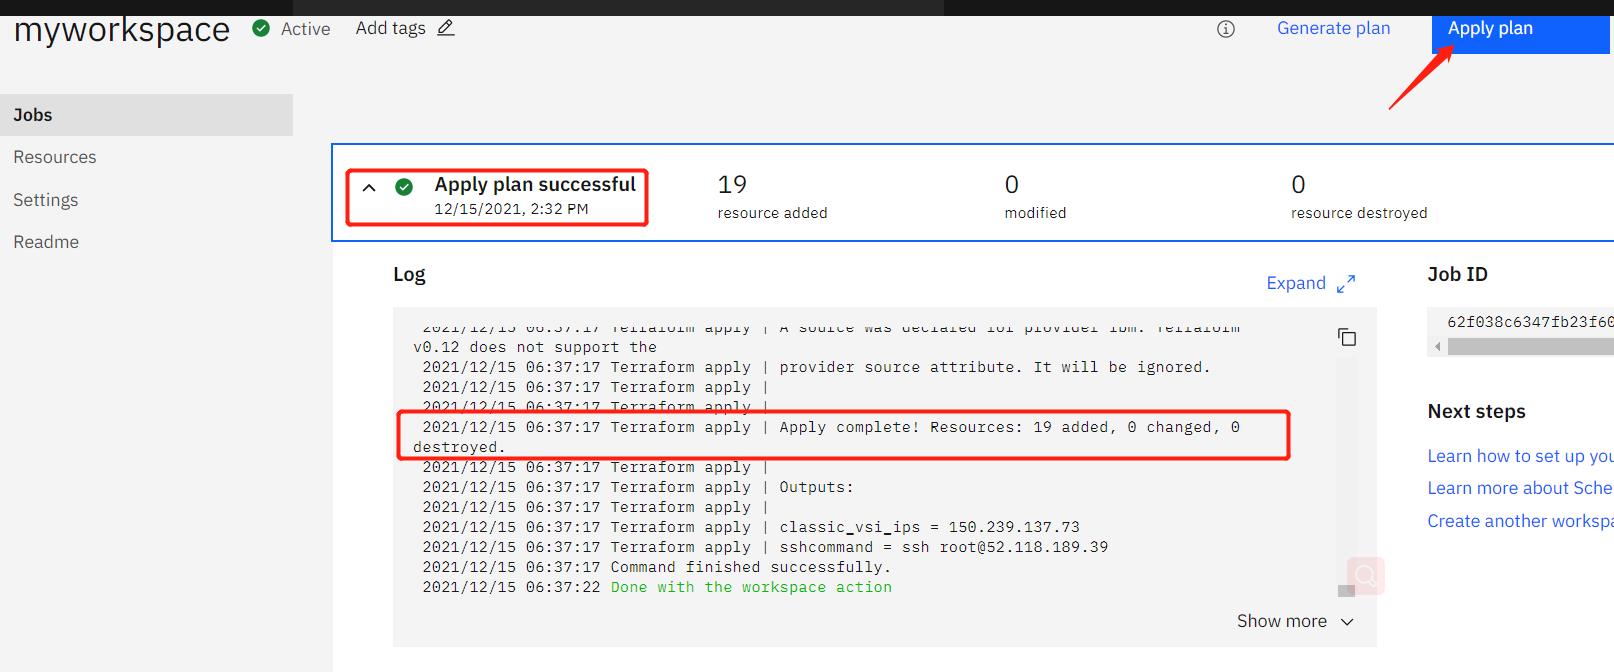
至此,我们的资源成功创建完成,期间,共有19个resource被创建,包括安全组,安全组里的规则,VPC,虚拟机等等。若中间有的资源创建失败,我们也不必要将环境删除,再重新来过,Schematics会记住我们已经创建成功的Resource,在我们修正完代码中的错误后,再次点击执行计划,它会将剩下的资源帮我们创建出来。
如果我们不再需要这个环境的话,可以点选右上角的Actions菜单里面的销毁,对所有资源进行删除。

有关如何使用Schematics创建云资源就介绍到这里,相信大家看过这个之后,也会觉得IBM Cloud的Schematics的使用是相当简单易用的。
我将在后面一篇文章中继续讲述如何使用IBM Cloud Schematics为创建好的资源环境进行后续的软件安装和配置。
以上是关于使用IBM Cloud Schematics部署云资源的主要内容,如果未能解决你的问题,请参考以下文章