来抠个图吧~——更优雅的Android UI界面控件高亮的实现
Posted 思忆(GeorgeQin)
tags:
篇首语:本文由小常识网(cha138.com)小编为大家整理,主要介绍了来抠个图吧~——更优雅的Android UI界面控件高亮的实现相关的知识,希望对你有一定的参考价值。
背景
在我们的开发过程中,常常遇到这样的问题,我们的APP开发中要在某个页面去加一些新功能的引导,最常用的就是将整个页面做成一个类似于Dialog背景的蒙层,然后将想提示用户的位置高亮出来,最后加一些元素在上面,那么大概效果就是这样:
乍一看很简单嘛,设计师切个纯图展示不就好了嘛? 其实我们之前的功能都是这么做的: 需要展示用户引导页的时候用一个设计师给的纯图覆盖在当前页面.
但是这样虽然又不是不能用,但其实一直会存在几个问题:
- 设计师一套16:9的图无法适配所有比例的屏幕,其他纵横比的机型会出现拉伸的情况.
- 高分辨率手机但一套图模糊,但是多图又会增大APk包大小
带着这个问题,我们去和设计师沟通了一番,后来设计无意间一句话引起了我的思考“既然多图适配这么麻烦,你是否可以把那块控件抠出来呢?”
预期效果:
在不使用纯图的前提下实现一个全屏的蒙层上制定的一个或者多个View的高亮
可行性分析:
最初尝试的方案A:
- 首先在整个界面画出一个半透明的全屏蒙层
- 通过View.getDrawingCache() 获取该目标View的bitmap缓存
- 获取该View在屏幕中的位置,在该位置放置一个ImageView去展示之前拿到的Bitmap缓存,即达到了高亮View的效果
效果: 发现部分View是可以通过该方案实现高亮的,但是会有几个的问题:
- 很多时候,我们看到的View 其实是层叠的,它自己本身没背景颜色,而背景就绘制在它的Parent中,我们获取它的DrawingCache 只能拿到一个没有背景的View缓存图,而这个结果肯定不是我们那想要的.
- 如果View通过Shape指定了背景的话,通过这个方式无法获取背景的圆角或者圆形,只能得到一个矩形的图
- 这个获取View,bitmap的方法在不同机型下有些兼容性问题,部分低端机型下会出现卡顿的情况
最终选择的方案B:
- 首先在整个界面画出一个半透明的全屏蒙层
- 找到View在屏幕中的位置,和它当前的大小,直接在蒙层上绘出这个大小的矩形,如果它是有设置背景的,根据它背景的类型,获取到相关的ShapeDrawable,然后判断它当前的形状然后我们绘制跟它背景一模一样的形状,然后将这块区域“镂空”即可!
那如何镂空呢? 我们先来看看最终实现效果,后面我们来讲实现原理:

而实现上述效果,仅仅需要一行代码:
private void showInitGuide()
    new Curtain(SimpleGuideActivity.this)
            .with(findViewById(R.id.iv_guide_first))
            .with(findViewById(R.id.btn_shape_circle))
            .with(findViewById(R.id.btn_shape_custom))
            .show();
Curtain(窗帘)
大致能实现如下功能:
- 一行代码完成某个View,或者多个View的高亮展示
- 同样支持基于AapterView(如ListView、GridView等) 或RecyclerView 的item以及item中元素的高亮
- 自动识别圆角背景,也可以自定义任何你想要的形状
- 如果依次按顺序去高亮一些列View,提供流式操作
设计流程
接下来我来分解一下主要设计思路,一步步达到我们想要的效果:
在蒙层上“镂空一块区域”
回想一下:
我们最开始通过接触CircleImageView,了解到View绘制过程中,图层层叠有16种叠加效果:

那么我们绘制的图层1不就是半透明的背景,而图层2就是我们的View的形状区域,我们只要找到一个叠加公共区域透明的效果是不是就是实现了镂空的效果了?所以这边我选择了DstOut效果,所以核心代码如下:
    @Override
    protected void onDraw(Canvas canvas)
        super.onDraw(canvas);
        drawBackGround(canvas);
        drawHollowFields(canvas);

    /**
     * 画一个半透明的背景
     */
    private void drawBackGround(Canvas canvas)
        mPaint.setXfermode(null);
        mPaint.setColor(mCurtainColor);
        canvas.drawRect(0, 0, getWidth(), getHeight(), mPaint);

    /**
     * 画出透明区域
     */
    private void drawHollowFields(Canvas canvas)
        mPaint.setColor(Color.WHITE);
        mPaint.setXfermode(new PorterDuffXfermode(PorterDuff.Mode.DST_OUT));
        //测试画一个圆
        canvas.drawCircle(getWidth()/2,getHeight()/4,300, mPaint);
效果如下,是不是已经镂空了?

当然,这里就是核心的逻辑了,实际上我们需要高亮的是我们的View,下面我们来一步步设计实现它:
- 因为我们是要把View镂空,所以,我们需要写一个类,包含我们的View,以及它的大小和区域,我们叫他HollowInfo:
public class HollowInfo

    /**
     * 目标View 用于定位透明区域
     */
    public View targetView;

    /**
     * 可自定义区域大小
     */
    public Rect targetBound;
这边列出了最核心的两个属性,第一个是我们核心的的View,我们需要根据它在屏幕上的位置确定我们绘制的起点,第二个是绘制的区域,我们可以使用View自己的的宽高,也可以自定义它的大小.
2.有了我们的基本绘制实体类,我来定义我们的画板,它主要做两件事:
- 根据指定颜色绘制整个屏幕大小的半透明蒙层
- 在蒙层上绘制指定大小的镂空区域
public class GuideView extends View

    private HollowInfo[] mHollows;

    private int mCurtainColor = 0x88000000;

    private Paint mPaint;

    public GuideView(@NonNull Context context)
        super(context, null);
        init();


    private void init()
        mPaint = new Paint(ANTI_ALIAS_FLAG);


    @Override
    protected void onMeasure(int widthMeasureSpec, int heightMeasureSpec)
        //当然是全屏大小
        setMeasuredDimension(getScreenWidth(getContext()), getScreenHeight(getContext()));


    @Override
    protected void onDraw(Canvas canvas)
        super.onDraw(canvas);
        int count;
        if (android.os.Build.VERSION.SDK_INT >= android.os.Build.VERSION_CODES.LOLLIPOP)
            count = canvas.saveLayer(0, 0, getWidth(), getHeight(), null);
         else
            count = canvas.saveLayer(0, 0, getWidth(), getHeight(), null, Canvas.ALL_SAVE_FLAG);

        drawBackGround(canvas);
        drawHollowFields(canvas);
        canvas.restoreToCount(count);


    private void drawBackGround(Canvas canvas)
        mPaint.setXfermode(null);
        mPaint.setColor(mCurtainColor);
        canvas.drawRect(0, 0, getWidth(), getHeight(), mPaint);

    /**
     * 绘制所有镂空区域
     */
    private void drawHollowFields(Canvas canvas)
        mPaint.setColor(Color.WHITE);
        mPaint.setXfermode(new PorterDuffXfermode(PorterDuff.Mode.DST_OUT));
        //可能有多个View 需要高亮, 所以遍历数组
        for (HollowInfo mHollow : mHollows)
            drawSingleHollow(mHollow, canvas);


    private void drawSingleHollow(HollowInfo info, Canvas canvas)
        if (mHollows.length <= 0)
            return;

        info.targetBound = new Rect();
        //获取View的边界方框
        info.targetView.getDrawingRect(info.targetBound);
        int[] viewLocation = new int[2];
        info.targetView.getLocationOnScreen(viewLocation);
        info.targetBound.left = viewLocation[0];
        info.targetBound.top = viewLocation[1];
        info.targetBound.right += info.targetBound.left;
        info.targetBound.bottom += info.targetBound.top;
        //要减去状态栏的高度
        info.targetBound.top -= getStatusBarHeight(getContext());
        info.targetBound.bottom -= getStatusBarHeight(getContext());
        //绘制镂空区域
        realDrawHollows(info, canvas);


    private void realDrawHollows(HollowInfo info, Canvas canvas)
        canvas.drawRect(info.targetBound, mPaint);
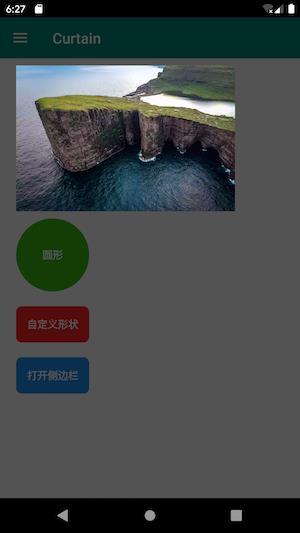
效果如下:
到目前我们已经把图片ImageView高亮了,似乎已经完成了,但是我们细看一下,它下面有两个设置了Shape的按钮,分别是圆形和圆角的,而我们代码中只绘制了矩形,所以肯定是没办法适配圆角的,那怎么办呢?
对!,我们可以从View的backGround入手,因为我们能设置各种shape的Drawable实际上就是GradientDrawable,我们可以同过判断它的类型,然后通过反射获取我们想要的属性,我们修改realDrawHollows代码如下:
    /**
     * 绘制镂空区域
     */
    private void realDrawHollows(HollowInfo info, Canvas canvas)
        if (!drawHollowSpaceIfMatched(info, canvas))
            //没有匹配上,默认降级方案:画一个矩形
            canvas.drawRect(info.targetBound, mPaint);


    private boolean drawHollowSpaceIfMatched(HollowInfo info, Canvas canvas)
        //android shape backGround
        Drawable drawable = info.targetView.getBackground();
        if (drawable instanceof GradientDrawable)
            drawGradientHollow(info, canvas, drawable);
            return true;

        return false;


    private void drawGradientHollow(HollowInfo info, Canvas canvas, Drawable drawable)
        Field fieldGradientState;
        Object mGradientState = null;
        int shape = GradientDrawable.RECTANGLE;
        try
            fieldGradientState = Class.forName("android.graphics.drawable.GradientDrawable").getDeclaredField("mGradientState");
            fieldGradientState.setAccessible(true);
            mGradientState = fieldGradientState.get(drawable);
            Field fieldShape = mGradientState.getClass().getDeclaredField("mShape");
            fieldShape.setAccessible(true);
            shape = (int) fieldShape.get(mGradientState);
         catch (Exception e)
            e.printStackTrace();

        float mRadius = 0;
        if (android.os.Build.VERSION.SDK_INT >= android.os.Build.VERSION_CODES.N)
            mRadius = ((GradientDrawable) drawable).getCornerRadius();
         else
            try
                Field fieldRadius = mGradientState.getClass().getDeclaredField("mRadius");
                fieldRadius.setAccessible(true);
                mRadius = (float) fieldRadius.get(mGradientState);
             catch (Exception e)
                e.printStackTrace();


        if (shape == GradientDrawable.OVAL)
            canvas.drawOval(new RectF(info.targetBound.left, info.targetBound.top, info.targetBound.right, info.targetBound.bottom), mPaint);
         else
            float rad = Math.min(mRadius,
                    Math.min(info.targetBound.width(), info.targetBound.height()) * 0.5f);
            canvas.drawRoundRect(new RectF(info.targetBound.left, info.targetBound.top, info.targetBound.right, info.targetBound.bottom), rad, rad, mPaint);
在获取到背景类型时候,我如果确定了是我们想要的GradientDrawable之后,我们就去获取它的形状实际类型,是椭圆还是圆角,再获取它的圆角度数,能拿到直接拿,拿不到通过反射的方式,最后绘制出相应的形状即可.
当然,我们View的背景可能是一个Selector,所以我们需要外加一层判断:取它当前的第一个:
   private boolean drawHollowSpaceIfMatched(HollowInfo info, Canvas canvas)
        //android shape backGround
        Drawable drawable = info.targetView.getBackground();
        if (drawable instanceof GradientDrawable)
            drawGradientHollow(info, canvas, drawable);
            return true;

        //android selector backGround
        if (drawable instanceof StateListDrawable)
            if (drawable.getCurrent() instanceof GradientDrawable)
                drawGradientHollow(info, canvas, drawable.getCurrent());
                return true;


        return false;
我们再来看看这么做之后的效果:
支持自定义
虽然我们能自己适配View的背景,可能不能包含所有Drawable的,比如RippleDrawable,而且实际业务场景肯定很复杂,也许产品需要特别的高亮形状?一个好的代码肯定要有拓展的能力,我们能否将图形的方法自定义?,接下来我们自定义一个Shape:
public interface Shape

    /**
     * 画你想要的任何形状
     */
    void drawShape(Canvas canvas, Paint paint, HollowInfo info);
在HolloInfo中增加Shape,由用户在构建HolloInfo时候传入:
public class HollowInfo

    /**
     * 目标View 用于定位透明区域
     */
    public View targetView;

    /**
     * 可自定义区域大小
     */
    public Rect targetBound;

     /**
     * 指定的形状
     */
    public Shape shape;
再来补充我们的drawHollowSpaceIfMatched方法:如果用户指定了形状的话,我们优先画形状,否则再自动适配它的背景:
    private boolean drawHollowSpaceIfMatched(HollowInfo info, Canvas canvas)
        //user custom shape
        if (null != info.shape)
            info.shape.drawShape(canvas, mPaint, info);
            return true;

        //android shape backGround
        Drawable drawable = info.targetView.getBackground();
        if (drawable instanceof GradientDrawable)
            drawGradientHollow(info, canvas, drawable);
            return true;

        //android selector backGround
        if (drawable instanceof StateListDrawable)
            if (drawable.getCurrent() instanceof GradientDrawable)
                drawGradientHollow(info, canvas, drawable.getCurrent());
                return true;


        return false;
我现在自定义一个圆角的形状:
public class RoundShape implements Shape

    private float radius;

    public RoundShape(float radius)
        this.radius = radius;


    @Override
    public void drawShape(Canvas canvas, Paint paint, HollowInfo info)
        canvas.drawRoundRect(new RectF(info.targetBound.left, info.targetBound.top, info.targetBound.right, info.targetBound.bottom), radius, radius, paint);


   private void showInitGuide()
        new Curtain(SimpleGuideActivity.this)
                //自定义高亮形状
                .withShape(findViewById(R.id.btn_shape_circle), new RoundShape(12)).show();
我们设置给一个圆形的View 那么效果如下:

所以,只要自定义了Shape,形状交给你,想怎么自定义都行~
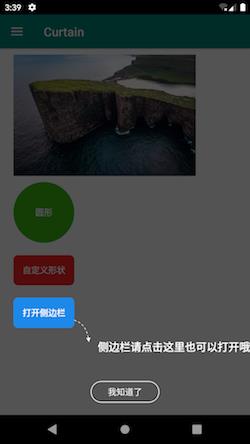
到这里有朋友问了…那我除了高亮View之外,还需要添加一些文字,或者可交互的元素(比如按钮)怎么办呢?
- 很简单嘛! 我们在我们的蒙层View中再盖上一层去展示额外的元素不就好了!,现在我们只需要给这些元素找一个载体即可~
寻找合适的载体:
因为我们是一个引导页的蒙层,所以我第一时间想到的就是Dialog,
- 第一方面,dialog构建方便,我们只需要自己构建View填充给它,然后将dialog设为全屏切透明即可
- 第二方面,dialog 可以自动和回退键交互,我们不需要额外自己处理,更符合用户操作习惯.
当然构建Dialog,我们当然推荐DialogFragment,方便管理横竖屏的情况,也是谷歌推荐的做法,
那么核心代码如下:
public class GuideDialogFragment extends DialogFragment

    private static final int MAX_CHILD_COUNT = 2;

    private static final int GUIDE_ID = 0x3;

    private FrameLayout contentView;

    private Dialog dialog;

    private int topLayoutRes = 0;

    private GuideView guideView;

    public void show()
        FragmentActivity activity = (FragmentActivity) guideView.getContext();
        guideView.setId(GUIDE_ID);
        this.contentView = new FrameLayout(activity);
        this.contentView.addView(guideView);
        if (topLayoutRes != 0)
            updateTopView();

        //定义一个全透明主题的Dialog
        dialog = new AlertDialog.Builder(activity, R.style.TransparentDialog)
                .setView(contentView)
                .create();
        show(activity.getSupportFragmentManager(), GuideDialogFragment.class.getSimpleName());


    void updateContent()
        contentView.removeAllViews();
        contentView.addView(guideView);
        if (contentView.getChildCount() == MAX_CHILD_COUNT)
            contentView.removeViewAt(1);

        //将自定义的View 布局加载入cont以上是关于来抠个图吧~——更优雅的Android UI界面控件高亮的实现的主要内容,如果未能解决你的问题,请参考以下文章