gconf/dconf实战编程利用gconf库读写配置实战以及诸多配套工具演示
Posted 奇妙之二进制
tags:
篇首语:本文由小常识网(cha138.com)小编为大家整理,主要介绍了gconf/dconf实战编程利用gconf库读写配置实战以及诸多配套工具演示相关的知识,希望对你有一定的参考价值。
文章目录
准备工作
首先安装相应的库:
sudo apt install libgconf2-dev
检查是否安装成功:
victory@victory-ThinkPad-T490:~$ pkg-config --cflags --libs gconf-2.0
-pthread -I/usr/include/gconf/2 -I/usr/include/dbus-1.0 -I/usr/lib/x86_64-linux-gnu/dbus-1.0/include -I/usr/include/glib-2.0 -I/usr/lib/x86_64-linux-gnu/glib-2.0/include -lgconf-2 -lglib-2.0
安装gconftool工具:
gconf2
安装gconf-editor:
sudo apt install gconf-editor
用gconftool工具插入一个key-value用于读取。
victory@victory-ThinkPad-T490:~$ gconftool-2 --help-all
Usage:
  gconftool-2 [OPTION…] - Tool to manipulate a GConf configuration

Help Options:
  -h, --help                                     Show help options
  --help-all                                     Show all help options
  --help-client                                  Show client options
  --help-key-type                                Show key type options
  --help-load                                    Show load/save options
  --help-server                                  Show server options
  --help-install                                 Show installation options
  --help-test                                    Show test options
  --help-schema                                  Show schema options

Client options:
  -s, --set                                      Set a key to a value and sync. Use with --type.
  -g, --get                                      Print the value of a key to standard output.
  -u, --unset                                    Unset the keys on the command line
  --recursive-unset                              Recursively unset all keys at or below the key/directory names on the command line
  --toggle                                       Toggles a boolean key.
  -a, --all-entries                              Print all key/value pairs in a directory.
  --all-dirs                                     Print all subdirectories in a directory.
  -R, --recursive-list                           Print all subdirectories and entries under a directory, recursively.
  -S, --search-key                               Search for a key, recursively.
  --search-key-regex                             Search for a key, recursively.
  --short-docs                                   Get the short doc string for a key
  --long-docs                                    Get the long doc string for a key
  --dir-exists                                   Return 0 if the directory exists, 2 if it does not.
  --ignore-schema-defaults                       Ignore schema defaults when reading values.

Key type options:
  -t, --type=int|bool|float|string|list|pair     Specify the type of the value being set, or the type of the value a schema describes. Unique abbreviations OK.
  -T, --get-type                                 Print the data type of a key to standard output.
  --get-list-size                                Get the number of elements in a list key.
  --get-list-element                             Get a specific element from a list key, numerically indexed.
  --list-type=int|bool|float|string              Specify the type of the list value being set, or the type of the value a schema describes. Unique abbreviations OK.
  --car-type=int|bool|float|string               Specify the type of the car pair value being set, or the type of the value a schema describes. Unique abbreviations OK.
  --cdr-type=int|bool|float|string               Specify the type of the cdr pair value being set, or the type of the value a schema describes. Unique abbreviations OK.

Load/Save options:
  --dump                                         Dump to standard output an XML description of all entries under a directory, recursively.
  --load                                         Load from the specified file an XML description of values and set them relative to a directory.
  --unload                                       Unload a set of values described in an XML file.

Server options:
  --get-default-source                           Get the name of the default source
  --shutdown                                     Shut down gconfd. DON'T USE THIS OPTION WITHOUT GOOD REASON.
  -p, --ping                                     Return 0 if gconfd is running, 2 if not.
  --spawn                                        Launch the configuration server (gconfd). (Normally happens automatically when needed.)

Installation options:
  --install-schema-file=FILENAME                 Specify a schema file to be installed
  --config-source=SOURCE                         Specify a configuration source to use rather than the default path
  --direct                                       Bypass server, and access the configuration database directly. Requires that gconfd is not running.
  --makefile-install-rule                        Properly installs schema files on the command line into the database. Specify a custom configuration source in the GCONF_CONFIG_SOURCE environment variable, or set set the variable to an empty string to use the default configuration source.
  --makefile-uninstall-rule                      Properly uninstalls schema files on the command line from the database. GCONF_CONFIG_SOURCE environment variable should be set to a non-default configuration source or set to the empty string to use the default.

Test options:
  --break-key                                    Torture-test an application by setting and unsetting a bunch of values of different types for keys on the command line.
  --break-directory                              Torture-test an application by setting and unsetting a bunch of keys inside the directories on the command line.

Schema options:
  --set-schema                                   Set a schema and sync. Use with --short-desc, --long-desc, --owner, and --type.
  --short-desc=DESCRIPTION                       Specify a short half-line description to go in a schema.
  --long-desc=DESCRIPTION                        Specify a several-line description to go in a schema.
  --owner=OWNER                                  Specify the owner of a schema
  --get-schema-name                              Get the name of the schema applied to this key
  --apply-schema                                 Specify the schema name followed by the key to apply the schema name to
  --unapply-schema                               Remove any schema name applied to the given keys

Application Options:
  -v, --version                                  Print version
victory@victory-ThinkPad-T490:~$ gconftool-2 --type string -s /test hello
victory@victory-ThinkPad-T490:~$ gconftool-2 -g /test
hello
gconf的后端服务:
victory@victory-ThinkPad-T490:/usr$ cat ./share/dbus-1/services/org.gnome.GConf.service
[D-BUS Service]
Name=org.gnome.GConf
Exec=/usr/lib/x86_64-linux-gnu/gconf/gconfd-2
gconf采用层级xml的格式存储配置:
victory@victory-ThinkPad-T490:~/.gconf$ gconftool-2  -s --type int /com/syriusrobotics/watchdog/mem_limit  80
victory@victory-ThinkPad-T490:~/.gconf$ tree
.
└── com
    ├── %gconf.xml
    └── syriusrobotics
        ├── %gconf.xml
        └── watchdog
            └── %gconf.xml

3 directories, 3 files
可读性非常好。需要注意的是,我们通过写入的配置,gconfd并不会立刻写入配置文件,它可能有自己的策略,例如定时或者退出时写入文件。
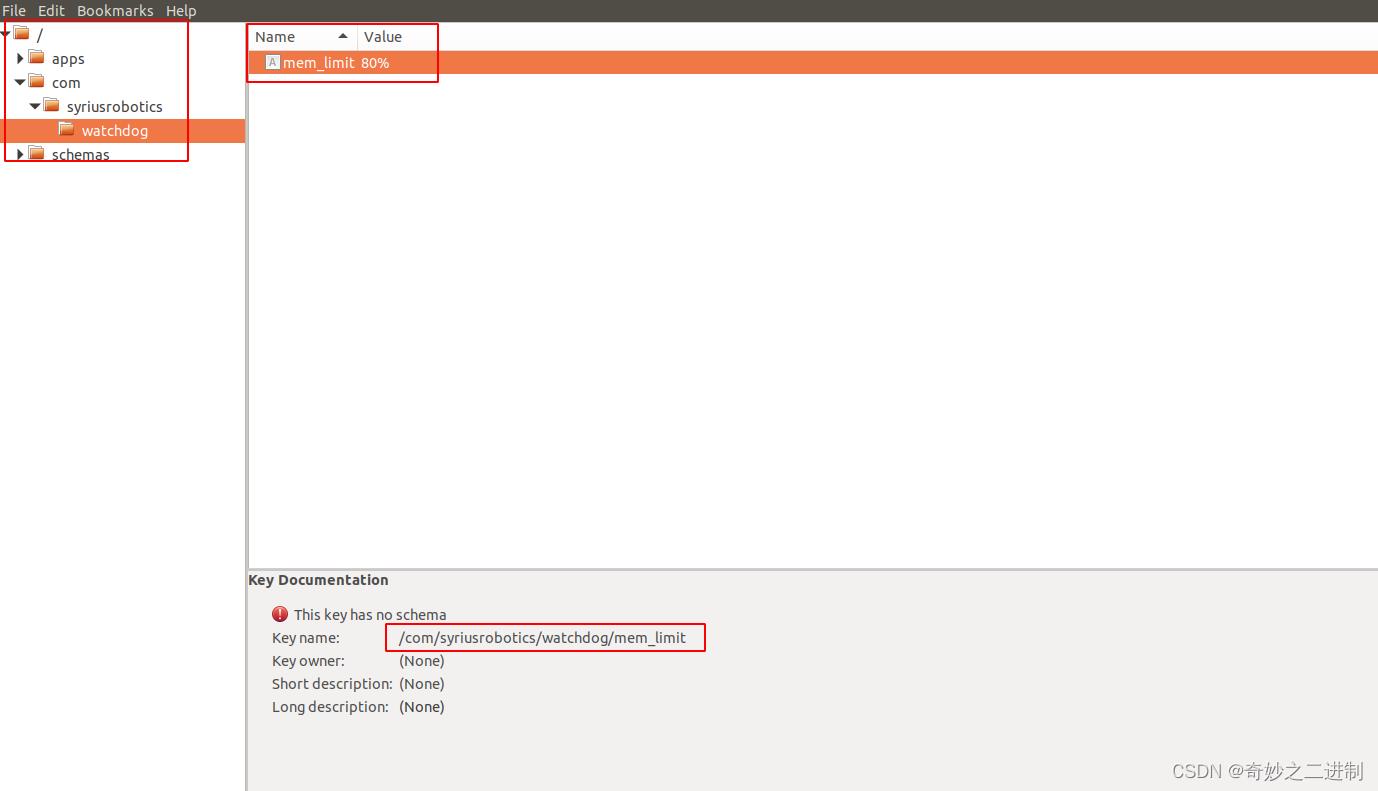
我们还可以gconf-editor工具可视化查看修改配置:

这个工具似乎有bug,/目录下添加的key无法显示。
编程
#include <gconf/gconf-client.h>
#include <stdio.h>

int main(int argc,char** argv)
  GConfClient* client;
  gchar* str;

  gconf_init(argc, argv, NULL);

  client = gconf_client_get_default();

  str = gconf_client_get_string(client, "/test", NULL);

  printf("/test=%s\\n",str);
编译:
gcc g.c `pkg-config --cflags --libs gconf-2.0`
写配置也很简单:
#include <gconf/gconf-client.h>
#include <stdio.h>

int main(int argc,char** argv)
  GConfClient* client;

  gconf_init(argc, argv, NULL);

  client = gconf_client_get_default();

  if(!gconf_client_set_string(client, "/test", "world",NULL))
	printf("set string failed!");


  return 0;
客户端和服务端采用dbus通信,我们可以使用dbus-monitor监听总线上的请求:
method call time=1659252379.022058 sender=:1.530 -> destination=org.gnome.GConf serial=7 path=/org/gnome/GConf/Server; interface=org.gnome.GConf.Server; member=GetDefaultDatabase
method return time=1659252379.030527 sender=:1.525 -> destination=:1.530 serial=97 reply_serial=7
   object path "/org/gnome/GConf/Database/0"
method call time=1659252379.030599 sender=:1.530 -> destination=org.gnome.GConf serial=8 path=/org/gnome/GConf/Database/0; interface=org.gnome.GConf.Database; member=Set
   string "/test"
   struct
      int32 1
      string "world"

method return time=1659252379.030729 sender=:1.525 -> destination=:1.530 serial=98 reply_serial=8
服务端的dbus服务名为org.gnome.GConf。
以上是关于gconf/dconf实战编程利用gconf库读写配置实战以及诸多配套工具演示的主要内容,如果未能解决你的问题,请参考以下文章