七夕专属博文-使用QGraphics画“红心“或“黑心“(含数学模型讲解)
Posted IT1995
tags:
篇首语:本文由小常识网(cha138.com)小编为大家整理,主要介绍了七夕专属博文-使用QGraphics画“红心“或“黑心“(含数学模型讲解)相关的知识,希望对你有一定的参考价值。
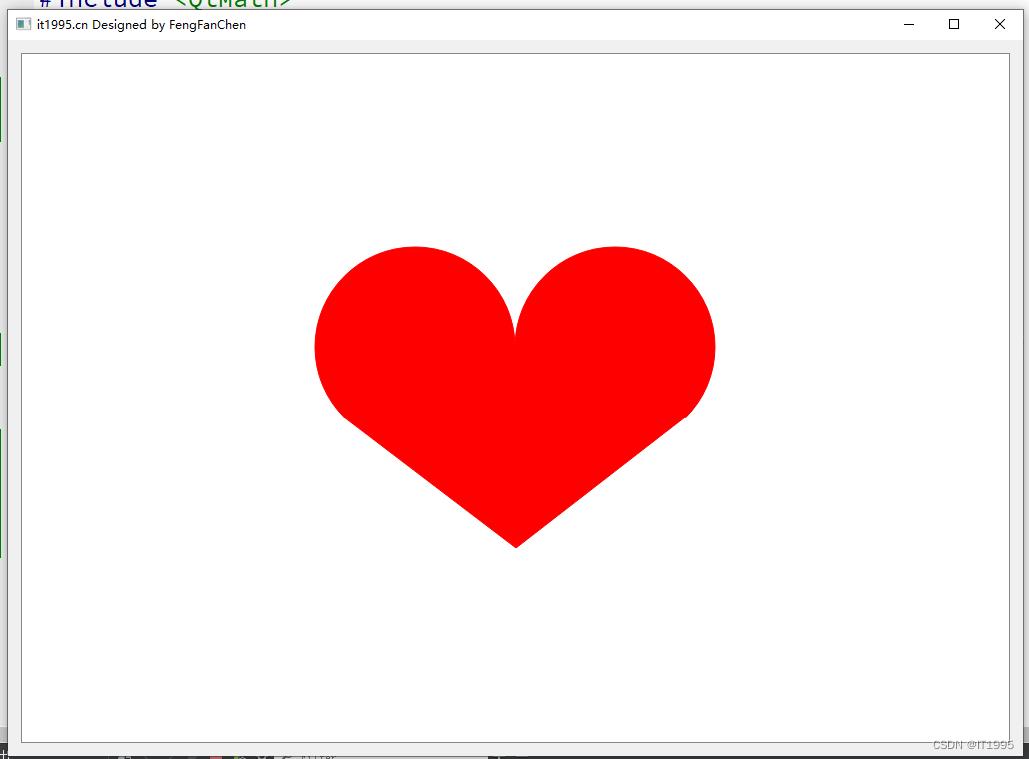
说明
实现的效果是这样的,使用QGraphicsEllipseItem和QGraphicsPolygonItem画“心”。
比如来个红心

再来个“黑心”:

“心形”模型详解
这里需要用到高中数学。
①要了解圆的参数方程,其公式是这样的:
x = a + r · cosθ 和 y = b + r · sinθ
其中(a, b)为圆心的坐标,r为圆的半径,θ是角度取值范围为[0, 2π]。
②在C++或各种语言里面有专门的sin、cos函数,在Qt框架里面使用QtMath的头文件。这里传的参数需要弧度,所以,而在数学里面,圆的参数方程里面传入的参数是角度,所以还要需要了解,角度转弧度公式:
弧度 = 角度 · (π / 180)
了解了公式后,下面来说下,这个爱心的画法:
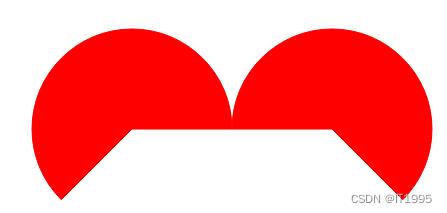
首先是画两个带角度的圆。
左边的圆:角度是从0度到225度。
右边的圆:角度是从-45度到180度。
如下图:
然后找到2个圆心点,用圆的参数方程,找边上的2个点

再到两圆之间找法线上找任意一点:
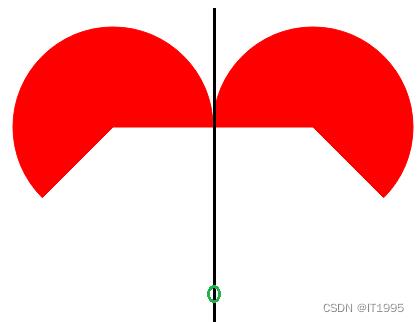
通过这5个点构造多边形,如下:

这样将这3个图形组合起来,就是一个“心”了。
代码解析
程序结构如下:

源码如下:
Widget.h
#ifndef WIDGET_H
#define WIDGET_H

#include <QWidget>

class QGraphicsScene;

QT_BEGIN_NAMESPACE
namespace Ui  class Widget;
QT_END_NAMESPACE

class Widget : public QWidget

    Q_OBJECT

public:
    Widget(QWidget *parent = nullptr);
    ~Widget();

protected:
    void drawCricle(int x, int y, int height, int width, int startAngle, int endAngle);
    void drawPolygon();

private:
    Ui::Widget *ui;
    QGraphicsScene *m_scene;
;
#endif // WIDGET_H
main.cpp
#include "Widget.h"

#include <QApplication>

int main(int argc, char *argv[])

    QApplication a(argc, argv);
    Widget w;
    w.show();
    return a.exec();
Widget.cpp
#include "Widget.h"
#include "ui_Widget.h"
#include <QGraphicsEllipseItem>
#include <QGraphicsPolygonItem>
#include <QPolygonF>
#include <QPen>
#include <iostream>
#include <QtMath>
#include <QGraphicsScene>
#include <QDebug>
#include <QPoint>


Widget::Widget(QWidget *parent)
    : QWidget(parent)
    , ui(new Ui::Widget)

    ui->setupUi(this);
    ui->graphicsView->setRenderHints(QPainter::Antialiasing | QPainter::SmoothPixmapTransform);
    m_scene = new QGraphicsScene;
    ui->graphicsView->setScene(m_scene);
    drawCricle(-100, 0, 200, 200, 0, 360 * 10);
    drawCricle(100, 0, 200, 200, 360 * 14, 360 * 10);
    drawPolygon();
    this->setWindowTitle("it1995.cn Designed by FengFanChen");


Widget::~Widget()

    delete m_scene;
    delete ui;


void Widget::drawCricle(int x, int y, int height, int width, int startAngle, int endAngle)

    auto item(new QGraphicsEllipseItem(x, y, height, width));
    item->setBrush(Qt::red);
    item->setStartAngle(startAngle);
    item->setSpanAngle(endAngle);
    item->setPen(QPen(Qt::red));
    m_scene->addItem(item);


void Widget::drawPolygon()

    double oneCricleHeartX = -2.5;
    double oneCricleHeartY = 95;
    double oneX = oneCricleHeartX + 100 * cos(135 * ( M_PI /180));
    double oneY = oneCricleHeartY + 100 * sin(135 * ( M_PI /180));

    double endX = 100;
    double endY = 100 + 200;
//    auto item(new QGraphicsEllipseItem(x, y, 10, 10));
    //auto item(new QGraphicsEllipseItem(100 - 5, 100 - 5 + 100, 10, 10));
//    auto item(new QGraphicsEllipseItem(endX, endY, 10, 10));
//    item->setBrush(Qt::blue);
//    m_scene->addItem(item);


//    auto line1Item(new QGraphicsLineItem(oneX, oneY + 2.5, endX + 1, endY + 1));
//    m_scene->addItem(line1Item);

    //第二个
    double twoCricleHeartX = 200;
    double twoCricleHeartY = 95;
//    auto item(new QGraphicsEllipseItem(twoCricleHeartX - 5, twoCricleHeartY, 10, 10));
//    item->setBrush(Qt::blue);
//    m_scene->addItem(item);

    double twoX = twoCricleHeartX + 100 * cos(45 * ( M_PI /180));
    double twoY = twoCricleHeartY + 100 * sin(45 * ( M_PI /180));
//    auto item(new QGraphicsEllipseItem(twoX - 5, twoY, 10, 10));
//    item->setBrush(Qt::blue);
//    m_scene->addItem(item);
//    auto line2Item(new QGraphicsLineItem(twoX, twoY + 5, endX + 1, endY + 1));
//    m_scene->addItem(line2Item);

    auto polygonItem = (new QGraphicsPolygonItem());
    QPolygonF pf;
    pf.append(QPoint(endX + 1, endY + 1));
    pf.append(QPoint(oneX + 2, oneY + 5));
    pf.append(QPoint(oneCricleHeartX, oneCricleHeartY + 5));
    pf.append(QPoint(twoCricleHeartX, twoCricleHeartY + 5));
    pf.append(QPoint(twoX, twoY + 5));
    polygonItem->setPolygon(pf);
    polygonItem->setPen(QPen(Qt::red));
    polygonItem->setBrush(Qt::red);
    m_scene->addItem(polygonItem);
有几个关键点要说:
①QGraphic的坐标系和数学里面的不一样,他和屏幕里面的坐标一样,y轴下方为正,y轴上方为负。
②在QGraphicsEllipseItem中有按角度画圆的函数:
void QGraphicsEllipseItem::setStartAngle(int angle)
Sets the start angle for an ellipse segment to angle, which is in 16ths of a degree. This angle is used together with spanAngle() for representing an ellipse segment (a pie). By default, the start angle is 0.
从官方文档可以知道,他扩大了16倍,也就是说360 * 16是直角坐标系的360,所以如果是90度的角度,就是90 * 16。
③代码里面的这些代码:
QPolygonF pf;
pf.append(QPoint(endX + 1, endY + 1));
pf.append(QPoint(oneX + 2, oneY + 5));
pf.append(QPoint(oneCricleHeartX, oneCricleHeartY + 5));
pf.append(QPoint(twoCricleHeartX, twoCricleHeartY + 5));
pf.append(QPoint(twoX, twoY + 5));
这些+1,+2,+5是用来调节的,避免算点时因为精度丢失,导致要画的“心”不好看。
源码打包下载
地址如下:
Qt/DrawHeart at master · fengfanchen/Qt · GitHub
以上是关于七夕专属博文-使用QGraphics画“红心“或“黑心“(含数学模型讲解)的主要内容,如果未能解决你的问题,请参考以下文章