基于 SpringBoot + MyBatis 的在线音乐播放器
Posted 独一无二的哈密瓜
tags:
篇首语:本文由小常识网(cha138.com)小编为大家整理,主要介绍了基于 SpringBoot + MyBatis 的在线音乐播放器相关的知识,希望对你有一定的参考价值。
文章目录
- 1. 项目设计
- 2. 效果展示
- 3. 创建项目 配置文件
- 4. 数据库的设计与实现
- 5. 交互接口的设计
- 6. 工具包
- 7. 登录模块
- 8. 注册模块
- 9. 退出功能
- 10. 上传音乐模块
- 11. 播放音乐模块
- 12. 删除音乐模块
- 13. 收藏音乐模块
- 14. 取消收藏音乐模块
- 15. 主页面 - 查询模块
- 16. 收藏页面 - 查询模块
1. 项目设计
前端 : html+CSS+javascript+JQuery
后端 : Spring MVC+Spring Boot+MyBatis
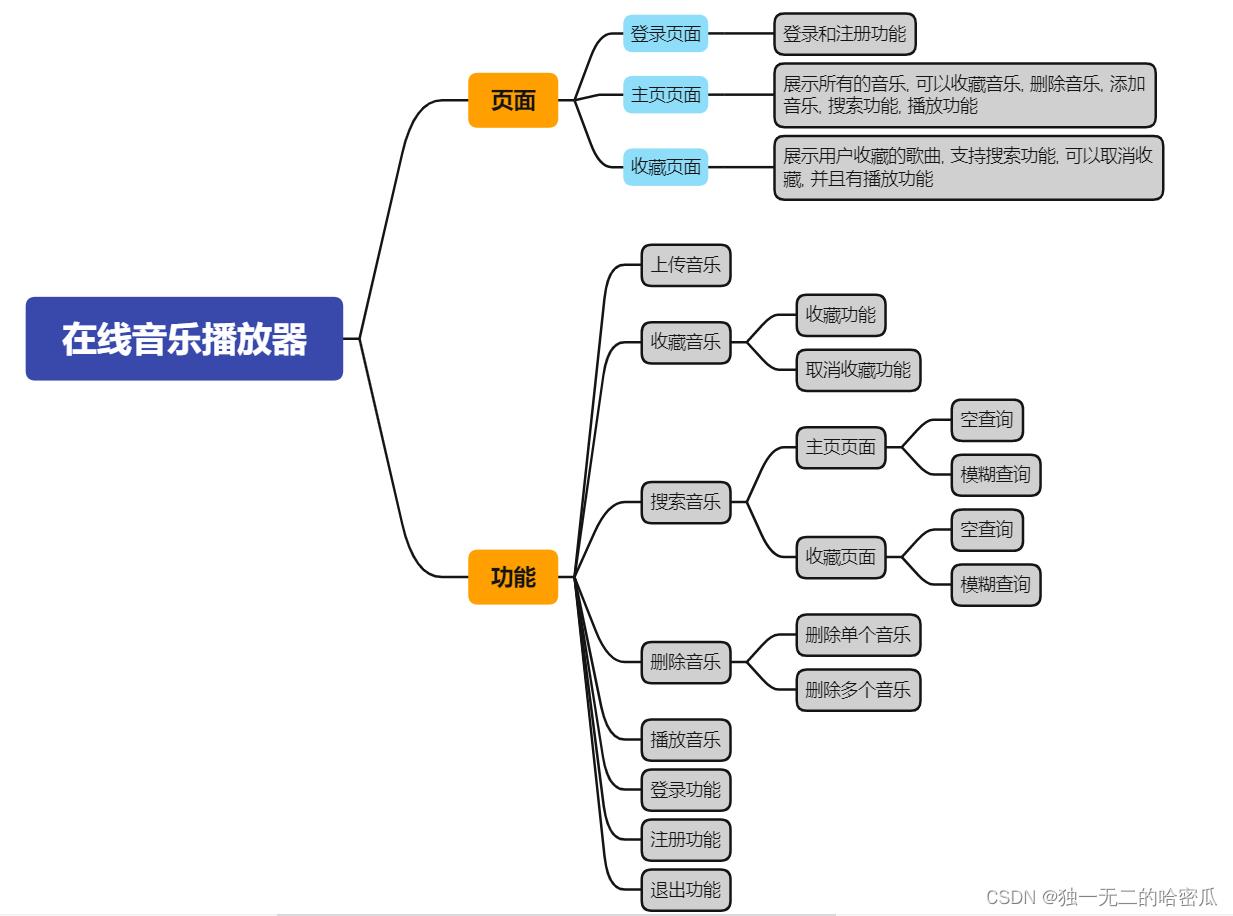
2. 效果展示


3. 创建项目 配置文件
3.1 创建项目
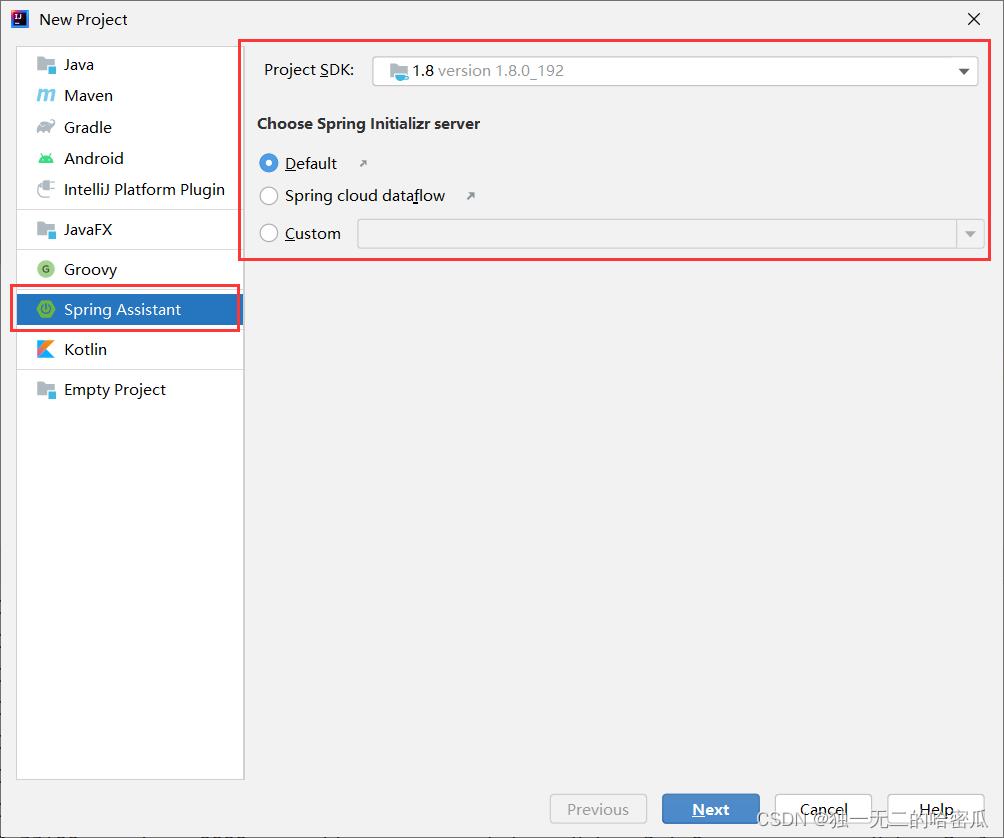
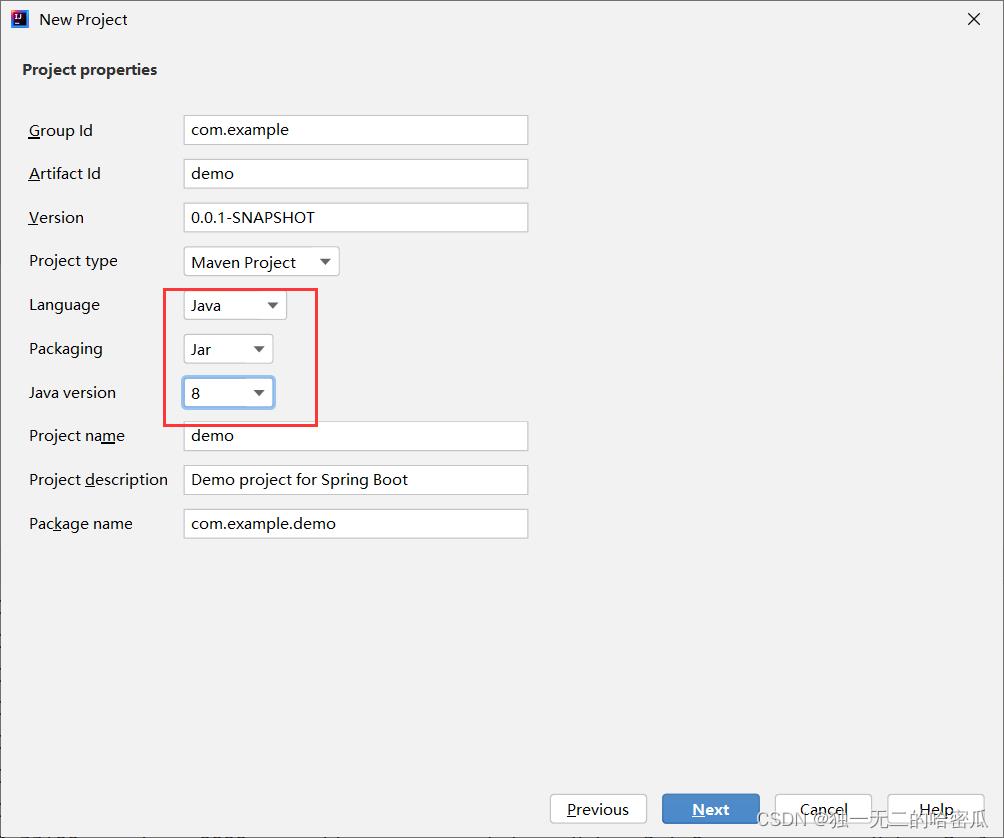
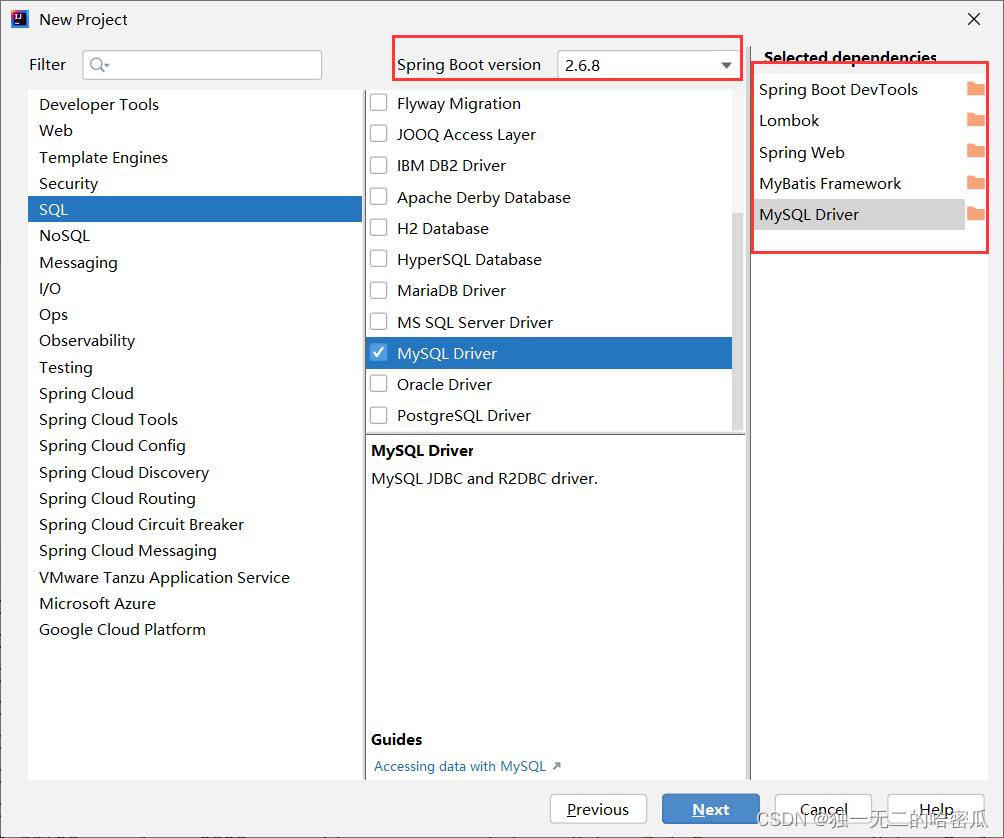
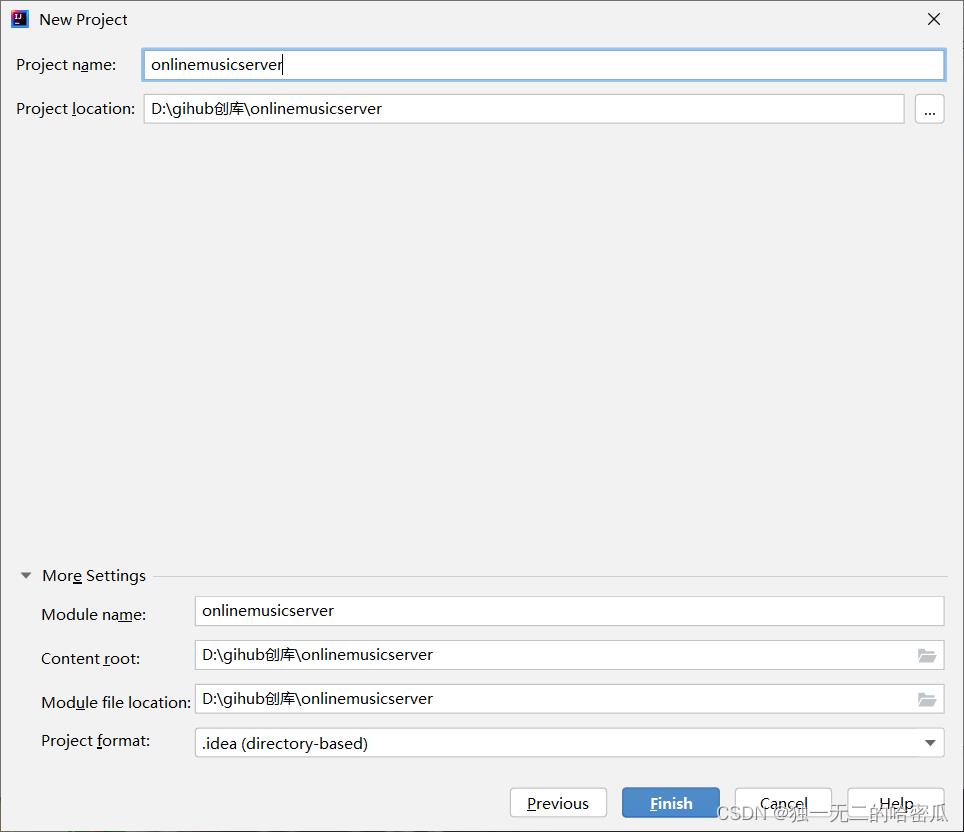
3.2 配置文件
3.2.1 在 application.properties 中添加配置文件
配置数据库
spring.datasource.url=jdbc:mysql://localhost:3306/onlinemusicserver?characterEncoding=utf8&useSSL=true
spring.datasource.username=root
spring.datasource.password=0000
spring.datasource.driver-class-name=com.mysql.cj.jdbc.Driver
配置 Mybatis
mybatis.mapper-locations=classpath:mapper/**Mapper.xml
配置文件上传大小
spring.servlet.multipart.max-file-size = 15MB
spring.servlet.multipart.max-request-size=100MB
配置上传的路径
upload.path=E:/logs/
3.2.2 在 resources 目录下创建mapper
mapper下添加 目录 **.xml 并添加代码
<?xml version="1.0" encoding="UTF-8"?>
<!DOCTYPE mapper PUBLIC "-//mybatis.org//DTD Mapper 3.0//EN"
        "http://mybatis.org/dtd/mybatis-3-mapper.dtd">
<mapper namespace="com.example.onlinemusicserver.mapper."对应的Mapper"">

</mapper>
4. 数据库的设计与实现
这里设计数据库.
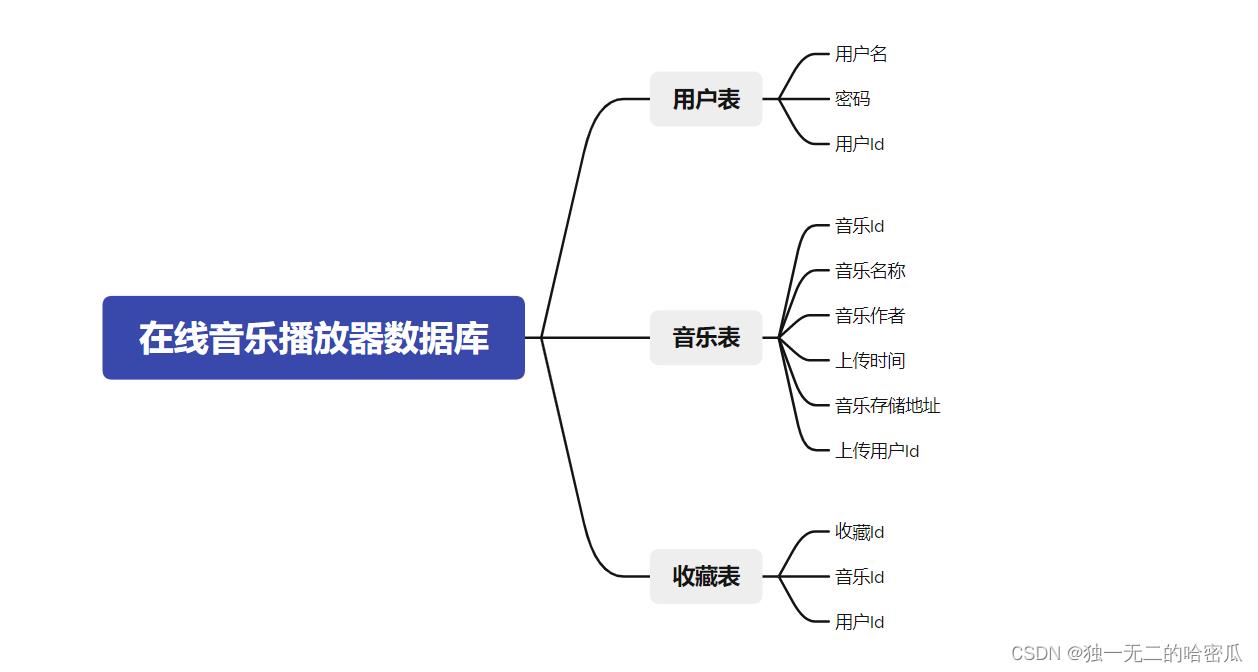
用户表
- 用户Id
- 用户账号
- 用户密码
音乐表
- 音乐Id
- 音乐名
- 音乐歌手
- 上传时间
- 存储地址
- 用户Id
收藏表
- 收藏Id
- 用户Id
- 音乐Id
drop database if exists `onlinemusicserver`;
create database `onlinemusicserver`;

use `onlinemusicserver`;

drop table if exists `user`;
create table `user`(
    `userId` int primary key auto_increment,
    `username` varchar(20) unique,
    `password` varchar(255) not null
);

drop table if exists `music`;
create table `music`(
    `musicId` int primary key auto_increment,
    `title` varchar(100) not null,
    `author` varchar(20) not null,
    `uploadtime` timestamp default CURRENT_TIMESTAMP,
    `path` varchar(1000) not null,
    `userId` int not null
);

drop table if exists `collect`;
create table `collect`(
    `collectId` int primary key auto_increment,
    `userId` int not null,
    `musicId` int not null
);
5. 交互接口的设计
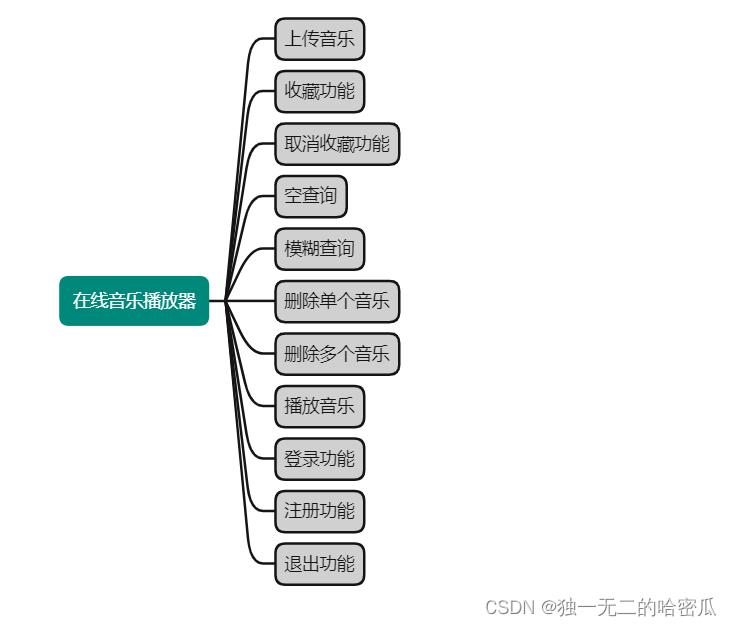
上传音乐
请求
POST /music/upload HTTP/1.1

singer, MultipartFile file

响应

	status: 1/-1 (1 为成功, -1 为失败),
	message: "对应信息",
	data: "内容"
收藏功能
请求
POST /collect/loveMusic HTTP/1.1

musicId: 1

响应

	status: 1/-1,
	message: "",
	data: ""
取消收藏功能
请求
POST /collect/deleteLoveMusic HTTP/1.1

musicId: 1

响应

	status: 1/-1,
	message: "",
	data: ""
收集页面 — 空查询 模糊查询
请求
POST /collect/findLoveMusic HTTP/1.1

musicName: "可以为空可以不为空, 为空的时候,查询所有, 不为空的时候, 模糊查询"

响应

	status: 1/-1,
	message: "",
	data:

			musicId: "",
			title: "",
			author: "",
			uploadtime: "",
			path: "",
			userId: "",

		...
主页页面 — 空查询 模糊查询
请求
POST /music/findMusic HTTP/1.1

musicName: "可以为空可以不为空, 为空的时候,查询所有, 不为空的时候, 模糊查询"

响应

	status: 1/-1,
	message: "",
	data:

			musicId: "",
			title: "",
			author: "",
			uploadtime: "",
			path: "",
			userId: "",

		...
删除单个音乐
请求
POST /music/delete HTTP/1.1

musicId: ""

响应

	status: 1/-1,
	message: "",
	data: ""
删除多个音乐
请求
POST /music/deleteMore HTTP/1.1

musicId: "1 2 3 4 5"(数组)

响应

	status: 1/-1,
	message: "",
	data: ""
播放音乐
请求
GET /music/play?path="..." HTTP/1.1

响应

	音乐的字节信息
登录功能
请求
POST /user/login HTTP/1.1

username: "",password: ""

响应

	status: 1/-1,
	message: "",
	data: ""
注销功能
请求
GET /user/logout HTTP/1.1

响应
HTTP/1.1 200
注册功能
请求
POST /user/register HTTP/1.1

username: "",password: ""

响应

	status: 1/-1,
	message: "",
	data: ""
6. 工具包
6.1 设置统一响应类
这个类是用来让响应返回的格式统一的.
public class ResponseBodyMessage<T>
    private int status;
    private String message;
    private T data;

    public ResponseBodyMessage(int status, String message, T data)
        this.status = status;
        this.message = message;
        this.data = data;
6.2 Constant类
这个类是用来存储不变的常量的. 例如设置了session对象 , 是一个字符串. 不变的字符串.将来在其他地方获取对应的session需要通过这个字符串获取 .
public class Constant
    public static final String USER_SESSION_KEY = "user";
6.3 了解 MD5 加密 和 BCrypt 加密
MD5是一个安全的散列算法,输入两个不同的明文不会得到相同的输出值,根据输出值,不能得到原始的明文,即其过程不可逆; 但是虽然不可逆,但是不是说就是安全的。因为自从出现彩虹表后,这样的密码也"不安全"。
更安全的做法是加盐或者长密码等做法,让整个加密的字符串变的更长,破解时间变慢。
Bcrypt就是一款加密工具,可以比较方便地实现数据的加密工作。你也可以简单理解为它内部自己实现了随机加盐处理 。我们使用MD5加密,每次加密后的密文其实都是一样的,这样就方便了MD5通过大数据的方式进行破解。
Bcrypt生成的密文是60位的。而MD5的是32位的。Bcrypt破解难度更大。
MD5使用示例 (加盐)
添加依赖
<dependency>
<groupId>commons-codec</groupId>
<artifactId>commons-codec</artifactId>
</dependency>
<dependency>
<groupId>org.apache.commons</groupId>
<artifactId>commons-lang3</artifactId>
<version>3.9</version>
</dependency>
实现类
public class MD5Util
    private static final String salt = "1q2w3e4r5t";//可任意设置

    public static String md5(String src)
        return DigestUtils.md5Hex(src);


    /**
     * 第一次加密 :模拟前端自己加密,然后传到后端
     * @param inputPass
     * @return
     */
    public static String inputPassToFormPass(String inputPass)
        String str = ""+salt.charAt(1)+salt.charAt(3) + inputPass
                +salt.charAt(5) + salt.charAt(6);
        return md5(str);


    /**
     * 第二次加密
     * @param formPass 前端加密过的密码,传给后端进行第2次加密
     * @param salt 后端当中的盐值
     * @return
     */
    public static String formPassToDBPass(String formPass, String salt)
        String str = ""+salt.charAt(0)+salt.charAt(2) + formPass +salt.charAt(5)
                + salt.charAt(4);
        return md5(str);


    /**
     * 上面两个函数合到一起进行调用
     * @param inputPass
     * @param saltDB
     * @return
     */
    public static String inputPassToDbPass(String inputPass, String saltDB)
        String formPass = inputPassToFormPass(inputPass);
        String dbPass = formPassToDBPass(formPass, saltDB);
        return dbPass;

BCrypt使用示例
添加依赖
<!-- security依赖包 (加密)-->
<dependency>
<groupId>org.springframework.security</groupId>
<artifactId>spring-security-web</artifactId>
</dependency>
<dependency>
<groupId>org.springframework.security</groupId>
<artifactId>spring-security-config</artifactId>
</dependency>
在springboot启动类添加:
@SpringBootApplication(exclude =org.springframework.boot.autoconfigure.security.servlet.SecurityAutoConfiguration.class)
创建BCryptTest测试类:
public class BCryptTest
public static void main(String[] args)
    //模拟从前端获得的密码
    String password = "123456";
    BCryptPasswordEncoder bCryptPasswordEncoder = new BCryptPasswordEncoder();
    String newPassword = bCryptPasswordEncoder.encode(password);
    System.out.println("加密的密码为: "+newPassword);
    //使用matches方法进行密码的校验
    boolean same_password_result = bCryptPasswordEncoder.matches(password,newPassword);
    //返回true
    System.out.println("加密的密码和正确密码对比结果: "+same_password_result);
    boolean other_password_result = bCryptPasswordEncoder.matches("987654",newPassword);
    //返回false
    System.out.println("加密的密码和错误的密码对比结果: " + other_password_result);
运行结果: (每次加密的密码都不同)


6.4 在Config中 注入 BCryptPasswordEncoder 对象
@Configuration
public class AppConfig implements WebMvcConfigurer

    @Bean
    public BCryptPasswordEncoder getBCryptPasswordEncoder()
        return new BCryptPasswordEncoder();
6.5 添加拦截器
6.5.1 LoginInterceptor 类
public class LoginInterceptor implements HandlerInterceptor
    @Override
    public boolean preHandle(HttpServletRequest request, HttpServletResponse response, Object handler) throws Exception
        HttpSession httpSession = request.getSession(false);
        if(httpSession != null && httpSession.getAttribute(Constant.USER_SESSION_KEY) != null)
            return true;

        response.sendRedirect("/login.html");
        return false;
6.5.2 AppConfig 类
@Configuration
public class AppConfig implements WebMvcConfigurer

    @Override
    public void addInterceptors(InterceptorRegistry registry)
        LoginInterceptor loginInterceptor = new LoginInterceptor();
        registry.addInterceptor(loginInterceptor)
                .addPathPatterns("/**")
                .excludePathPatterns("/**/login.html")
                .excludePathPatterns("/**/css/**.css")
                .excludePathPatterns("/**/images/**")
                .excludePathPatterns("/**/fonts/**")
                .excludePathPatterns("/**/js/**.js")
                .excludePathPatterns("/**/scss/**")
                .excludePathPatterns("/**/user/login")
                .excludePathPatterns("/**/user/register")
                .excludePathPatterns("/**/user/logout");
7. 登录模块
7.1 创建 User 实体类
创建 model 包, 然后创建 User 类
@Data
public class User
    private int userId;
    private String username;
    private String password;
7.2 使用 Mybatis 操作数据库
这里登录 需要进行 数据库的查询. 查询是否存在当前 username 的用户.
所以要设计, 通过用户名查找用户信息
7.2.1 在 UserServer 中添加代码
public User selectByName(String username)
        return userMapper.selectByName(username);
7.2.2 在 UserMapper 中添加代码
    /**
     * 通过用户名去查找用户信息, 用来对比登录信息.
     * @param username 用户名
     * @return 对应用户名的用户信息
     */
    User selectByName(String username);
7.2.3 在 UserMapper.xml 中添加代码
    <select id="selectByName" resultType="com.example.onlinemusicserver.model.User">
        select * from user where username=#username;
    </select>
7.3 创建 UserConroller 添加代码
注意这里的登录.
- 首先去数据库根据用户名查询是否存在当前用户.
- 如果不存在, 登录失败.
- 如果存在, 用输入的密码, 和数据库中的密码进行比较, 看是否相等. (注: 数据中的密码是加密的)
- 如果不相等, 登录失败.
- 如果相等, 创建 session, 并登录成功.
@RestController
@RequestMapping("/user")
public class UserController

    @Autowired
    private UserServer userServer;

    @Autowired
    private BCryptPasswordEncoder bCryptPasswordEncoder;

    /**
     * 用户登录
     * @param user
     * @param req
     * @return
     */
    @RequestMapping("/login")
    public ResponseBodyMessage<User> login(@RequestBody User user, HttpServletRequest req)
        User truUser = userServer.selectByName(user.getUsername());
        if(truUser != null)
            System.out.println("登陆成功");
            System.out.println(user.getPassword() + " " + truUser.getPassword());
            boolean flg = bCryptPasswordEncoder.matches(user.getPassword(),truUser.getPassword());
            if(!flg)
                return new ResponseBodyMessage<>(-1,"当前账号密码错误!",user);

            HttpSession session = req.getSession(true);
            session.setAttribute(Constant.USER_SESSION_KEY,truUser);
            return new ResponseBodyMessage<>(1,"登录成功!",truUser);
        else
            System.out.println("登录失败");
            return new ResponseBodyMessage<>(-1,"当前账号密码错误!",user);
7.4 前端代码
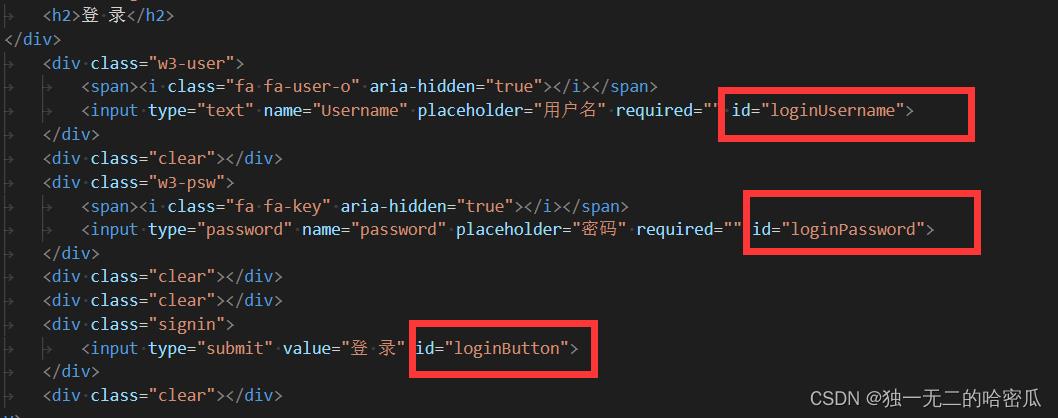
let loginButton = document.querySelector('#loginButton');
loginButton.onclick = function()
let username = document.querySelector('#loginUsername');
let password = document.querySelector('#loginPassword');
if (username.value.trim() == "")
alert('请先输入用户名!');
username.focus();
return;
if (password.value.trim() == "")