微服务Spring Boot线上和application.properties说再见第二弹原理篇
Posted 工匠小猪猪的技术世界
tags:
篇首语:本文由小常识网(cha138.com)小编为大家整理,主要介绍了微服务Spring Boot线上和application.properties说再见第二弹原理篇相关的知识,希望对你有一定的参考价值。

您对于源码的疑问每条留言都将得到认真回复。甚至不知道如何读源码也可以请教噢。
新的源码解析文章实时收到通知。每两周更新一篇左右。
前情回顾Spring Cloud带来的思路理解Spring的配置文件资源辅助程序属性源动态配置后端集成动态配置更新源码解析如何用本地配置覆盖远程配置
前情回顾
在上文中我们通过两个实际的代码案例演示了如何加载远程配置中心的配置,这篇文章承接上文的话题,深入浅出剖析一下原理。
Spring Cloud带来的思路
Spring Cloud 为开发人员提供了一系列的工具来快速构建分布式系统的通用模型 。例如:配置管理、服务发现、断路由、智能路由、微代理、控制总线、一次性Token、全局锁、决策竞选、分布式session、集群状态等等。
Cloud Native是一种持续交付和价值驱动开发推荐的最佳实践方式。它的理念包含了DevOps、持续交付、微服务、敏捷基础设施、康威定律,以及根据商业能力对公司进行重组。一个很好的契约例子是12-factor Apps。在环境中存储配置是十二因素中的第三个因素,在一个持续交付的世界里,管理我们的应用程序的配置变得更加重要,这样我们就可以从部署我们的应用程序中改变配置。Spring Cloud 遵循第三个因素的解决方案是Spring Cloud Config, 这基本上是一种独立于应用程序本身管理应用程序配置的方法。
Spirng Cloud 提供了一系列的工具和特性来促进这些开发,所有的组件都是基于分布式,并且非常容易开始使用。
构建Spring Cloud的大部分特性都是基于Spring Boot的。Spring Cloud的一些特性来源于两个库:Spring Cloud Context 和 Spring Cloud Commons。Spring Cloud Context为Spring Cloud应用程序的ApplicationContext提供了基础的服务(启动上下文,加密,刷新作用域和环境端点)。Spring Cloud Commons是为实现不同的Spring Cloud实现的抽象。(例如:Spring Cloud Netflix 和 Spring Cloud Consul)
Spring Cloud会创建一个Bootstrap Context,作为Spring应用的Application Context的父上下文。初始化的时候,Bootstrap Context负责从外部源加载配置属性并解析配置。这两个上下文共享一个从外部获取的Environment。Bootstrap属性有高优先级,默认情况下,它们不会被本地配置覆盖。
上一篇文章的方法二PropertySourceLocator就是基于Spring Cloud Config的设计思路,很多公司并不使用Spring Cloud的那套配置,而是使用自研的配置中心,比如阿里巴巴就使用diamond。微服务具有良好的伸缩性和扩展性,这是我们比较关注的两个方面。当后台的服务模块越多,随之带来的配置就越多,这样配置集中化管理就变的很有必要,微服务应用一般会有配置的集中管理、不同环境配置的切换、配置的动态更新等需求。将spring boot和一个统一配置中心合并起来,这是极好的。
笔者的架构思路是:
1.application.properties,从配置中心拉取,仅仅启动时进行
2.配置发生变更通知,直接使用配置中心的client满足业务需求
3.数据库、缓存之类的采用数据库中间件、缓存中间件,方法就是更换datasource,compare and swap,和hikariCP的实现一样,使用housekeeper即可
理解Spring的配置文件资源
在DZONE https://dzone.com/articles/spring-cloud-config-series-part-1-introduction 中详细介绍了Spring Cloud Config的相关内容,我们引用一部分学习一下
在每个 Spring 应用程序中,运行的配置文件总是以相同的方式处理。 运行的配置文件被称为属性源,基本上是一组按属性源来分组的配置文件,举个例子 ,将加载到应用程序中的 .properties 文件分组到一个 PropertySource 对象中。
当您的应用程序运行时,Spring 使用优先级属性源列表创建 Environment ,然后在每次您想要读取属性时,它将使用Spring 提供的查找配置的任何方式来查找属性。
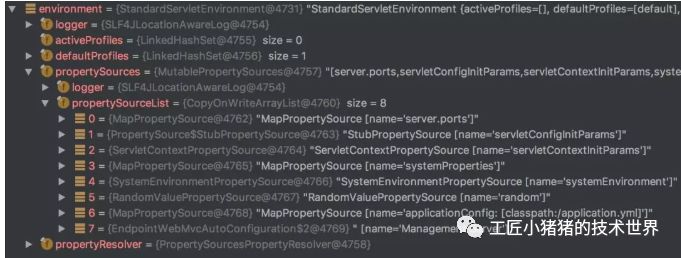
为了获得更直观的表示,当一个非常简单的 Spring Boot 应用程序启动时,您可以看到以下 Environment 对象的屏幕截图。

如您所见,环境包含一个属性源列表。每当尝试在应用程序中使用属性时,Spring 都会按照属性值的顺序查询每个属性源。如果它在属性源中找到一个值,它将返回它。否则,它将转到下一个属性源。它将继续这样做,直到它在一个属性源中找到一个值,或者直到没有其他属性源为止。
对于上面的示例,在 application.yml 属性源中,如果您有一个名为 sample.firstProperty 的属性(在列表第七个里) ,Spring 将首先遍历前面的六个属性源。因为它们都不包含该值,所以最终会到达 application.yml 。但是,如果您给系统属性名为 sample.firstProperty 添加一些值,然后应用程序将使用该值,因为系统属性源是列表中的第四个元素。
辅助程序属性源
在使用Spring Cloud Config 库时, 您的运行时配置设置将有轻微改变。如果我们用类路径中可用的这些库之一启动应用程序,比如Spring Cloud Config Zookeeper,检查应用程序的属性源,就像我们之前对普通应用程序所做的那样,你会注意到有一些不同之处。正如您在下图中看到的,还有一些属性源
这些是 Spring Cloud 添加的一些属性源。最重要的是列表中的第二个元素,名为 bootstrapProperties。Spring Cloud 引入了 PropertySourceLocator 的概念,该概念用于定位远程属性源。当您的应用程序启动时,这些远程属性源将被解析,然后将它们组合成一个 CompositePropertySource,并将其插入到环境的优先级列表的顶部,并使用名称 bootstrapProperties。这基本上意味着远程配置将覆盖您在应用程序中嵌入的任何配置,甚至是系统属性。
动态配置后端集成
PropertySourceLocator 对象如何负责加载远程属性。Spring Cloud Config 的一个主要特性是,它提供了一些不同的选项,用于加载远程属性,如Git、Zookeeper 或 Consul。
需要注意的是,当您编写应用程序时,您可以选择如何使用前面讨论过的方法之一将配置注入到组件中,但是正如你所看到的,这些方法都没有定义这些属性的真正来源。代码完全不知道属性在哪里定义。这使得修改用于加载远程配置的底层技术变得非常容易。
动态配置更新
当应用程序启动时,您的远程属性源就会被加载。由于 Spring Cloud Config 的整个目的是能够管理配置,而无需重新部署应用程序,它还提供了一种刷新配置的方法RefreshScope。详细内容请移步https://dzone.com/articles/spring-cloud-config-series-part-1-introduction
源码解析
SpringBoot应用启动后的调用栈如下:
SpringApplicationBuilder.run() -> SpringApplication.run() -> SpringApplication.createAndRefreshContext() -> SpringApplication.applyInitializers() -> PropertySourceBootstrapConfiguration.initialize()
ConfigFileApplicationListener(spring boot) : 管理我们的配置文件的,例如:application.properties
ConfigFileApplicationListener(spring boot) : 管理我们的配置文件的,例如:application.properties
BootstrapApplicationListener(spring cloud) 负责加载bootstrap.properties 或者 bootstrap.yaml,初始化Bootstrap上下文(如图所示,启动后初始化顶级上下文,命名为bootstrap,有没有点java的BootstrapClassLoader的意思。也可以看出spring cloud是事件驱动的方式进行初始化)
Spring-boot启动时,会加载一些默认的监听器,其中有一个监听器是ConfigFileApplicationListener,这个监听器的作用就是读取工程中的配置信息。我们简单梳理下启动流程,首先启动类调用SpringApplication的run方法,并在run方法中调用了SpringApplication的构造方法,然后构造方法中初始化了Spring-boot启动需要的监听器;这个ConfigFileApplicationListener监听了SpringApplication启动事件,监听代码如下:
    @Override
    public void onApplicationEvent(ApplicationEvent event) {
        if (event instanceof ApplicationEnvironmentPreparedEvent) {
            onApplicationEnvironmentPreparedEvent(
                    (ApplicationEnvironmentPreparedEvent) event);
        }
        if (event instanceof ApplicationPreparedEvent) {
            onApplicationPreparedEvent(event);
        }
    }

    private void onApplicationEnvironmentPreparedEvent(
            ApplicationEnvironmentPreparedEvent event) {
        List<EnvironmentPostProcessor> postProcessors = loadPostProcessors();
        postProcessors.add(this);
        AnnotationAwareOrderComparator.sort(postProcessors);
        for (EnvironmentPostProcessor postProcessor : postProcessors) {
            postProcessor.postProcessEnvironment(event.getEnvironment(),
                    event.getSpringApplication());
        }
    }

    List<EnvironmentPostProcessor> loadPostProcessors() {
        return SpringFactoriesLoader.loadFactories(EnvironmentPostProcessor.class,
                getClass().getClassLoader());
    }

    @Override
    public void postProcessEnvironment(ConfigurableEnvironment environment,
            SpringApplication application) {
        addPropertySources(environment, application.getResourceLoader());
    }

    private void onApplicationPreparedEvent(ApplicationEvent event) {
        this.logger.replayTo(ConfigFileApplicationListener.class);
        addPostProcessors(((ApplicationPreparedEvent) event).getApplicationContext());
    }
当启动时候,触发监听器执行任务,执行过程中调用了postProcessEnvironment方法,这个方法中的“addPropertySources(environment, application.getResourceLoader())”这句代码,便是添加属性到上下文环境中去,再往后就会看到具体实现是通过内部类Loader实现的。
/**
     * Load and instantiate the factory implementations of the given type from
     * {@value #FACTORIES_RESOURCE_LOCATION}, using the given class loader.
     * <p>The returned factories are sorted through {@link AnnotationAwareOrderComparator}.
     * <p>If a custom instantiation strategy is required, use {@link #loadFactoryNames}
     * to obtain all registered factory names.
     * @param factoryClass the interface or abstract class representing the factory
     * @param classLoader the ClassLoader to use for loading (can be {@code null} to use the default)
     * @see #loadFactoryNames
     * @throws IllegalArgumentException if any factory implementation class cannot
     * be loaded or if an error occurs while instantiating any factory
     */
    public static <T> List<T> loadFactories(Class<T> factoryClass, @Nullable ClassLoader classLoader) {
        Assert.notNull(factoryClass, "'factoryClass' must not be null");
        ClassLoader classLoaderToUse = classLoader;
        if (classLoaderToUse == null) {
            classLoaderToUse = SpringFactoriesLoader.class.getClassLoader();
        }
        List<String> factoryNames = loadFactoryNames(factoryClass, classLoaderToUse);
        if (logger.isTraceEnabled()) {
            logger.trace("Loaded [" + factoryClass.getName() + "] names: " + factoryNames);
        }
        List<T> result = new ArrayList<>(factoryNames.size());
        for (String factoryName : factoryNames) {
            result.add(instantiateFactory(factoryName, factoryClass, classLoaderToUse));
        }
        AnnotationAwareOrderComparator.sort(result);
        return result;
    }
在ConfigFileApplicationListener的内部类Loader中(springboot 2.X改变了),简要说一下Loader类中加载配置文件代码逻辑。首先创建PropertySourcesLoader对象,并通用PropertySourcesLoader对象在目录classpath:/(类加载目录)、classpath:/config/(类加载目录下的config目录)、file:./(当前目录)、file:./config/(当前目录下的config目录)中,查找名称为application的属性文件(后缀名可以是properties、xml、yml、yaml)。通过上面步骤,Spring就会读取到所有配置信息,接下来通过addConfigurationProperties()方法将属性放入到环境变量的propertySources中去。源码如下:
private void addConfigurationProperties(MutablePropertySources sources) {
            List<PropertySource<?>> reorderedSources = new ArrayList<PropertySource<?>>();
            for (PropertySource<?> item : sources) {
                reorderedSources.add(item);
            }
            addConfigurationProperties(
                    new ConfigurationPropertySources(reorderedSources));
        }

        private void addConfigurationProperties(
                ConfigurationPropertySources configurationSources) {
            MutablePropertySources existingSources = this.environment
                    .getPropertySources();
            if (existingSources.contains(DEFAULT_PROPERTIES)) {
                existingSources.addBefore(DEFAULT_PROPERTIES, configurationSources);
            }
            else {
                existingSources.addLast(configurationSources);
            }
        }
加入全局配置后 ,远程配置文件是如何放入到环境变量的propertySources中去呢?读取本地配置的代码不变,接着后面在SpringApplication.applyInitializers()方法中,会调用PropertySourceBootstrapConfiguration.initialize()的方法,PropertySourceBootstrapConfiguration是非常重要的类,它实现了ApplicationContextInitializer接口,该接口会在应用上下文刷新之前refresh()被回调,从而执行初始化操作。获取到的配置信息存放在CompositePropertySource。
public class PropertySourceBootstrapConfiguration implements
        ApplicationContextInitializer<ConfigurableApplicationContext>, Ordered {

    private int order = Ordered.HIGHEST_PRECEDENCE + 10;

    @Autowired(required = false)
    private List<PropertySourceLocator> propertySourceLocators = new ArrayList<>();

    @Override
    public void initialize(ConfigurableApplicationContext applicationContext) {
        CompositePropertySource composite = new CompositePropertySource(
                BOOTSTRAP_PROPERTY_SOURCE_NAME);
        //对propertySourceLocators数组进行排序,根据默认的AnnotationAwareOrderComparator
        AnnotationAwareOrderComparator.sort(this.propertySourceLocators);
        boolean empty = true;
        //获取运行的环境上下文
        ConfigurableEnvironment environment = applicationContext.getEnvironment();
        for (PropertySourceLocator locator : this.propertySourceLocators) {
            //遍历this.propertySourceLocators
            PropertySource<?> source = null;
            source = locator.locate(environment);
            if (source == null) {
                continue;
            }
            logger.info("Located property source: " + source);
            //将source添加到PropertySource的链表中
            composite.addPropertySource(source);
            empty = false;
        }
        //只有source不为空的情况,才会设置到environment中
        if (!empty) {
            //返回Environment的可变形式,可进行的操作如addFirst、addLast
            MutablePropertySources propertySources = environment.getPropertySources();
            String logConfig = environment.resolvePlaceholders("${logging.config:}");
            LogFile logFile = LogFile.get(environment);
            if (propertySources.contains(BOOTSTRAP_PROPERTY_SOURCE_NAME)) {
                //移除bootstrapProperties
                propertySources.remove(BOOTSTRAP_PROPERTY_SOURCE_NAME);
            }
            //根据config server覆写的规则,设置propertySources
            insertPropertySources(propertySources, composite);
            reinitializeLoggingSystem(environment, logConfig, logFile);
            setLogLevels(environment);
            //处理多个active profiles的配置信息
            handleIncludedProfiles(environment);
        }
    }
    //...
}
下面我们看一下,在initialize方法中进行了哪些操作。
根据默认的 AnnotationAwareOrderComparator 排序规则对propertySourceLocators数组进行排序
获取运行的环境上下文ConfigurableEnvironment
遍历propertySourceLocators时
调用 locate 方法,传入获取的上下文environment
将source添加到PropertySource的链表中
设置source是否为空的标识标量empty
source不为空的情况,才会设置到environment中
返回Environment的可变形式,可进行的操作如addFirst、addLast
移除propertySources中的bootstrapProperties
根据config server覆写的规则,设置propertySources
处理多个active profiles的配置信息
初始化方法initialize处理时,先将所有PropertySourceLocator类型的对象的locate方法遍历,然后将各种方式得到的属性值放到CompositePropertySource中,最后调用insertPropertySources(propertySources, composite)方法设置到Environment中。Spring Cloud Context中提供了覆写远端属性的PropertySourceBootstrapProperties,利用该配置类进行判断属性源的优先级。
private void insertPropertySources(MutablePropertySources propertySources,
            CompositePropertySource composite) {
        MutablePropertySources incoming = new MutablePropertySources();
        incoming.addFirst(composite);
        PropertySourceBootstrapProperties remoteProperties = new PropertySourceBootstrapProperties();
        new RelaxedDataBinder(remoteProperties, "spring.cloud.config")
                .bind(new PropertySourcesPropertyValues(incoming));
        //如果不允许本地覆写
        if (!remoteProperties.isAllowOverride() || (!remoteProperties.isOverrideNone()
                && remoteProperties.isOverrideSystemProperties())) {
            propertySources.addFirst(composite);
            return;
        }
        //overrideNone为true,外部配置优先级最低
        if (remoteProperties.isOverrideNone()) {
            propertySources.addLast(composite);
            return;
        }
        if (propertySources
                .contains(StandardEnvironment.SYSTEM_ENVIRONMENT_PROPERTY_SOURCE_NAME)) {
            //根据overrideSystemProperties,设置外部配置的优先级
            if (!remoteProperties.isOverrideSystemProperties()) {
                propertySources.addAfter(
                        StandardEnvironment.SYSTEM_ENVIRONMENT_PROPERTY_SOURCE_NAME,
                        composite);
            }
            else {
                propertySources.addBefore(
                        StandardEnvironment.SYSTEM_ENVIRONMENT_PROPERTY_SOURCE_NAME,
                        composite);
            }
        }
        else {
            propertySources.addLast(composite);
        }
    }
上述实现主要是根据PropertySourceBootstrapProperties中的属性,调整多个配置源的优先级。从其实现可以看到 PropertySourceBootstrapProperties 对象的是被直接初始化,使用的是默认的属性值而并未注入我们在配置文件中设置的。(根据默认的 AnnotationAwareOrderComparator 排序规则对propertySourceLocators数组进行排序,这个数组中存放的就是全局配置的访问信息,如URL,配置名称等。接着代码中遍历propertySourceLocators这个对象,循环中调用PropertySourceLocator.locate方法将source添加到PropertySource的链表中。)
现在回想我们上一节的方法二,应该可以很方便的理解了
public class MyPropertySourceLocator implements PropertySourceLocator {
    @Override
    public PropertySource<?> locate(Environment environment) {
        //简单起见,这里直接创建一个map,你可以在这里写从哪里获取配置信息。这里应该从远程配置中心拉取,实际中间件开发时替换为配置中心的client
        Map<String,String> properties = new HashMap<>();
        properties.put("author","Tom");
        properties.put("spring.cloud.config.overrideNone","true");

        MyPropertySource myPropertySource = new MyPropertySource("myPropertySource",properties);
        return myPropertySource;
    }
}
propertySources中配置置文件读取是按照顺序进行的,当对应的属性读取到值之后,下面的文件就不会被遍历。表现出来的现象就是Spring-boot是按照一下顺序读取配置文件的。
远程配置文件
当前目录的config子目录
当前目录
classpath下的config子目录
classpath目录
如果在实际开发过程中,调试需要改变文件的优先级,可以通过实现ApplicationContextInitializer
如何用本地配置覆盖远程配置
应用的配置源通常都是远端的Config Server服务器,默认情况下,本地的配置优先级低于远端配置仓库。但是可以通过启动命令行参数来覆盖远程配置。如果需要本地文件覆盖远程文件,需要在远程配置文件里设置授权
spring.cloud.config.allowOverride=true(这个配置不能在本地被设置)。一旦设置了这个权限,你可以配置更加细粒度的配置来配置覆盖的方式,
比如:
spring.cloud.config.overrideNone=true 覆盖任何本地属性。当allowOverride为true时,overrideNone设置为true,外部的配置优先级更低,而且不能覆盖任何存在的属性源。默认为false
spring.cloud.config.overrideSystemProperties=false 仅仅系统属性和环境变量。用来标识外部配置是否能够覆盖系统属性,默认为true
allowOverride:标识overrideSystemProperties属性是否启用。默认为true,设置为false意为禁止用户的设置
还是继续上一篇文章中方法二的代码,如以下代码所示:
public class MyPropertySourceLocator implements PropertySourceLocator {
    @Override
    public PropertySource<?> locate(Environment environment) {
        //简单起见,这里直接创建一个map,你可以在这里写从哪里获取配置信息。这里应该从远程配置中心拉取,实际中间件开发时替换为配置中心的client
        Map<String,String> properties = new HashMap<>();
        properties.put("author","Tom");
        properties.put("spring.cloud.config.overrideNone","true");

        MyPropertySource myPropertySource = new MyPropertySource("myPropertySource",properties);
        return myPropertySource;
    }
}
我们的application.properties值为
spring.application.name=good-luck
author=Charles
city=Hangzhou
然而我们访问http://localhost:8080/author做测试时,却返回来我们本地的配置Charles
这是为什么呢?
我们继续回到PropertySourceBootstrapConfiguration的源码
private void insertPropertySources(MutablePropertySources propertySources,
            CompositePropertySource composite) {
        MutablePropertySources incoming = new MutablePropertySources();
        incoming.addFirst(composite);
        PropertySourceBootstrapProperties remoteProperties = new PropertySourceBootstrapProperties();
        Binder.get(environment(incoming)).bind("spring.cloud.config", Bindable.ofInstance(remoteProperties));
        if (!remoteProperties.isAllowOverride() || (!remoteProperties.isOverrideNone()
                && remoteProperties.isOverrideSystemProperties())) {
            propertySources.addFirst(composite);
            return;
        }
        if (remoteProperties.isOverrideNone()) {
            propertySources.addLast(composite);
            return;
        }
        if (propertySources
                .contains(StandardEnvironment.SYSTEM_ENVIRONMENT_PROPERTY_SOURCE_NAME)) {
            if (!remoteProperties.isOverrideSystemProperties()) {
                propertySources.addAfter(
                        StandardEnvironment.SYSTEM_ENVIRONMENT_PROPERTY_SOURCE_NAME,
                        composite);
            }
            else {
                propertySources.addBefore(
                        StandardEnvironment.SYSTEM_ENVIRONMENT_PROPERTY_SOURCE_NAME,
                        composite);
            }
        }
        else {
            propertySources.addLast(composite);
        }
    }
我们聚焦到核心点
        if (remoteProperties.isOverrideNone()) {
            propertySources.addLast(composite);
            return;
        }
继续跟进进去
    /**
     * Add the given property source object with lowest precedence.
     */
    public void addLast(PropertySource<?> propertySource) {
        if (logger.isDebugEnabled()) {
            logger.debug("Adding PropertySource '" + propertySource.getName() + "' with lowest search precedence");
        }
        removeIfPresent(propertySource);
        this.propertySourceList.add(propertySource);
    }
我们可以看到spring.cloud.config.overrideNone为true的逻辑,会将该属性降低为最低优先级(放到数组的最末尾),这样就实现了服务端修改来达到本地配置覆盖远程配置的功能。
以上是关于微服务Spring Boot线上和application.properties说再见第二弹原理篇的主要内容,如果未能解决你的问题,请参考以下文章
Spring Cloud:构建微服务 - Spring Boot