攻读netty源码,编码器
Posted 猴子学java
tags:
篇首语:本文由小常识网(cha138.com)小编为大家整理,主要介绍了攻读netty源码,编码器相关的知识,希望对你有一定的参考价值。
前言
前面已经深入分析了解码器的源码,那么这章就来分析解码的相反操作编码。而netty的编码器是怎么把一个对象转换成字节流,写入到socket中的呢?
带着这个疑问,我们从如下四点来分析:
1、writeAndFlush()分析;
2、MessageToByteEncoder分析;
3、写buff队列分析;
4、刷新buff队列分析。
5、总结。
一、writeAndFlush()分析
writeAndFlush属于应用程序主动发起的行为,属于Outbound事件,从前面的章节可以看出,write或者flush事件的传播是从Tail节点传播到Head节点,整个过程可以分为三步:
1、从Tail节点开始往前传播;
2、逐个调用ChannelHandler的write()方法;
3、逐个调用ChannelHandler的flush()方法.。
1、从Tail节点开始往前传播
当调用ctx.channel().writeAndFlush(msg)的时候,首先会调用Tail节点的writeAndFlush()。
public final ChannelFuture writeAndFlush(Object msg) {return tail.writeAndFlush(msg);}
继续跟进到AbstractChannelHandlerContext,依次调用如下方法:
public ChannelFuture writeAndFlush(Object msg) {return writeAndFlush(msg, newPromise());}public ChannelFuture writeAndFlush(Object msg, ChannelPromise promise) {write(msg, true, promise);return promise;}private void write(Object msg, boolean flush, ChannelPromise promise) {// 忽略无关代码AbstractChannelHandlerContext next = findContextOutbound();final Object m = pipeline.touch(msg, next);EventExecutor executor = next.executor();if (executor.inEventLoop()) {if (flush) {next.invokeWriteAndFlush(m, promise);} else {next.invokeWrite(m, promise);}} else {final AbstractWriteTask task;if (flush) {task = WriteAndFlushTask.newInstance(next, m, promise);} else {task = WriteTask.newInstance(next, m, promise);}if (!safeExecute(executor, task, promise, m)) {task.cancel();}}}private void invokeWriteAndFlush(Object msg, ChannelPromise promise) {if (invokeHandler()) {// 分别调用write和flushinvokeWrite0(msg, promise);invokeFlush0();} else {writeAndFlush(msg, promise);}}
2、逐个调用ChannelHandler的write()方法
writeAndFlush拆成了两份write和flush,首先查看invokeWrite0,由Pipeline章节的内容可知,此处会逐个调用ChannelHandler的write方法,直到HeadContext.。
private void invokeWrite0(Object msg, ChannelPromise promise) {try {((ChannelOutboundHandler) handler()).write(this, msg, promise);} catch (Throwable t) {notifyOutboundHandlerException(t, promise);}}
3、逐个调用ChannelHandler的flush()方法
在invokeWrite0方法中,逐个调用ChannelHandler的flush方法
private void invokeFlush0() {try {((ChannelOutboundHandler) handler()).flush(this);} catch (Throwable t) {notifyHandlerException(t);}}
二、MessageToByteEncoder分析
当调用writeAndFlush()方法之后,write事件的传播会经过MessageToByteEncoder的write方法,从字面意思也能明白它是一个把对象转换的成字节的编码器。在write方法中,实现了netty编码的逻辑骨架,具体可分为六步:
1、匹配对象;
2、申请内存;
3、调用子类的编码器,实现编码;
4、释放对象;
5、传播数据;
6、释放内存。
public void write(ChannelHandlerContext ctx, Object msg, ChannelPromise promise) throws Exception {ByteBuf buf = null;try {// 匹配对象if (acceptOutboundMessage(msg)) {("unchecked")I cast = (I) msg;// 申请内存buf = allocateBuffer(ctx, cast, preferDirect);try {// 调用子类d饿编码器,实现编码encode(ctx, cast, buf);} finally {// 回收对象ReferenceCountUtil.release(cast);}// 传播数据if (buf.isReadable()) {//说明writeIndex>readIndexctx.write(buf, promise);} else {buf.release();ctx.write(Unpooled.EMPTY_BUFFER, promise);}// 释放内存,等待GCbuf = null;} else {ctx.write(msg, promise);}} catch (EncoderException e) {throw e;} catch (Throwable e) {throw new EncoderException(e);} finally {// 释放内存if (buf != null) {buf.release();}}}
三、写buff队列分析
当write事件传播到HeadContext的时候,会调用UnSafe的write()方法,写入到buff队列。
public void write(ChannelHandlerContext ctx, Object msg, ChannelPromise promise) throws Exception {unsafe.write(msg, promise);}
在AbstractUnsafe的write方法中,可以分成三步进行分析:
1、direct化ByteBuf
2、插入到写队列
3、设置写状态
public final void write(Object msg, ChannelPromise promise) {// 忽略无关代码int size;try {// direct化ByteBufmsg = filterOutboundMessage(msg);// ByteBuf中的可读字节数size = pipeline.estimatorHandle().size(msg);if (size < 0) {size = 0;}} catch (Throwable t) {safeSetFailure(promise, t);ReferenceCountUtil.release(msg);return;}// 插入到写队列outboundBuffer.addMessage(msg, size, promise);}
1、direct化ByteBuf
首先进入AbstractNioByteChannel的filterOutboundMessage方法,如果ByteBuf是direct类型的,那么直接返回,否则转换成一个direct类型的ByteBuf。
protected final Object filterOutboundMessage(Object msg) {if (msg instanceof ByteBuf) {ByteBuf buf = (ByteBuf) msg;if (buf.isDirect()) {// direct类型额ByteBufreturn msg;}// 转换成direct类型的ByteBufreturn newDirectBuffer(buf);}if (msg instanceof FileRegion) {return msg;}throw new UnsupportedOperationException("unsupported message type: " + StringUtil.simpleClassName(msg) + EXPECTED_TYPES);}
2、插入写队列
Entry(flushedEntry) --> ... Entry(unflushedEntry) --> ... Entry(tailEntry)接着调用ChannelOutboundBuffer的addMessage方法,首先把数据封装成一个Entry,然后才是写buff队列。
public void addMessage(Object msg, int size, ChannelPromise promise) {// 把ByteBuf封装成一个EntryEntry entry = Entry.newInstance(msg, size, total(msg), promise);// 写队列操作if (tailEntry == null) {flushedEntry = null;} else {Entry tail = tailEntry;// 添加到链表尾部tail.next = entry;}tailEntry = entry;if (unflushedEntry == null) {unflushedEntry = entry;}// 设置写状态incrementPendingOutboundBytes(entry.pendingSize, false);}
通过下面两个图来形象的理解写队列的过程:
图1-首次写队列
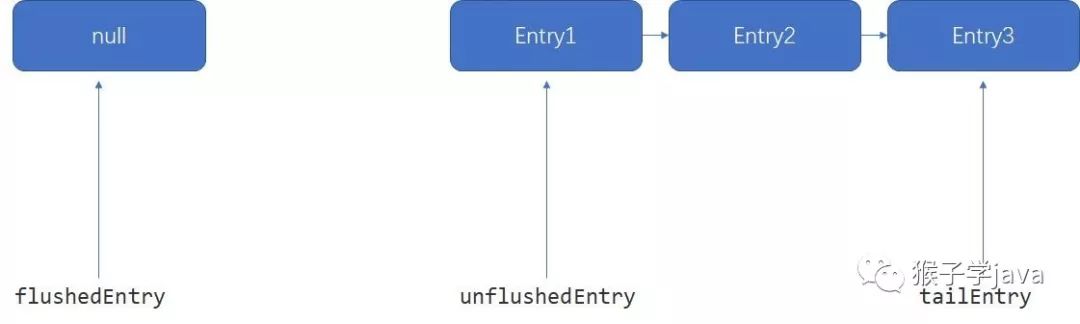
图2-N+1次写队列
buff队列是一个单向链表结构,flushedEntry到unflushedEntry是已经被flush的ByteBuf,从unflushedEntry到tailEntry是未被flush的ByteBuf。
3、设置写状态
当ByteBuf写到Buff队列之后,接着会计算未被flush的ByteBuf总字节数,如果超过了64K,那么触发ChannelWritabilityChanged事件,标志目前不可写。
private void incrementPendingOutboundBytes(long size, boolean invokeLater) {if (size == 0) {return;}// 计算未被flush的ByteBuf总字节数long newWriteBufferSize = TOTAL_PENDING_SIZE_UPDATER.addAndGet(this, size);if (newWriteBufferSize > channel.config().getWriteBufferHighWaterMark()) {// 为flush的ByteBuf字节数超过64K,// 触发ChannelWritabilityChanged事件setUnwritable(invokeLater);}}
四、刷新buff队列分析
写入buff队列完成之后,接着会调用invokeFlush0()方法,flush事件最终会传播到HeadContext,调用UnSafe的flush()方法刷新buff队列。
public void flush(ChannelHandlerContext ctx) throws Exception {unsafe.flush();}
继续跟进到AbstractUnsafe的flush()方法中,分析刷新buff队列的具体实现,整个过程可以分为两步:
1、添加刷新标志并且设置写状态;
2、遍历buff队列,过滤ByteBuf,调用jdk底层api进行自旋写。
public final void flush() {assertEventLoop();ChannelOutboundBuffer outboundBuffer = this.outboundBuffer;if (outboundBuffer == null) {return;}// 1、添加刷新标志并且设置写状态outboundBuffer.addFlush();//flush0();}
1、添加刷新标志并且设置写状态
在addFlush()方法中,遍历unflushedEntry到tailEntry这段链表的所有Entry,通过移动unflushedEntry和flushedEntry的指针,buff队列最终的数据结构会变成如下图所示:
图3-刷新buff队列之后
public void addFlush() {Entry entry = unflushedEntry;if (entry != null) {if (flushedEntry == null) {// there is no flushedEntry yet, so start with the entryflushedEntry = entry;}do {// 记录flush的Entry数量flushed ++;if (!entry.promise.setUncancellable()) {// Was cancelled so make sure we free up memory and notify about the freed bytesint pending = entry.cancel();// Entry 字节大小// 递减未被flush的字节数,当字节数小于32K的时候,设置写状态为可写decrementPendingOutboundBytes(pending, false, true);}// 遍历所有未被flush的Entryentry = entry.next;} while (entry != null);// All flushed so reset unflushedEntryunflushedEntry = null;}}
在遍历未被flush的Entry的时候,会递减未被flush总字节数,当未被flush的总字节数小于32K的时候,写状态会设置为可写状态,触发ChannelWritabilityChanged事件。
private void decrementPendingOutboundBytes(long size, boolean invokeLater, boolean notifyWritability) {if (size == 0) {return;}// 递减未被flush的总字节数long newWriteBufferSize = TOTAL_PENDING_SIZE_UPDATER.addAndGet(this, -size);// 小于32Kif (notifyWritability && newWriteBufferSize < channel.config().getWriteBufferLowWaterMark()) {// 设置可写状态setWritable(invokeLater);}}
2、遍历buff队列,过滤ByteBuf,调用jdk底层api进行自旋写
接着调用flush0(),其中的核心方法是调用doWrite()。
protected void flush0() {doWrite(outboundBuffer);}
然后进入NiosocketChannel的doWrite()方法,首先取到自旋锁的自旋次数,默认16,netty使用自旋锁是为了提高写入的吞吐量和内存利用率,然后遍历flushedEntry到unflushedEntry这段链表的Entry,过滤ByteBuf,把ByteBuf中包含的JDK ByteBuffer的放入到数组中,接着调用jdk底层api写入到Socket中,然后调整写入的最大字节数,移除buff队列中需要flush的Entry。
protected void doWrite(ChannelOutboundBuffer in) throws Exception {SocketChannel ch = javaChannel();// 获取自旋锁的自旋次数,默认16// 使用自旋锁可以提高写入的吞吐量和内存利用率int writeSpinCount = config().getWriteSpinCount();do {if (in.isEmpty()) { // 如果flush队列为空// All written so clear OP_WRITEclearOpWrite();// Directly return here so incompleteWrite(...) is not called.return;}// TCP发送缓冲区大小(默认8K)的两倍(16K),这样可以防止操作系统比我们更快的发送数据出去int maxBytesPerGatheringWrite = ((NioSocketChannelConfig) config).getMaxBytesPerGatheringWrite();// 遍历buff队列,取出ByteBuf中包含的JDK ByteBuffer放入数组// 数组最大1024个JDK ByteBuffer,总字节数不会超过16KByteBuffer[] nioBuffers = in.nioBuffers(1024, maxBytesPerGatheringWrite);// 需要写入Socket的JDK ByteBuffer的数量int nioBufferCnt = in.nioBufferCount();// Always us nioBuffers() to workaround data-corruption.// See https://github.com/netty/netty/issues/2761switch (nioBufferCnt) {case 0:// We have something else beside ByteBuffers to write so fallback to normal writes.writeSpinCount -= doWrite0(in);break;case 1: {// Only one ByteBuf so use non-gathering write// Zero length buffers are not added to nioBuffers by ChannelOutboundBuffer, so there is no need// to check if the total size of all the buffers is non-zero.ByteBuffer buffer = nioBuffers[0];int attemptedBytes = buffer.remaining();// 调用jdk底层api写入Socketfinal int localWrittenBytes = ch.write(buffer);if (localWrittenBytes <= 0) {incompleteWrite(true);return;}// 调整最大写入字节数adjustMaxBytesPerGatheringWrite(attemptedBytes, localWrittenBytes, maxBytesPerGatheringWrite);// 移除buff队列中的Entryin.removeBytes(localWrittenBytes);// 自旋减一--writeSpinCount;break;}default: {// Zero length buffers are not added to nioBuffers by ChannelOutboundBuffer, so there is no need// to check if the total size of all the buffers is non-zero.// We limit the max amount to int above so cast is safelong attemptedBytes = in.nioBufferSize();final long localWrittenBytes = ch.write(nioBuffers, 0, nioBufferCnt);if (localWrittenBytes <= 0) {incompleteWrite(true);return;}// Casting to int is safe because we limit the total amount of data in the nioBuffers to int above.adjustMaxBytesPerGatheringWrite((int) attemptedBytes, (int) localWrittenBytes,maxBytesPerGatheringWrite);in.removeBytes(localWrittenBytes);--writeSpinCount;break;}}} while (writeSpinCount > 0);// 如果自旋次数小于0,那么注册一个写事件到Selector上// 否则清除Selector上的写事件,并且封装一个flush的任务incompleteWrite(writeSpinCount < 0);}
如果最后的自旋次数小于0,说明数据还没写入完,那么会在Selector上注册一个Write事件,等待selector事件轮询,强制刷新。
否则会清除Selector上的Write事件,防止空轮询,最后封装一个flush的任务到队列中。
protected final void incompleteWrite(boolean setOpWrite) {// Did not write completely.if (setOpWrite) {setOpWrite();} else {// It is possible that we have set the write OP, woken up by NIO because the socket is writable, and then// use our write quantum. In this case we no longer want to set the write OP because the socket is still// writable (as far as we know). We will find out next time we attempt to write if the socket is writable// and set the write OP if necessary.clearOpWrite();// Schedule flush again later so other tasks can be picked up in the meantimeeventLoop().execute(flushTask);}}
五、总结
回到文章开头的疑问:netty在调用writeAndFlush方法的时候,会先后触发Pipeline中的write事件flush事件,当触发write事件的时候,一般会经过继承了MessageToByteEncoder的编码器,负责把写入的对象放到ByteBuf中,这两个事件都会传播到HeadContext中,调用UnSafe的write和flush方法,调用write方法主要把ByteBuf放到一个buff队列,如果buff队列中未flush的字节数超过了64K,那么会变得不可写,当调用flush方法的时候,未flush的字节数会递减,如果低于32K,Channel重新恢复到可写状态,buff队列中的数据,netty使用自旋锁的方式把ByteBuf写入到Socket中。
欢迎关注个人博客:https://my.oschina.net/chenfanglin
以上是关于攻读netty源码,编码器的主要内容,如果未能解决你的问题,请参考以下文章