技术篇 | 从响应式编程到WebFlux
Posted 携宁技术
tags:
篇首语:本文由小常识网(cha138.com)小编为大家整理,主要介绍了技术篇 | 从响应式编程到WebFlux相关的知识,希望对你有一定的参考价值。
背 景
自1991年发布了http 0.9版本到1997年发布http 1.1版本,至今已活跃20余年且如今依然是最活跃的版本.
然而http 1.1虽然已解决了大多数问题,然而也有诸多缺陷,为了解决这些缺陷后来又相继推出的http/2和websocket等协议。
比如为了实现实时推送这个功能时,过去的做法基本上都是采用轮询机制,而这种方式显然浪费了很多带宽资源.而不论是http/2还是websocket,我们都可以发现他们都可以实现服务器主动推送的方式。
可是不管是http/2还是websocket,他们都只是在应用层的协议,最终都需要有客户端和服务端进行支持才可以实现。
就拿websocket来说,目前主流客户端(即浏览器)的支持如下:

在服务端方面,当前主流的语言和web容器都对WebSocket提供了支持,
如php,jetty,tomcat,Node.js,nginx等等.
http/2的实现也是大同小异,不多赘述.
探 索
既然客户端已经实现了,容器也实现了,可是笔者作为一个开发人员,更关心的是服务端如何实现.既然如此,必然有好事之者为我们提供了这么一套框架,为我们屏蔽繁琐了学习成本和坑.这就是ReactiveX:
ReactiveX is a library for composing asynchronous and event-based programs by using observable sequences.
It extends the observer pattern to support sequences of data and/or events and adds operators that allow you to compose sequences together declaratively while abstracting away concerns about things like low-level threading, synchronization, thread-safety, concurrent data structures, and non-blocking I/O.
译:
ReactiveX 是一个基于一系列可观察的异步和基础事件编程组成的一个库。
它继承观察者模式,支持序列数据或者事件。更高级的用法允许你将如下的一些抽象概念操作一起联合使用,比如低线程,同步,线程安全,数据并发,非阻塞I/O流。
基于以上官网介绍可知,ReactiveX 只是一个库,它可以用各种编程语言实现,例如官网中列出的Java实现:RxJava.
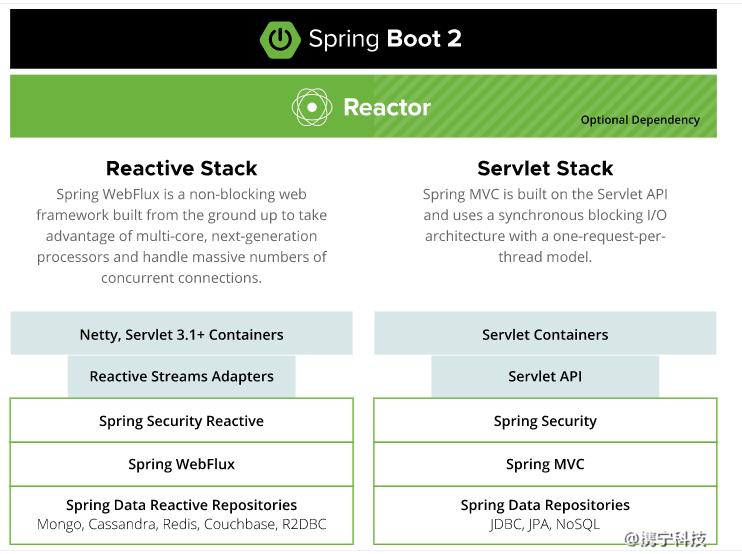
可是光是这样还是不够,我们还是需要去关注RxJava的一些实现,于是乎号称开发人员春天的Spring出手了,在2017年9月,反应式编程模型作为最新的Spring Framework 5新特性加入了Spring框架,而Spring WebFlux则是相关功能的核心.它为我们提供了两种编程模型:
1、基于注解的模型
基于注解的模型是 Spring WebMVC 的替代方案,该模型基于反应式基础而构建.可以让开发人员通过类似于Spring WebMVC的方式开发,降低了学习成本.
2、Functional Web Framework
必须注意的是,在Spring Framework中,MVC和Reactive是互相独立的栈,不能同时使用,其对应的架构如下图所示:
体 验
说了这么多,接下来就是体验一把,下面笔者会分享一个简单的前后端分离的对话机器人和一个简单的实时股价刷新帮助大家更好的学习和使用WebFlux.
以下是一些前置工具和选型:
JDK:JDK 1.8以上,demo中用的是1.8
构建工具:Gradle 4+ or Maven 3.2+,这里用的是Maven
IDE:笔者用的是IntelliJ IDEA 2019.2
SpringBoot版本:2.1.5.RELEASE
事实上,如何使用开发工具创建一个SpringBoot项目想必大家早已熟能生巧,在此不多赘述.说一下主要的POM配置:
<dependency><groupId>org.springframework.boot</groupId><artifactId>spring-boot-starter-webflux</artifactId></dependency><dependency><groupId>javax.websocket</groupId><artifactId>javax.websocket-api</artifactId><version>1.1</version></dependency>
对话机器人
新建一个EchoHandler,代码如下:
public class EchoHandler implements WebSocketHandler {public Mono<Void> handle(WebSocketSession session){// 价值一个亿的代码return session.send(session.receive().map(msg -> msg.getPayloadAsText().replace("吗","").replace("?","").replace("?","")).map(session::textMessage));}}
修改启动类,添加如下配置:
public EchoHandler echoHandler() {return new EchoHandler();}public HandlerMapping handlerMapping() {Map<String, WebSocketHandler> map = new HashMap<>();map.put("/echo", echoHandler());SimpleUrlHandlerMapping mapping = new SimpleUrlHandlerMapping();mapping.setUrlMap(map);mapping.setOrder(Ordered.HIGHEST_PRECEDENCE);return mapping;}public WebSocketHandlerAdapter handlerAdapter() {return new WebSocketHandlerAdapter(webSocketService());}public WebSocketService webSocketService() {return new HandshakeWebSocketService(new ReactorNettyRequestUpgradeStrategy());}
需要注意的是其中的类都有同名,选择org.springframework.web.reactive下的.
在resources文件夹下新建static文件夹,新建app.js和index.html,加入如下代码:
app.js
var ws = null;var url = "ws://localhost:8080/echo";function setConnected(connected) {document.getElementById('connect').disabled = connected;document.getElementById('disconnect').disabled = !connected;document.getElementById('echo').disabled = !connected;}function connect(){ws = new WebSocket(url);ws.onopen = function() {setConnected(true);log('Info: Connection Established.');};ws.onmessage = function(event) {log(event.data);};ws.onclose = function(event) {setConnected(false);log('Info: Closing Connection.');};}function disconnect() {if (ws != null) {ws.close();ws = null;}setConnected(false);}function echo() {if (ws != null){var message = document.getElementById('message').value;log('Sent to server :: ' + message);ws.send(message);} else {alert('connection not established, please connect.');}}function log(message) {var console = document.getElementById('logging');var p = document.createElement('p');p.appendChild(document.createTextNode(message));console.appendChild(p);}
index.html
<html><head><link type="text/css" rel="stylesheet"href="https://cdnjs.cloudflare.com/ajax/libs/semantic-ui/2.2.10/semantic.min.css" /><script type="text/javascript" src="app.js"></script></head><body><div><div id="connect-container" class="ui centered grid"><div class="row"><button id="connect" onclick="connect();" class="ui green button ">Connect</button><button id="disconnect" disabled="disabled" onclick="disconnect();"class="ui red button">Disconnect</button></div><div class="row"><textarea id="message" style="width: 350px" class="ui input"placeholder="Message to Echo"></textarea></div><div class="row"><button id="echo" onclick="echo();" disabled="disabled"class="ui button">Echo message</button></div></div><div id="console-container"><h3>Logging</h3><div id="logging"></div></div></div></body></html>
运行项目,在浏览器中打开http://localhost:8080/index.html
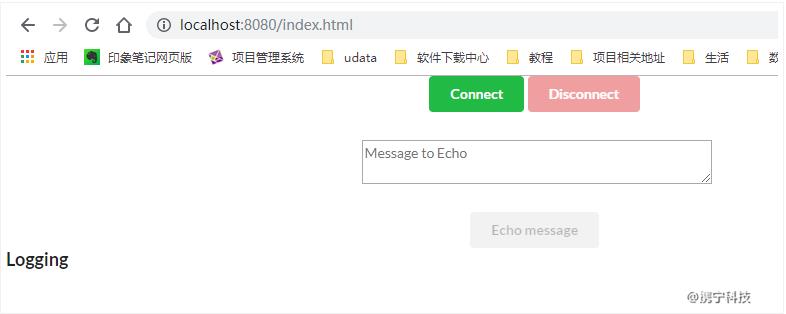
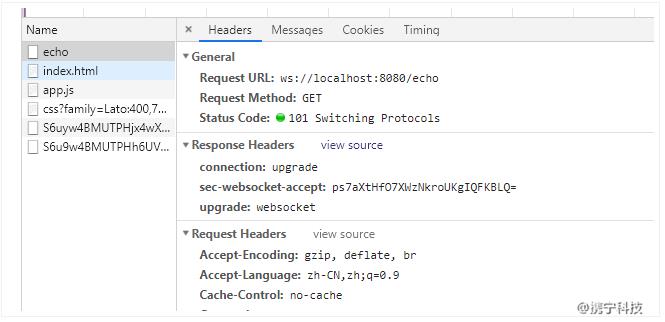
单机connect创建连接,此时可以在开发者工具中看到ws的相关信息:
发送消息进行对话:
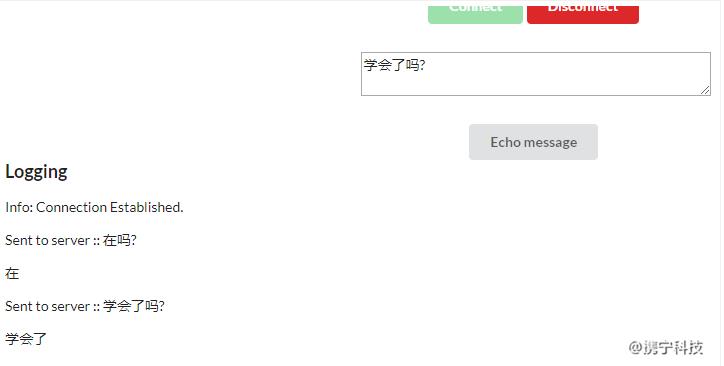
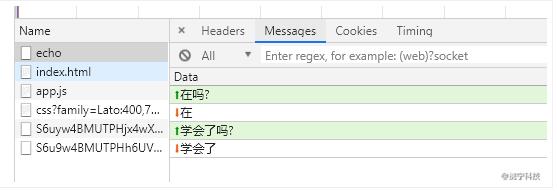
一个简单的websocket对话机器人就这样做好了。
实时股价刷新
考虑了一下还是加上这个例子,毕竟前文中所题的类似MVC注解方式和服务器端推送的效果在上一个例子中体现的不够。接下来直接上代码,大家可以直接复制到开发工具中,应该可以直接跑起。
新建一个Controller类
public class WebFluxController {private Random r = new Random();public Flux<ServerSentEvent<Object>> sendPrice() {return Flux.interval(Duration.ofSeconds(1)).map(seq -> Tuples.of(seq, getPrice())).map(data -> ServerSentEvent.<Object>builder().event("change").id(Long.toString(data.getT1())).data(data.getT2().toString()).build());}private Double getPrice() {return new BigDecimal(r.nextDouble() * 10).setScale(2, RoundingMode.HALF_UP).doubleValue();}}
还是index.html
<html lang="en"><head><meta charset="UTF-8"><title>Title</title></head><body>XX公司实时股价:<div id="price"></div></body><script>if (typeof (EventSource) !== "undefined") {new EventSource("/stock/price").addEventListener("change", function(e) {document.getElementById("price").innerHTML = e.data;}, false);} else {// 轮询的方式处理}</script></html>
运行后效果如图:

查看开发者工具会发现复用连接的端倪:
END
以上是关于技术篇 | 从响应式编程到WebFlux的主要内容,如果未能解决你的问题,请参考以下文章