玩转Flume之核心架构深入解析
Posted 小象
tags:
篇首语:本文由小常识网(cha138.com)小编为大家整理,主要介绍了玩转Flume之核心架构深入解析相关的知识,希望对你有一定的参考价值。
一、Flume架构分析
这个图中核心的组件是:
Source,ChannelProcessor,Channel,Sink。他们的关系结构如下:
Source  {    ChannelProcessor  {             Channel  ch1             Channel  ch2             …    }}
Sink  {   Channel  ch; } SinkGroup {   Channel ch;   Sink s1;   Sink s2;   … }
二、各组件详细介绍
1、Source组件
Source是数据源的总称,我们往往设定好源后,数据将源源不断的被抓取或者被推送。
常见的数据源有:ExecSource,KafkaSource,HttpSource,NetcatSource,JmsSource,AvroSource等等。
所有的数据源统一实现一个接口类如下:
@InterfaceAudience.Public@InterfaceStability.Stablepublic interface Source extends LifecycleAware, NamedComponent {  /**   * Specifies which channel processor will handle this source's events.   *   * @param channelProcessor   */
  public void setChannelProcessor(ChannelProcessor channelProcessor);  /**   * Returns the channel processor that will handle this source's events.   */
  public ChannelProcessor getChannelProcessor();

}
Source提供了两种机制: PollableSource(轮询拉取)和EventDrivenSource(事件驱动):
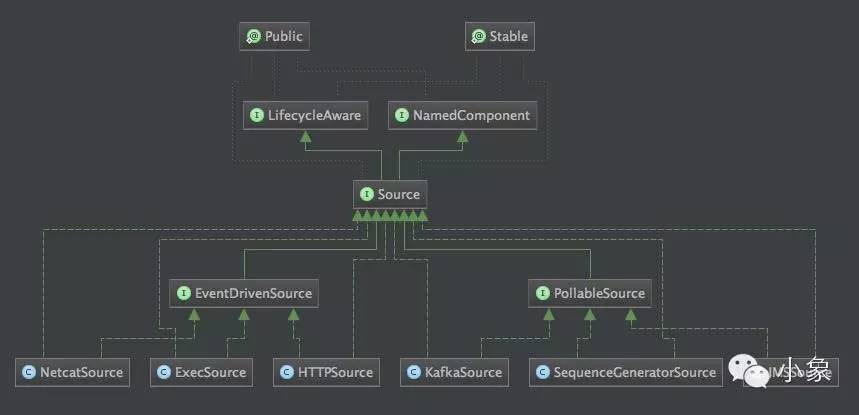
B0F4FCCA-7DAF-4E2B-B1DB-1AC23ACA2128.png
上图展示的Source继承关系类图。
通过类图我们可以看到NetcatSource,ExecSource和HttpSource属于事件驱动模型。KafkaSource,SequenceGeneratorSource和JmsSource属于轮询拉取模型。
Source接口继承了LifecycleAware接口,它的的所有逻辑的实现在接口的start和stop方法中进行。
下图是类关系方法图:
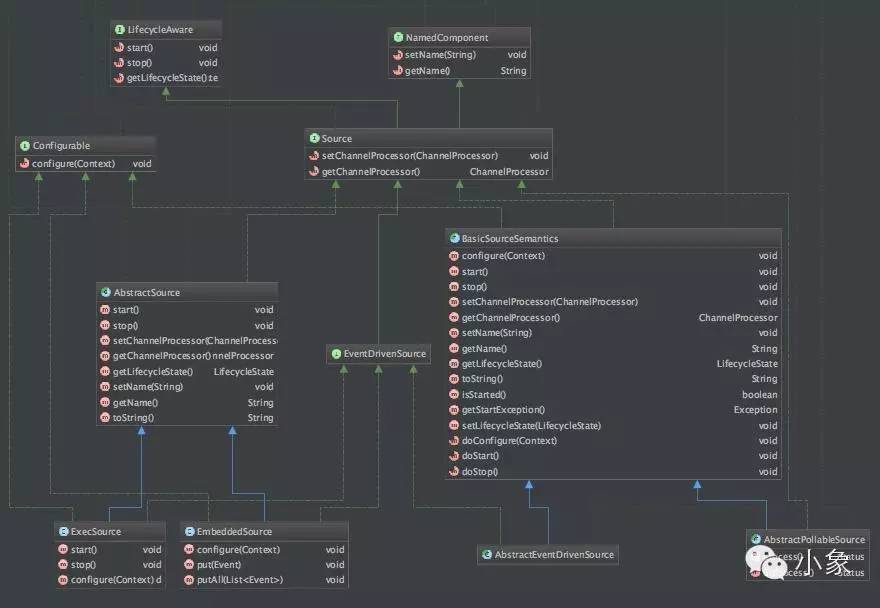
E8953D29-35EC-4A63-AC72-78675BE0A56E.png
Source接口定义的是最终的实现过程,比如通过日志抓取日志,这个抓取的过程和实际操作就是在对应的Source实现中,比如:ExecSource。那么这些Source实现由谁来驱动的呢?现在我们将介绍SourceRunner类。将看一下类继承结构图:
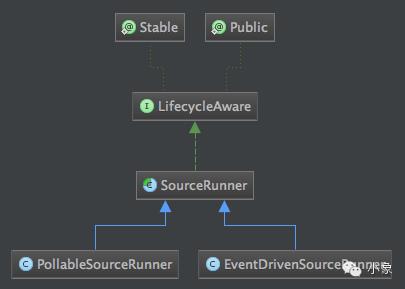
Paste_Image.png
我们看一下PollableSourceRunner和EventDrivenSourceRunner的具体实现:
//PollableSourceRunner:public void start() {
    PollableSource source = (PollableSource) getSource();
    ChannelProcessor cp = source.getChannelProcessor();
    cp.initialize();
    source.start();

    runner = new PollingRunner();

    runner.source = source; //Source实现类就在这里被赋与。
    runner.counterGroup = counterGroup;
    runner.shouldStop = shouldStop;

    runnerThread = new Thread(runner);
    runnerThread.setName(getClass().getSimpleName() + "-" +
        source.getClass().getSimpleName() + "-" + source.getName());
    runnerThread.start();

    lifecycleState = LifecycleState.START;
  }//EventDrivenSourceRunner:@Override
  public void start() {
    Source source = getSource();
    ChannelProcessor cp = source.getChannelProcessor();
    cp.initialize();
    source.start();
    lifecycleState = LifecycleState.START;
  }
注:其实所有的Source实现类内部都维护着线程,执行source.start()其实就是启动了相应的线程。
刚才我们看代码,代码中一直都在展示channelProcessor这个类,同时最上面架构设计图里面也提到了这个类,那它到底是干什么呢,下面我们就对其分解。
2、Channel组件
Channel用于连接Source和Sink,Source将日志信息发送到Channel,Sink从Channel消费日志信息;Channel是中转日志信息的一个临时存储,保存有Source组件传递过来的日志信息。
先看代码如下:
ChannelSelectorConfiguration selectorConfig = config.getSelectorConfiguration();

ChannelSelector selector = ChannelSelectorFactory.create(sourceChannels, selectorConfig);

ChannelProcessor channelProcessor = new ChannelProcessor(selector);
Configurables.configure(channelProcessor, config);

source.setChannelProcessor(channelProcessor);
ChannelSelectorFactory.create方法实现如下:
public static ChannelSelector create(List<Channel> channels, ChannelSelectorConfiguration conf) { String type = ChannelSelectorType.REPLICATING.toString(); if (conf != null){ type = conf.getType();
} ChannelSelector selector = getSelectorForType(type);
selector.setChannels(channels); Configurables.configure(selector, conf); return selector;
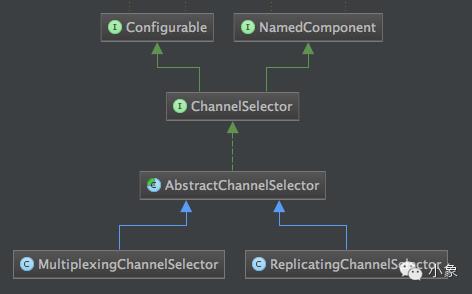
}其中我们看一下ChannelSelectorType这个枚举类,包括了几种类型:
public enum ChannelSelectorType {  /**   * Place holder for custom channel selectors not part of this enumeration.   */
  OTHER(null),  /**   * 复用通道选择器   */
  REPLICATING("org.apache.flume.channel.ReplicatingChannelSelector"),  /**   *  多路通道选择器   */
  MULTIPLEXING("org.apache.flume.channel.MultiplexingChannelSelector");
}
ChannelSelector的类结构图如下所示:
Paste_Image.png
注:RelicatingChannelSelector和MultiplexingChannelSelector是二个通道选择器,第一个是复用型通道选择器,也就是的默认的方式,会把接收到的消息发送给其他每个channel。第二个是多路通道选择器,这个会根据消息header中的参数进行通道选择。
说完通道选择器,正式来解释Channel是什么,先看一个接口类:
public interface Channel extends LifecycleAware, NamedComponent {
  public void put(Event event) throws ChannelException;
  public Event take() throws ChannelException;
  public Transaction getTransaction();
}
注:put方法是用来发送消息,take方法是获取消息,transaction是用于事务操作。
类结构图如下:
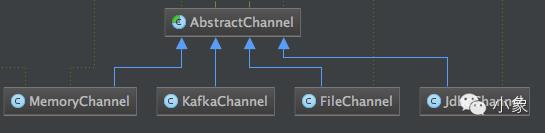
Paste_Image.png
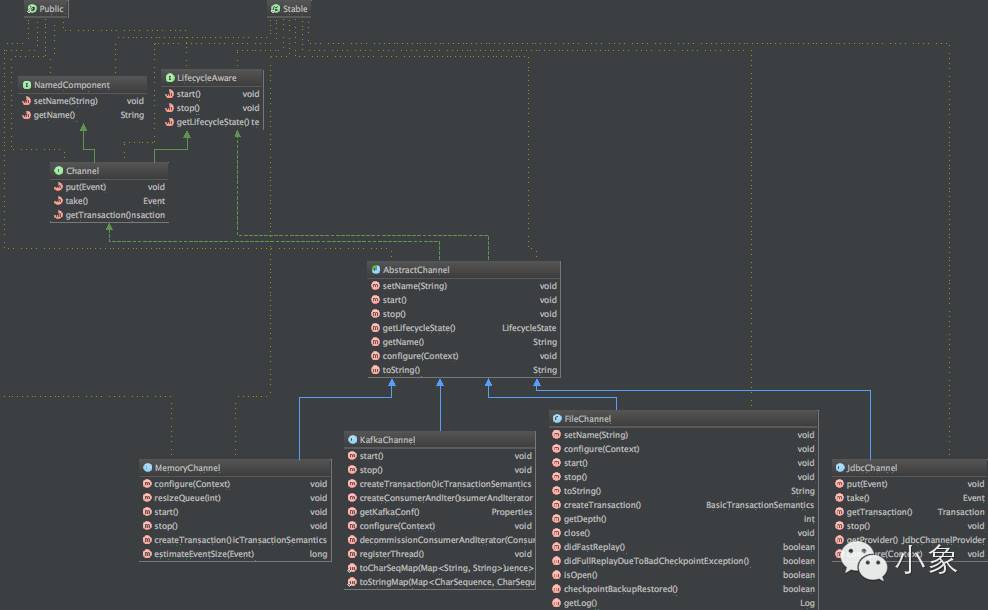
Paste_Image.png
3、Sink组件
Sink负责取出Channel中的消息数据,进行相应的存储文件系统,数据库,或者提交到远程服务器。
Sink在设置存储数据时,可以向文件系统中,数据库中,hadoop中储数据,在日志数据较少时,可以将数据存储在文件系中,并且设定一定的时间间隔保存数据。在日志数据较多时,可以将相应的日志数据存储到Hadoop中,便于日后进行相应的数据分析。
Sink接口类内容如下:
public interface Sink extends LifecycleAware, NamedComponent {
  public void setChannel(Channel channel);
  public Channel getChannel();
  public Status process() throws EventDeliveryException;
  public static enum Status {
    READY, BACKOFF
  }
}
Sink是通过如下代码进行的创建:
Sink sink = sinkFactory.create(comp.getComponentName(), comp.getType());DefaultSinkFactory.create方法如下:
public Sink create(String name, String type) throws FlumeException {
    Preconditions.checkNotNull(name, "name");
    Preconditions.checkNotNull(type, "type");
    logger.info("Creating instance of sink: {}, type: {}", name, type);
    Class<? extends Sink> sinkClass = getClass(type);    try {
      Sink sink = sinkClass.newInstance();
      sink.setName(name);      return sink;
    } catch (Exception ex) {
      System.out.println(ex);      throw new FlumeException("Unable to create sink: " + name
          + ", type: " + type + ", class: " + sinkClass.getName(), ex);
    }
  }
注:Sink是通过SinkFactory工厂来创建,提供了DefaultSinkFactory默认工厂,程序会查找org.apache.flume.conf.sink.SinkType这个枚举类找到相应的Sink处理类,比如:org.apache.flume.sink.LoggerSink,如果没找到对应的处理类,直接通过Class.forName(className)进行直接查找实例化实现类。
Sink的类结构图如下:
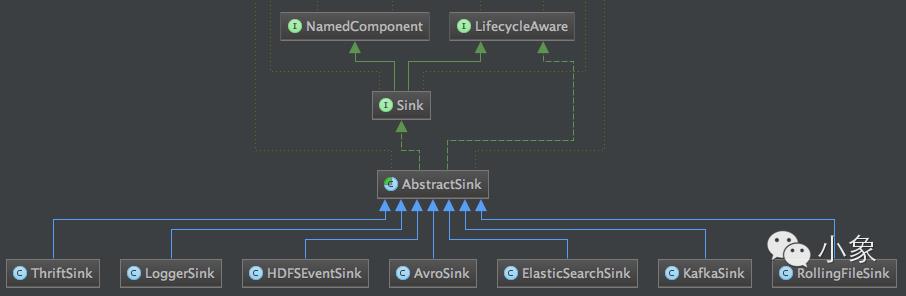
Paste_Image.png
与ChannelProcessor处理类对应的是SinkProcessor,由SinkProcessorFactory工厂类负责创建,SinkProcessor的类型由一个枚举类提供,看下面代码:
public enum SinkProcessorType {  /**   * Place holder for custom sinks not part of this enumeration.   */
  OTHER(null),  /**   * 故障转移 processor   *   * @see org.apache.flume.sink.FailoverSinkProcessor   */
  FAILOVER("org.apache.flume.sink.FailoverSinkProcessor"),  /**   * 默认processor   *   * @see org.apache.flume.sink.DefaultSinkProcessor   */
  DEFAULT("org.apache.flume.sink.DefaultSinkProcessor"),  /**   * 负载processor   *   * @see org.apache.flume.sink.LoadBalancingSinkProcessor   */
  LOAD_BALANCE("org.apache.flume.sink.LoadBalancingSinkProcessor");  private final String processorClassName;  private SinkProcessorType(String processorClassName) {
    this.processorClassName = processorClassName;
  }  public String getSinkProcessorClassName() {    return processorClassName;
  }
}
SinkProcessor的类结构图如下:
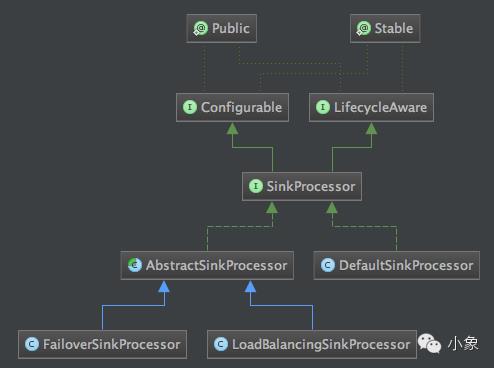
Paste_Image.png
说明:
1、FailoverSinkProcessor是故障转移处理器,当sink从通道拿数据信息时出错进行的相关处理,代码如下:
public Status process() throws EventDeliveryException {    // 经过了冷却时间,再次发起重试
    Long now = System.currentTimeMillis();    while(!failedSinks.isEmpty() && failedSinks.peek().getRefresh() < now) {      //从失败队列中获取sink节点
      FailedSink cur = failedSinks.poll();
      Status s;      try {        //调用相应sink进行处理,比如将channel的数据读取存放到文件中,
        //这个存放文件的动作就在process中进行。
        s = cur.getSink().process();        if (s  == Status.READY) {          //如果处理成功,则放到存活队列中
          liveSinks.put(cur.getPriority(), cur.getSink());
          activeSink = liveSinks.get(liveSinks.lastKey());
          logger.debug("Sink {} was recovered from the fail list",
                  cur.getSink().getName());
        } else {          // if it's a backoff it needn't be penalized.
          //如果处理失败,则继续放到失败队列中
          failedSinks.add(cur);
        }        return s;
      } catch (Exception e) {
        cur.incFails();
        failedSinks.add(cur);
      }
    }

    Status ret = null;    while(activeSink != null) {      try {
        ret = activeSink.process();        return ret;
      } catch (Exception e) {
        logger.warn("Sink {} failed and has been sent to failover list",
                activeSink.getName(), e);
        activeSink = moveActiveToDeadAndGetNext();
      }
    }
2、LoadBalancingSinkProcessor是负载Sink处理器
首先我们和ChannelProcessor一样,我们也要重点说明一下SinkSelector这个选择器。
先看一下SinkSelector.configure方法的部分代码:
if (selectorTypeName.equalsIgnoreCase(SELECTOR_NAME_ROUND_ROBIN)) {
      selector = new RoundRobinSinkSelector(shouldBackOff);
    } else if (selectorTypeName.equalsIgnoreCase(SELECTOR_NAME_RANDOM)) {
      selector = new RandomOrderSinkSelector(shouldBackOff);
    } else {      try {        @SuppressWarnings("unchecked")        Class<? extends SinkSelector> klass = (Class<? extends SinkSelector>)            Class.forName(selectorTypeName);

        selector = klass.newInstance();
      } catch (Exception ex) {        throw new FlumeException("Unable to instantiate sink selector: "
            + selectorTypeName, ex);
      }
    }
结合上面的代码,再看类结构图如下:
Paste_Image.png
注:RoundRobinSinkSelector是轮询选择器,RandomOrderSinkSelector是随机分配选择器。
最后我们以KafkaSink为例看一下Sink里面的具体实现:
public Status process() throws EventDeliveryException {
    Status result = Status.READY;
    Channel channel = getChannel();
    Transaction transaction = null;
    Event event = null;
    String eventTopic = null;
    String eventKey = null;    try {      long processedEvents = 0;

      transaction = channel.getTransaction();
      transaction.begin();

      messageList.clear();      for (; processedEvents < batchSize; processedEvents += 1) {        event = channel.take();        if (event == null) {          // no events available in channel
          break;
        }        byte[] eventBody = event.getBody();
        Map<String, String> headers = event.getHeaders();        if ((eventTopic = headers.get(TOPIC_HDR)) == null) {
          eventTopic = topic;
        }

        eventKey = headers.get(KEY_HDR);        if (logger.isDebugEnabled()) {
          logger.debug("{Event} " + eventTopic + " : " + eventKey + " : "
            + new String(eventBody, "UTF-8"));
          logger.debug("event #{}", processedEvents);
        }        // create a message and add to buffer
        KeyedMessage<String, byte[]> data = new KeyedMessage<String, byte[]>
          (eventTopic, eventKey, eventBody);
        messageList.add(data);

      }      // publish batch and commit.
      if (processedEvents > 0) {        long startTime = System.nanoTime();
        producer.send(messageList);        long endTime = System.nanoTime();
        counter.addToKafkaEventSendTimer((endTime-startTime)/(1000*1000));
        counter.addToEventDrainSuccessCount(Long.valueOf(messageList.size()));
      }

      transaction.commit();

    } catch (Exception ex) {
      String errorMsg = "Failed to publish events";
      logger.error("Failed to publish events", ex);
      result = Status.BACKOFF;      if (transaction != null) {        try {
          transaction.rollback();
          counter.incrementRollbackCount();
        } catch (Exception e) {
          logger.error("Transaction rollback failed", e);          throw Throwables.propagate(e);
        }
      }      throw new EventDeliveryException(errorMsg, ex);
    } finally {      if (transaction != null) {
        transaction.close();
      }
    }    return result;
  }
注:方法从channel中不断的获取数据,然后通过Kafka的producer生产者将消息发送到Kafka里面
以上是关于玩转Flume之核心架构深入解析的主要内容,如果未能解决你的问题,请参考以下文章