Android绘制工具Canvas
Posted Andoter的学习笔记
tags:
篇首语:本文由小常识网(cha138.com)小编为大家整理,主要介绍了Android绘制工具Canvas相关的知识,希望对你有一定的参考价值。
在android自定义View的学习中,我们经常需要绘制,Canvas类就承担起绘制的作用。在Android中,绘制一个View需要四个基本的步骤:
一个视图或者像素的承载体:Bitmap
一个绘制方法的承载体:Canvas
绘制物:Rect、Path、text、Bitmap
绘制方式的承载体:Paint
如何构建一个Canvas对象
通过查看Canvas的api得知:
Canvas():创建一个空的栅格画布。
Canvas(Bitmap bitmap):构建一个指定bitmap的画布。
构造方法有两种,一种是创建空的栅格画布画布对象用来绘制。另一种是构建一个Canvas对象,绘制在Bitmap上。
Canvas方法介绍
1、clipXXX:裁剪画布
clipPath(Path path):裁剪掉指定的path区域的Canvas
clipPath(Path path, Region.Op op):裁剪掉指定的path区域的Canvas,同时指定与上次裁剪的类型。
clipRect(int left, int top, int right, int bottom):裁剪掉指定矩形的Canvas区域
clipRect(float left, float top, float right, float bottom):裁剪指定区域
clipRect(RectF rect):裁剪指定矩形区域
clipRect(float left, float top, float right, float bottom, Region.Op op)
clipRect(Rect rect)
clipRegion(Region region)
clipRegion(Region region, Region.Op op)
在ClipXX方法中,可以分为三类:Path类、Rect类、Region类。注意,在ClipXX的方法中,通过ClipXX方法,即改变显示区域,但是坐标区域并没有改变。在ClipXX方法中,我们需要重要介绍下Region.Op(区域操作符)的使用。
通过查看源码,Region.Op是一个枚举类型:
// the native values for these must match up with the enum in SkRegion.h
public enum Op {
    DIFFERENCE(0),
    INTERSECT(1),
    UNION(2),
    XOR(3),
    REVERSE_DIFFERENCE(4),
    REPLACE(5);

    Op(int nativeInt) {
        this.nativeInt = nativeInt;
    }

    /**
     * @hide
     */
    public final int nativeInt;
}
第一裁剪区域A,第二裁剪区域B。介绍如下:
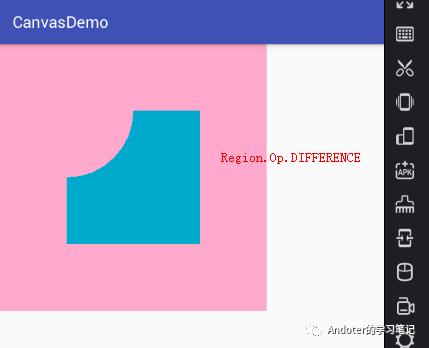
Region.Op.DIFFERENCE:A-B的差集,即裁剪Canvas区域显示A与B的差集。
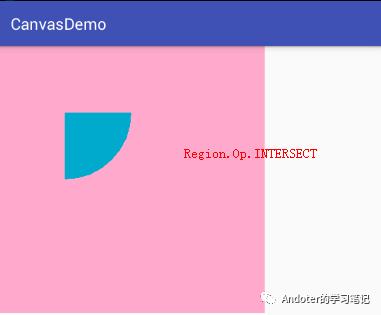
Region.Op.INTERSECT:A∩B的交集,即裁剪Canvas区域显示A与B的差集。
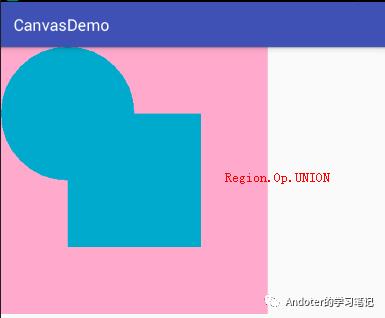
Region.Op.UNION:A∪B的并集,即裁剪Canvas区域显示A与B的并集。
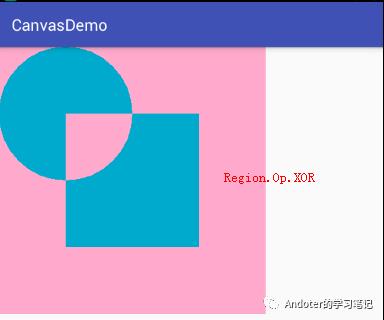
Region.Op.XOR:a⊕b的异或,即裁剪Canvas区域显示A与B的异或。如果A与B有相交,则A、B的并集减去相交的部分。如果A与B不想交,则显示A、B的并集。
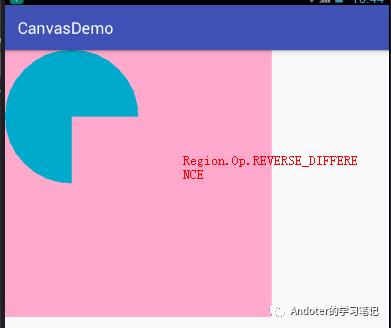
Region.Op.REVERSE_DIFFERENCE:反转差集,即B-A生成的差集。即裁剪区域显示B-A的差集。
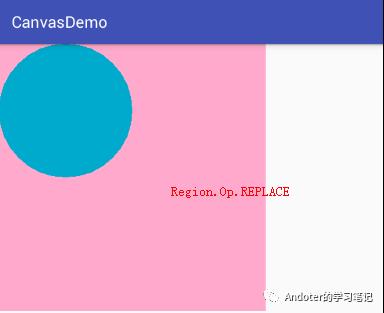
Region.Op.REPLACE:用当前要剪切的区域代替之前剪切过的区域。
在这里,通过简单的实例看下效果。
private void createBitmap(){
    //创建一个空白的Bitmap对象
    Bitmap bitmap = Bitmap.createBitmap(400,400, Bitmap.Config.ARGB_8888);
    //绘制一个矩形区域
    Canvas canvas = new Canvas(bitmap);
    Paint paint = new Paint(Paint.ANTI_ALIAS_FLAG);
    paint.setStyle(Paint.Style.FILL_AND_STROKE);
    paint.setColor(Color.parseColor("#ffaacc"));
    canvas.drawRect(0, 0, 500, 500,paint);

    //裁剪出一个矩形,区域A
    canvas.clipRect(100,100,300,300);

    //再次裁剪一个区域,区域B
    Path path = new Path();
    path.addCircle(100,100,100, Path.Direction.CW);
    //此处修改op的值,来进行判断。
    canvas.clipPath(path, Region.Op.REPLACE);

    //裁剪后,绘制Canvas的画布
    paint.setColor(Color.parseColor("#00aacc"));
    canvas.drawRect(0, 0, 500, 500,paint);
    iv_image.setImageBitmap(bitmap);
}
通过上面的简单案例,我们通过修改以下代码片段,来修改效果:
//此处修改op的值,来进行判断。
canvas.clipPath(path, Region.Op.REPLACE);
1、Region.Op.DIFFERENCE效果
2、Region.Op.INTERSECT
3、Region.Op.UNION
4、Region.Op.XOR
5、Region.Op.REVERSE_DIFFERENCE
6、Region.Op.REPLACE
2、drawXXX系列方法
Canvas是我们的画布,给我们提供了一系列的方法满足我们在画布上进行绘制的需求,通过对api的分类,主要可以分为以下几种的绘制:
drawArc:绘制圆弧。
drawARGB:给整个可见的画布区域绘制颜色,即背景色。
drawBitmap:绘制Bitmap对象。
drawBitmapMesh:
drawCircle:绘制圆形。
drawColor:给整个可见的画布区域绘制颜色,即背景色。同drawARGB。
drawLine(s):绘制线条。
drawOval:绘制椭圆。
drawPaint:给Canvas设置画笔paint。
drawPatch:绘制.9.png图片。
drawPath:绘制Path路径。
drawPicture:绘制Picture对象。
drawPoint(s):绘制点。
drawRect:绘制矩形。
drawRoundRect:绘制圆角矩形。
drawRGB:给整个可见的画布区域绘制颜色,即背景色。同drawARGB。
drawText:绘制文本。
1、drawArc:绘制圆弧
drawArc(RectF oval, float startAngle, float sweepAngle, boolean useCenter, Paint paint)
public void drawArc(float left, float top, float right, float bottom, float startAngle,float sweepAngle, boolean useCenter, Paint paint)
以上两个方法中,本质的核心都是根据指定的RectF矩形约束的范围进行圆弧的绘制。重点的以下几个参数的约束。
startAngle:起始角度,这里需要注意:如果起始角度<0或>=360度,则取angle %360作为起始角度。
sweepAngle:如果旋转角度>360度,则绘制全部。这点不同于path.arcTo的angle%360度取余数。如果angle是负数,则进行取余处理。
useCenter:如果设置中心,则绘制圆弧的时候连接起点、中点和终点的连线闭合。
此处补充一点,负数的余数是负整数<=0,正数的余数是正整数>=0。绘制的圆弧会自动进行缩放来填充指定矩形的椭圆形状,不会超过指定的矩形区域大小。换种说法,绘制的圆弧片段是矩形的内切椭圆上的指定角度的圆弧。
/**
 * 绘制圆弧
 */
private void drawArc(){
    //创建空白的Bitmap对象
    Bitmap bitmap = Bitmap.createBitmap(500, 500, Bitmap.Config.ARGB_8888);
    Canvas canvas = new Canvas(bitmap);
    Paint paint = new Paint(Paint.ANTI_ALIAS_FLAG);
    paint.setColor(Color.BLUE);
    paint.setStyle(Paint.Style.STROKE);
    //绘制我们约束的矩形的范围,以便形成对比
    RectF rect = new RectF(100,200,400,400);
    canvas.drawRect(rect,paint);

    //绘制圆弧的形状
    paint.setColor(Color.CYAN);
    canvas.drawArc(rect,-180,90,false,paint);
    canvas.drawArc(rect,20,80,true,paint);
    iv_image.setImageBitmap(bitmap);
}
效果图:
2、drawBitmap系列:绘制Bitmap资源
drawBitmap(int[] colors, int offset, int stride, float x, float y, int width, int height, boolean hasAlpha, Paint paint):将集合中的Colors绘制成Bitmap对象。需要开启硬件加速器,已经在api21中过期。
drawBitmap(Bitmap bitmap, Matrix matrix, Paint paint):绘制一个给定matrix的Bitmap对象。
drawBitmap(int[] colors, int offset, int stride, int x, int y, int width, int height, boolean hasAlpha, Paint paint):将集合中的Colors绘制成Bitmap对象。需要开启硬件加速器,已经在api21中过期。
drawBitmap(Bitmap bitmap, Rect src, RectF dst, Paint paint):绘制一个适应给定RectF大小的Bitmap资源。
drawBitmap(Bitmap bitmap, float left, float top, Paint paint):在left、top的位置出绘制一个Bitmap资源。
drawBitmap(Bitmap bitmap, Rect src, Rect dst, Paint paint)
绘制Bitmap对象。
private class BitmapView extends View{
    Paint paint = null;
    Bitmap bitmap = null;
    public BitmapView(Context context) {
        super(context);
        paint = new Paint(Paint.ANTI_ALIAS_FLAG);
        paint.setFlags(Paint.DITHER_FLAG);
    }

    @Override
    protected void onDraw(Canvas canvas) {
        super.onDraw(canvas);
        bitmap = BitmapFactory.decodeResource(getResources(), R.mipmap.ic_launcher)
                .copy(Bitmap.Config.ARGB_8888,true);
        drawBitmap(canvas, 100, 100, paint);
        drawBitmapWithMatrix(canvas);
        drawBitmapWithRect(canvas);
        drawBitmapColors(canvas);
    }

    /**
     * 在指定的位置绘制Bitmap对象
     * @param canvas
     * @param left
     * @param top
     * @param paint
     */
    private void drawBitmap(Canvas canvas, int left, int top, Paint paint){
        canvas.drawBitmap(bitmap, left, top,paint);
    }

    /**
     * 绘制指定Matrix变换的bitmap
     * @param canvas
     */
    private void drawBitmapWithMatrix(Canvas canvas){
        Matrix matrix = new Matrix();
        matrix.setTranslate(200,200);
        matrix.postRotate(30);
        canvas.drawBitmap(bitmap, matrix, paint);
    }

    /**
     * 绘制指定DstRect大小的Bitmap
     * @param canvas
     */
    private void drawBitmapWithRect(Canvas canvas){
        Rect rectSrc = new Rect(0,0,100,100);
        Rect rectDst = new Rect(100,100,300,400);
        canvas.drawBitmap(bitmap, rectSrc,rectDst,paint);
    }

    private void drawBitmapColors(Canvas canvas){
        Bitmap bitmap = Bitmap.createBitmap(200, 200, Bitmap.Config.ARGB_8888);
        canvas.setBitmap(bitmap);
        canvas.drawBitmap(new int[]{Color.RED,Color.BLUE,Color.GREEN},
                1,1,0,0,200,200,false,paint);
    }
}
3、drawColor系列
Canvas为我们提供了绘制背景色的方法。
drawARGB(int a, int r, int g, int b)
drawColor(int color)
drawColor(int color, PorterDuff.Mode mode)
drawRGB(int r, int g, int b)
首先简单介绍下几个参数:
a:透明度,取值(0..255),0表示完全透明,255表示完全不透明
r:三元素中的红,取值(0..255)
g:三元素中的绿,取值(0..255)
b:三元素中的蓝,取值(0..255)
PorterDuff.Mode:颜色混合模式,共有18中混合方式。
在drawColor系列的方法中,我认为掌握的难点就是针对PorterDuff.Mode的掌握和使用。
PorterDuff.Mode.CLEAR:所绘制不会提交到画布上。
PorterDuff.Mode.SRC:显示上层绘制图片
PorterDuff.Mode.DST:显示下层绘制图片
PorterDuff.Mode.SRC_OVER:正常绘制显示,上下层绘制叠盖。
PorterDuff.Mode.DST_OVER:上下层都显示。下层居上显示。
PorterDuff.Mode.SRC_IN:取两层绘制交集。显示上层。
PorterDuff.Mode.DST_IN:取两层绘制交集。显示下层。
PorterDuff.Mode.SRC_OUT:取上层绘制非交集部分。
PorterDuff.Mode.DST_OUT:取下层绘制非交集部分。
PorterDuff.Mode.SRC_ATOP:取下层非交集部分与上层交集部分
PorterDuff.Mode.DST_ATOP:取上层非交集部分与下层交集部分
PorterDuff.Mode.XOR: 异或:去除两图层交集部分
PorterDuff.Mode.DARKEN:取两图层全部区域,交集部分颜色加深
PorterDuff.Mode.LIGHTEN: 取两图层全部,点亮交集部分颜色
PorterDuff.Mode.MULTIPLY: 取两图层交集部分叠加后颜色
PorterDuff.Mode.SCREEN:取两图层全部区域,交集部分变为透明色
PorterDuff.Mode.ADD:饱和度叠加
PorterDuff.Mode.OVERLAY:像素是进行 Multiply (正片叠底)混合还是 Screen (屏幕)混合,取决于底层颜色,但底层颜色的高光与阴影部分的亮度细节会被保留
注意:在上面的描述中下层的图层对应的是Dst图层,上层对应的是Src图层。注意PorterDuff.Mode是作用于相互叠加的位置。
通过一段测试代码进行测试该功能的使用。
/**
 * PorterDuff的使用测试
 */
private void drawColorWithPorterDuff(){
    //首先我们创建一个绘制的背景画布
    Bitmap bitmapBG = Bitmap.createBitmap(400, 400, Bitmap.Config.ARGB_8888);
    Bitmap bitmapDst = createDst(400, 400);
    Bitmap bitmapSrc = createSrc(400, 400);
    Canvas canvas = new Canvas(bitmapBG);
    Paint paint = new Paint(Paint.ANTI_ALIAS_FLAG);
    canvas.drawColor(Color.GRAY);

    int sc = canvas.saveLayer(0, 0, 400, 400,null,
            Canvas.CLIP_TO_LAYER_SAVE_FLAG);
    //创建Dst图,绘制出来
    canvas.drawBitmap(bitmapDst,0,0,paint);
    //创建Src图
    paint.setXfermode(new PorterDuffXfermode(PorterDuff.Mode.SRC_IN));
    canvas.drawBitmap(bitmapSrc,0,0,paint);
    canvas.restoreToCount(sc);
    iv_image.setImageBitmap(bitmapBG);
}

/**
 * 创建Dst图
 * @param w
 * @param h
 * @return
 */
private Bitmap createDst(int w, int h) {
    Bitmap bitDstMap = Bitmap.createBitmap(w, h, Bitmap.Config.ARGB_8888);
    Canvas canvas = new Canvas(bitDstMap);
    Paint paint = new Paint(Paint.ANTI_ALIAS_FLAG);
    paint.setColor(0xFFFFCC44);
    canvas.drawRect(0, 0, 200, 200,paint);
    return bitDstMap;
}

/**
 * 创建Src资源图
 * @param w     宽度
 * @param h     高度
 * @return
 */
private Bitmap createSrc(int w, int h) {
    Bitmap bitSrcMap = Bitmap.createBitmap(w, h, Bitmap.Config.ARGB_8888);
    Canvas canvas = new Canvas(bitSrcMap);
    Paint paint = new Paint(Paint.ANTI_ALIAS_FLAG);
    paint.setColor(0xFF66AAFF);
    canvas.drawRect(100, 100, 300, 300,paint);
    return bitSrcMap;
}
在上面的测试代码中,我们创建两个矩形来模拟这个叠加效果。创建一个400×400大小的Dst图像区域,然后我们绘制一个[(0,0),(200,200)]位置的矩形。同样,创建一个400×400大小的Src图像区域,然后我们绘制一个[(100,100),(300,300)]位置的矩形。然后我们将Dst和Src绘制在400×400大小底图中,这里有一个细节,为了达到比较好的展示效果,我们让Dst和Src矩形所占的“图纸”大小相同,但是图形的位置不同。谨记,PorterDuff.Mode作用于叠加部分。
演示效果:

建议,最好实际拿着我上面的实例进行操作下,看看实际的效果。
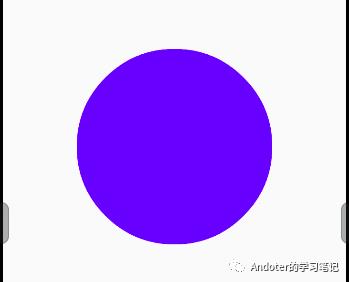
4、drawCircle绘制圆形
通过drawCircle进行圆形的绘制。
/**
 * 绘制圆形
 */
private void drawCircle(){
    Bitmap bitmap = Bitmap.createBitmap(800, 800, Bitmap.Config.ARGB_8888);
    Canvas canvas = new Canvas(bitmap);
    Paint paint = new Paint(Paint.ANTI_ALIAS_FLAG);
    paint.setFilterBitmap(true);
    /**
     * 此处设置Style样式:
     * Paint.Style.STROKE:描边
     * Paint.Style.FILL:填充
     * Paint.Style.FILL_AND_STROKE:描边+填充
     */
    paint.setStyle(Paint.Style.FILL_AND_STROKE);
    paint.setColor(Color.BLUE);
    canvas.drawCircle(400, 400, 250, paint);
    iv_image.setImageBitmap(bitmap);
}
如下展示:
5、drawOval绘制椭圆
drawOval(float left, float top, float right, float bottom, Paint paint)
drawOval(RectF oval, Paint paint)
通过以上两个重载方法实现椭圆的绘制。参照一下简单的demo。
/**
 * 绘制椭圆
 */
private void drawOval(){
    Bitmap bitmap = Bitmap.createBitmap(400,400, Bitmap.Config.ARGB_8888);
    Canvas canvas = new Canvas(bitmap);
    Paint paint = new Paint(Paint.ANTI_ALIAS_FLAG);
    paint.setColor(Color.BLUE);
    paint.setStyle(Paint.Style.FILL);
    //通过指定定点坐标Rect来绘制椭圆
    //canvas.drawOval(0,0,400,400,paint);
    //通过指定RectF绘制椭圆
    RectF rectF = new RectF(0,0,400,400);
    canvas.drawOval(rectF,paint);
}
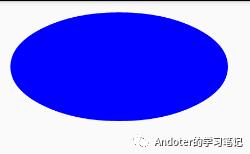
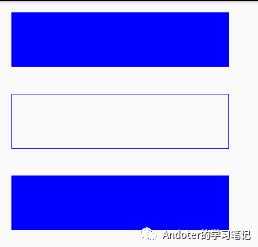
6、drawRect绘制矩形
drawRect(float left, float top, float right, float bottom, Paint paint)
drawRect(RectF rect, Paint paint)
drawRect(Rect r, Paint paint)
绘制矩形。
/**
 * 绘制矩形
 */
private void drawRect(){
    Bitmap bitmap = Bitmap.createBitmap(400,400, Bitmap.Config.ARGB_8888);
    Canvas canvas = new Canvas(bitmap);
    Paint paint = new Paint();
    paint.setColor(Color.BLUE);

    paint.setStyle(Paint.Style.FILL);
    canvas.drawRect(0, 0, 400, 100,paint);

    canvas.translate(0,150);
    paint.setStyle(Paint.Style.STROKE);
    canvas.drawRect(new RectF(0, 0, 399, 100),paint);

    canvas.translate(0,150);
    paint.setStyle(Paint.Style.FILL_AND_STROKE);
    canvas.drawRect(new Rect(0, 0, 400, 100),paint);

    iv_image.setImageBitmap(bitmap);
}
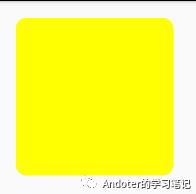
7、drawRoundRect绘制圆角矩形
drawRoundRect(float left, float top, float right, float bottom, float rx, float ry, Paint paint)
drawRoundRect(RectF rect, float rx, float ry, Paint paint)
left、top、right、bottom:用于指定Rect的大小。
rx:x方向上圆的半径;ry:y方向上圆的半径。
paint:画笔
通过指定Rect来绘制圆角矩形。
/**
 * 绘制圆角矩形
 */
private void drawRoundRect(){
    Bitmap bitmap = Bitmap.createBitmap(400, 400, Bitmap.Config.ARGB_8888);
    Canvas canvas = new Canvas(bitmap);
    Paint paint = new Paint();
    paint.setColor(Color.YELLOW);

    canvas.drawRoundRect(new RectF(10, 10, 300, 300),20, 20, paint);

    iv_image.setImageBitmap(bitmap);
}
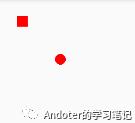
8、drawPoint绘制点
drawPoint(float x, float y, Paint paint):绘制单点操作
x:x轴坐标
y:y轴坐标
paint:画笔
drawPoints(float[] pts, int offset, int count, Paint paint):绘制一系列点
pts:一系列的点坐标集合[x0 y0 x1 y1 x2 y2 …];
offset:开头跳过的点数
count:处理数据的个数,注意这里一个点会使用两个数据,所以最终的点数为count>>1
paint:用来绘制点的画笔
drawPoints(float[] pts, Paint paint):同2.
在绘制点的方法中,核心是绘制一列点的方法。每个点在当前的坐标系下以给点的x、y作为中心,它的直接通过stroke width来指定,一般默认是1px。同时点的形状通过Cap来指定、有三种类型:
Paint.Cap.BUTT:无
Paint.Cap.ROUND:圆形
Paint.Cap.SQUARE:方形
/**
 * 绘制圆点
 */
private void drawPoints(){
    Bitmap bitmap = Bitmap.createBitmap(400, 400, Bitmap.Config.ARGB_8888);
    Canvas canvas = new Canvas(bitmap);
    Paint paint = new Paint();
    paint.setColor(Color.RED);
    paint.setStrokeWidth(20);
    paint.setStrokeCap(Paint.Cap.SQUARE);
    canvas.drawPoint(20, 20,paint);

    paint.setStrokeCap(Paint.Cap.ROUND);
    canvas.drawPoints(new float[]{50,50,90,90},2,2,paint);

    iv_image.setImageBitmap(bitmap);
}
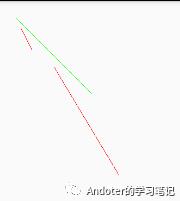
9、drawLines绘制线条
drawLine(float startX, float startY, float stopX, float stopY, Paint paint)
drawLines(float[] pts, Paint paint)
drawLines(float[] pts, int offset, int count, Paint paint)
这里要注意pts参数,这个pts数组的长度要求必须是4的整数倍。绘制的顺序如下:drawLine(pts[0], pts[1], pts[2], pts[3]) 接着是:drawLine(pts[4], pts[5], pts[6], pts[7]) ,依次下去。
private void drawLines(){
    Bitmap bitmap = Bitmap.createBitmap(400, 400, Bitmap.Config.ARGB_8888);
    Canvas canvas = new Canvas(bitmap);
    Paint paint = new Paint();
    paint.setColor(Color.GREEN);
    canvas.drawLine(10, 10, 150, 150, paint);

    paint.setColor(Color.RED);
    canvas.drawLines(new float[]{20,30,40,70,80,100,200,300},paint);
    iv_image.setImageBitmap(bitmap);
}
10、drawText绘制文本
drawText(String text, float x, float y, Paint paint)
text:绘制文本
x、y:绘制文本的起始坐标位置
drawText(CharSequence text, int start, int end, float x, float y, Paint paint)
text:绘制文本
start:绘制文本的起始下标
end:绘制文本的终点下标,end - 1是最后一个字符的位置。所以一般绘制到文本的结尾,直接 text.length
drawText(char[] text, int index, int count, float x, float y, Paint paint)
drawText(String text, int start, int end, float x, float y, Paint paint)
drawTextOnPath(String text, Path path, float hOffset, float vOffset, Paint paint)
text:绘制文本
path:文本绘制依附的路径path
hOffset:text绘制时距离path开头处的距离
vOffset:text绘制在path上面还是下面的距离,above < 0, below >0
drawTextOnPath(char[] text, int index, int count, Path path, float hOffset, float vOffset, Paint paint)
drawTextRun(CharSequence text, int start, int end, int contextStart, int contextEnd, float x, float y, boolean isRtl, Paint paint)
text:绘制文本
0<= contextStart <= start <=end <= contextEnd <= text.length
isRtl:是否是从右往左绘制,true是;false:从左往右。
drawTextRun(char[] text, int index, int count, int contextIndex, int contextCount, float x, float y, boolean isRtl, Paint paint)
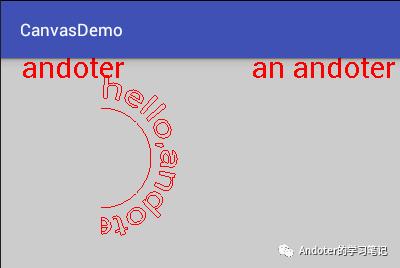
private void createBitmapWithText(){
    Bitmap bitmap = Bitmap.createBitmap(400,400, Bitmap.Config.ARGB_8888);
    Canvas canvas = new Canvas(bitmap);
    Paint paint = new Paint();
    paint.setColor(Color.RED);
    paint.setStyle(Paint.Style.STROKE);
    paint.setTextSize(30);
    canvas.drawColor(Color.LTGRAY);
    //drawText(String text, float x, float y, Paint paint)
    canvas.drawText("andoter",20,20,paint);

    /**
     * drawText(CharSequence text, int start, int end, float x, float y, Paint paint)
     * text:绘制的文本
     * start:绘制文本的起始下标
     * end:绘制文本的终点下标,end - 1是最后一个字符的位置。所以一般绘制到文本的结尾,直接
     *      text.length。
     * x、y:文本绘制的位置
     * paint:画笔
     */
    CharSequence text = "I`m an andoter";
    canvas.drawText(text, 4, text.length(), 250, 20, paint);

    /**
     * drawTextRun(CharSequence text, int start, int end, int contextStart,int contextEnd,
     *              float x, float y, boolean isRtl,Paint paint)
     *  注意:0<= contextStart <= start <=end <= contextEnd <= text.length
     *  isRtl:是否是从右往左绘制,true是;false:从左往右。
     */
    CharSequence textRun = "I`m an andoter";
    //canvas.drawTextRun(text, 0, 10, 0,text.length(),20, 60, true,paint);

    /**
     * drawTextOnPath(String text, Path path, float hOffset,float vOffset, Paint paint)
     *  text:绘制文本
     *  path:文本所依附的路径
     *  hOffset:text绘制时距离path开头处的距离
     *  vOffset:text绘制在path上面还是下面的距离,above < 0, below >0
     *  paint:画笔
     */
    Path path = new Path();
    path.addArc(new RectF(50, 50, 150, 150), -90, 180);
    //首先绘制出圆弧,突出效果
    canvas.drawPath(path,paint);
    canvas.drawTextOnPath("hello,andoter",path,0,-10,paint);

    iv_image.setImageBitmap(bitmap);
}
11、drawPath绘制path路径图形
绘制path路径。这里需要熟练掌握通过path构建路径,然后绘制。一个简单的例子:
private void createBitmapWithPath(){
    Bitmap bitmap = Bitmap.createBitmap(400,400, Bitmap.Config.ARGB_8888);
    Canvas canvas = new Canvas(bitmap);
    Paint paint = new Paint();
    paint.setStrokeWidth(2);
    paint.setStyle(Paint.Style.STROKE);
    paint.setColor(Color.BLUE);

    Path path = new Path();
    path.addCircle(100,100,50, Path.Direction.CW);
    canvas.drawPath(path,paint);
    iv_image.setImageBitmap(bitmap);
}
12、drawPicture绘制Picture对象
Picture对应可用于记录我们的绘制过程,所以自然少不了canvas对它的支持。这里就不展开了。
private void createBitmapWithPicture(){
    Picture picture = new Picture();
    Canvas  canvas = picture.beginRecording(200,200);
    Paint paint = new Paint();
    paint.setColor(Color.BLUE);
    canvas.drawRoundRect(new RectF(20, 20, 180, 180),5, 5, paint);
    picture.endRecording();
    iv_image.setImageDrawable(new PictureDrawable(picture));
}
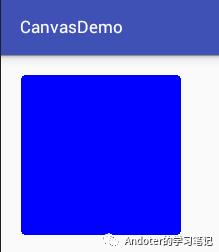
通过对上面draw方法的总结,可以看出Canvas画布给我们提供了很多绘图形的类。
3、Canvas基础变换
在第二小节中,我们对于Canvas中的绘制功能有了一定初步认识。这节中,我们开始学习Canvas的基本变换操作。这里主要包含:
translate(float dx, float dy)
scale(float sx, float sy)
rotate(float degrees)
skew(float sx, float sy)
1、Canvas.translate(float dx, float dy)
dx:横坐标在X轴方向的平移距离
dy:纵坐标在Y轴方向的平移距离
在这里,我仅仅说是坐标值在X、Y轴上的平移距离,并没有说是画布的平移。这个通过下面的实例很好证明“画布Canvas的平移”这句话描述是片面的。
private void drawCanvas(){
    Bitmap bitmap = Bitmap.createBitmap(400, 400, Bitmap.Config.ARGB_8888);
    Canvas canvas = new Canvas(bitmap);
    Paint paint = new Paint();
    canvas.drawColor(Color.GRAY);

    canvas.save();
    paint.setColor(Color.BLUE);
    canvas.translate(100f,100f);
    canvas.drawColor(Color.YELLOW);
    canvas.restore();

    iv_image.setImageBitmap(bitmap);
}
如下图:
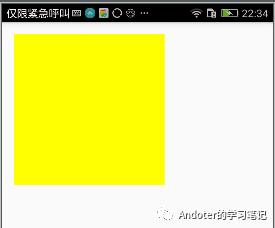
在上面代码中,我们绘制一个400×400大小的画布,同时进行平移100px。但是根据效果图来看,我们并没有发现画布的位置出现了移动,所以很容易发现,针对画布进行的translate、scale、rotate、skew仅仅是针对画布中的图形的X、Y进行对应的变换。而画布的位置、大小并没有发生改变。
通过下面一个简单的实例,看看translate的具体效果。
private void drawTranslateCanvas(){
    Bitmap bitmap = Bitmap.createBitmap(400, 400, Bitmap.Config.ARGB_8888);
    Canvas canvas = new Canvas(bitmap);
    Paint paint = new Paint();
    canvas.drawColor(Color.GRAY);
    paint.setColor(Color.GREEN);
    canvas.drawCircle(100, 100, 40, paint);

    canvas.save();
    paint.setColor(Color.BLUE);
    canvas.translate(100f,100f);
    canvas.drawCircle(100, 100, 40, paint);
    canvas.restore();

    iv_image.setImageBitmap(bitmap);
}
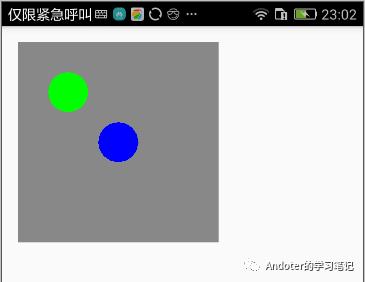
可以看到,两个圆之间的x和y坐标差值就是我们的平移dx、dy。即,平移是针对图形的X、Y坐标值进行平移。
2、Canvas.scale() 坐标值进行缩放
scale(float sx, float sy)
sx:横坐标对应的缩放比例
sy:纵坐标对应的缩放比例
scale(float sx, float sy, float px, float py)
sx:横坐标对应的缩放比例
sy:纵坐标对应的缩放比例
px:横坐标缩放的中心点
py:纵坐标缩放的中心店
1、canvas.scale(float sx, float sy)
我们可以通过查看scale的源码:
/**
 * Preconcat the current matrix with the specified scale.
 *
 * @param sx The amount to scale in X
 * @param sy The amount to scale in Y
 */
public void scale(float sx, float sy) {
    native_scale(mNativeCanvasWrapper, sx, sy);
}
通过上面的注释,我们可以看到sx、sy指的是X、Y的缩放比例,这里并没有指定是Canvas画布进行缩放。通过下面的一个简单例子可以发现:
private void drawScaleCanvas(){
    Bitmap bitmap = Bitmap.createBitmap(400, 400, Bitmap.Config.ARGB_8888);
    Canvas canvas = new Canvas(bitmap);
    Paint paint = new Paint();
    paint.setColor(Color.GRAY);
    canvas.drawRect(new Rect(0, 0, 400, 400), paint);

    canvas.save();
    paint.setColor(Color.BLUE);
    canvas.scale(0.5f, 0.5f);
    canvas.drawRect(new Rect(0, 0, 400, 400), paint);
    canvas.restore();

    iv_image.setImageBitmap(bitmap);
}
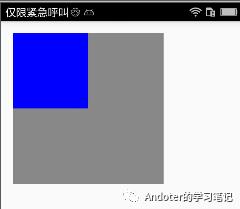
2、scale(float sx, float sy, float px, float py)
/**
 * Preconcat the current matrix with the specified scale.
 *
 * @param sx The amount to scale in X
 * @param sy The amount to scale in Y
 * @param px The x-coord for the pivot point (unchanged by the scale)
 * @param py The y-coord for the pivot point (unchanged by the scale)
 */
public final void scale(float sx, float sy, float px, float py) {
    translate(px, py);
    scale(sx, sy);
    translate(-px, -py);
}
通过上面可以看到scale(sx,sy,px,py)的执行过程,是先进行平移px,py,然后在进行按照sx、sy的比例进行缩放,最后在平移回去。通过对过程的精简,即等价于:
public final void scale(float sx, float sy, float px, float py) {
    translate(px- sx*px, py - sy*py);
    scale(sx, sy);
}
我们通过一个简单的例子来观察下:
private void drawScaleCanvas(){
    Bitmap bitmap = Bitmap.createBitmap(400, 400, Bitmap.Config.ARGB_8888);
    Canvas canvas = new Canvas(bitmap);
    Paint paint = new Paint();
    paint.setColor(Color.GRAY);
    canvas.drawRect(new Rect(0, 0, 400, 400), paint);

    canvas.save();
    paint.setColor(Color.BLUE);
    canvas.scale(0.5f, 0.5f, 100, 100);
    canvas.drawRect(new Rect(0, 0, 400, 400), paint);
    canvas.restore();

    iv_image.setImageBitmap(bitmap);
}
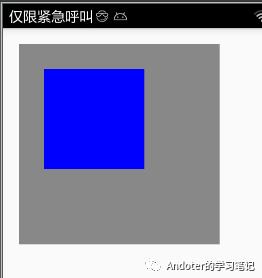
3、Canvas.rotate坐标值进行旋转
1、rotate(float degrees)
将canvas中绘制图形进行旋转角度degree。
private void drawRotateCanvas(){
    Bitmap bitmap = Bitmap.createBitmap(400, 400, Bitmap.Config.ARGB_8888);
    Canvas canvas = new Canvas(bitmap);
    Paint paint = new Paint();
    paint.setColor(Color.GRAY);
    canvas.drawRect(new Rect(0, 0, 400, 400), paint);

    canvas.save();
    paint.setColor(Color.BLUE);
    canvas.rotate(30);
    canvas.drawRect(new Rect(0, 0, 400, 400), paint);
    canvas.restore();

    iv_image.setImageBitmap(bitmap);
}
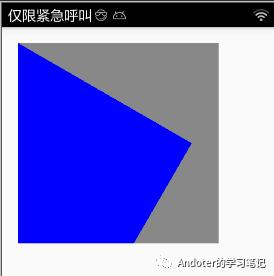
2、rotate(float degrees, float px, float py)
查看源码:
/**
 * Preconcat the current matrix with the specified rotation.
 *
 * @param degrees The amount to rotate, in degrees
 * @param px The x-coord for the pivot point (unchanged by the rotation)
 * @param py The y-coord for the pivot point (unchanged by the rotation)
 */
public final void rotate(float degrees, float px, float py) {
    translate(px, py);
    rotate(degrees);
    translate(-px, -py);
}
我们可以看到,执行的过程是跟scale的重载方法执行过程是相同的。起始就是以点(px,py)作为旋转中心,旋转degrees角度。
private void drawRotateCanvas(){
    Bitmap bitmap = Bitmap.createBitmap(400, 400, Bitmap.Config.ARGB_8888);
    Canvas canvas = new Canvas(bitmap);
    Paint paint = new Paint();
    paint.setColor(Color.GRAY);
    canvas.drawRect(new Rect(0, 0, 400, 400), paint);

    canvas.save();
    paint.setColor(Color.BLUE);
    canvas.rotate(30, 100, 100);
    canvas.drawRect(new Rect(0, 0, 400, 400), paint);
    canvas.restore();

    iv_image.setImageBitmap(bitmap);
}
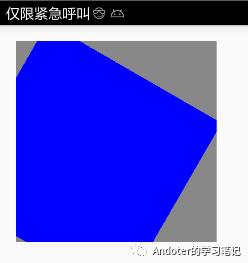
4、Canvas.skew() 坐标值进行错切
3、Canvas画布图层操作
在上面的基本图层操作中,我们对canvas的图层操作有了初次见面,下面我们看看基本的图层操作包含哪些。
save
saveLayer
saveLayerAlpha
restore
getSaveCount
restoreToCount
以上几个方法,可以归结为两类,一类是保存Canvas信息,另外一类是恢复Canvas保存信息。
1、cavnas.save()
/**
 * Saves the current matrix and clip onto a private stack.
 * <p>
 * Subsequent calls to translate,scale,rotate,skew,concat or clipRect,
 * clipPath will all operate as usual, but when the balancing call to
 * restore() is made, those calls will be forgotten, and the settings that
 * existed before the save() will be reinstated.
 *
 * @return The value to pass to restoreToCount() to balance this save()
 */
public int save() {
    return native_save(mNativeCanvasWrapper, MATRIX_SAVE_FLAG | CLIP_SAVE_FLAG);
}
通过源码的了解,我们可以得知save方法用于单独保存当前的matrix和clip信息。当我们调用save方法之后,我们调用canvas的translate、scale、rotate、skew、clipXX类的Canvas变换操作的时候,当吊起restore方法的时候,这些操作都会舍弃,重新恢复到save之前的状态。
关于save方法的实例,我们可以参照之前的Cavnas变换的相关操作。
2、save(int saveFlags)
/**
 * Based on saveFlags, can save the current matrix and clip onto a private
 * stack.
 * <p class="note"><strong>Note:</strong> if possible, use the
 * parameter-less save(). It is simpler and faster than individually
 * disabling the saving of matrix or clip with this method.
 * <p>
 * Subsequent calls to translate,scale,rotate,skew,concat or clipRect,
 * clipPath will all operate as usual, but when the balancing call to
 * restore() is made, those calls will be forgotten, and the settings that
 * existed before the save() will be reinstated.
 *
 * @param saveFlags flag bits that specify which parts of the Canvas state
 *                  to save/restore
 * @return The value to pass to restoreToCount() to balance this save()
 */
public int save(@Saveflags int saveFlags) {
    return native_save(mNativeCanvasWrapper, saveFlags);
}
从上面的源码中可以看出,根据指定的saveFlag进行保存当前图层的信息。同样当调用save方法之后,调用Canvas的变换操作,我们在调用restore方法,就会设置我们所做的变换操作,恢复到save之前的状态。这里,可以通过指定saveFlag的值来保存Canvas的属性。
MATRIX_SAVE_FLAG:保存对应的matrix信息
CLIP_SAVE_FLAG:保存clip裁剪信息
HAS_ALPHA_LAYER_SAVE_FLAG:保存Alpha信息
FULL_COLOR_LAYER_SAVE_FLAG:保存颜色信息
CLIP_TO_LAYER_SAVE_FLAG,:保存Clip裁剪信息
ALL_SAVE_FLAG:保存所有信息
3、saveLayer
保存图层信息系列方法。saveLayer方法与save方法有些类似,但是区别在于saveLayer方法在一个“离屏”bitmap对象上进行绘制。saveLayer可以为canvas创建一个新的透明图层,在新的图层上绘制,并不会直接绘制到屏幕上,而会在restore之后,绘制到上一个图层或者屏幕上(如果没有上一个图层)。为什么会需要一个新的图层,例如在处理xfermode的时候,原canvas上的图(包括背景)会影响src和dst的合成,这个时候,使用一个新的透明图层是一个很好的选择。对PS有点了解的我们可以想象下图层的概念。
4、restore
恢复Canvas到上一次调用save之前的状态。注意,resotre方法调用的次数不能大于save调用的次数。
5、getSaveCount
获取Canvas单独栈中所做的Matrix和Clip操作的次数。与调用的save次数或restore次数相同。
6、restoreToCount(int saveCount)
快速回退到某次save的操作。注意saveCount值不能小于1.
int count = canvas.save();
... // more calls potentially to save()
canvas.restoreToCount(count);
// now the canvas is back in the same state it was before the initial
// call to save().
至此,对Canvas的基本使用有了初步的介绍。
欢迎 长按下图 ->识别图中二维码
以上是关于Android绘制工具Canvas的主要内容,如果未能解决你的问题,请参考以下文章