技术观点Keras深度学习框架配置
Posted 数据智农
tags:
篇首语:本文由小常识网(cha138.com)小编为大家整理,主要介绍了技术观点Keras深度学习框架配置相关的知识,希望对你有一定的参考价值。
Keras深度学习框架配置
Wang H, Zhou Z, Li Y, et al. Comparison of machine learning methods for classifying mediastinal lymph node metastasis of non-small cell lung cancer from 18F-FDG PET/CT images[J]. 2017, 7.
论文引用——3.2 测试平台
项目代码是在Windows 7上运行的,主要用到的Matlab R2013a和Python,其中Matlab用于patch的分割和预处理,卷积神经网络搭建用到了根植于Python和Theano的深度学习框架Keras。Keras是基于Theano的一个深度学习框架,它的设计参考了Torch,用Python语言编写,是一个高度模块化的神经网络库,支持GPU和CPU,用起来特别简单,适合快速开发。
直接上干货,拒绝走弯路
下载一个Anaconda Python Distribution,网址:https://www.continuum.io/downloads#_windows
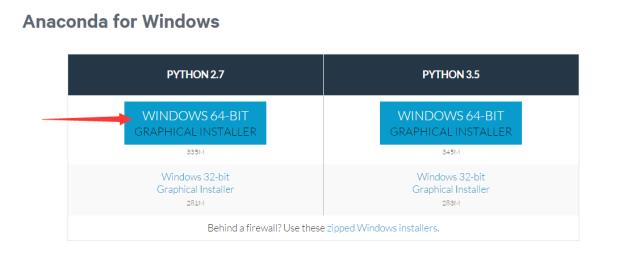
无脑安装,一直next
安装完成后,该有的基础包就都有了,安装完anaconda,就相当于安装了Python、IPython、集成开发环境Spyder、一些包等等。然后打开Anaconda Prompt,cd到 .py 文件的路径,输入“python **.py”,注意:这儿和cmd的命令相比多了一个“python”。要是你不加python,会提示错误:拒绝访问。
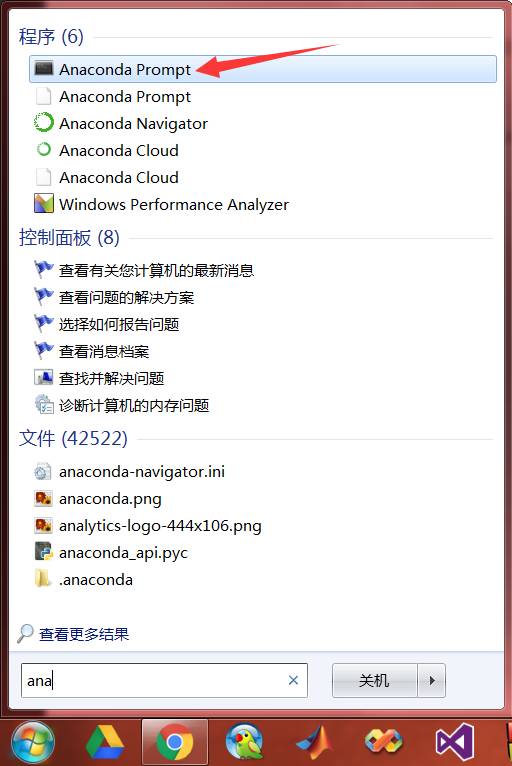

打开Anaconda Prompt,输入命令,就可以运行py文件了

在打开的Anaconda Prompt的命令行中输入“pip install keras",稍等片刻,keras直接就安装完了,好方便!
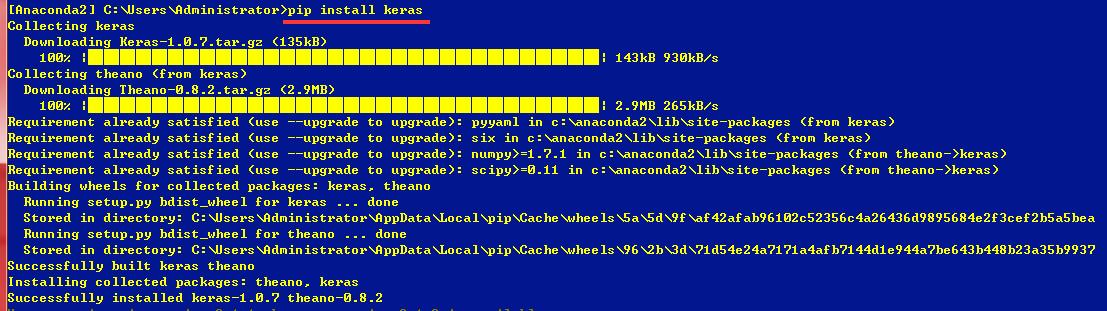
pip install keras
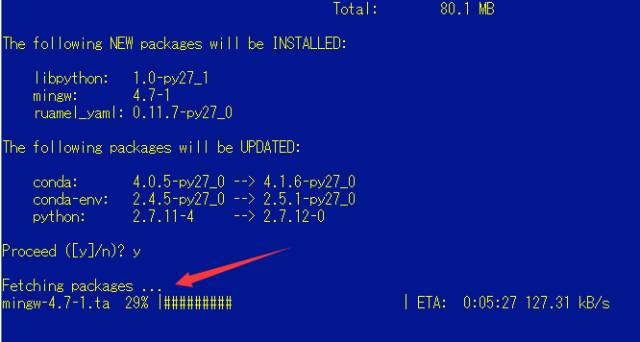
再接着输命令“conda install mingw libpython”,多等片刻,MinGW也就安装完了。

解决g++ not detected问题
最近我安装的时候感觉特别慢,有时候根本就没有进度,我怀疑是被墙了。
所以我默默地翻墙了,然后就有进度啦
接下来呢,开始装theano~三步走
1. 下载theano的zip文件,解压到你电脑的.../Anaconda/Lib/site-packages/theano目录下,注意:原来这个site-packages里面本身就有一个叫做theano的东西,把它删了!替换成压缩包里的文件,并重命名为theano
2. 添加环境变量: path: C:/Anaconda/MinGW/bin; C:/Anaconda/MinGW/x86_64-w64-mingw32/lib;
3. 新建环境变量: PYTHONPATH: C:/Anaconda/Lib/site-packages/theano;
好了,理论上theano也安装成功了,测试一下看~在Anaconda Prompt的命令行中输入“python”,回车,然后输入“import theano”,回车。如果你看到“>>>”三个箭头,没有别的乱七八糟的东西了,就说明:你!安!装!成!功!啦!
至此,你已经可以运行keras的神经网络程序了,但是有一个小瑕疵:会警告你cl.exe找不到。你可以不理它,我提供解决方案是
去电脑的C盘目录下检索“cl.exe”,会出来几个cl.exe
靠谱的路径名是C:\Program Files(x86)\Microsoft Visual Studio 11.0\VC\bin\x86_amd64
下载完,把搜索到的cl.exe的路径添加到系统路径Path里头,这个警告就会消失啦~
(可选)加速库CuDNN
从官网下载需要注册账号申请,两三天批准。网盘搜索一般也能找到最新版。
Windows目前就是cudnn-7.0-win-x64-v5.0-prod.zip。
下载解压出来是名为cuda的文件夹,里面有bin、include、lib,将三个文件夹复制到安装CUDA的地方覆盖对应文件夹,默认文件夹在:
C:\Program Files\NVIDIA GPU Computing Toolkit\CUDA
添加环境变量: path: C:\Anaconda2;C:\Anaconda2\Scripts
Cool,整个64位的python·keras就配置完成了,也就是说可以运行你的深度学习代码啰:)
至于说找keras的源代码,去这儿里随便挑一个,一般就用mnist_cnn.py。
如果你根据“干货”成功地配完了keras,那么就别往下看了,要是没成功,下面就是更加详细的步骤、遇到的错误和对应解决方案。供你参考:)
安装python

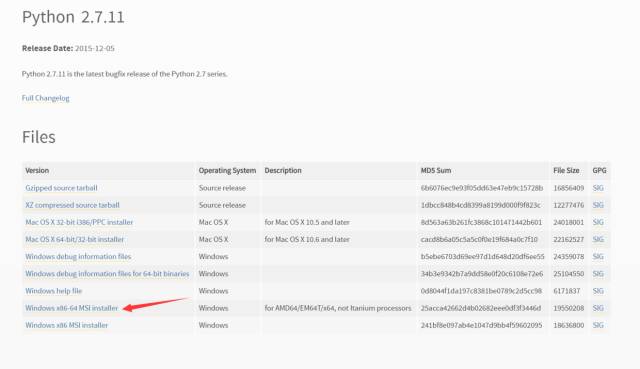
下载2.7.11,不要追求最新的!!
选择64位!选择64位!选择64位!说三遍,不然到时候数据量大了就MemoryError了!
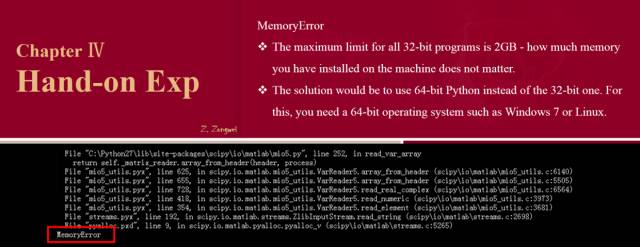
就是因为这个原因我要重新装python了!呵呵
我是Windows 7 64位的机子
当然喽,我当初没有装64位是有原因的,因为在运行mnist手写字体识别的神经网络时出现这个问题,那时我为了图简单,就干脆装了32位的python,哎,现在还得填坑!!!
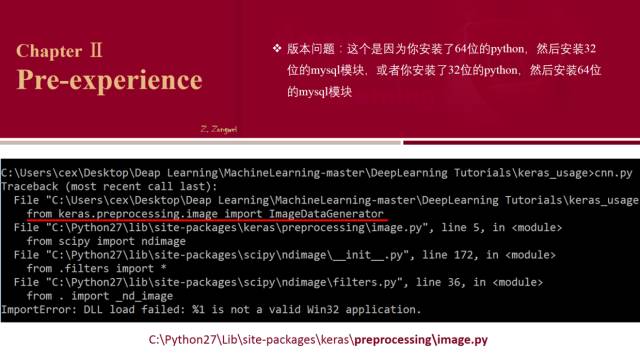
64位的ImageDataGenerator会报错,但是你最后只要别用这个模块就好啦
在下载完成之后,一直点击下一步就OK了。注意:安装在系统盘!!
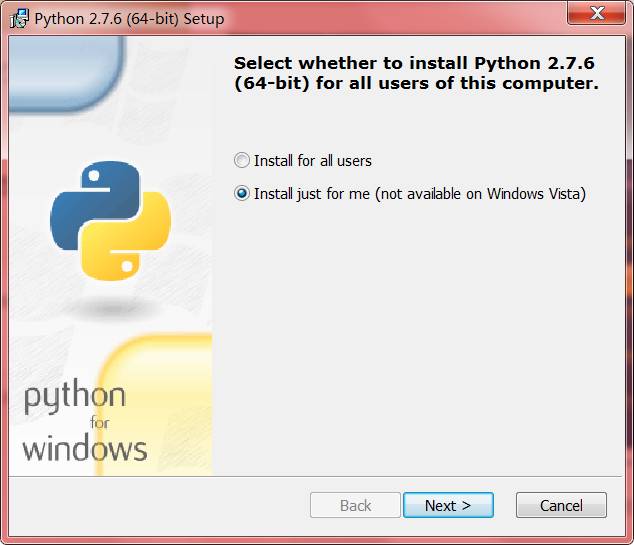
这儿选择just for me
在安装完成之后,我们需要手动添加环境变量:鼠标右键我的电脑 -> 属性 -> 点击高级系统设置 -> 点击环境变量 -> 点击PATH -> 在最后面加上我们的Python安装路径 -> 点击确定。反正就是Python27这个文件夹的系统目录
我的路径是:C:\\Python27
怎么看你有没有装成功咧,打开cmd命令行界面,输入python,返回了版本号,就可以啦
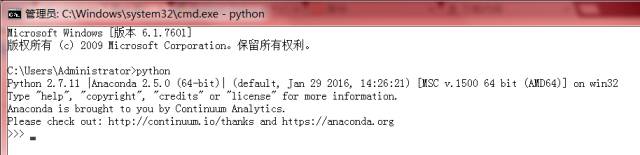
cmd怎么开我就不说了呗~
python安装成功!
安装pip
pip对于python就相当于apple store对于iPhone,是各个包的下载中心,刚刚下完的python相当于一个裸机,需要在pip里面下载一些深度学习需要的包~所以现在我们先下载安装pip。
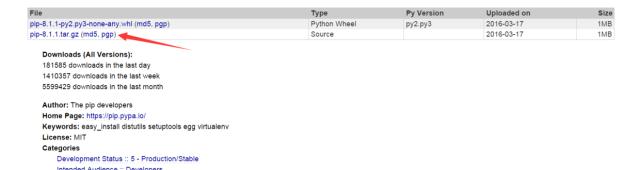
自动跳转到这儿,下这个好了
下载完,解压到python27文件路径下
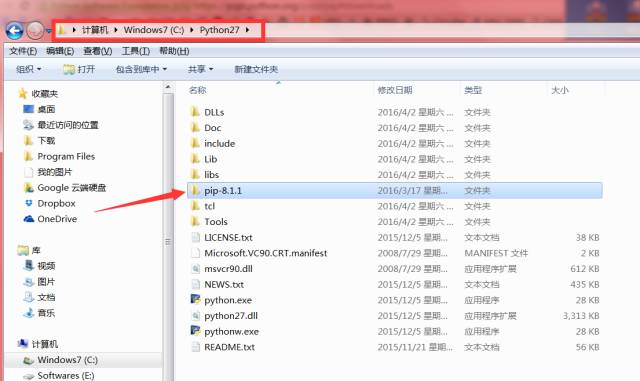
解压到这儿
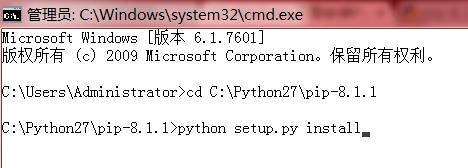
打开,里面有一个setup.py,复制当前路径,在cmd下cd到这儿
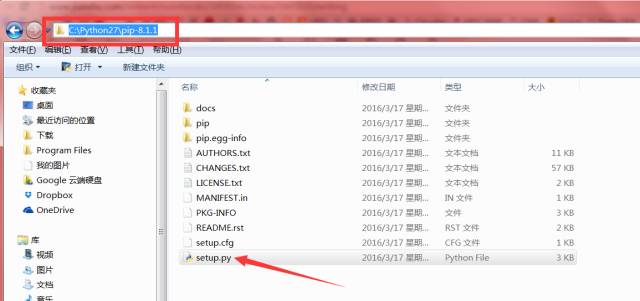
cd C:\\Python27\\pip-8.1.1
到了C:\\Python27\\pip-8.1.1后,输入
python setup.py install
就酱,输两行代码
这种情况就是“没有配环境变量”!python安装的时候也一样

当然最近还出现了一个新的错误,就是这个
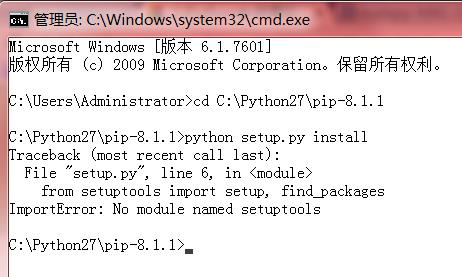
ImportError: No module named setuptools
要是你没遇到最好,直接跳到下一个分割线,遇到的话解决方法是:
运行cmd,cd到get-pip.py所在目录(我是C:\\Python27),运行代码:

运行get-pip.py,安装完成:)
按照之前介绍的添加环境变量的方法,我们在PATH最后添加:
C:\\Python27\\Scripts;
然后看看到底pip安装成功了没,在cmd里面输入pip,会出现这个
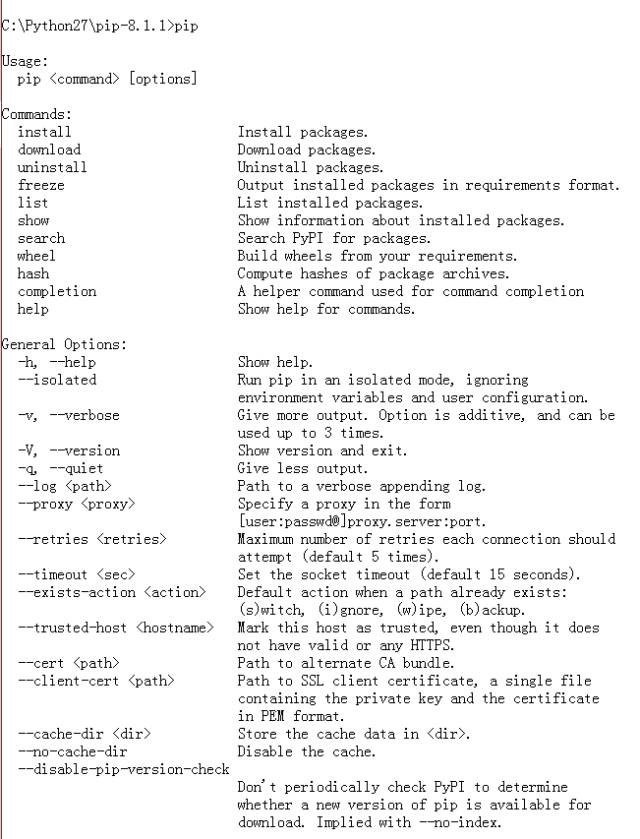
good for u, 你成功了!
安装深度学习框架keras
上面都是基本的准备东西,要是你已经跪在前面了,那。。只能。。自求多福:) 啰,我现在要开始正式讲keras怎么用了!
注意一点:python以及keras的所有代码都在cmd界面运行的~
我们可以先看看现在python有些什么包,在cmd下输入:
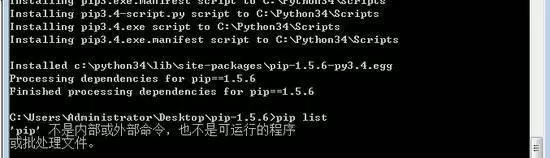
pip list
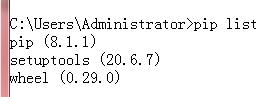
现在有pip,setuptools,wheel这仨
我们需要先安装scipy和numpy这两个包,注意:这两的比较奇葩,用pip安装会给你出来一堆错误,建议用网上的scipy.exe和numpy.exe无脑装,省事儿。你可能在网上会看到whl等格式文件和所谓的去“官网”安装,我只能忠告一下:不要入坑。。。:)
也许scipy.exe需要注册账号,就提供一下我的这两个exe的百度云链接:numpy.exe、scipy.exe
下载完这两个exe,都是无脑安装的,一直摁next即可。然后在cmd下输入“pip list”查看是否安装完,如果成功了是这个界面
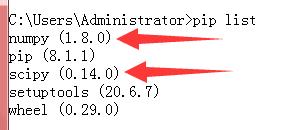
阶段性开心一下:)
接下来我介绍pip这个appstore怎么用。也就是一句话的事儿,在cmd中输入:pip install **(你想下载的包),回车就好了,确保有网,就可以自动开始下载安装啰,超级简单的。举例:
现在安装完scipy和numpy,我就可以下载安装keras了,就这样
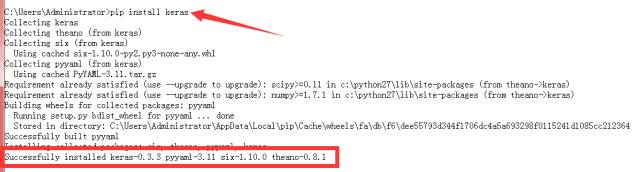
pip install keras
这样keras就成功安装完了。。。
调试keras
首先,你得有一个卷积神经网络的keras样例代码,一般来说比较推荐minst的,我可以提供代码和数据,我想这个网站要成为下一步学习的垫脚石了,因为要开始小小地改代码了。
http://keras.io/
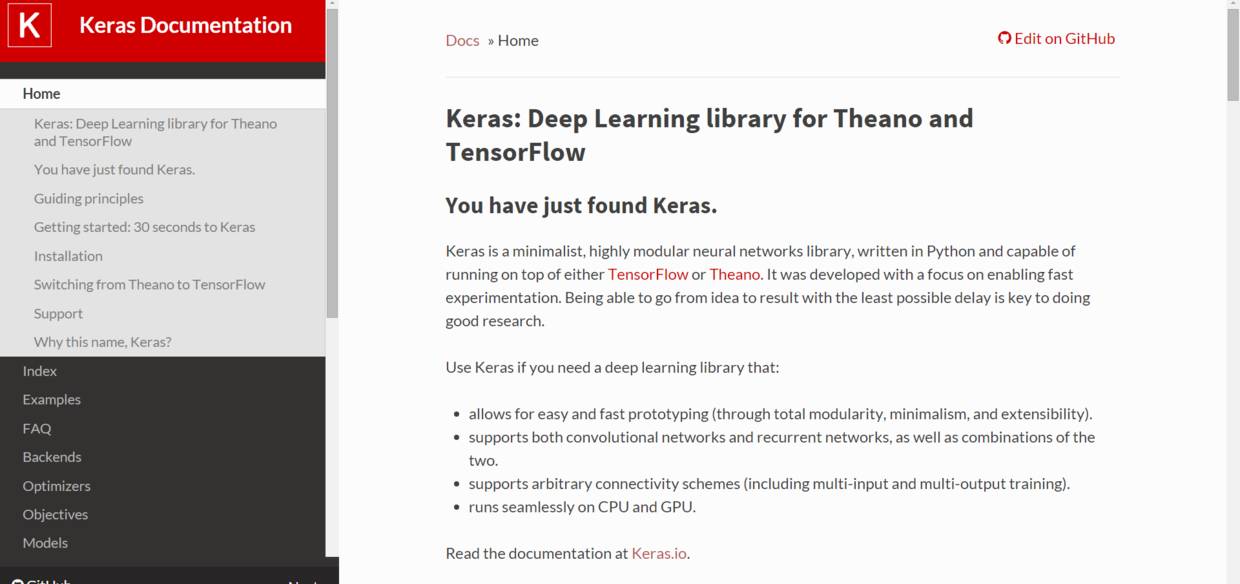
这个网站相当于keras的详细使用文档,是学习keras过程中避不开的参考
有了代码和数据,小改一下数据的路径,然后就开始解决一堆报错的问题了嘿嘿嘿:
错误1:sorry, unimplemented: 64-bit mode not compiled in
原因:32位的gcc不能编译64位程序。
解决方法:下载并安装64位gcc到E:\\MinGW\\bin,需要修改环境变量。(亲测不可行,呵呵)
错误2:'g++' is not recognized as an internal or external command.
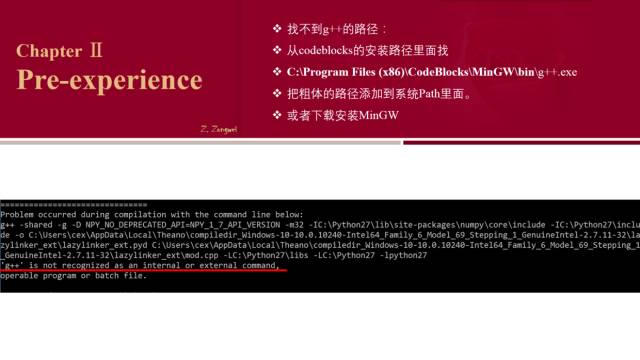
我就是用我已经安装的codeblocks的g++.exe所在的路径放到环境变量里头就行了
错误3:TypeError: max_pool_2d() got an unexpected keyword argument 'mode'
这个就是keras内部的函数定义的时候形参多了一个“mode”,找到这个函数,把mode='average_exc_pad'这项删了即可;找函数的方法如下图,函数在theano_backend.py这个文件内(C:\\Python27\\Lib\\site-packages\\keras\\backend\\theano_backend.py),用搜索找到pool_out = downsample.max_pool_2d这个位置,把该删的删掉!
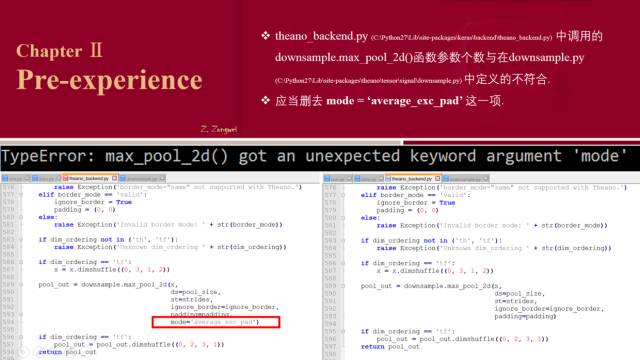
这个需要修改一下keras内部的代码~
如果实在遇到的坑太多,就换个方法,要是正常的话直接跳到下一个分割线就好了(额)
Anaconda Python Distribution安装
下载一个Anaconda Python Distribution,网址:https://www.continuum.io/downloads#_windows
无脑安装,一直next
安装完成后,该有的基础包就都有了,安装完anaconda,就相当于安装了Python、IPython、集成开发环境Spyder、一些包等等。然后打开Anaconda Prompt,cd到py文件的路径,输入“python **.py”,注意:这儿和cmd的命令相比多了一个python。要是你不加python,会拒绝访问。
打开Anaconda Prompt,输入命令,就可以运行py文件了
然后在打开的Anaconda Prompt命令行中输入“pip install keras",这样keras直接就安装完了,好方便!
好了,我们继续填坑。
错误4:g++ not detected !
前提是我已经将E:\\Program Files (x86)\\CodeBlocks\\MinGW\\bin和lib, include加入系统路径了。呵呵

找不到g++!!!!
解决办法:在[Anaconda2] 中输入命令“conda install mingw libpython”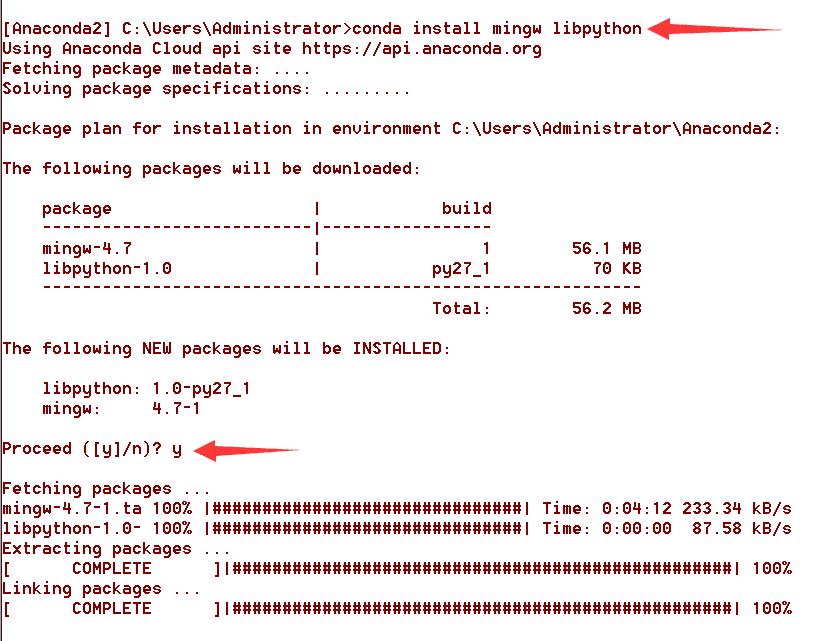
成功解决g++ not detected问题
错误5:Exception: Compilation failed (return status=-1073741701)
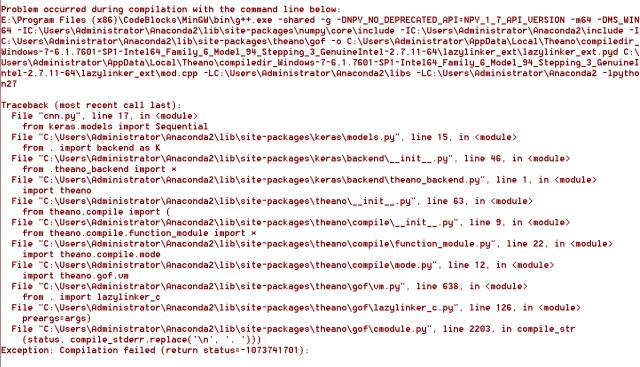
错误提示长这样
-fPIC问题的解决:看不懂,妈的
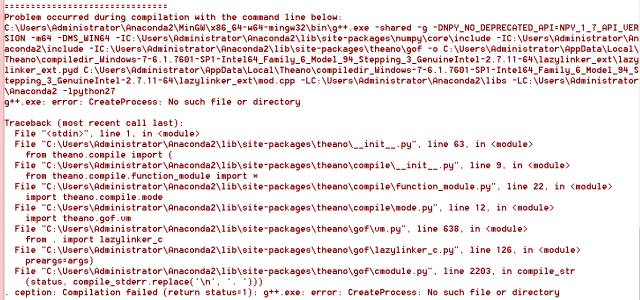
error: CreateProcess: No such file or directory
对于这种错误4,错误5,我要提供一个终极解决方案啦!!!(不能忍了)
64位WIN7上成功安装theano,并运行了g++, GPU
我们已经安装完Anaconda了,然后现在要重!新!安!装!theano!
下载theano的zip文件,解压到
.../Anaconda/Lib/sitepackages/theano (文件里面有个theano的文件夹,拿出来放在E:/Anaconda/Lib/site-packages里面)目录下。
2. 添加环境变量: path: E:/Anaconda/MinGW/bin;E:/Anaconda/MinGW/x86_64-w64-mingw32/lib;
(32bitE:/Anaconda/MinGW/i686-w64-mingw32/lib;)
新建环境变量:PYTHONPATH: E:/Anaconda/Lib/site-packages/theano;

g++.exe,theano这种问题完美解决!收~
至此,我所有的问题都顺利的解决了,你呢?是不是也可以成功地训练你的神经网络了呢?
写个彩蛋~
对于64位的Anaconda,如果python要读入MATLAB的数据文件.mat,好像不能再用32位的那句代码了,因为会出现“Python.exe已停止工作”的错误。
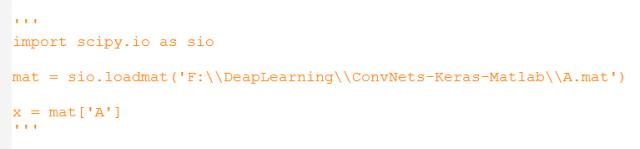
sio.loadmat()不好使了
解决方法是换一个读入方法呗~
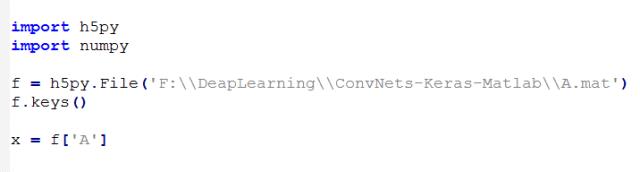
h5py.File()
这个函数有很多优点哦:
1. 可以读入MATLAB Version 7.3 or later (save -v7.3) Variables can exceed 2GB on 64-bit systems ! 这个版本的mat文件能储存的数据量超级大。
2. 输入的矩阵就是mat内部存的形式,举例:mat文件里面有一个A(3*2)的变量,sio.loadmat()读入的是一个一维的(1*6)的数组,然后还得reshape()一下变成(3*2)的;h5py.File()直接就读入一个(3*2)的数组。
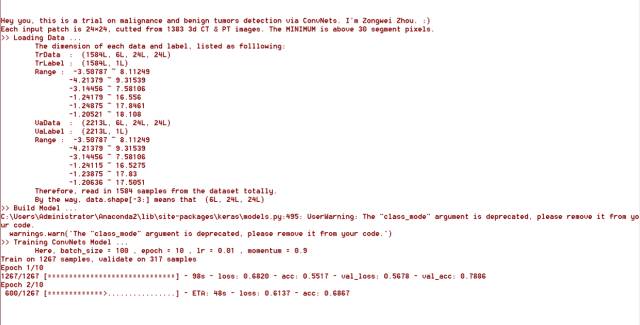
刚刚测试了一下花了我72小时的64·python·keras,真的可以利用的内存爆大诶!!!
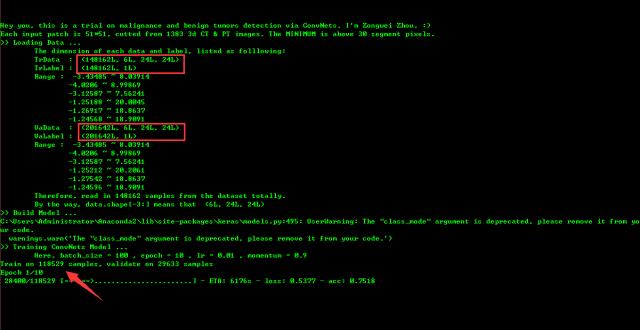
你看!导入的训练集14w+,测试集20w+
祝一切顺利~
如有任何问题
您可以发送邮件至
dataintellagr@126.com
或关注微博/知乎、微信后台留言
我们期待您的提问!
微博:数据智农
知乎:数据智农
邮箱:dataintellagr@126.com
制作|姚雪岩
推荐阅读:
以上是关于技术观点Keras深度学习框架配置的主要内容,如果未能解决你的问题,请参考以下文章